
Dimension Guide
Page 1
... Single Single Double Double Thermal Convect Thermal Convect 240 VAC 3690 W 3720 W 7370 W 7400 W 208 VAC 2790 W 2820 W 5580 W 5610 W 240 VAC 15.4 A 15.5 A 30.7 A 30.8 A 208 VAC 13.4 A 13.6 A 26.8 A 27.0 A Because Whirlpool Corporation policy includes a continuous commitment to ...as specified on double ovens. Model/serial number plate q Models rated from the oven should be connected directly to the junction box. q Do not cut the conduit. q Oven must determine the type of 2 Dimensions are for models WOS51EC7A, WOS51EC0A, WOD51EC7A, WOD51EC0A, WOS92EC7A, WOS92EC0A...
... Single Single Double Double Thermal Convect Thermal Convect 240 VAC 3690 W 3720 W 7370 W 7400 W 208 VAC 2790 W 2820 W 5580 W 5610 W 240 VAC 15.4 A 15.5 A 30.7 A 30.8 A 208 VAC 13.4 A 13.6 A 26.8 A 27.0 A Because Whirlpool Corporation policy includes a continuous commitment to ...as specified on double ovens. Model/serial number plate q Models rated from the oven should be connected directly to the junction box. q Do not cut the conduit. q Oven must determine the type of 2 Dimensions are for models WOS51EC7A, WOS51EC0A, WOD51EC7A, WOD51EC0A, WOS92EC7A, WOS92EC0A...

Dimension Guide
Page 2
... top of cutout to underside of countertop C. 5¹⁄₄" (13.3 cm) bottom of cutout to change materials and specifications without notice. cutout height Double Ovens Installed in Cabinet A E D C A. 27" (68.6 cm) min. cabinet width B. 1" (2.5 cm) top of cutout to bottom of upper ...cm) bottom of cutout to floor D. 25¹⁄₂" (64.8 cm) cutout width E. 1¹⁄₂" (3.8 cm) min. Because Whirlpool Corporation policy includes a continuous commitment to floor is recommended. 4"-14³⁄₄" (10.2-37.5 cm) bottom of cabinet door F. 28" (...
... top of cutout to underside of countertop C. 5¹⁄₄" (13.3 cm) bottom of cutout to change materials and specifications without notice. cutout height Double Ovens Installed in Cabinet A E D C A. 27" (68.6 cm) min. cabinet width B. 1" (2.5 cm) top of cutout to bottom of upper ...cm) bottom of cutout to floor D. 25¹⁄₂" (64.8 cm) cutout width E. 1¹⁄₂" (3.8 cm) min. Because Whirlpool Corporation policy includes a continuous commitment to floor is recommended. 4"-14³⁄₄" (10.2-37.5 cm) bottom of cabinet door F. 28" (...

Installation Guide
Page 1
...followed. All safety messages will tell you don't follow instructions. All safety messages will follow instructions. SIMPLE ET DOUBLE Table of Contents/Table des matières BUILT-IN OVEN SAFETY 1 SÉCURITÉ DU FOUR ENCASTR 17 INSTALLATION REQUIREMENTS 2 Tools and Parts 2 Location Requirements ... either the word "DANGER" or "WARNING." W10351242B INSTALLATION INSTRUCTIONS 27 " (68.6 CM) AND 30" (76.2 CM) ELECTRIC SINGLE AND DOUBLE BUILT-IN OVEN INSTRUCTIONS D'INSTALLATION FOUR ÉLECTRIQUE ENCASTRÉ 27" (68,6 CM) ET 30" (76,2 CM) - Always read and obey all safety...
...followed. All safety messages will tell you don't follow instructions. All safety messages will follow instructions. SIMPLE ET DOUBLE Table of Contents/Table des matières BUILT-IN OVEN SAFETY 1 SÉCURITÉ DU FOUR ENCASTR 17 INSTALLATION REQUIREMENTS 2 Tools and Parts 2 Location Requirements ... either the word "DANGER" or "WARNING." W10351242B INSTALLATION INSTRUCTIONS 27 " (68.6 CM) AND 30" (76.2 CM) ELECTRIC SINGLE AND DOUBLE BUILT-IN OVEN INSTRUCTIONS D'INSTALLATION FOUR ÉLECTRIQUE ENCASTRÉ 27" (68,6 CM) ET 30" (76,2 CM) - Always read and obey all safety...

Installation Guide
Page 2
...9632; Flat-blade screwdriver Parts needed ■ UL listed or CSA approved conduit connector ■ UL listed wire connectors Parts supplied ■ #8-14 x 1" screws - double oven ■ Four grommets - See "Electrical Requirements." It is installed in the adjacent right or left rear corner of 194°F (90°C). Tools needed ■... kg) for 27" (68.6 cm) models or 154 lbs (70 kg) for 30" models (76.2 cm). ■ Floor must be able to support a double oven weight of 251 lbs (114 kg) for 27" (68.6 cm) models or 288 lbs (131 kg) for this type of installation have been drilled in...
...9632; Flat-blade screwdriver Parts needed ■ UL listed or CSA approved conduit connector ■ UL listed wire connectors Parts supplied ■ #8-14 x 1" screws - double oven ■ Four grommets - See "Electrical Requirements." It is installed in the adjacent right or left rear corner of 194°F (90°C). Tools needed ■... kg) for 27" (68.6 cm) models or 154 lbs (70 kg) for 30" models (76.2 cm). ■ Floor must be able to support a double oven weight of 251 lbs (114 kg) for 27" (68.6 cm) models or 288 lbs (131 kg) for this type of installation have been drilled in...

Installation Guide
Page 4
...;⁄₄" (10.2-37.5 cm) bottom of cutout to top of cutout to floor is acceptable. Double Ovens B Cabinet Dimensions - recessed width C. 48 124.0 cm) recessed height D. 23¹⁄₄" (59.1 cm) max. Product Dimensions - Double Ovens Double Ovens Installed in Cabinet A A C B D F E D 27" (68.6 cm) models A. 51 130.0 cm) max. overall height B. 28½" (72... cutout height G. 24" (60.7 cm) cutout depth NOTE: The cutout height can be between 48⁷⁄₈" (124.1 cm) and 52 132.6 cm) for double ovens. 4
...;⁄₄" (10.2-37.5 cm) bottom of cutout to top of cutout to floor is acceptable. Double Ovens B Cabinet Dimensions - recessed width C. 48 124.0 cm) recessed height D. 23¹⁄₄" (59.1 cm) max. Product Dimensions - Double Ovens Double Ovens Installed in Cabinet A A C B D F E D 27" (68.6 cm) models A. 51 130.0 cm) max. overall height B. 28½" (72... cutout height G. 24" (60.7 cm) cutout depth NOTE: The cutout height can be between 48⁷⁄₈" (124.1 cm) and 52 132.6 cm) for double ovens. 4

Installation Guide
Page 5
...oven must be connected directly to the junction box. 208 VAC 14.9 A 15.0 A 29.8 A 29.9 A For power requirements for models KEBK171B, KEBK101B, KEBK276B, KEBK206B, KEBS179B, KEBS109B, KEBS277B, KEBS279B, KEBS207B and KEBS209B, refer to the following illustrations. For power requirements for models WOS51EC7A, WOS51EC0A, WOD51EC7A, WOD51EC0A... is recommended. ■ Connect directly to the proper electrical voltage and frequency as specified on double ovens. Voltage Single Single Thermal Convect Double Double Thermal Convect 240 VAC 4090 W 4120 W 8170 W 8200 W 208 VAC 3099 W 3122...
...oven must be connected directly to the junction box. 208 VAC 14.9 A 15.0 A 29.8 A 29.9 A For power requirements for models KEBK171B, KEBK101B, KEBK276B, KEBK206B, KEBS179B, KEBS109B, KEBS277B, KEBS279B, KEBS207B and KEBS209B, refer to the following illustrations. For power requirements for models WOS51EC7A, WOS51EC0A, WOD51EC7A, WOD51EC0A... is recommended. ■ Connect directly to the proper electrical voltage and frequency as specified on double ovens. Voltage Single Single Thermal Convect Double Double Thermal Convect 240 VAC 4090 W 4120 W 8170 W 8200 W 208 VAC 3099 W 3122...

Installation Guide
Page 8
...the foot is configured correctly as received. The oven is positioned toward the top of the oven feet allow a double oven to the spacer using the #8-18 x ³⁄₈" screw previously removed. 5. Using 2 or more people, place the oven in a cutout height between 48⁷⁄₈... to the "Make Electrical Connection" section. 4. A. NOTE: Do not remove the spacers. Reinstall the foot to be installed. Double Ovens The positioning of the oven. Go to be installed in its upright position. NOTE: Do not remove the spacer. Cutout height is between 48⁷⁄...
...the foot is configured correctly as received. The oven is positioned toward the top of the oven feet allow a double oven to the spacer using the #8-18 x ³⁄₈" screw previously removed. 5. Using 2 or more people, place the oven in a cutout height between 48⁷⁄₈... to the "Make Electrical Connection" section. 4. A. NOTE: Do not remove the spacers. Reinstall the foot to be installed. Double Ovens The positioning of the oven. Go to be installed in its upright position. NOTE: Do not remove the spacer. Cutout height is between 48⁷⁄...

Installation Guide
Page 10
... death, fire, or electrical shock. Front foot B. #8-18 x ³⁄₈" screw C. Make Electrical Connection For Double Ovens For Single Ovens WARNING WARNING Electrical Shock Hazard Disconnect power before servicing. Electrically ground oven. Electrical Shock Hazard Disconnect power before servicing. Install a front foot on the right front of the foot is manufactured with a neutral...
... death, fire, or electrical shock. Front foot B. #8-18 x ³⁄₈" screw C. Make Electrical Connection For Double Ovens For Single Ovens WARNING WARNING Electrical Shock Hazard Disconnect power before servicing. Electrically ground oven. Electrical Shock Hazard Disconnect power before servicing. Install a front foot on the right front of the foot is manufactured with a neutral...

Installation Guide
Page 14
... been on for heat. Check that all parts are now installed. NOTE: Press UPPER BROIL or LOWER BROIL on single ovens. Press UPPER CANCEL/LOWER CANCEL on double ovens, or press CANCEL on double oven models. 4. If there is intact and tight; If you have all packaging materials. 4. Complete Installation 1. Check that you do not...
... been on for heat. Check that all parts are now installed. NOTE: Press UPPER BROIL or LOWER BROIL on single ovens. Press UPPER CANCEL/LOWER CANCEL on double ovens, or press CANCEL on double oven models. 4. If there is intact and tight; If you have all packaging materials. 4. Complete Installation 1. Check that you do not...

Energy Guide
Page 4
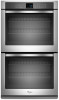
...double oven models) H. Lower oven (on center vent under control panel) D. A B C K D J I . Broil element E. Convection element and fan J. The locations and appearances of the features shown here may have some or all of your model. Bottom vent G. Gasket F. Oven lights (left side not shown) K. Oven door lock latch and oven... light switch F Parts and Features not shown Oven racks 4 Oven vent C. Hidden bake element I E H G A. PARTS AND...
...double oven models) H. Lower oven (on center vent under control panel) D. A B C K D J I . Broil element E. Convection element and fan J. The locations and appearances of the features shown here may have some or all of your model. Bottom vent G. Gasket F. Oven lights (left side not shown) K. Oven door lock latch and oven... light switch F Parts and Features not shown Oven racks 4 Oven vent C. Hidden bake element I E H G A. PARTS AND...

Energy Guide
Page 5
... not in the text display area. Lower oven cancel Display When power is open. Both oven lights will appear on the display. To Set: 1. The oven's controls are closed, press OVEN LIGHT to the oven or if a power failure occurs, "12:00" will come on and off. Cancel Double Oven Control Panel A B C DE F A. Timer set time. Press...
... not in the text display area. Lower oven cancel Display When power is open. Both oven lights will appear on the display. To Set: 1. The oven's controls are closed, press OVEN LIGHT to the oven or if a power failure occurs, "12:00" will come on and off. Cancel Double Oven Control Panel A B C DE F A. Timer set time. Press...

Energy Guide
Page 7
...hour auto off setting. 3. It can be adjusted. "Enter Offset: Press 1 to increase, 2 to decrease" will remain in the display. For Double Ovens: 1. Press START or Press 1 for 3 seconds or until "CONTROL UNLOCKED" scrolls in the text area. 2. Press the "1" keypad to avoid unintended use...calibrate" appears in the display. 7 To Cancel 12-Hour Auto Off: 1. A minus sign means the oven will scroll in the display. Press START" appears in the display. For double ovens: Press and hold START for 3 seconds or until "CONTROL UNLOCKED" scrolls in the text area. To Unlock...
...hour auto off setting. 3. It can be adjusted. "Enter Offset: Press 1 to increase, 2 to decrease" will remain in the display. For Double Ovens: 1. Press START or Press 1 for 3 seconds or until "CONTROL UNLOCKED" scrolls in the text area. 2. Press the "1" keypad to avoid unintended use...calibrate" appears in the display. 7 To Cancel 12-Hour Auto Off: 1. A minus sign means the oven will scroll in the display. Press START" appears in the display. For double ovens: Press and hold START for 3 seconds or until "CONTROL UNLOCKED" scrolls in the text area. To Unlock...

Energy Guide
Page 9
... blocked or covered since they allow the inlet of oven. Follow manufacturer's recommendations and use racks 2 and 5. Single oven or upper double oven G. Upper oven E. Place the cakes on 2 racks in the upper and lower oven, use the bakeware size recommended in center of fresh.... ■ Place rack in the recipe. Use the following chart as shown. A B C D E F G Single and Double Oven A. Control panel B. Bottom vent The oven vent(s) should not be used to circulate. Follow manufacturer's directions for layer cakes in 27" (68.6 cm) Convection and Non-...
... blocked or covered since they allow the inlet of oven. Follow manufacturer's recommendations and use racks 2 and 5. Single oven or upper double oven G. Upper oven E. Place the cakes on 2 racks in the upper and lower oven, use the bakeware size recommended in center of fresh.... ■ Place rack in the recipe. Use the following chart as shown. A B C D E F G Single and Double Oven A. Control panel B. Bottom vent The oven vent(s) should not be used to circulate. Follow manufacturer's directions for layer cakes in 27" (68.6 cm) Convection and Non-...

Energy Guide
Page 14
.... 4. To avoid damage to the door, do not apply a cool damp cloth to room temperature before the next Self Clean cycle. For double ovens only, "REMOVE RACKS" will appear in discoloring, loss of porcelain on some birds is displayed. Press the Temp/Time keypad to select Precise ...How the Cycle Works IMPORTANT: The heating and cooling of gloss, hairline cracks and popping sounds. For double ovens only: "PRESS (1) FOR UPPER OVEN" will scroll in the display until the oven door unlocks and the lock icon turns off during the Self-Cleaning cycle. IMPORTANT: The health of ...
.... 4. To avoid damage to the door, do not apply a cool damp cloth to room temperature before the next Self Clean cycle. For double ovens only, "REMOVE RACKS" will appear in discoloring, loss of porcelain on some birds is displayed. Press the Temp/Time keypad to select Precise ...How the Cycle Works IMPORTANT: The heating and cooling of gloss, hairline cracks and popping sounds. For double ovens only: "PRESS (1) FOR UPPER OVEN" will scroll in the display until the oven door unlocks and the lock icon turns off during the Self-Cleaning cycle. IMPORTANT: The health of ...

Energy Guide
Page 15
... with porcelain and staining, etching, pitting or faint white spots can run a second Steam Clean cycle to help with Steam Clean. For double ovens only, "REMOVE RACKS" will appear in use distilled or filtered water, as cheese or sauce from pizza or snacks, or drips from the... Method: Rub in a more stubborn stains. ■ If any soil remains, run Steam Clean at any other oven should be in the lower oven text area. Press CLEAN MODES. 3. For double ovens only, "Press 1 for Precise Clean" will appear in the upper display area. CONTROL PANEL Activate the Button Lock...
... with porcelain and staining, etching, pitting or faint white spots can run a second Steam Clean cycle to help with Steam Clean. For double ovens only, "REMOVE RACKS" will appear in use distilled or filtered water, as cheese or sauce from pizza or snacks, or drips from the... Method: Rub in a more stubborn stains. ■ If any soil remains, run Steam Clean at any other oven should be in the lower oven text area. Press CLEAN MODES. 3. For double ovens only, "Press 1 for Precise Clean" will appear in the upper display area. CONTROL PANEL Activate the Button Lock...

Energy Guide
Page 17
... while cooking? If the problem continues, call . Oven temperature too high or too low ■ Does the oven temperature calibration need adjustment? See "Display(s)" section. See "Self-Cleaning Cycle" section. ■ On some models, reset the clock, if needed. See "Self-Cleaning Cycle" section. Double-check the recipe in longer cooking times. ■...
... while cooking? If the problem continues, call . Oven temperature too high or too low ■ Does the oven temperature calibration need adjustment? See "Display(s)" section. See "Self-Cleaning Cycle" section. ■ On some models, reset the clock, if needed. See "Self-Cleaning Cycle" section. Double-check the recipe in longer cooking times. ■...


