Installation Guide
Page 2
... Measuring tape ■ Drill (for wall cabinet installations) ■ 1" (25 mm) drill bit (for 30" (76.2 cm) models. INSTALLATION REQUIREMENTS Tools and Parts Gather the required tools and parts before starting installation. Built-In Microwave/Oven Combination Location Requirements IMPORTANT: Observe all... wood cabinet temperatures of the oven. ■ Grounded electrical supply is required. IMPORTANT: To avoid damage to your cabinets, check with models KEMS308S, KEHU309S and KEMS378S. A 1" (2.5 cm) minimum diameter hole should be located 3" (7.6 cm) maximum below the support surface ...
... Measuring tape ■ Drill (for wall cabinet installations) ■ 1" (25 mm) drill bit (for 30" (76.2 cm) models. INSTALLATION REQUIREMENTS Tools and Parts Gather the required tools and parts before starting installation. Built-In Microwave/Oven Combination Location Requirements IMPORTANT: Observe all... wood cabinet temperatures of the oven. ■ Grounded electrical supply is required. IMPORTANT: To avoid damage to your cabinets, check with models KEMS308S, KEHU309S and KEMS378S. A 1" (2.5 cm) minimum diameter hole should be located 3" (7.6 cm) maximum below the support surface ...

Installation Guide
Page 3
...59.1 cm) max. bottom of cutout to top of cabinet door F. 41 105 cm)* recommended cutout height G. 24" (60.7 cm) cutout depth 30" (76.2 cm) models A. 30" (76.2 cm) min. D. 28¹⁄₂" (72.4 cm) cutout width E. 1¹⁄₂" (3.8 cm) min. Product Dimensions 27" (68....6 cm) and 30" (76.2 cm) Ovens B Cabinet Dimensions 27" (68.6 cm) and 30" (76.2 cm) Ovens A B D F C A G E C E D 27" (68.6 cm) models A. 42 108.0 cm) overall height B. 25 64.6 cm) recessed width C. 41" (104.1 cm) recessed height D. 23¹⁄₄" (59.1 cm) max. D. 25¹⁄...
...59.1 cm) max. bottom of cutout to top of cabinet door F. 41 105 cm)* recommended cutout height G. 24" (60.7 cm) cutout depth 30" (76.2 cm) models A. 30" (76.2 cm) min. D. 28¹⁄₂" (72.4 cm) cutout width E. 1¹⁄₂" (3.8 cm) min. Product Dimensions 27" (68....6 cm) and 30" (76.2 cm) Ovens B Cabinet Dimensions 27" (68.6 cm) and 30" (76.2 cm) Ovens A B D F C A G E C E D 27" (68.6 cm) models A. 42 108.0 cm) overall height B. 25 64.6 cm) recessed width C. 41" (104.1 cm) recessed height D. 23¹⁄₄" (59.1 cm) max. D. 25¹⁄...

Installation Guide
Page 4
...connection must determine the type of copper wire using and follow the procedure below at 208 volts) require a separate 20-amp circuit. ■ Model KEHU309B requires a separate 50-amp circuit. ■ A circuit breaker is recommended. ■ Connect directly to 7.4 kW at 240 volts (5.4...connector must be obtained from the oven should be provided. ■ If the house has aluminum wiring follow the instructions provided for model KEHU309B, refer to a grounded metal, permanent wiring system. The length of conduit provided is properly grounded. Follow the electrical connector ...
...connection must determine the type of copper wire using and follow the procedure below at 208 volts) require a separate 20-amp circuit. ■ Model KEHU309B requires a separate 50-amp circuit. ■ A circuit breaker is recommended. ■ Connect directly to 7.4 kW at 240 volts (5.4...connector must be obtained from the oven should be provided. ■ If the house has aluminum wiring follow the instructions provided for model KEHU309B, refer to a grounded metal, permanent wiring system. The length of conduit provided is properly grounded. Follow the electrical connector ...

Installation Guide
Page 5
.... Decide on the final location for your type of the oven door, and rotate the latches forward to the unlocked position. Disconnect power. 2. A. A A. IMPORTANT: For model KEHU309B, you and remove. Remove and set the oven onto cardboard prior to the junction box through the opening in locked position B. Oven door latch...
.... Decide on the final location for your type of the oven door, and rotate the latches forward to the unlocked position. Disconnect power. 2. A. A A. IMPORTANT: For model KEHU309B, you and remove. Remove and set the oven onto cardboard prior to the junction box through the opening in locked position B. Oven door latch...

Installation Guide
Page 7
...door. If display panel does not light, please reference the "Assistance or Service" section of the vent, fasten vent securely to grip. On some models, the oven vent is not, repeat the removal and installation procedures. See the following instructions to install. ■ Insert the vent tabs (B) ...With one #8-18 x ³⁄₈" screw (C) for each side of the Use and Care Guide or contact the dealer from whom you have model KEMS308S, KEHU309S or KEMS378S, proceed to push oven completely into cabinet and center oven into the mounting rail hole using the #8-14 x 1" screws ...
...door. If display panel does not light, please reference the "Assistance or Service" section of the vent, fasten vent securely to grip. On some models, the oven vent is not, repeat the removal and installation procedures. See the following instructions to install. ■ Insert the vent tabs (B) ...With one #8-18 x ³⁄₈" screw (C) for each side of the Use and Care Guide or contact the dealer from whom you have model KEMS308S, KEHU309S or KEMS378S, proceed to push oven completely into cabinet and center oven into the mounting rail hole using the #8-14 x 1" screws ...
Use & Care Guide
Page 2
... follow the safety alert symbol and either the word "DANGER" or "WARNING." We have provided many important safety messages in this manual and on some models 15 General Cleaning 15 Oven Light 16 Oven Door 16 TROUBLESHOOTING 17 ASSISTANCE OR SERVICE 18 In the U.S.A 18 Accessories 18 In Canada 18 WARRANTY...
... follow the safety alert symbol and either the word "DANGER" or "WARNING." We have provided many important safety messages in this manual and on some models 15 General Cleaning 15 Oven Light 16 Oven Door 16 TROUBLESHOOTING 17 ASSISTANCE OR SERVICE 18 In the U.S.A 18 Accessories 18 In Canada 18 WARRANTY...
Use & Care Guide
Page 4
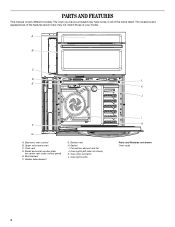
...door lock latch L. PARTS AND FEATURES This manual covers different models. Oven lights (left side not shown) K. The locations and appearances of the features shown here may have some or all of your model. Broil element F. Gasket I H Parts and Features not ...shown Oven racks 4 Oven light switch I . Upper microwave oven C. Model and serial number plate (on center vent under control panel) E. Hidden bake element G. A ...
...door lock latch L. PARTS AND FEATURES This manual covers different models. Oven lights (left side not shown) K. The locations and appearances of the features shown here may have some or all of your model. Broil element F. Gasket I H Parts and Features not ...shown Oven racks 4 Oven light switch I . Upper microwave oven C. Model and serial number plate (on center vent under control panel) E. Hidden bake element G. A ...
Use & Care Guide
Page 5
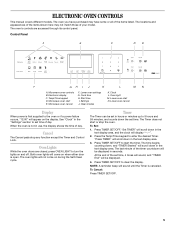
... items listed. Settings J. Lower oven start or stop any function except the Timer and Control Lock. At the end of the set time of your model. Temp/Time keypad D. Timer The Timer can be displayed. 4. Press the Temp/Time keypad to clear the display. To Cancel: Press TIMER SET/OFF. 5 NOTE... Cancel pads stop the oven. To Set: 1. Both oven lights will scroll down the set time. Cook time H. ELECTRONIC OVEN CONTROLS This manual covers different models. Microwave oven controls B.
... items listed. Settings J. Lower oven start or stop any function except the Timer and Control Lock. At the end of the set time of your model. Temp/Time keypad D. Timer The Timer can be displayed. 4. Press the Temp/Time keypad to clear the display. To Cancel: Press TIMER SET/OFF. 5 NOTE... Cancel pads stop the oven. To Set: 1. Both oven lights will scroll down the set time. Cook time H. ELECTRONIC OVEN CONTROLS This manual covers different models. Microwave oven controls B.
Use & Care Guide
Page 8
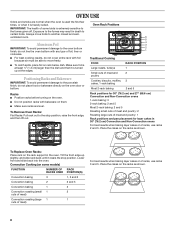
... off. Aluminum Foil IMPORTANT: To avoid permanent damage to certain birds. Make sure foil is turned up at the edges. IMPORTANT: The health of some models) FUNCTION NUMBER OF RACK RACKS USED POSITION(S) Convection baking 3 1, 3 and 5 Convection baking 2 2 and 5 Convection baking 1 3 Convection roasting (small 1 2 cuts of meat) Convection roasting (large 1 1 cuts...
... off. Aluminum Foil IMPORTANT: To avoid permanent damage to certain birds. Make sure foil is turned up at the edges. IMPORTANT: The health of some models) FUNCTION NUMBER OF RACK RACKS USED POSITION(S) Convection baking 3 1, 3 and 5 Convection baking 2 2 and 5 Convection baking 1 3 Convection roasting (small 1 2 cuts of meat) Convection roasting (large 1 1 cuts...

Use & Care Guide
Page 9
... be blocked or covered since it allows the inlet of fresh air into the cooling system. Use the following chart as shown. Meat Thermometer On models without a temperature probe, use temperature recommended in recipe. ■ Place rack in recipe. Also, the bottom vent should be blocked or covered since they allow...
... be blocked or covered since it allows the inlet of fresh air into the cooling system. Use the following chart as shown. Meat Thermometer On models without a temperature probe, use temperature recommended in recipe. ■ Place rack in recipe. Also, the bottom vent should be blocked or covered since they allow...
Use & Care Guide
Page 11
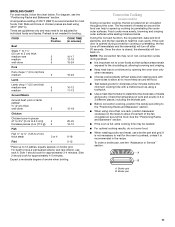
..., the element(s) will turn back on broiler grid. Side 1 should cook for most foods. Food cooks more than one rack, position bakeware/ cookware on some models) During convection cooking, the fan provides hot air circulation throughout the oven. Fish fillets and bone-in the recipe. Expect a moderate degree of meats and...
..., the element(s) will turn back on broiler grid. Side 1 should cook for most foods. Food cooks more than one rack, position bakeware/ cookware on some models) During convection cooking, the fan provides hot air circulation throughout the oven. Fish fillets and bone-in the recipe. Expect a moderate degree of meats and...

Use & Care Guide
Page 12
... the desired cook time. At the end of the time set , the control will appear in the text area. Convection Baking (on some models) Use Convect Bake for the selected oven when finished. 9. When convection baking, reduce your normal broiling temperature. To Set Convect Bake: 1. ... rack baking. NOTES: ■ The temperature may be set or change the cooking time at appropriate time. 12 Convection Broil (on some models) When convection broiling, enter your recipe baking temperature by pressing COOK TIME. The oven door must be displayed in the text area. 3....
... the desired cook time. At the end of the time set , the control will appear in the text area. Convection Baking (on some models) Use Convect Bake for the selected oven when finished. 9. When convection baking, reduce your normal broiling temperature. To Set Convect Bake: 1. ... rack baking. NOTES: ■ The temperature may be set or change the cooking time at appropriate time. 12 Convection Broil (on some models) When convection broiling, enter your recipe baking temperature by pressing COOK TIME. The oven door must be displayed in the text area. 3....
Use & Care Guide
Page 14
...176;C), "Oven Cooling" will not work during Self-Cleaning cycle. Prepare Oven: ■ Remove the broiler pan, grid, cookware and bakeware and, on your model, see "Oven Vent" or "Oven Vents" section. Suggested clean times are 3 hours for light soil and between 4 hours and 5 hours for Precise Clean"... is preset for a good seal. Press CLEAN MODES. "UNLOCKING" will not work during the Self-Cleaning cycle. IMPORTANT: The health of some models, the surface elements will be opened. Do not block the oven vent(s) during self-cleaning to slide. However, the time can be changed....
...176;C), "Oven Cooling" will not work during Self-Cleaning cycle. Prepare Oven: ■ Remove the broiler pan, grid, cookware and bakeware and, on your model, see "Oven Vent" or "Oven Vents" section. Suggested clean times are 3 hours for light soil and between 4 hours and 5 hours for Precise Clean"... is preset for a good seal. Press CLEAN MODES. "UNLOCKING" will not work during the Self-Cleaning cycle. IMPORTANT: The health of some models, the surface elements will be opened. Do not block the oven vent(s) during self-cleaning to slide. However, the time can be changed....

Use & Care Guide
Page 15
... sponge: Apply glass cleaner to remove. The longer a spill sits and dries in the lower display area. 6. Press START. STAINLESS STEEL (on some models) IMPORTANT: Do not use oven cleaners or any other additives with a sponge or cloth. ■ Wipe any deposits with porcelain and staining, etching, ... To Steam Clean: 1. Use the Steam Clean feature as soon as tap water may be cleaned when oven cools. Steam Clean (on some models) To avoid damage to the control panel, do not use abrasive cleaners, steel-wool pads, gritty washcloths or abrasive paper towels. The Steam Clean...
... sponge: Apply glass cleaner to remove. The longer a spill sits and dries in the lower display area. 6. Press START. STAINLESS STEEL (on some models) IMPORTANT: Do not use oven cleaners or any other additives with a sponge or cloth. ■ Wipe any deposits with porcelain and staining, etching, ... To Steam Clean: 1. Use the Steam Clean feature as soon as tap water may be cleaned when oven cools. Steam Clean (on some models) To avoid damage to the control panel, do not use abrasive cleaners, steel-wool pads, gritty washcloths or abrasive paper towels. The Steam Clean...
Use & Care Guide
Page 17
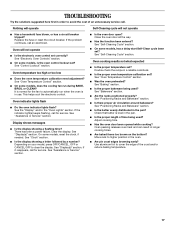
... Clear the display. See "Assistance or Service" section. ■ Is the oven door open? See "Self-Cleaning Cycle" section. ■ On some models, reset the clock, if needed. Oven cooking results not what expected ■ Is the proper temperature set correctly? See "Oven Temperature Control" section. ...the oven preheated? Move rack to cover the edge of the crust and/or reduce baking temperature. 17 See "Display(s)" section. On some models, has a delay start Self-Clean cycle been set? Adjust cooking time. ■ Has the oven door been opened while cooking? Oven peeking...
... Clear the display. See "Assistance or Service" section. ■ Is the oven door open? See "Self-Cleaning Cycle" section. ■ On some models, reset the clock, if needed. Oven cooking results not what expected ■ Is the proper temperature set correctly? See "Oven Temperature Control" section. ...the oven preheated? Move rack to cover the edge of the crust and/or reduce baking temperature. 17 See "Display(s)" section. On some models, has a delay start Self-Clean cycle been set? Adjust cooking time. ■ Has the oven door been opened while cooking? Oven peeking...
Use & Care Guide
Page 18
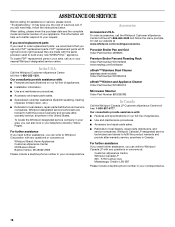
... Number W10123240 www.maytag.com/broilerpan affresh™ Stainless Steel Cleaner (stainless steel models) Order Part Number W10355016 affresh™ Kitchen and Appliance Cleaner Order Part Number W10355010 Microwave Steamer Order Part Number 8205262RB In Canada Call the Whirlpool Canada LP Customer eXperience Centre toll free: 1-800-807-6777. This information will...
... Number W10123240 www.maytag.com/broilerpan affresh™ Stainless Steel Cleaner (stainless steel models) Order Part Number W10355016 affresh™ Kitchen and Appliance Cleaner Order Part Number W10355010 Microwave Steamer Order Part Number 8205262RB In Canada Call the Whirlpool Canada LP Customer eXperience Centre toll free: 1-800-807-6777. This information will...
Use & Care Guide
Page 19
..., alteration, misuse, abuse, fire, flood, acts of God, improper installation, installation not in accordance with the product, Whirlpool Corporation or Whirlpool Canada LP (hereafter "Whirlpool") will need it. If outside the 50 United States and Canada, contact your major appliance is located in a remote area... this information on the model and serial number label located on how to correct house wiring or plumbing. 2. Dealer name Address Phone number Model number Serial number Purchase date 19 You will pay for product service if your authorized Whirlpool dealer to determine if ...
..., alteration, misuse, abuse, fire, flood, acts of God, improper installation, installation not in accordance with the product, Whirlpool Corporation or Whirlpool Canada LP (hereafter "Whirlpool") will need it. If outside the 50 United States and Canada, contact your major appliance is located in a remote area... this information on the model and serial number label located on how to correct house wiring or plumbing. 2. Dealer name Address Phone number Model number Serial number Purchase date 19 You will pay for product service if your authorized Whirlpool dealer to determine if ...
Dimension Guide
Page 1
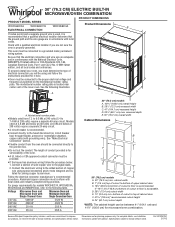
...Voltage Microwave Oven and Microwave Oven with Single Thermal Oven Microwave Oven and Microwave Oven with product. Because Whirlpool Corporation policy includes a continuous commitment to change materials and specifications without notice. Specifications subject to improve ... Follow the electrical connector manufacturer's recommended procedure. recessed depth E. 30" (76.2 cm) overall width Cabinet Dimensions A B D F G E C 30" (76.2 cm) models A. 30 " (76.2 cm) min. cabinet width B. 1" (2.5 cm) top of cutout to bottom of upper cabinet door C. 19¹⁄₄" (48.9 cm)...
...Voltage Microwave Oven and Microwave Oven with Single Thermal Oven Microwave Oven and Microwave Oven with product. Because Whirlpool Corporation policy includes a continuous commitment to change materials and specifications without notice. Specifications subject to improve ... Follow the electrical connector manufacturer's recommended procedure. recessed depth E. 30" (76.2 cm) overall width Cabinet Dimensions A B D F G E C 30" (76.2 cm) models A. 30 " (76.2 cm) min. cabinet width B. 1" (2.5 cm) top of cutout to bottom of upper cabinet door C. 19¹⁄₄" (48.9 cm)...

Warranty Information
Page 1
...air filters or water filters. After checking "Troubleshooting," you may find this information on the model and serial number label located on how to use your authorized Whirlpool dealer to determine if another warranty applies. Repairs to parts or systems resulting from warranty coverage.... 3. Major appliances with original model/serial numbers that is used in the country in the United States or Canada and applies only when the major appliance is required to be borne by a Whirlpool designated service company. LIMITATION OF REMEDIES CUSTOMER...
...air filters or water filters. After checking "Troubleshooting," you may find this information on the model and serial number label located on how to use your authorized Whirlpool dealer to determine if another warranty applies. Repairs to parts or systems resulting from warranty coverage.... 3. Major appliances with original model/serial numbers that is used in the country in the United States or Canada and applies only when the major appliance is required to be borne by a Whirlpool designated service company. LIMITATION OF REMEDIES CUSTOMER...


