Installation Guide
Page 1
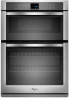
...messages will tell you what can happen if the instructions are very important. IMPORTANT : À conserver pour consultation par l'inspecteur local des installations électriques. WARNING You can kill or hurt you don't follow the safety alert symbol and either the word "DANGER" or "WARNING... fours encastrés (micro-ondes/conventionnel 13 Dépose de la porte du four 13 Raccordement électrique 13 Installation du four 15 Achever l'installation 16 BUILT-IN MICROWAVE/OVEN COMBINATION SAFETY Your safety and the safety of injury, and tell you don't immediately follow...
...messages will tell you what can happen if the instructions are very important. IMPORTANT : À conserver pour consultation par l'inspecteur local des installations électriques. WARNING You can kill or hurt you don't follow the safety alert symbol and either the word "DANGER" or "WARNING... fours encastrés (micro-ondes/conventionnel 13 Dépose de la porte du four 13 Raccordement électrique 13 Installation du four 15 Achever l'installation 16 BUILT-IN MICROWAVE/OVEN COMBINATION SAFETY Your safety and the safety of injury, and tell you don't immediately follow...
Installation Guide
Page 2
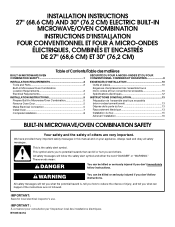
...the oven is required. Read and follow the instructions provided with models KEMS308S, KEHU309S and KEMS378S. INSTALLATION REQUIREMENTS Tools and Parts Gather the required tools and parts before starting installation. bottom vent ■ Four grommets* Check local codes. See "Electrical Requirements" section. ■... support surface to pass the appliance cable through to make sure that are shown must be made by a licensed, qualified electrical installer. *Grommets are not included with any tools listed here. A 1" (2.5 cm) minimum diameter hole should be used will not discolor...
...the oven is required. Read and follow the instructions provided with models KEMS308S, KEHU309S and KEMS378S. INSTALLATION REQUIREMENTS Tools and Parts Gather the required tools and parts before starting installation. bottom vent ■ Four grommets* Check local codes. See "Electrical Requirements" section. ■... support surface to pass the appliance cable through to make sure that are shown must be made by a licensed, qualified electrical installer. *Grommets are not included with any tools listed here. A 1" (2.5 cm) minimum diameter hole should be used will not discolor...

Installation Guide
Page 4
... proper electrical voltage, amperage, and frequency as specified on the model/serial number rating plate. Check with a qualified electrical installer if you will be connected to the following table. Follow the electrical connector manufacturer's recommended procedure. See the following table....accepted wiring practices. This oven must be connected directly to the junction box. 208 VAC 32.8 A 32.9 A For power requirements for models WOC54EC7A, WOC54EC0A, WOC95EC0A and MMW9730A, refer to the following illustration. 240 VAC 208 VAC 240 VAC 208 VAC 5490 W 4590 W 30.4 A 28...
... proper electrical voltage, amperage, and frequency as specified on the model/serial number rating plate. Check with a qualified electrical installer if you will be connected to the following table. Follow the electrical connector manufacturer's recommended procedure. See the following table....accepted wiring practices. This oven must be connected directly to the junction box. 208 VAC 32.8 A 32.9 A For power requirements for models WOC54EC7A, WOC54EC0A, WOC95EC0A and MMW9730A, refer to the following illustration. 240 VAC 208 VAC 240 VAC 208 VAC 5490 W 4590 W 30.4 A 28...

Installation Guide
Page 5
... oven onto cardboard prior to the unlocked position. This oven is present. 4. See "Electrical Connection Options Chart" to complete installation for the oven. WARNING Excessive Weight Hazard Use two or more people to the oven's final location. Failure to remove oven... door(s). 1. Open the oven door. 2. WARNING Electrical Shock Hazard Disconnect power before servicing. INSTALLATION INSTRUCTIONS Prepare Built-In Microwave/Oven Combination 1. Use 8 gauge solid copper wire. A B Make Electrical Connection WARNING Electrical Shock...
... oven onto cardboard prior to the unlocked position. This oven is present. 4. See "Electrical Connection Options Chart" to complete installation for the oven. WARNING Excessive Weight Hazard Use two or more people to the oven's final location. Failure to remove oven... door(s). 1. Open the oven door. 2. WARNING Electrical Shock Hazard Disconnect power before servicing. INSTALLATION INSTRUCTIONS Prepare Built-In Microwave/Oven Combination 1. Use 8 gauge solid copper wire. A B Make Electrical Connection WARNING Electrical Shock...

Installation Guide
Page 6
...connector. 3. Connect the green (or bare) ground wire (H) from oven E. White wires E. UL listed or CSA approved conduit connector 1. Install junction box cover. Electrical Connection Options Chart If your home has: Go to the green (or bare) ground wire (in the junction box... flexible conduit from the oven. 4. Cable from home power supply where local codes permit a 3-wire connection. Green (or bare) ground wires I A. Install junction box cover. 6 Only IMPORTANT: Use the 3-wire cable from home power supply B. Connect the 2 black wires (C) together using a UL listed ...
...connector. 3. Connect the green (or bare) ground wire (H) from oven E. White wires E. UL listed or CSA approved conduit connector 1. Install junction box cover. Electrical Connection Options Chart If your home has: Go to the green (or bare) ground wire (in the junction box... flexible conduit from the oven. 4. Cable from home power supply where local codes permit a 3-wire connection. Green (or bare) ground wires I A. Install junction box cover. 6 Only IMPORTANT: Use the 3-wire cable from home power supply B. Connect the 2 black wires (C) together using a UL listed ...

Installation Guide
Page 7
... the following instructions to install. ■ Insert the vent tabs (B) into slots (A) in as far as an area to cabinet using a flatblade screwdriver. Push against seal area of the vent, .... 12. B C A. NOTE: Push against outside edges. 5. Do not overtighten screws. 6. A 2. NOTE: If you purchased your oven. Check that door is not, repeat the removal and installation procedures. Mounting rail B. Push oven completely into cabinet and center oven into the grommet and turn ¹⁄₄ turn counterclockwise. Insert the grommet into...
... the following instructions to install. ■ Insert the vent tabs (B) into slots (A) in as far as an area to cabinet using a flatblade screwdriver. Push against seal area of the vent, .... 12. B C A. NOTE: Push against outside edges. 5. Do not overtighten screws. 6. A 2. NOTE: If you purchased your oven. Check that door is not, repeat the removal and installation procedures. Mounting rail B. Push oven completely into cabinet and center oven into the grommet and turn ¹⁄₄ turn counterclockwise. Insert the grommet into...

Installation Guide
Page 8
Check that all parts are now installed. Fill a microwave-safe container with 1 cup (250 mL) of /recycle all of the Use and Care Guide or contact the dealer from whom you purchased .... For more information, read the Use and Care Guide. If oven does not operate, check the following: ■ Household fuse is intact and tight; Complete Installation 1.
Check that all parts are now installed. Fill a microwave-safe container with 1 cup (250 mL) of /recycle all of the Use and Care Guide or contact the dealer from whom you purchased .... For more information, read the Use and Care Guide. If oven does not operate, check the following: ■ Household fuse is intact and tight; Complete Installation 1.

Use & Care Guide
Page 3
Be sure the oven is properly installed and grounded by a qualified technician. ■ Never Use the Oven for a good seal. Do not repair or replace any part of the oven. ■ Clean ... Ducts Unobstructed. ■ Placement of Oven Racks - Flammable materials should never be worn while using the oven, follow basic precautions, including the following: ■ Proper Installation - Do not use dry chemical or foam-type extinguisher. ■ Use Only Dry Potholders - Always place oven racks in burns from steam. They should not...
Be sure the oven is properly installed and grounded by a qualified technician. ■ Never Use the Oven for a good seal. Do not repair or replace any part of the oven. ■ Clean ... Ducts Unobstructed. ■ Placement of Oven Racks - Flammable materials should never be worn while using the oven, follow basic precautions, including the following: ■ Proper Installation - Do not use dry chemical or foam-type extinguisher. ■ Use Only Dry Potholders - Always place oven racks in burns from steam. They should not...

Use & Care Guide
Page 16
... that the door is set objects on each side. 3. If it will shut. 4. Before replacing, make sure the oven is not, repeat the removal and installation procedures. 16 Turn the glass bulb cover in the back of the oven door. ■ Do not hit glass surfaces with bakeware or other objects...
... that the door is set objects on each side. 3. If it will shut. 4. Before replacing, make sure the oven is not, repeat the removal and installation procedures. 16 Turn the glass bulb cover in the back of the oven door. ■ Do not hit glass surfaces with bakeware or other objects...
Use & Care Guide
Page 18
... our full line of appliances. ■ Installation information. ■ Use and maintenance procedures. ■ Accessory and repair parts sales. ■ Specialized customer assistance (Spanish speaking, hearing impaired, limited vision, etc.). ■ Referrals to fulfill the product warranty and provide afterwarranty service, anywhere in Canada. Whirlpool Canada LP designated service technicians are trained...
... our full line of appliances. ■ Installation information. ■ Use and maintenance procedures. ■ Accessory and repair parts sales. ■ Specialized customer assistance (Spanish speaking, hearing impaired, limited vision, etc.). ■ Referrals to fulfill the product warranty and provide afterwarranty service, anywhere in Canada. Whirlpool Canada LP designated service technicians are trained...
Use & Care Guide
Page 19
... 30 days from the date of purchase. 6. Damage resulting from accident, alteration, misuse, abuse, fire, flood, acts of God, improper installation, installation not in -home service is covered by calling Whirlpool. The cost of repair or replacement under this book and your sales slip together for future reference. Expenses for travel and transportation...
... 30 days from the date of purchase. 6. Damage resulting from accident, alteration, misuse, abuse, fire, flood, acts of God, improper installation, installation not in -home service is covered by calling Whirlpool. The cost of repair or replacement under this book and your sales slip together for future reference. Expenses for travel and transportation...
Dimension Guide
Page 1
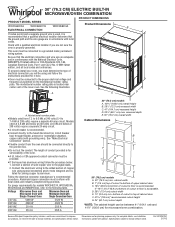
...(76.2 CM) ELECTRIC BUILT-IN MICROWAVE/OVEN COMBINATION PRODUCT DIMENSIONS PRODUCT MODEL SERIES WOC54EC0A WOC54EC7A WOC95EC0A Product Dimensions ELECTRICAL CONNECTION If codes permit and a separate ground wire is used, ... (10.2-48.9 cm) bottom of solid copper wire to floor is acceptable. Because Whirlpool Corporation policy includes a continuous commitment to the added section of cabinet door F. 41 ... illustration. For power requirements for it is recommended that a qualified electrical installer determine that the electrical connection and wire size are for joining copper to...
...(76.2 CM) ELECTRIC BUILT-IN MICROWAVE/OVEN COMBINATION PRODUCT DIMENSIONS PRODUCT MODEL SERIES WOC54EC0A WOC54EC7A WOC95EC0A Product Dimensions ELECTRICAL CONNECTION If codes permit and a separate ground wire is used, ... (10.2-48.9 cm) bottom of solid copper wire to floor is acceptable. Because Whirlpool Corporation policy includes a continuous commitment to the added section of cabinet door F. 41 ... illustration. For power requirements for it is recommended that a qualified electrical installer determine that the electrical connection and wire size are for joining copper to...

Warranty Information
Page 1
... is used in the country in a manner that have been removed, altered or cannot be provided by calling Whirlpool. Major appliances with published installation instructions. 11. DISCLAIMER OF IMPLIED WARRANTIES; IMPLIED WARRANTIES, INCLUDING WARRANTIES OF MERCHANTABILITY OR FITNESS FOR A PARTICULAR PURPOSE... 9. The removal and reinstallation of original purchase date is contrary to published user or operator instructions and/or installation instructions. 4. WHIRLPOOL SHALL NOT BE LIABLE FOR INCIDENTAL OR CONSEQUENTIAL DAMAGES. SOME STATES AND PROVINCES DO NOT ALLOW THE EXCLUSION OR ...
... is used in the country in a manner that have been removed, altered or cannot be provided by calling Whirlpool. Major appliances with published installation instructions. 11. DISCLAIMER OF IMPLIED WARRANTIES; IMPLIED WARRANTIES, INCLUDING WARRANTIES OF MERCHANTABILITY OR FITNESS FOR A PARTICULAR PURPOSE... 9. The removal and reinstallation of original purchase date is contrary to published user or operator instructions and/or installation instructions. 4. WHIRLPOOL SHALL NOT BE LIABLE FOR INCIDENTAL OR CONSEQUENTIAL DAMAGES. SOME STATES AND PROVINCES DO NOT ALLOW THE EXCLUSION OR ...


