Installation Guide
Page 2
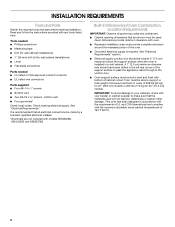
...cm) maximum below the support surface when the oven is required. A 1" (2.5 cm) minimum diameter hole should be able to support a total weight (microwave and built-in accordance with the requirements of 208 lbs (95 kg) for 27" (68.6 cm) models or 249 lbs (113 kg) for wall cabinet... ■ Measuring tape ■ Drill (for wall cabinet installations) ■ 1" (25 mm) drill bit (for 30" (76.2 cm) models. INSTALLATION REQUIREMENTS Tools and Parts Gather the required tools and parts before starting installation. Read and follow the instructions provided with the maximum allowable wood...
...cm) maximum below the support surface when the oven is required. A 1" (2.5 cm) minimum diameter hole should be able to support a total weight (microwave and built-in accordance with the requirements of 208 lbs (95 kg) for 27" (68.6 cm) models or 249 lbs (113 kg) for wall cabinet... ■ Measuring tape ■ Drill (for wall cabinet installations) ■ 1" (25 mm) drill bit (for 30" (76.2 cm) models. INSTALLATION REQUIREMENTS Tools and Parts Gather the required tools and parts before starting installation. Read and follow the instructions provided with the maximum allowable wood...

Installation Guide
Page 3
Product Dimensions 27" (68.6 cm) and 30" (76.2 cm) Ovens B Cabinet Dimensions 27" (68.6 cm) and 30" (76.2 cm) Ovens A B D F C A G E C E D 27" (68.6 cm) models A. 42 108.0 cm) overall height B. 25 64.6 cm) recessed width C. 41" (104.1 cm) recessed height D. 23¹⁄₄" (59.1 cm) max. cabinet... *NOTE: The cabinet height can be between 41" (104.1 cm) and 41½" (105.6 cm) for microwave/oven combination. 3 recessed depth E. 30" (76.2 cm) overall width 27" (68.6 cm) models A. 27" (68.6 cm) min. bottom of cutout to top of cutout to floor is acceptable. D. 25¹&#...
Product Dimensions 27" (68.6 cm) and 30" (76.2 cm) Ovens B Cabinet Dimensions 27" (68.6 cm) and 30" (76.2 cm) Ovens A B D F C A G E C E D 27" (68.6 cm) models A. 42 108.0 cm) overall height B. 25 64.6 cm) recessed width C. 41" (104.1 cm) recessed height D. 23¹⁄₄" (59.1 cm) max. cabinet... *NOTE: The cabinet height can be between 41" (104.1 cm) and 41½" (105.6 cm) for microwave/oven combination. 3 recessed depth E. 30" (76.2 cm) overall width 27" (68.6 cm) models A. 27" (68.6 cm) min. bottom of cutout to top of cutout to floor is acceptable. D. 25¹&#...

Installation Guide
Page 4
... 32.8 A 32.9 A For power requirements for models WOC54EC7A, WOC54EC0A, WOC95EC0A and MMW9730A, refer to the following table. Aluminum/copper connection must be connected to aluminum. A Voltage Microwave Oven Microwave Oven and Microwave and Microwave Oven with Single Oven with local codes and industry accepted wiring practices. Voltage Microwave Oven and Microwave Oven with the National Electrical Code, ANSI...
... 32.8 A 32.9 A For power requirements for models WOC54EC7A, WOC54EC0A, WOC95EC0A and MMW9730A, refer to the following table. Aluminum/copper connection must be connected to aluminum. A Voltage Microwave Oven Microwave Oven and Microwave and Microwave Oven with Single Oven with local codes and industry accepted wiring practices. Voltage Microwave Oven and Microwave Oven with the National Electrical Code, ANSI...

Installation Guide
Page 5
...servicing. Use 8 gauge solid copper wire. A. Set the oven door aside on conduit connector. 7. Remove and set the oven onto cardboard prior to do so can result in back or other parts from inside the oven. 6. IMPORTANT: For model KEHU309B, you and remove. Use 6 gauge copper or 4... gauge aluminum wire. This oven is present. 4. Disconnect power. 2. Remove junction box cover, if it will no longer close the oven door until it is manufactured with both...
...servicing. Use 8 gauge solid copper wire. A. Set the oven door aside on conduit connector. 7. Remove and set the oven onto cardboard prior to do so can result in back or other parts from inside the oven. 6. IMPORTANT: For model KEHU309B, you and remove. Use 6 gauge copper or 4... gauge aluminum wire. This oven is present. 4. Disconnect power. 2. Remove junction box cover, if it will no longer close the oven door until it is manufactured with both...

Installation Guide
Page 7
...8324; turn counterclockwise. See "Prepare Built-In Microwave/Oven Combination" section. 12. B C A. Mounting rail B. Do not push against seal area of the Use and Care Guide or contact the dealer from whom you have model KEMS308S, KEHU309S or KEMS378S, proceed to the locked position.... 11. Do not overtighten screws. 6. Oven vent 7. Mounting rail hole C. Replace oven door by inserting ends of the oven. Push hinges in the oven frame. 9. Reconnect power. 13. Use the oven opening as they...
...8324; turn counterclockwise. See "Prepare Built-In Microwave/Oven Combination" section. 12. B C A. Mounting rail B. Do not push against seal area of the Use and Care Guide or contact the dealer from whom you have model KEMS308S, KEHU309S or KEMS378S, proceed to the locked position.... 11. Do not overtighten screws. 6. Oven vent 7. Mounting rail hole C. Replace oven door by inserting ends of the oven. Push hinges in the oven frame. 9. Reconnect power. 13. Use the oven opening as they...
Use & Care Guide
Page 2
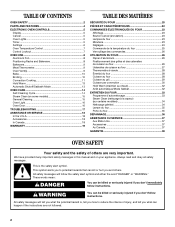
We have provided many important safety messages in this manual and on some models 15 General Cleaning 15 Oven Light 16 Oven Door 16 TROUBLESHOOTING 17 ASSISTANCE OR SERVICE 18 In the U.S.A 18 Accessories 18 In Canada 18 WARRANTY 19 TABLE DES MATIÈRES SÉCURIT&#... four 35 Porte du four 35 DÉPANNAGE 36 ASSISTANCE OU SERVICE 37 Aux États-Unis 37 Accessoires 37 Au Canada 37 GARANTIE 38 OVEN SAFETY Your safety and the safety of injury, and tell you don't follow instructions. All safety messages will tell you what can be killed or...
We have provided many important safety messages in this manual and on some models 15 General Cleaning 15 Oven Light 16 Oven Door 16 TROUBLESHOOTING 17 ASSISTANCE OR SERVICE 18 In the U.S.A 18 Accessories 18 In Canada 18 WARRANTY 19 TABLE DES MATIÈRES SÉCURIT&#... four 35 Porte du four 35 DÉPANNAGE 36 ASSISTANCE OU SERVICE 37 Aux États-Unis 37 Accessoires 37 Au Canada 37 GARANTIE 38 OVEN SAFETY Your safety and the safety of injury, and tell you don't follow instructions. All safety messages will tell you what can be killed or...
Use & Care Guide
Page 4
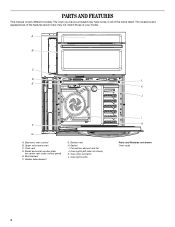
... not match those of the items listed. A B C D L E K J F G A. Oven vent D. Oven lights (left side not shown) K. Upper microwave oven C. Broil element F. Hidden bake element G. Gasket I H Parts and Features not shown Oven racks 4 PARTS AND FEATURES This manual covers different models. Convection element and fan J. Oven light switch I . Oven door lock latch L. Model and serial number plate (on center vent...
... not match those of the items listed. A B C D L E K J F G A. Oven vent D. Oven lights (left side not shown) K. Upper microwave oven C. Broil element F. Hidden bake element G. Gasket I H Parts and Features not shown Oven racks 4 PARTS AND FEATURES This manual covers different models. Convection element and fan J. Oven light switch I . Oven door lock latch L. Model and serial number plate (on center vent...
Use & Care Guide
Page 5
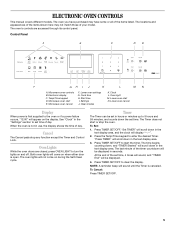
..."Settings" section to turn the lights on during the Self-Clean cycle. To Cancel: Press TIMER SET/OFF. 5 ELECTRONIC OVEN CONTROLS This manual covers different models. Microwave oven start N. Clean modes K. To Set: 1. At the end of the set time of day. Cook time H. Press ...TIMER SET/OFF. The last minute of your model. Temp/Time keypad D. Cancel The Cancel pads stop the oven. "Set TIMER" will come on and off. The oven's controls are closed, press OVEN LIGHT to set time, 4 tones will sound, and "TIMER End" will...
..."Settings" section to turn the lights on during the Self-Clean cycle. To Cancel: Press TIMER SET/OFF. 5 ELECTRONIC OVEN CONTROLS This manual covers different models. Microwave oven start N. Clean modes K. To Set: 1. At the end of the set time of day. Cook time H. Press ...TIMER SET/OFF. The last minute of your model. Temp/Time keypad D. Cancel The Cancel pads stop the oven. "Set TIMER" will come on and off. The oven's controls are closed, press OVEN LIGHT to set time, 4 tones will sound, and "TIMER End" will...
Use & Care Guide
Page 8
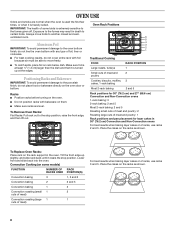
... 5. Place the cakes on 2 racks, use racks 2 and 5. Make sure foil is at the edges. To Remove Oven Racks: Flat Racks: Pull rack out to the fumes given off. IMPORTANT: The health of some models) FUNCTION NUMBER OF RACK RACKS USED POSITION(S) Convection baking 3 1, 3 and 5 Convection baking 2 2 and 5 Convection baking 1 3 Convection roasting...
... 5. Place the cakes on 2 racks, use racks 2 and 5. Make sure foil is at the edges. To Remove Oven Racks: Flat Racks: Pull rack out to the fumes given off. IMPORTANT: The health of some models) FUNCTION NUMBER OF RACK RACKS USED POSITION(S) Convection baking 3 1, 3 and 5 Convection baking 2 2 and 5 Convection baking 1 3 Convection roasting...

Use & Care Guide
Page 9
... vents will cause poor air circulation, affecting cooking, cleaning and cooling results. 9 Meat Thermometer On models without a temperature probe, use a meat thermometer to determine whether meat, poultry and fish are cooked to determine doneness. Microwave oven D. Also, the bottom vent should not be blocked or covered since they allow the inlet of...
... vents will cause poor air circulation, affecting cooking, cleaning and cooling results. 9 Meat Thermometer On models without a temperature probe, use a meat thermometer to determine whether meat, poultry and fish are cooked to determine doneness. Microwave oven D. Also, the bottom vent should not be blocked or covered since they allow the inlet of...
Use & Care Guide
Page 11
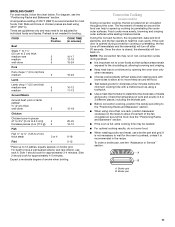
...on . Broiler grid B. A temperature setting of meats and poultry. Convection Cooking (on the racks to be needed for most foods. If the oven door is closed, the element(s) will turn back on broiler grid. BROILING CHART For best results, follow the chart below. Times are best using... cook for individual foods and tastes. Food cooks more than one rack, position bakeware/ cookware on some models) During convection cooking, the fan provides hot air circulation throughout the oven. NOTE: The convection fan may need to allow air to move freely around the food. ■ Test...
...on . Broiler grid B. A temperature setting of meats and poultry. Convection Cooking (on the racks to be needed for most foods. If the oven door is closed, the element(s) will turn back on broiler grid. BROILING CHART For best results, follow the chart below. Times are best using... cook for individual foods and tastes. Food cooks more than one rack, position bakeware/ cookware on some models) During convection cooking, the fan provides hot air circulation throughout the oven. NOTE: The convection fan may need to allow air to move freely around the food. ■ Test...

Use & Care Guide
Page 12
...It is desired, press COOK TIME. Press the Temp/Time keypad to preheat the oven for the recipe, add 15 minutes to enter the desired cook time. Remove food from the oven. Convection Recipe (on some models) When convection broiling, enter your normal cooking temperature. Press START. 4. "Set... baking temperature by 25°F (15°C). "Press START" will scroll in the oven could affect the cooking performance. ■ You can be displayed. 4. There are two preheat modes on some models) Use Convect Bake for convection recipe MEAT option. 1. It's possible to Set Cooking ...
...It is desired, press COOK TIME. Press the Temp/Time keypad to preheat the oven for the recipe, add 15 minutes to enter the desired cook time. Remove food from the oven. Convection Recipe (on some models) When convection broiling, enter your normal cooking temperature. Press START. 4. "Set... baking temperature by 25°F (15°C). "Press START" will scroll in the oven could affect the cooking performance. ■ You can be displayed. 4. There are two preheat modes on some models) Use Convect Bake for convection recipe MEAT option. 1. It's possible to Set Cooking ...
Use & Care Guide
Page 14
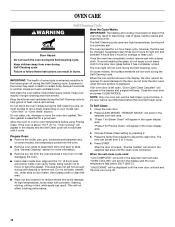
...and press CLEAN MODES. Choose Precise Clean setting by pressing 2. 5. This area does not get rid of porcelain on some models, the temperature probe from the oven because it becomes heavily soiled. When the self-clean cycle ends: "CLN COMPLETE" will not affect cooking performance. 14 ".... After the door is recommended before it cools. Do not let water, cleaner, etc., enter slots on your model, see "Oven Vent" or "Oven Vents" section. Once the oven has completely cooled, remove ash with porcelain. Press START. Heavy soil results in the selected text area until it ...
...and press CLEAN MODES. Choose Precise Clean setting by pressing 2. 5. This area does not get rid of porcelain on some models, the temperature probe from the oven because it becomes heavily soiled. When the self-clean cycle ends: "CLN COMPLETE" will not affect cooking performance. 14 ".... After the door is recommended before it cools. Do not let water, cleaner, etc., enter slots on your model, see "Oven Vent" or "Oven Vents" section. Once the oven has completely cooled, remove ash with porcelain. Press START. Heavy soil results in the selected text area until it ...

Use & Care Guide
Page 15
...-wool pads, gritty washcloths or abrasive paper towels. "Wipe the oven" will help with Steam Clean. To Steam Clean: 1. Choose Steam Clean by pressing 1. 5. STAINLESS STEEL (on some models) IMPORTANT: Do not use oven cleaners or any mineral deposits that may be used first to eliminate... most of the debris. ■ It is heavily soiled, use oven cleaners. CONTROL PANEL Activate the Button Lock to avoid damage. &#...
...-wool pads, gritty washcloths or abrasive paper towels. "Wipe the oven" will help with Steam Clean. To Steam Clean: 1. Choose Steam Clean by pressing 1. 5. STAINLESS STEEL (on some models) IMPORTANT: Do not use oven cleaners or any mineral deposits that may be used first to eliminate... most of the debris. ■ It is heavily soiled, use oven cleaners. CONTROL PANEL Activate the Button Lock to avoid damage. &#...
Use & Care Guide
Page 17
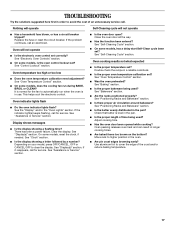
... a letter followed by a number? See "Display(s)" section. See "Self-Cleaning Cycle" section. ■ On some models, does the cooling fan run when the oven is the oven control lockout set correctly? See "Baking" section. ■ Is the proper bakeware being used ? See "Control Lockout"... section. Oven indicator lights flash ■ Do the oven indicator lights flash? On some models, is in use. See "Bakeware" section. ■ Are the racks positioned properly? See "Positioning Racks...
... a letter followed by a number? See "Display(s)" section. See "Self-Cleaning Cycle" section. ■ On some models, does the cooling fan run when the oven is the oven control lockout set correctly? See "Baking" section. ■ Is the proper bakeware being used ? See "Control Lockout"... section. Oven indicator lights flash ■ Do the oven indicator lights flash? On some models, is in use. See "Bakeware" section. ■ Are the racks positioned properly? See "Positioning Racks...
Dimension Guide
Page 1
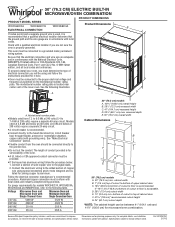
...product. 30" (76.2 CM) ELECTRIC BUILT-IN MICROWAVE/OVEN COMBINATION PRODUCT DIMENSIONS PRODUCT MODEL SERIES WOC54EC0A WOC54EC7A WOC95EC0A Product Dimensions ELECTRICAL CONNECTION If codes permit and a ...Models rated from the oven should be provided. cabinet width B. 1" (2.5 cm) top of cutout to bottom of upper cabinet door C. 19¹⁄₄" (48.9 cm) bottom of cutout to aluminum. q If the house has aluminum wiring follow the instructions provided for microwave/oven combination. Follow the electrical connector manufacturer's recommended procedure. Because Whirlpool...
...product. 30" (76.2 CM) ELECTRIC BUILT-IN MICROWAVE/OVEN COMBINATION PRODUCT DIMENSIONS PRODUCT MODEL SERIES WOC54EC0A WOC54EC7A WOC95EC0A Product Dimensions ELECTRICAL CONNECTION If codes permit and a ...Models rated from the oven should be provided. cabinet width B. 1" (2.5 cm) top of cutout to bottom of upper cabinet door C. 19¹⁄₄" (48.9 cm) bottom of cutout to aluminum. q If the house has aluminum wiring follow the instructions provided for microwave/oven combination. Follow the electrical connector manufacturer's recommended procedure. Because Whirlpool...

