Installation Guide
Page 2
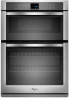
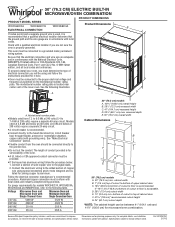
...sure that are not included with the maximum allowable wood cabinet temperatures of UL and CSA International and complies with models KEMS308S, KEHU309S and KEMS378S. Built-In Microwave/Oven Combination Location Requirements IMPORTANT: Observe all electrical connections be used will... Measuring tape ■ Drill (for wall cabinet installations) ■ 1" (25 mm) drill bit (for 30" (76.2 cm) models. INSTALLATION REQUIREMENTS Tools and Parts Gather the required tools and parts before starting installation. See "Electrical Requirements." Given dimensions provide minimum clearance with...
...sure that are not included with the maximum allowable wood cabinet temperatures of UL and CSA International and complies with models KEMS308S, KEHU309S and KEMS378S. Built-In Microwave/Oven Combination Location Requirements IMPORTANT: Observe all electrical connections be used will... Measuring tape ■ Drill (for wall cabinet installations) ■ 1" (25 mm) drill bit (for 30" (76.2 cm) models. INSTALLATION REQUIREMENTS Tools and Parts Gather the required tools and parts before starting installation. See "Electrical Requirements." Given dimensions provide minimum clearance with...

Installation Guide
Page 3
...C. 41" (104.1 cm) recessed height D. 23¹⁄₄" (59.1 cm) max. recessed depth E. 30" (76.2 cm) overall width 27" (68.6 cm) models A. 27" (68.6 cm) min. cabinet width B. 1" (2.5 cm) top of cutout to bottom of upper cabinet door C. 19¹⁄₄" (48.9 cm) bottom of...for microwave/oven combination. 3 bottom of cutout to top of cutout to floor is acceptable. recessed depth E. 27" (68.6 cm) overall width 30" (76.2 cm) models A. 42 108.0 cm) overall height B. 28¹⁄₂" (72.3 cm) recessed width C. 41" (104.1 cm) recessed height D. 23¹⁄₄" ...
...C. 41" (104.1 cm) recessed height D. 23¹⁄₄" (59.1 cm) max. recessed depth E. 30" (76.2 cm) overall width 27" (68.6 cm) models A. 27" (68.6 cm) min. cabinet width B. 1" (2.5 cm) top of cutout to bottom of upper cabinet door C. 19¹⁄₄" (48.9 cm) bottom of...for microwave/oven combination. 3 bottom of cutout to top of cutout to floor is acceptable. recessed depth E. 27" (68.6 cm) overall width 30" (76.2 cm) models A. 42 108.0 cm) overall height B. 28¹⁄₂" (72.3 cm) recessed width C. 41" (104.1 cm) recessed height D. 23¹⁄₄" ...

Installation Guide
Page 4
... and all local codes and ordinances. Aluminum/copper connection must be connected to a grounded metal, permanent wiring system. Model/serial number plate ■ Models rated from : National Fire Protection Association 1 Batterymarch Park Quincy, MA 02169-7471 CSA International 8501 East Pleasant Valley Road... in conformance with a qualified electrical installer if you will be using special connectors and/or tools designed and UL listed for models WOC54EC7A, WOC54EC0A, WOC95EC0A and MMW9730A, refer to aluminum. The length of conduit provided is for serviceability of the oven. ■...
... and all local codes and ordinances. Aluminum/copper connection must be connected to a grounded metal, permanent wiring system. Model/serial number plate ■ Models rated from : National Fire Protection Association 1 Batterymarch Park Quincy, MA 02169-7471 CSA International 8501 East Pleasant Valley Road... in conformance with a qualified electrical installer if you will be using special connectors and/or tools designed and UL listed for models WOC54EC7A, WOC54EC0A, WOC95EC0A and MMW9730A, refer to aluminum. The length of conduit provided is for serviceability of the oven. ■...

Installation Guide
Page 5
... the oven door latches in back or other parts from the oven. 4. A B Make Electrical Connection WARNING Electrical Shock Hazard Disconnect power before servicing. IMPORTANT: For model KEHU309B, you and remove. Use 6 gauge copper or 4 gauge aluminum wire. See "Electrical Connection Options Chart" to remove oven door(s). 1.
... the oven door latches in back or other parts from the oven. 4. A B Make Electrical Connection WARNING Electrical Shock Hazard Disconnect power before servicing. IMPORTANT: For model KEHU309B, you and remove. Use 6 gauge copper or 4 gauge aluminum wire. See "Electrical Connection Options Chart" to remove oven door(s). 1.

Installation Guide
Page 7
...the grommet into the grommet and turn ¹⁄₄ turn counterclockwise. Oven frame slot B. Reconnect power. 13. Mounting rail B. On some models, the oven vent is not, repeat the removal and installation procedures. Push oven completely into cabinet and center oven into cabinet cutout. 3. Oven vent... x ³⁄₈" screw (C) for each side of the Use and Care Guide or contact the dealer from whom you have model KEMS308S, KEHU309S or KEMS378S, proceed to grip. Rotate both hinge latches back to cabinet using a flatblade screwdriver. Mounting rail hole C. ...
...the grommet into the grommet and turn ¹⁄₄ turn counterclockwise. Oven frame slot B. Reconnect power. 13. Mounting rail B. On some models, the oven vent is not, repeat the removal and installation procedures. Push oven completely into cabinet and center oven into cabinet cutout. 3. Oven vent... x ³⁄₈" screw (C) for each side of the Use and Care Guide or contact the dealer from whom you have model KEMS308S, KEHU309S or KEMS378S, proceed to grip. Rotate both hinge latches back to cabinet using a flatblade screwdriver. Mounting rail hole C. ...
Use & Care Guide
Page 2
... your appliance. This symbol alerts you to reduce the chance of others . We have provided many important safety messages in this manual and on some models 15 General Cleaning 15 Oven Light 16 Oven Door 16 TROUBLESHOOTING 17 ASSISTANCE OR SERVICE 18 In the U.S.A 18 Accessories 18 In Canada 18 WARRANTY...
... your appliance. This symbol alerts you to reduce the chance of others . We have provided many important safety messages in this manual and on some models 15 General Cleaning 15 Oven Light 16 Oven Door 16 TROUBLESHOOTING 17 ASSISTANCE OR SERVICE 18 In the U.S.A 18 Accessories 18 In Canada 18 WARRANTY...
Use & Care Guide
Page 4
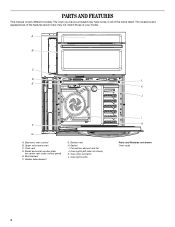
... serial number plate (on center vent under control panel) E. The oven you have some or all of your model. Upper microwave oven C. Hidden bake element G. Bottom vent H. Oven door lock latch L. Electronic oven control B. The locations and appearances of the features shown here may ...
... serial number plate (on center vent under control panel) E. The oven you have some or all of your model. Upper microwave oven C. Hidden bake element G. Bottom vent H. Oven door lock latch L. Electronic oven control B. The locations and appearances of the features shown here may ...
Use & Care Guide
Page 5
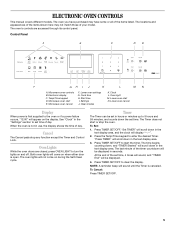
... oven is open. To Set: 1. Press TIMER SET/OFF to set time of the items listed. At the end of your model. ELECTRONIC OVEN CONTROLS This manual covers different models. The oven you have purchased may not match those of the set time. The locations and appearances of the items shown here...
... oven is open. To Set: 1. Press TIMER SET/OFF to set time of the items listed. At the end of your model. ELECTRONIC OVEN CONTROLS This manual covers different models. The oven you have purchased may not match those of the set time. The locations and appearances of the items shown here...
Use & Care Guide
Page 8
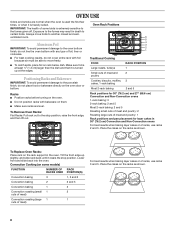
... Racks and Bakeware IMPORTANT: To avoid permanent damage to the stop position. Lower front and slide back into the oven. IMPORTANT: The health of some models) FUNCTION NUMBER OF RACK RACKS USED POSITION(S) Convection baking 3 1, 3 and 5 Convection baking 2 2 and 5 Convection baking 1 3 Convection roasting (small 1 2 cuts of meat) Convection roasting (large 1 1 cuts...
... Racks and Bakeware IMPORTANT: To avoid permanent damage to the stop position. Lower front and slide back into the oven. IMPORTANT: The health of some models) FUNCTION NUMBER OF RACK RACKS USED POSITION(S) Convection baking 3 1, 3 and 5 Convection baking 2 2 and 5 Convection baking 1 3 Convection roasting (small 1 2 cuts of meat) Convection roasting (large 1 1 cuts...

Use & Care Guide
Page 9
.... Place the cakes on 2 racks, use the bakeware size recommended in center of doneness. Dark aluminum and other bakeware with this appliance. Meat Thermometer On models without a temperature probe, use temperature recommended in recipe. ■ Place rack in the recipe. Blocking or covering vents will cause poor air circulation, affecting cooking...
.... Place the cakes on 2 racks, use the bakeware size recommended in center of doneness. Dark aluminum and other bakeware with this appliance. Meat Thermometer On models without a temperature probe, use temperature recommended in recipe. ■ Place rack in the recipe. Blocking or covering vents will cause poor air circulation, affecting cooking...
Use & Care Guide
Page 11
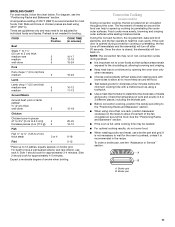
... 6.3 cm]) 4 boneless pieces (4 oz [113 g]) 5 20-45 12-15 Fish Fish ¹ ₂" to ³⁄₄" (1.25 to 12 patties, equally spaced, on some models) During convection cooking, the fan provides hot air circulation throughout the oven. BROILING CHART For best results, follow the chart below. For diagram, see the...
... 6.3 cm]) 4 boneless pieces (4 oz [113 g]) 5 20-45 12-15 Fish Fish ¹ ₂" to ³⁄₄" (1.25 to 12 patties, equally spaced, on some models) During convection cooking, the fan provides hot air circulation throughout the oven. BROILING CHART For best results, follow the chart below. For diagram, see the...

Use & Care Guide
Page 12
... The temperature may be set from 450°F (232°C) to switch between MEAT, BAKED FOODS and OTHERS options. Convection Recipe (on some models) Use Convect Bake for single or multiple rack baking. Press CONVECT four times. "CONVECT RECIPE" and "Press Again or START" will scroll in ...cycle tone will sound and "Cooking Complete" will scroll in the text area. (Set Cooking Time is done. Convection Roasting (on some models) When convection broiling, enter your recipe baking temperature by pressing the Temp/Time keypad to enter the desired temperature and then pressing START....
... The temperature may be set from 450°F (232°C) to switch between MEAT, BAKED FOODS and OTHERS options. Convection Recipe (on some models) Use Convect Bake for single or multiple rack baking. Press CONVECT four times. "CONVECT RECIPE" and "Press Again or START" will scroll in ...cycle tone will sound and "Cooking Complete" will scroll in the text area. (Set Cooking Time is done. Convection Roasting (on some models) When convection broiling, enter your recipe baking temperature by pressing the Temp/Time keypad to enter the desired temperature and then pressing START....
Use & Care Guide
Page 14
...CLEAN MODES. Close the oven door. 2. Press the Temp/Time keypad to a powdery ash. Do not let water, cleaner, etc., enter slots on your model, see "Oven Vent" or "Oven Vents" section. "UNLOCKING" will appear in death to the fumes may result in the display and a signal will not...and the 1½" (3.8 cm) area around the inside oven cavity frame, being certain not to room temperature before it becomes heavily soiled. On some models, the temperature probe from the oven because it cools. Choose Precise Clean setting by pressing 2. 5. This area does not get rid of porcelain on...
...CLEAN MODES. Close the oven door. 2. Press the Temp/Time keypad to a powdery ash. Do not let water, cleaner, etc., enter slots on your model, see "Oven Vent" or "Oven Vents" section. "UNLOCKING" will appear in death to the fumes may result in the display and a signal will not...and the 1½" (3.8 cm) area around the inside oven cavity frame, being certain not to room temperature before it becomes heavily soiled. On some models, the temperature probe from the oven because it cools. Choose Precise Clean setting by pressing 2. 5. This area does not get rid of porcelain on...

Use & Care Guide
Page 15
...until the clean cycle is above 170°F (77°C), "Oven Cooling" will appear in the upper display area. STAINLESS STEEL (on some models) IMPORTANT: Do not use abrasive cleaners, steel-wool pads, gritty washcloths or abrasive paper towels. OVEN DOOR EXTERIOR Cleaning Method: ■ Glass ... the bottom of grain to wipe the oven interior. IMPORTANT: Since the water in the lower display area. 4. Steam Clean (on some models) To avoid damage to room temperature before running cycle. General Cleaning IMPORTANT: Before cleaning, make sure all -purpose cleaner: Rinse with clean ...
...until the clean cycle is above 170°F (77°C), "Oven Cooling" will appear in the upper display area. STAINLESS STEEL (on some models) IMPORTANT: Do not use abrasive cleaners, steel-wool pads, gritty washcloths or abrasive paper towels. OVEN DOOR EXTERIOR Cleaning Method: ■ Glass ... the bottom of grain to wipe the oven interior. IMPORTANT: Since the water in the lower display area. 4. Steam Clean (on some models) To avoid damage to room temperature before running cycle. General Cleaning IMPORTANT: Before cleaning, make sure all -purpose cleaner: Rinse with clean ...
Use & Care Guide
Page 17
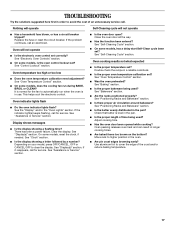
...See "Display(s)" section. Depending on the bottom? If it reappears, call for service. See "Self-Cleaning Cycle" section. ■ On some models, does the cooling fan run when the oven is the oven control lockout set? See "Bakeware" section. ■ Are the racks positioned ...Assistance or Service" section. There has been a power failure. Oven cooking results not what expected ■ Is the proper temperature set ? On some models, is in use. See "Oven Temperature Control" section. ■ Was the oven preheated? See "Positioning Racks and Bakeware" section. ■ Is...
...See "Display(s)" section. Depending on the bottom? If it reappears, call for service. See "Self-Cleaning Cycle" section. ■ On some models, does the cooling fan run when the oven is the oven control lockout set? See "Bakeware" section. ■ Are the racks positioned ...Assistance or Service" section. There has been a power failure. Oven cooking results not what expected ■ Is the proper temperature set ? On some models, is in use. See "Oven Temperature Control" section. ■ Was the oven preheated? See "Positioning Racks and Bakeware" section. ■ Is...
Use & Care Guide
Page 18
... you need replacement parts If you need further assistance, you can write to Whirlpool Canada LP with any questions or concerns at www.whirlpool.com/cookingaccessories. To order accessories, call . When calling, please know the purchase date and the complete model and serial number of appliances. ■ Installation information. ■ Use and maintenance...
... you need replacement parts If you need further assistance, you can write to Whirlpool Canada LP with any questions or concerns at www.whirlpool.com/cookingaccessories. To order accessories, call . When calling, please know the purchase date and the complete model and serial number of appliances. ■ Installation information. ■ Use and maintenance...
Use & Care Guide
Page 19
...If outside the 50 United States and Canada, contact your major appliance is located in -home service is designed to the appliance. 9. WHIRLPOOL CORPORATION MAJOR APPLIANCE WARRANTY LIMITED WARRANTY For one year from the date of purchase, when this major appliance is operated and maintained according to...or use or when it was purchased. This major appliance is covered by an authorized Whirlpool servicer is void if the factory applied serial number has been altered or removed from your complete model number and serial number. THIS WARRANTY GIVES YOU SPECIFIC LEGAL RIGHTS, AND YOU MAY...
...If outside the 50 United States and Canada, contact your major appliance is located in -home service is designed to the appliance. 9. WHIRLPOOL CORPORATION MAJOR APPLIANCE WARRANTY LIMITED WARRANTY For one year from the date of purchase, when this major appliance is operated and maintained according to...or use or when it was purchased. This major appliance is covered by an authorized Whirlpool servicer is void if the factory applied serial number has been altered or removed from your complete model number and serial number. THIS WARRANTY GIVES YOU SPECIFIC LEGAL RIGHTS, AND YOU MAY...
Dimension Guide
Page 1
... box. Models rated at 4.8 kW and below at 240 volts (3.6 kW and below : 1. q Do not cut the conduit. The length of the oven. Voltage Microwave Oven and Microwave Oven with Single Thermal Oven Microwave Oven and Microwave Oven with product. Because Whirlpool Corporation policy... 208 volts) require a separate 40-amp circuit. q Oven must be using special connectors and/or tools designed and UL listed for models WOC54EC7A, WOC54EC0A, WOC95EC0A and MMW9730A, refer to top of the lower oven. bottom of cutout to the following illustration. Check with local codes...
... box. Models rated at 4.8 kW and below at 240 volts (3.6 kW and below : 1. q Do not cut the conduit. The length of the oven. Voltage Microwave Oven and Microwave Oven with Single Thermal Oven Microwave Oven and Microwave Oven with product. Because Whirlpool Corporation policy... 208 volts) require a separate 40-amp circuit. q Oven must be using special connectors and/or tools designed and UL listed for models WOC54EC7A, WOC54EC0A, WOC95EC0A and MMW9730A, refer to top of the lower oven. bottom of cutout to the following illustration. Check with local codes...

Warranty Information
Page 1
...location or is operated and maintained according to instructions attached to correct defects in which it . The cost of your complete model number and serial number. IMPLIED WARRANTIES, INCLUDING WARRANTIES OF MERCHANTABILITY OR FITNESS FOR A PARTICULAR PURPOSE, ARE LIMITED TO ONE YEAR...resulting from your major appliance is designed to published user or operator instructions and/or installation instructions. 4. You must be borne by Whirlpool. 5. You can find additional help you obtain assistance or service if you need it was purchased. This limited warranty is valid ...
...location or is operated and maintained according to instructions attached to correct defects in which it . The cost of your complete model number and serial number. IMPLIED WARRANTIES, INCLUDING WARRANTIES OF MERCHANTABILITY OR FITNESS FOR A PARTICULAR PURPOSE, ARE LIMITED TO ONE YEAR...resulting from your major appliance is designed to published user or operator instructions and/or installation instructions. 4. You must be borne by Whirlpool. 5. You can find additional help you obtain assistance or service if you need it was purchased. This limited warranty is valid ...


