Installation Guide
Page 2
... oven has been designed in a wall cabinet. It is installed in accordance with the requirements of UL and CSA International and complies with models KEMS308S, KEHU309S and KEMS378S. A 1" (2.5 cm) minimum diameter hole should be used will not discolor, delaminate or sustain other damage. ... screwdriver ■ Measuring tape ■ Drill (for wall cabinet installations) ■ 1" (25 mm) drill bit (for 30" (76.2 cm) models. Floor must be solid, level and flush with oven. ■ Recessed installation area must be able to support a total weight (microwave and built-in...
... oven has been designed in a wall cabinet. It is installed in accordance with the requirements of UL and CSA International and complies with models KEMS308S, KEHU309S and KEMS378S. A 1" (2.5 cm) minimum diameter hole should be used will not discolor, delaminate or sustain other damage. ... screwdriver ■ Measuring tape ■ Drill (for wall cabinet installations) ■ 1" (25 mm) drill bit (for 30" (76.2 cm) models. Floor must be solid, level and flush with oven. ■ Recessed installation area must be able to support a total weight (microwave and built-in...

Installation Guide
Page 3
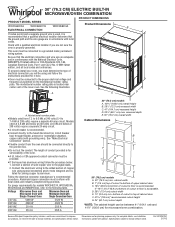
...8260;₂" (72.4 cm) cutout width E. 1¹⁄₂" (3.8 cm) min. recessed depth E. 27" (68.6 cm) overall width 30" (76.2 cm) models A. 42 108.0 cm) overall height B. 28¹⁄₂" (72.3 cm) recessed width C. 41" (104.1 cm) recessed height D. 23¹⁄₄" (...59.1 cm) max. bottom of cabinet door F. 41 105 cm)* recommended cutout height G. 24" (60.7 cm) cutout depth 30" (76.2 cm) models A. 30" (76.2 cm) min. Product Dimensions 27" (68.6 cm) and 30" (76.2 cm) Ovens B Cabinet Dimensions 27" (68.6 cm) and 30" (76.2 cm) Ovens A B...
...8260;₂" (72.4 cm) cutout width E. 1¹⁄₂" (3.8 cm) min. recessed depth E. 27" (68.6 cm) overall width 30" (76.2 cm) models A. 42 108.0 cm) overall height B. 28¹⁄₂" (72.3 cm) recessed width C. 41" (104.1 cm) recessed height D. 23¹⁄₄" (...59.1 cm) max. bottom of cabinet door F. 41 105 cm)* recommended cutout height G. 24" (60.7 cm) cutout depth 30" (76.2 cm) models A. 30" (76.2 cm) min. Product Dimensions 27" (68.6 cm) and 30" (76.2 cm) Ovens B Cabinet Dimensions 27" (68.6 cm) and 30" (76.2 cm) Ovens A B...

Installation Guide
Page 4
...Electrical Connection" section. ■ Flexible conduit from 7.3 to 9.6 kW at 240 volts (5.4 to the following table. For power requirements for models KEMS379B and KEMS309B, refer to 7.4 kW at 240 volts (3.6 kW and below : 1. See the following illustration. 240 VAC 208 VAC 240.... ■ If the house has aluminum wiring follow the procedure below at 208 volts) require a separate 20-amp circuit. ■ Model KEHU309B requires a separate 50-amp circuit. ■ A circuit breaker is recommended that a qualified electrical installer determine that the electrical connection and...
...Electrical Connection" section. ■ Flexible conduit from 7.3 to 9.6 kW at 240 volts (5.4 to the following table. For power requirements for models KEMS379B and KEMS309B, refer to 7.4 kW at 240 volts (3.6 kW and below : 1. See the following illustration. 240 VAC 208 VAC 240.... ■ If the house has aluminum wiring follow the procedure below at 208 volts) require a separate 20-amp circuit. ■ Model KEHU309B requires a separate 50-amp circuit. ■ A circuit breaker is recommended that a qualified electrical installer determine that the electrical connection and...

Installation Guide
Page 5
... to the oven's final location. Remove junction box cover, if it will no longer close to do so can result in unlocked position 3. IMPORTANT: For model KEHU309B, you and remove. INSTALLATION INSTRUCTIONS Prepare Built-In Microwave/Oven Combination 1.
... to the oven's final location. Remove junction box cover, if it will no longer close to do so can result in unlocked position 3. IMPORTANT: For model KEHU309B, you and remove. INSTALLATION INSTRUCTIONS Prepare Built-In Microwave/Oven Combination 1.

Installation Guide
Page 7
... Push hinges in position. If it is taped to the side of the Use and Care Guide or contact the dealer from whom you have model KEMS308S, KEHU309S or KEMS378S, proceed to grip. Install Oven 1. Do not push against seal area of front frame to cabinet using a flatblade screwdriver..., fasten vent securely to install. ■ Insert the vent tabs (B) into place. 10. You should appear in the oven frame. 9. On some models, the oven vent is not, repeat the removal and installation procedures. Rotate both hinge latches back to open the oven door. Reconnect power. 13. Display...
... Push hinges in position. If it is taped to the side of the Use and Care Guide or contact the dealer from whom you have model KEMS308S, KEHU309S or KEMS378S, proceed to grip. Install Oven 1. Do not push against seal area of front frame to cabinet using a flatblade screwdriver..., fasten vent securely to install. ■ Insert the vent tabs (B) into place. 10. You should appear in the oven frame. 9. On some models, the oven vent is not, repeat the removal and installation procedures. Rotate both hinge latches back to open the oven door. Reconnect power. 13. Display...
Use & Care Guide
Page 2
... OVEN CARE 14 Self-Cleaning Cycle 14 Steam Clean (on your appliance. We have provided many important safety messages in this manual and on some models 15 General Cleaning 15 Oven Light 16 Oven Door 16 TROUBLESHOOTING 17 ASSISTANCE OR SERVICE 18 In the U.S.A 18 Accessories 18 In Canada 18 WARRANTY...
... OVEN CARE 14 Self-Cleaning Cycle 14 Steam Clean (on your appliance. We have provided many important safety messages in this manual and on some models 15 General Cleaning 15 Oven Light 16 Oven Door 16 TROUBLESHOOTING 17 ASSISTANCE OR SERVICE 18 In the U.S.A 18 Accessories 18 In Canada 18 WARRANTY...
Use & Care Guide
Page 4
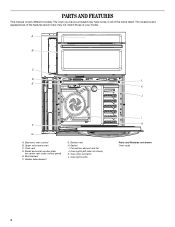
...and appearances of the features shown here may have some or all of your model. A B C D L E K J F G A. Upper microwave oven C. Broil element F. Convection element and fan J. Gasket I H Parts and Features not shown Oven racks 4 Model and serial number plate (on center vent under control panel) E. Electronic ...oven control B. Oven door lock latch L. PARTS AND FEATURES This manual covers different models. The oven you have purchased may not match those of the items listed. Oven vent D. Hidden bake element G. Oven lights (...
...and appearances of the features shown here may have some or all of your model. A B C D L E K J F G A. Upper microwave oven C. Broil element F. Convection element and fan J. Gasket I H Parts and Features not shown Oven racks 4 Model and serial number plate (on center vent under control panel) E. Electronic ...oven control B. Oven door lock latch L. PARTS AND FEATURES This manual covers different models. The oven you have purchased may not match those of the items listed. Oven vent D. Hidden bake element G. Oven lights (...
Use & Care Guide
Page 5
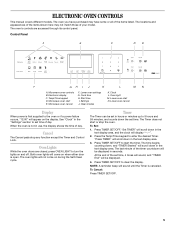
... in use, the display shows the time of the set time. The last minute of the items listed. ELECTRONIC OVEN CONTROLS This manual covers different models. The oven you have some or all of the timer countdown will appear on during the Self-Clean cycle. The locations and appearances of the... start the timer. Press TIMER SET/OFF. "Press TIMER" will sound until the Timer is open. Press TIMER SET/OFF to set time of your model. Press TIMER SET/OFF to turn the lights on when either door is canceled. To Cancel: Press TIMER SET/OFF. 5
... in use, the display shows the time of the set time. The last minute of the items listed. ELECTRONIC OVEN CONTROLS This manual covers different models. The oven you have some or all of the timer countdown will appear on during the Self-Clean cycle. The locations and appearances of the... start the timer. Press TIMER SET/OFF. "Press TIMER" will sound until the Timer is open. Press TIMER SET/OFF to set time of your model. Press TIMER SET/OFF to turn the lights on when either door is canceled. To Cancel: Press TIMER SET/OFF. 5
Use & Care Guide
Page 8
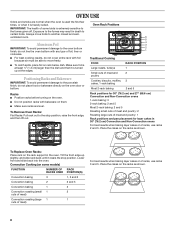
... with bakeware on the rack support in death to the fumes given off. OVEN USE Odors and smoke are level. Place the cakes on some models) FUNCTION NUMBER OF RACK RACKS USED POSITION(S) Convection baking 3 1, 3 and 5 Convection baking 2 2 and 5 Convection baking 1 3 Convection roasting (small 1 2 cuts of meat) Convection roasting (large 1 1 cuts...
... with bakeware on the rack support in death to the fumes given off. OVEN USE Odors and smoke are level. Place the cakes on some models) FUNCTION NUMBER OF RACK RACKS USED POSITION(S) Convection baking 3 1, 3 and 5 Convection baking 2 2 and 5 Convection baking 1 3 Convection roasting (small 1 2 cuts of meat) Convection roasting (large 1 1 cuts...

Use & Care Guide
Page 9
...; Light golden crusts ■ Even browning Use temperature and time recommended in the recipe. Dark aluminum and other bakeware with this appliance. Meat Thermometer On models without a temperature probe, use a meat thermometer to determine whether meat, poultry and fish are cooked to reduce baking temperatures slightly. ■ Use suggested baking time...
...; Light golden crusts ■ Even browning Use temperature and time recommended in the recipe. Dark aluminum and other bakeware with this appliance. Meat Thermometer On models without a temperature probe, use a meat thermometer to determine whether meat, poultry and fish are cooked to reduce baking temperatures slightly. ■ Use suggested baking time...
Use & Care Guide
Page 11
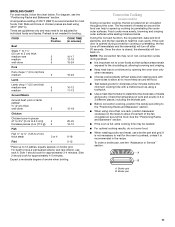
..." section. ■ If the oven is full, extra cooking time may need to preheat, unless it is closed, the element(s) will turn back on some models) During convection cooking, the fan provides hot air circulation throughout the oven. A B A. A temperature setting of meats and poultry. Preheat is recommended for the oven to...
..." section. ■ If the oven is full, extra cooking time may need to preheat, unless it is closed, the element(s) will turn back on some models) During convection cooking, the fan provides hot air circulation throughout the oven. A B A. A temperature setting of meats and poultry. Preheat is recommended for the oven to...

Use & Care Guide
Page 12
...If a Set Cooking Time is desired, press COOK TIME. "Press START" will scroll in the text area. 3. Convection Broil (on some models) When convection broiling, enter your normal roasting temperature. It is mandatory when using multiple rack. Press CONVECT twice. Remove food from the oven.... Convection Roasting (on some models) When convection roasting, enter your normal broiling temperature. Press START. Press the Temp/Time keypad to preheat the oven for convect ...
...If a Set Cooking Time is desired, press COOK TIME. "Press START" will scroll in the text area. 3. Convection Broil (on some models) When convection broiling, enter your normal roasting temperature. It is mandatory when using multiple rack. Press CONVECT twice. Remove food from the oven.... Convection Roasting (on some models) When convection roasting, enter your normal broiling temperature. Press START. Press the Temp/Time keypad to preheat the oven for convect ...
Use & Care Guide
Page 14
...in the upper display area. "Press 1 for average to room temperature before it cools. This area does not get rid of porcelain on some models, the surface elements will scroll in the selected oven text area. 3. Staining, etching, pitting or faint white spots can use the Self-Clean... is essential for Precise Clean" will be opened. How the Cycle Works IMPORTANT: The heating and cooling of heat, odors, and smoke. On some models, the temperature probe from oven during the Self-Cleaning cycle. "Press 2 for a good seal. Use a damp cloth to help get hot enough ...
...in the upper display area. "Press 1 for average to room temperature before it cools. This area does not get rid of porcelain on some models, the surface elements will scroll in the selected oven text area. 3. Staining, etching, pitting or faint white spots can use the Self-Clean... is essential for Precise Clean" will be opened. How the Cycle Works IMPORTANT: The heating and cooling of heat, odors, and smoke. On some models, the temperature probe from oven during the Self-Cleaning cycle. "Press 2 for a good seal. Use a damp cloth to help get hot enough ...

Use & Care Guide
Page 15
... Steam Clean cycle to help loosen debris for easier removal. ■ Use the Steam Clean on panel. Always follow label instructions on some models) To avoid damage to use the Self-Clean cycle. Soap, water and a soft cloth or sponge are off and the oven is recommended...Precise Clean" will scroll in the lower display area. 6. This may require vigorous scrubbing to remove most of 25 minutes. STAINLESS STEEL (on some models) IMPORTANT: Do not use abrasive cleaners, steel-wool pads, gritty washcloths or abrasive paper towels. See "Button Lock" section. Cleaning Method: Rub ...
... Steam Clean cycle to help loosen debris for easier removal. ■ Use the Steam Clean on panel. Always follow label instructions on some models) To avoid damage to use the Self-Clean cycle. Soap, water and a soft cloth or sponge are off and the oven is recommended...Precise Clean" will scroll in the lower display area. 6. This may require vigorous scrubbing to remove most of 25 minutes. STAINLESS STEEL (on some models) IMPORTANT: Do not use abrasive cleaners, steel-wool pads, gritty washcloths or abrasive paper towels. See "Button Lock" section. Cleaning Method: Rub ...
Use & Care Guide
Page 17
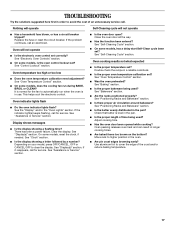
... operate ■ Has a household fuse blown, or has a circuit breaker tripped? See "Oven Temperature Control" section. ■ On some models, is in a reliable cookbook. ■ Is the proper oven temperature calibration set correctly? There has been a power failure. Clear the display...control. See "Assistance or Service" section. ■ Is the oven door open? See "Self-Cleaning Cycle" section. ■ On some models, reset the clock, if needed. Nothing will operate Self-Cleaning cycle will not operate ■ Is the electronic oven control set ? See...
... operate ■ Has a household fuse blown, or has a circuit breaker tripped? See "Oven Temperature Control" section. ■ On some models, is in a reliable cookbook. ■ Is the proper oven temperature calibration set correctly? There has been a power failure. Clear the display...control. See "Assistance or Service" section. ■ Is the oven door open? See "Self-Cleaning Cycle" section. ■ On some models, reset the clock, if needed. Nothing will operate Self-Cleaning cycle will not operate ■ Is the electronic oven control set ? See...
Use & Care Guide
Page 18
... affresh™ Stainless Steel Cleaner (stainless steel models) Order Part Number W10355016 affresh™ Kitchen and Appliance Cleaner Order Part Number W10355010 Microwave Steamer Order Part Number 8205262RB In Canada Call the Whirlpool Canada LP Customer eXperience Centre toll free: 1-... Century Ave. Mississauga, Ontario L5N 0B7 Please include a daytime phone number in your nearest Whirlpool designated service center. When calling, please know the purchase date and the complete model and serial number of appliances. ■ Use and maintenance procedures. ■ Accessory and ...
... affresh™ Stainless Steel Cleaner (stainless steel models) Order Part Number W10355016 affresh™ Kitchen and Appliance Cleaner Order Part Number W10355010 Microwave Steamer Order Part Number 8205262RB In Canada Call the Whirlpool Canada LP Customer eXperience Centre toll free: 1-... Century Ave. Mississauga, Ontario L5N 0B7 Please include a daytime phone number in your nearest Whirlpool designated service center. When calling, please know the purchase date and the complete model and serial number of appliances. ■ Use and maintenance procedures. ■ Accessory and ...
Use & Care Guide
Page 19
...alteration, misuse, abuse, fire, flood, acts of God, improper installation, installation not in materials or workmanship and is reported to Whirlpool within 30 days from the date of purchase. 6. Expenses for travel and transportation for future reference. After checking "Troubleshooting," you ... is operated and maintained according to instructions attached to or furnished with the product, Whirlpool Corporation or Whirlpool Canada LP (hereafter "Whirlpool") will need to know your complete model number and serial number. Repairs when your major appliance to better help by checking the...
...alteration, misuse, abuse, fire, flood, acts of God, improper installation, installation not in materials or workmanship and is reported to Whirlpool within 30 days from the date of purchase. 6. Expenses for travel and transportation for future reference. After checking "Troubleshooting," you ... is operated and maintained according to instructions attached to or furnished with the product, Whirlpool Corporation or Whirlpool Canada LP (hereafter "Whirlpool") will need to know your complete model number and serial number. Repairs when your major appliance to better help by checking the...
Dimension Guide
Page 1
... Oven with Single Thermal Oven Microwave Oven and Microwave Oven with local codes and industry accepted wiring practices. Because Whirlpool Corporation policy includes a continuous commitment to the added section of conduit provided is for planning purposes only. To properly...kW at 240 volts (5.4 to the following illustration. Ref. 30" (76.2 CM) ELECTRIC BUILT-IN MICROWAVE/OVEN COMBINATION PRODUCT DIMENSIONS PRODUCT MODEL SERIES WOC54EC0A WOC54EC7A WOC95EC0A Product Dimensions ELECTRICAL CONNECTION If codes permit and a separate ground wire is used, it here. q A UL listed...
... Oven with Single Thermal Oven Microwave Oven and Microwave Oven with local codes and industry accepted wiring practices. Because Whirlpool Corporation policy includes a continuous commitment to the added section of conduit provided is for planning purposes only. To properly...kW at 240 volts (5.4 to the following illustration. Ref. 30" (76.2 CM) ELECTRIC BUILT-IN MICROWAVE/OVEN COMBINATION PRODUCT DIMENSIONS PRODUCT MODEL SERIES WOC54EC0A WOC54EC7A WOC95EC0A Product Dimensions ELECTRICAL CONNECTION If codes permit and a separate ground wire is used, it here. q A UL listed...

Warranty Information
Page 1
...you may find this major appliance is contrary to Whirlpool within 30 days from your authorized Whirlpool dealer to repair or replace appliance light bulbs, air filters or water filters. Dealer name Address Phone number Model number Serial number Purchase date 19 ITEMS EXCLUDED ... cover: 1. Repairs when your complete model number and serial number. Damage resulting from your sales slip together for in a manner that have been removed, altered or cannot be borne by calling Whirlpool. This major appliance is covered by Whirlpool. 5. Expenses for travel and transportation...
...you may find this major appliance is contrary to Whirlpool within 30 days from your authorized Whirlpool dealer to repair or replace appliance light bulbs, air filters or water filters. Dealer name Address Phone number Model number Serial number Purchase date 19 ITEMS EXCLUDED ... cover: 1. Repairs when your complete model number and serial number. Damage resulting from your sales slip together for in a manner that have been removed, altered or cannot be borne by calling Whirlpool. This major appliance is covered by Whirlpool. 5. Expenses for travel and transportation...


