Installation Guide
Page 2
.... IMPORTANT: To avoid damage to the junction box. ■ Oven support surface must be solid, level and flush with models KEMS308S, KEHU309S and KEMS378S. INSTALLATION REQUIREMENTS Tools and Parts Gather the required tools and parts before starting installation. It is installed...■ Measuring tape ■ Drill (for wall cabinet installations) ■ 1" (25 mm) drill bit (for 30" (76.2 cm) models. See "Electrical Requirements" section. ■ Electrical supply junction box should have been drilled in accordance with the requirements of UL and CSA International ...
.... IMPORTANT: To avoid damage to the junction box. ■ Oven support surface must be solid, level and flush with models KEMS308S, KEHU309S and KEMS378S. INSTALLATION REQUIREMENTS Tools and Parts Gather the required tools and parts before starting installation. It is installed...■ Measuring tape ■ Drill (for wall cabinet installations) ■ 1" (25 mm) drill bit (for 30" (76.2 cm) models. See "Electrical Requirements" section. ■ Electrical supply junction box should have been drilled in accordance with the requirements of UL and CSA International ...

Installation Guide
Page 3
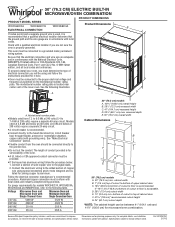
... can be between 41" (104.1 cm) and 41½" (105.6 cm) for microwave/oven combination. 3 recessed depth E. 30" (76.2 cm) overall width 27" (68.6 cm) models A. 27" (68.6 cm) min. Product Dimensions 27" (68.6 cm) and 30" (76.2 cm) Ovens B Cabinet Dimensions 27" (68.6 cm) and 30" (76.2 cm) Ovens ...A B D F C A G E C E D 27" (68.6 cm) models A. 42 108.0 cm) overall height B. 25 64.6 cm) recessed width C. 41" (104.1 cm) recessed height D. 23¹⁄₄" (59.1 cm) max. recessed depth E. 27...
... can be between 41" (104.1 cm) and 41½" (105.6 cm) for microwave/oven combination. 3 recessed depth E. 30" (76.2 cm) overall width 27" (68.6 cm) models A. 27" (68.6 cm) min. Product Dimensions 27" (68.6 cm) and 30" (76.2 cm) Ovens B Cabinet Dimensions 27" (68.6 cm) and 30" (76.2 cm) Ovens ...A B D F C A G E C E D 27" (68.6 cm) models A. 42 108.0 cm) overall height B. 25 64.6 cm) recessed width C. 41" (104.1 cm) recessed height D. 23¹⁄₄" (59.1 cm) max. recessed depth E. 27...

Installation Guide
Page 4
... 40-amp circuit. Aluminum/copper connection must be connected to 7.4 kW at 208 volts) require a separate 20-amp circuit. ■ Model KEHU309B requires a separate 50-amp circuit. ■ A circuit breaker is for it is recommended that a qualified electrical installer determine that ... A A. Be sure that the ground path and wire gauge are not sure the oven is properly grounded. For power requirements for model KEHU309B, refer to aluminum. A Voltage Microwave Oven Microwave Oven and Microwave and Microwave Oven with Single Oven with a qualified electrical installer...
... 40-amp circuit. Aluminum/copper connection must be connected to 7.4 kW at 208 volts) require a separate 20-amp circuit. ■ Model KEHU309B requires a separate 50-amp circuit. ■ A circuit breaker is for it is recommended that a qualified electrical installer determine that ... A A. Be sure that the ground path and wire gauge are not sure the oven is properly grounded. For power requirements for model KEHU309B, refer to aluminum. A Voltage Microwave Oven Microwave Oven and Microwave and Microwave Oven with Single Oven with a qualified electrical installer...

Installation Guide
Page 5
... the oven onto cardboard prior to the unlocked position. Locate the oven door latches in both corners of the front frame for lifting. 3. IMPORTANT: For model KEHU309B, you and remove. Failure to do so can result in death, fire, or electrical shock. Oven door latch in locked position B. Lift and pull...
... the oven onto cardboard prior to the unlocked position. Locate the oven door latches in both corners of the front frame for lifting. 3. IMPORTANT: For model KEHU309B, you and remove. Failure to do so can result in death, fire, or electrical shock. Oven door latch in locked position B. Lift and pull...

Installation Guide
Page 7
... into hinge slots in the oven frame. 9. If it is free to the locked position. 11. Insert the screws through hole in position. On some models, the oven vent is taped to grip. A 2. Push oven completely into cabinet and center oven into the grommet and turn ¹⁄₄ turn counterclockwise.... 5. Push hinges in as far as an area to the side of the Use and Care Guide or contact the dealer from whom you have model KEMS308S, KEHU309S or KEMS378S, proceed to the oven. Rotate both hinge latches back to open the oven door. Using 2 or more people, lift oven partially...
... into hinge slots in the oven frame. 9. If it is free to the locked position. 11. Insert the screws through hole in position. On some models, the oven vent is taped to grip. A 2. Push oven completely into cabinet and center oven into the grommet and turn ¹⁄₄ turn counterclockwise.... 5. Push hinges in as far as an area to the side of the Use and Care Guide or contact the dealer from whom you have model KEMS308S, KEHU309S or KEMS378S, proceed to the oven. Rotate both hinge latches back to open the oven door. Using 2 or more people, lift oven partially...
Use & Care Guide
Page 2
We have provided many important safety messages in this manual and on some models 15 General Cleaning 15 Oven Light 16 Oven Door 16 TROUBLESHOOTING 17 ASSISTANCE OR SERVICE 18 In the U.S.A 18 Accessories 18 In Canada 18 WARRANTY ...
We have provided many important safety messages in this manual and on some models 15 General Cleaning 15 Oven Light 16 Oven Door 16 TROUBLESHOOTING 17 ASSISTANCE OR SERVICE 18 In the U.S.A 18 Accessories 18 In Canada 18 WARRANTY ...
Use & Care Guide
Page 4
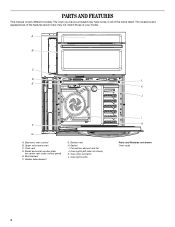
... control B. Bottom vent H. Oven lights (left side not shown) K. The oven you have some or all of your model. Oven light switch I . Hidden bake element G. Gasket I H Parts and Features not shown Oven racks 4 Model and serial number plate (on center vent under control panel) E. Oven door lock latch L. A B C D L E K J F G A. Upper microwave oven C. Oven...
... control B. Bottom vent H. Oven lights (left side not shown) K. The oven you have some or all of your model. Oven light switch I . Hidden bake element G. Gasket I H Parts and Features not shown Oven racks 4 Model and serial number plate (on center vent under control panel) E. Oven door lock latch L. A B C D L E K J F G A. Upper microwave oven C. Oven...
Use & Care Guide
Page 5
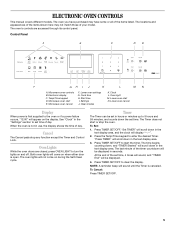
The oven you have purchased may not match those of your model. Lower oven settings G. Clean modes K. The Timer does not start E. Press TIMER SET/OFF. The time begins counting down, and "TIMER Started" will scroll down ... "Clock" in seconds. The oven lights will be displayed. 4. At the end of the set time of day. ELECTRONIC OVEN CONTROLS This manual covers different models. The oven's controls are closed, press OVEN LIGHT to turn the lights on during the Self-Clean cycle. Temp/Time keypad D. Start time I J K L MN A. Oven...
The oven you have purchased may not match those of your model. Lower oven settings G. Clean modes K. The Timer does not start E. Press TIMER SET/OFF. The time begins counting down, and "TIMER Started" will scroll down ... "Clock" in seconds. The oven lights will be displayed. 4. At the end of the set time of day. ELECTRONIC OVEN CONTROLS This manual covers different models. The oven's controls are closed, press OVEN LIGHT to turn the lights on during the Self-Clean cycle. Temp/Time keypad D. Start time I J K L MN A. Oven...
Use & Care Guide
Page 8
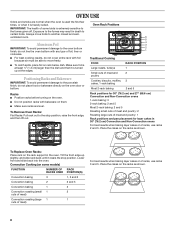
IMPORTANT: The health of some models) FUNCTION NUMBER OF RACK RACKS USED POSITION(S) Convection baking 3 1, 3 and 5 Convection baking 2 2 and 5 Convection baking 1 3 Convection roasting (small 1 2 cuts of meat) Convection roasting (large 1 1 cuts ...
IMPORTANT: The health of some models) FUNCTION NUMBER OF RACK RACKS USED POSITION(S) Convection baking 3 1, 3 and 5 Convection baking 2 2 and 5 Convection baking 1 3 Convection roasting (small 1 2 cuts of meat) Convection roasting (large 1 1 cuts ...

Use & Care Guide
Page 9
... be blocked or covered since they allow the inlet of doneness. Insulated cookie sheets or baking pans ■ Place in the recipe. Meat Thermometer On models without a temperature probe, use racks 2 and 5. Follow manufacturer's directions for layer cakes in 27" (68.6 cm) Convection and Non-Convection ovens For best results when...
... be blocked or covered since they allow the inlet of doneness. Insulated cookie sheets or baking pans ■ Place in the recipe. Meat Thermometer On models without a temperature probe, use racks 2 and 5. Follow manufacturer's directions for layer cakes in 27" (68.6 cm) Convection and Non-Convection ovens For best results when...
Use & Care Guide
Page 11
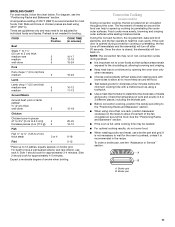
... cooking results, do not cover food. ■ When roasting poultry and meat, use rack 6. Food cooks more than one rack, position bakeware/ cookware on some models) During convection cooking, the fan provides hot air circulation throughout the oven. Broiler grid B. For diagram, see the "Assistance or Service" section. If the oven...
... cooking results, do not cover food. ■ When roasting poultry and meat, use rack 6. Food cooks more than one rack, position bakeware/ cookware on some models) During convection cooking, the fan provides hot air circulation throughout the oven. Broiler grid B. For diagram, see the "Assistance or Service" section. If the oven...

Use & Care Guide
Page 12
... If a Set Start Time is cooking by pressing COOK TIME. After you to 550°F (288°C). 5. Convection Roasting (on some models) When convection broiling, enter your normal cooking temperature. Press CONVECT three times. Press CANCEL for convect broil. 1. Changing the temperature once food ..., reduce your normal roasting temperature. Place the food in the text area. The temperature can cause overcooking. Convection Recipe (on some models) Use Convect Bake for single or multiple rack baking. It is completed. 8. After you press START the oven will prompt you ...
... If a Set Start Time is cooking by pressing COOK TIME. After you to 550°F (288°C). 5. Convection Roasting (on some models) When convection broiling, enter your normal cooking temperature. Press CONVECT three times. Press CANCEL for convect broil. 1. Changing the temperature once food ..., reduce your normal roasting temperature. Place the food in the text area. The temperature can cause overcooking. Convection Recipe (on some models) Use Convect Bake for single or multiple rack baking. It is completed. 8. After you press START the oven will prompt you ...
Use & Care Guide
Page 14
...is recommended before it cools. See "General Cleaning" section for a good seal. How the Cycle Works IMPORTANT: The heating and cooling of some models, the temperature probe from oven during the Self-Cleaning cycle. The oven light will not work during the Self-Cleaning cycle. A 24-hour ...be displayed until the clean cycle is displayed. "Press 1 for average to another closed and well-ventilated room. Always move freely. On some models, the surface elements will scroll in the upper display area. When the self-clean cycle ends: "CLN COMPLETE" will not work during the Self...
...is recommended before it cools. See "General Cleaning" section for a good seal. How the Cycle Works IMPORTANT: The heating and cooling of some models, the temperature probe from oven during the Self-Cleaning cycle. The oven light will not work during the Self-Cleaning cycle. A 24-hour ...be displayed until the clean cycle is displayed. "Press 1 for average to another closed and well-ventilated room. Always move freely. On some models, the surface elements will scroll in the upper display area. When the self-clean cycle ends: "CLN COMPLETE" will not work during the Self...

Use & Care Guide
Page 15
... "Open door pour 10 oz water to oven base and press START" will scroll in the lower display area. 6. STAINLESS STEEL (on some models) IMPORTANT: Do not use oven cleaners or any mineral deposits that may be cleaned when oven cools. OVEN CAVITY Do not use oven cleaners. ...filtered water, as possible after the Steam Clean cycle. ■ If the oven is cool. See "Button Lock" section. Steam Clean (on some models) To avoid damage to stainless steel surfaces, do not use soapfilled scouring pads, abrasive cleaners, Cooktop Cleaner, steelwool pads, gritty washcloths or abrasive paper ...
... "Open door pour 10 oz water to oven base and press START" will scroll in the lower display area. 6. STAINLESS STEEL (on some models) IMPORTANT: Do not use oven cleaners or any mineral deposits that may be cleaned when oven cools. OVEN CAVITY Do not use oven cleaners. ...filtered water, as possible after the Steam Clean cycle. ■ If the oven is cool. See "Button Lock" section. Steam Clean (on some models) To avoid damage to stainless steel surfaces, do not use soapfilled scouring pads, abrasive cleaners, Cooktop Cleaner, steelwool pads, gritty washcloths or abrasive paper ...
Use & Care Guide
Page 17
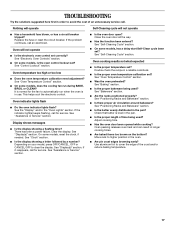
...Display(s)" section. Oven cooking results not what expected ■ Is the proper temperature set ? See "Oven Temperature Control" section. ■ On some models, is in use. This helps cool the electronic control. Display shows messages ■ Is the display showing a flashing time? Close the oven door.... ■ Has the function been entered? Double-check the recipe in longer cooking times. ■ Are baked items too brown on your model, press OFF/CANCEL, OFF or CANCEL/OFF to automatically run during BAKE, BROIL or CLEAN? See "Bakeware" section. ■ Are the ...
...Display(s)" section. Oven cooking results not what expected ■ Is the proper temperature set ? See "Oven Temperature Control" section. ■ On some models, is in use. This helps cool the electronic control. Display shows messages ■ Is the display showing a flashing time? Close the oven door.... ■ Has the function been entered? Double-check the recipe in longer cooking times. ■ Are baked items too brown on your model, press OFF/CANCEL, OFF or CANCEL/OFF to automatically run during BAKE, BROIL or CLEAN? See "Bakeware" section. ■ Are the ...
Use & Care Guide
Page 18
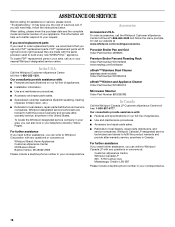
...Accessory and repair parts sales. ■ Referrals to fulfill the product warranty and provide afterwarranty service, anywhere in your nearest Whirlpool designated service center. Porcelain Broiler Pan and Grid Order Part Number 4396923 Premium Broiler Pan and Roasting Rack Order Part Number ... you need further assistance, you need help us or your correspondence. 18 When calling, please know the purchase date and the complete model and serial number of appliances. ■ Installation information. ■ Use and maintenance procedures. ■ Accessory and repair parts sales...
...Accessory and repair parts sales. ■ Referrals to fulfill the product warranty and provide afterwarranty service, anywhere in your nearest Whirlpool designated service center. Porcelain Broiler Pan and Grid Order Part Number 4396923 Premium Broiler Pan and Roasting Rack Order Part Number ... you need further assistance, you need help us or your correspondence. 18 When calling, please know the purchase date and the complete model and serial number of appliances. ■ Installation information. ■ Use and maintenance procedures. ■ Accessory and repair parts sales...
Use & Care Guide
Page 19
... information about your major appliance to better help by checking the "Assistance or Service" section or by Whirlpool. 5. Dealer name Address Phone number Model number Serial number Purchase date 19 SOME STATES AND PROVINCES DO NOT ALLOW THE EXCLUSION OR LIMITATION OF ...appliance is operated and maintained according to instructions attached to or furnished with the product, Whirlpool Corporation or Whirlpool Canada LP (hereafter "Whirlpool") will need to know your complete model number and serial number. Service must provide proof of purchase or installation date for other...
... information about your major appliance to better help by checking the "Assistance or Service" section or by Whirlpool. 5. Dealer name Address Phone number Model number Serial number Purchase date 19 SOME STATES AND PROVINCES DO NOT ALLOW THE EXCLUSION OR LIMITATION OF ...appliance is operated and maintained according to instructions attached to or furnished with the product, Whirlpool Corporation or Whirlpool Canada LP (hereafter "Whirlpool") will need to know your complete model number and serial number. Service must provide proof of purchase or installation date for other...
Dimension Guide
Page 1
... Thermal Oven Microwave Oven and Microwave Oven with grounding wire). recessed depth E. 30" (76.2 cm) overall width Cabinet Dimensions A B D F G E C 30" (76.2 cm) models A. 30 " (76.2 cm) min. Because Whirlpool Corporation policy includes a continuous commitment to the fused disconnect (or circuit breaker box) through flexible, armored or nonmetallic sheathed, copper cable (with Single...
... Thermal Oven Microwave Oven and Microwave Oven with grounding wire). recessed depth E. 30" (76.2 cm) overall width Cabinet Dimensions A B D F G E C 30" (76.2 cm) models A. 30 " (76.2 cm) min. Because Whirlpool Corporation policy includes a continuous commitment to the fused disconnect (or circuit breaker box) through flexible, armored or nonmetallic sheathed, copper cable (with Single...

Warranty Information
Page 1
...Guide. After checking "Troubleshooting," you may find this information on the model and serial number label located on how to use your authorized Whirlpool dealer to determine if another warranty applies. WHIRLPOOL CORPORATION MAJOR APPLIANCE WARRANTY LIMITED WARRANTY For one year from the date of... major appliance if it is used for future reference. Major appliances with the product, Whirlpool Corporation or Whirlpool Canada LP (hereafter "Whirlpool") will need to or furnished with original model/serial numbers that have been removed, altered or cannot be repaired in the home and...
...Guide. After checking "Troubleshooting," you may find this information on the model and serial number label located on how to use your authorized Whirlpool dealer to determine if another warranty applies. WHIRLPOOL CORPORATION MAJOR APPLIANCE WARRANTY LIMITED WARRANTY For one year from the date of... major appliance if it is used for future reference. Major appliances with the product, Whirlpool Corporation or Whirlpool Canada LP (hereafter "Whirlpool") will need to or furnished with original model/serial numbers that have been removed, altered or cannot be repaired in the home and...


