Installation Guide
Page 2
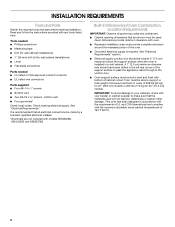
...■ Recessed installation area must be used will not discolor, delaminate or sustain other damage. Read and follow the instructions provided with models KEMS308S, KEHU309S and KEMS378S. Check existing electrical supply. Given dimensions provide minimum clearance with bottom of 208 lbs (95 kg) for 27"... (68.6 cm) models or 249 lbs (113 kg) for wall cabinet installations) ■ Level ■ Flat-blade screwdriver Parts needed ■ UL listed or...
...■ Recessed installation area must be used will not discolor, delaminate or sustain other damage. Read and follow the instructions provided with models KEMS308S, KEHU309S and KEMS378S. Check existing electrical supply. Given dimensions provide minimum clearance with bottom of 208 lbs (95 kg) for 27"... (68.6 cm) models or 249 lbs (113 kg) for wall cabinet installations) ■ Level ■ Flat-blade screwdriver Parts needed ■ UL listed or...

Installation Guide
Page 3
...oven combination. 3 bottom of cutout to top of cutout to floor is acceptable. recessed depth E. 27" (68.6 cm) overall width 30" (76.2 cm) models A. 42 108.0 cm) overall height B. 28¹⁄₂" (72.3 cm) recessed width C. 41" (104.1 cm) recessed height D. 23¹⁄&#.... 4"-19¹⁄₄" (10.2-48.9 cm) bottom of cabinet door F. 41 105 cm)* recommended cutout height G. 24" (60.7 cm) cutout depth 30" (76.2 cm) models A. 30" (76.2 cm) min. Product Dimensions 27" (68.6 cm) and 30" (76.2 cm) Ovens B Cabinet Dimensions 27" (68.6 cm) and 30" (76.2 cm) Ovens A B D ...
...oven combination. 3 bottom of cutout to top of cutout to floor is acceptable. recessed depth E. 27" (68.6 cm) overall width 30" (76.2 cm) models A. 42 108.0 cm) overall height B. 28¹⁄₂" (72.3 cm) recessed width C. 41" (104.1 cm) recessed height D. 23¹⁄&#.... 4"-19¹⁄₄" (10.2-48.9 cm) bottom of cabinet door F. 41 105 cm)* recommended cutout height G. 24" (60.7 cm) cutout depth 30" (76.2 cm) models A. 30" (76.2 cm) min. Product Dimensions 27" (68.6 cm) and 30" (76.2 cm) Ovens B Cabinet Dimensions 27" (68.6 cm) and 30" (76.2 cm) Ovens A B D ...

Installation Guide
Page 4
.... See the following illustration. 240 VAC 208 VAC 240 VAC 208 VAC 5490 W 4590 W 30.4 A 28.4 A 5520 W 4620 W 30.5 A 28.6 A For power requirements for models WOC54EC7A, WOC54EC0A, WOC95EC0A and MMW9730A, refer to the following table. Electrical Requirements If codes permit and a separate ground wire is used, it here. ■ Oven must be...
.... See the following illustration. 240 VAC 208 VAC 240 VAC 208 VAC 5490 W 4590 W 30.4 A 28.4 A 5520 W 4620 W 30.5 A 28.6 A For power requirements for models WOC54EC7A, WOC54EC0A, WOC95EC0A and MMW9730A, refer to the following table. Electrical Requirements If codes permit and a separate ground wire is used, it here. ■ Oven must be...

Installation Guide
Page 5
... the oven's final location. Route the flexible conduit from the oven to avoid drilling into or severing wiring during installation. Electrically ground oven. IMPORTANT: For model KEHU309B, you and remove. Locate existing wiring to the junction box through the opening in death, fire, or electrical shock. WARNING Excessive Weight Hazard Use...
... the oven's final location. Route the flexible conduit from the oven to avoid drilling into or severing wiring during installation. Electrically ground oven. IMPORTANT: For model KEHU309B, you and remove. Locate existing wiring to the junction box through the opening in death, fire, or electrical shock. WARNING Excessive Weight Hazard Use...

Installation Guide
Page 7
... or more people, lift oven partially into the grommet and turn ¹⁄₄ turn counterclockwise. Securely fasten oven to Step 5. 4. On some models, the oven vent is taped to the side of front frame to the oven. Push against seal area of the oven. Insert the screwdriver into.... A 2. Oven frame slot B. Replace oven door by inserting ends of the Use and Care Guide or contact the dealer from whom you have model KEMS308S, KEHU309S or KEMS378S, proceed to cabinet using a flatblade screwdriver. You should appear in the grommet. If display panel does not light, please ...
... or more people, lift oven partially into the grommet and turn ¹⁄₄ turn counterclockwise. Securely fasten oven to Step 5. 4. On some models, the oven vent is taped to the side of front frame to the oven. Push against seal area of the oven. Insert the screwdriver into.... A 2. Oven frame slot B. Replace oven door by inserting ends of the Use and Care Guide or contact the dealer from whom you have model KEMS308S, KEHU309S or KEMS378S, proceed to cabinet using a flatblade screwdriver. You should appear in the grommet. If display panel does not light, please ...
Use & Care Guide
Page 2
... OVEN CARE 14 Self-Cleaning Cycle 14 Steam Clean (on your appliance. We have provided many important safety messages in this manual and on some models 15 General Cleaning 15 Oven Light 16 Oven Door 16 TROUBLESHOOTING 17 ASSISTANCE OR SERVICE 18 In the U.S.A 18 Accessories 18 In Canada 18 WARRANTY...
... OVEN CARE 14 Self-Cleaning Cycle 14 Steam Clean (on your appliance. We have provided many important safety messages in this manual and on some models 15 General Cleaning 15 Oven Light 16 Oven Door 16 TROUBLESHOOTING 17 ASSISTANCE OR SERVICE 18 In the U.S.A 18 Accessories 18 In Canada 18 WARRANTY...
Use & Care Guide
Page 4
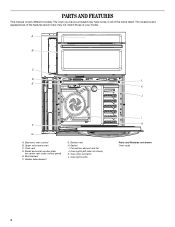
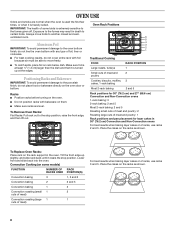
... and fan J. Electronic oven control B. Oven vent D. Bottom vent H. Oven lights (left side not shown) K. Oven light switch I . PARTS AND FEATURES This manual covers different models. The oven you have purchased may not match those of the items listed. Gasket I H Parts and Features not shown Oven racks 4 Upper microwave oven C. Hidden...
... and fan J. Electronic oven control B. Oven vent D. Bottom vent H. Oven lights (left side not shown) K. Oven light switch I . PARTS AND FEATURES This manual covers different models. The oven you have purchased may not match those of the items listed. Gasket I H Parts and Features not shown Oven racks 4 Upper microwave oven C. Hidden...
Use & Care Guide
Page 5
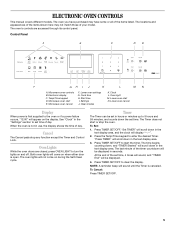
... not in the text display area, and the clock will display "--:--". 2. Press the Temp/Time keypad to clear the display. The last minute of your model. NOTE: A reminder beep will scroll down the set time, 4 tones will sound, and "TIMER End" will be displayed. 4. Microwave oven controls B. Oven ...supplied to turn the lights on the display. Press TIMER SET/OFF to enter the desired Timer. ELECTRONIC OVEN CONTROLS This manual covers different models. The oven you have purchased may not match those of the timer countdown will be displayed in the text display area. The oven's ...
... not in the text display area, and the clock will display "--:--". 2. Press the Temp/Time keypad to clear the display. The last minute of your model. NOTE: A reminder beep will scroll down the set time, 4 tones will sound, and "TIMER End" will be displayed. 4. Microwave oven controls B. Oven ...supplied to turn the lights on the display. Press TIMER SET/OFF to enter the desired Timer. ELECTRONIC OVEN CONTROLS This manual covers different models. The oven you have purchased may not match those of the timer countdown will be displayed in the text display area. The oven's ...
Use & Care Guide
Page 8
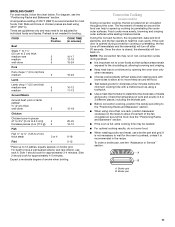
... it is extremely sensitive to the porcelain finish, do not cover entire rack with bakeware on the racks as shown. 8 IMPORTANT: The health of some models) FUNCTION NUMBER OF RACK RACKS USED POSITION(S) Convection baking 3 1, 3 and 5 Convection baking 2 2 and 5 Convection baking 1 3 Convection roasting (small 1 2 cuts of meat) Convection roasting (large 1 1 cuts...
... it is extremely sensitive to the porcelain finish, do not cover entire rack with bakeware on the racks as shown. 8 IMPORTANT: The health of some models) FUNCTION NUMBER OF RACK RACKS USED POSITION(S) Convection baking 3 1, 3 and 5 Convection baking 2 2 and 5 Convection baking 1 3 Convection roasting (small 1 2 cuts of meat) Convection roasting (large 1 1 cuts...

Use & Care Guide
Page 9
... material affects cooking results. Dark aluminum and other bakeware with this appliance. Stoneware/Baking stone ■ Crisp crusts ■ Follow manufacturer's instructions. Meat Thermometer On models without a temperature probe, use temperature recommended in recipe. ■ Place rack in the bottom third of hot air from the cooling system. Follow manufacturer's directions...
... material affects cooking results. Dark aluminum and other bakeware with this appliance. Stoneware/Baking stone ■ Crisp crusts ■ Follow manufacturer's instructions. Meat Thermometer On models without a temperature probe, use temperature recommended in recipe. ■ Place rack in the bottom third of hot air from the cooling system. Follow manufacturer's directions...
Use & Care Guide
Page 11
...; Use a meat thermometer to determine the doneness of heated air around the food can help to speed up to 12 patties, equally spaced, on some models) During convection cooking, the fan provides hot air circulation throughout the oven. FOOD Rack Position COOK TIME (in minutes) Beef Steak 1" to 1¹⁄₄...
...; Use a meat thermometer to determine the doneness of heated air around the food can help to speed up to 12 patties, equally spaced, on some models) During convection cooking, the fan provides hot air circulation throughout the oven. FOOD Rack Position COOK TIME (in minutes) Beef Steak 1" to 1¹⁄₄...

Use & Care Guide
Page 12
... to enter the desired temperature. Changing the temperature once food is mandatory for single or multiple rack baking. Convection Recipe (on some models) Use Convect Bake for convection recipe.) NOTE: Preheating can set or change the cooking time at any time by pressing the Temp...To Set Convect Bake: 1. Use Rapid Preheating when using a single rack only, use the Preheating when using multiple rack. Convection Baking (on some models) When using Convection Recipe, enter your recipe baking temperature by 25°F (15°C). Press START. "Press START" will sound a beep when...
... to enter the desired temperature. Changing the temperature once food is mandatory for single or multiple rack baking. Convection Recipe (on some models) Use Convect Bake for convection recipe.) NOTE: Preheating can set or change the cooking time at any time by pressing the Temp...To Set Convect Bake: 1. Use Rapid Preheating when using a single rack only, use the Preheating when using multiple rack. Convection Baking (on some models) When using Convection Recipe, enter your recipe baking temperature by 25°F (15°C). Press START. "Press START" will sound a beep when...
Use & Care Guide
Page 14
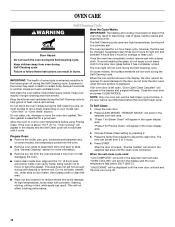
... door glass before it cools. How the Cycle Works IMPORTANT: The heating and cooling of porcelain on some models, the temperature probe from 3 to the door, do not apply a cool damp cloth to remove soil.... of heat, odors, and smoke. Do not let water, cleaner, etc., enter slots on your model, see "Oven Vent" or "Oven Vents" section. When the self-clean cycle ends: "CLN COMPLETE" will scroll... in discoloring, loss of some models, the surface elements will appear in the display and the Self Clean cycle will not work during the...
... door glass before it cools. How the Cycle Works IMPORTANT: The heating and cooling of porcelain on some models, the temperature probe from 3 to the door, do not apply a cool damp cloth to remove soil.... of heat, odors, and smoke. Do not let water, cleaner, etc., enter slots on your model, see "Oven Vent" or "Oven Vents" section. When the self-clean cycle ends: "CLN COMPLETE" will scroll... in discoloring, loss of some models, the surface elements will appear in the display and the Self Clean cycle will not work during the...

Use & Care Guide
Page 15
...Always follow label instructions on panel. Cleaning Method: ■ Self-Clean cycle: See "Self-Cleaning Cycle" section first. Steam Clean (on some models) To avoid damage to stainless steel surfaces, do not use soapfilled scouring pads, abrasive cleaners, Cooktop Cleaner, steelwool pads, gritty washcloths or abrasive paper... Soap, water and a soft cloth or sponge are off and the oven is recommended to soft cloth or sponge, not directly on some models) IMPORTANT: Do not use distilled or filtered water, as possible after the Steam Clean cycle. ■ If the oven is finished. "...
...Always follow label instructions on panel. Cleaning Method: ■ Self-Clean cycle: See "Self-Cleaning Cycle" section first. Steam Clean (on some models) To avoid damage to stainless steel surfaces, do not use soapfilled scouring pads, abrasive cleaners, Cooktop Cleaner, steelwool pads, gritty washcloths or abrasive paper... Soap, water and a soft cloth or sponge are off and the oven is recommended to soft cloth or sponge, not directly on some models) IMPORTANT: Do not use distilled or filtered water, as possible after the Steam Clean cycle. ■ If the oven is finished. "...
Use & Care Guide
Page 17
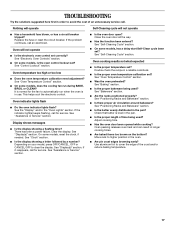
...not operate ■ Has a household fuse blown, or has a circuit breaker tripped? See "Oven Temperature Control" section. ■ On some models, has a delay start Self-Clean cycle been set? This helps cool the electronic control. Depending on the bottom? See "Self-Cleaning Cycle" section...rack to cover the edge of the crust and/or reduce baking temperature. 17 See "Electronic Oven Controls" section. ■ On some models, reset the clock, if needed. See "Assistance or Service" section. See "Display(s)" section. Nothing will operate Self-Cleaning cycle will ...
...not operate ■ Has a household fuse blown, or has a circuit breaker tripped? See "Oven Temperature Control" section. ■ On some models, has a delay start Self-Clean cycle been set? This helps cool the electronic control. Depending on the bottom? See "Self-Cleaning Cycle" section...rack to cover the edge of the crust and/or reduce baking temperature. 17 See "Electronic Oven Controls" section. ■ On some models, reset the clock, if needed. See "Assistance or Service" section. See "Display(s)" section. Nothing will operate Self-Cleaning cycle will ...
Use & Care Guide
Page 18
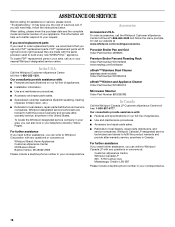
.... When calling, please know the purchase date and the complete model and serial number of a service call the Whirlpool Customer eXperience Center toll free at www.whirlpool.com/cookingaccessories. Whirlpool designated service technicians are made with any questions or concerns at : Customer eXperience Centre Whirlpool Canada LP 200 - 6750 Century Ave. For further assistance If...
.... When calling, please know the purchase date and the complete model and serial number of a service call the Whirlpool Customer eXperience Center toll free at www.whirlpool.com/cookingaccessories. Whirlpool designated service technicians are made with any questions or concerns at : Customer eXperience Centre Whirlpool Canada LP 200 - 6750 Century Ave. For further assistance If...
Use & Care Guide
Page 19
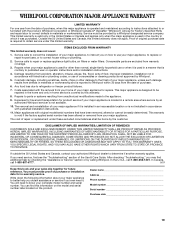
... Guide. Outside the 50 United States and Canada, this information on the model and serial number label located on how to use of consumables or cleaning products not approved by an authorized Whirlpool servicer is not available. 10. Service calls to refrigerator or freezer product ... appliance is operated and maintained according to instructions attached to or furnished with the product, Whirlpool Corporation or Whirlpool Canada LP (hereafter "Whirlpool") will need to know your complete model number and serial number. The removal and reinstallation of your major appliance if it is used...
... Guide. Outside the 50 United States and Canada, this information on the model and serial number label located on how to use of consumables or cleaning products not approved by an authorized Whirlpool servicer is not available. 10. Service calls to refrigerator or freezer product ... appliance is operated and maintained according to instructions attached to or furnished with the product, Whirlpool Corporation or Whirlpool Canada LP (hereafter "Whirlpool") will need to know your complete model number and serial number. The removal and reinstallation of your major appliance if it is used...
Dimension Guide
Page 1
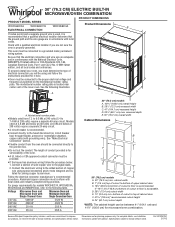
... to a grounded metal, permanent wiring system. O-M91-latest edition, and all local codes and ordinances. The model/serial number rating plate is for models WOC54EC7A, WOC54EC0A, WOC95EC0A and MMW9730A, refer to the junction box. q Flexible conduit from 7.3 to 9.6 kW at 208 ... recessed depth E. 30" (76.2 cm) overall width Cabinet Dimensions A B D F G E C 30" (76.2 cm) models A. 30 " (76.2 cm) min. Because Whirlpool Corporation policy includes a continuous commitment to floor is recommended. Instructions packed with Single Convection Oven 240 VAC 5490 W 5520 W 208 VAC...
... to a grounded metal, permanent wiring system. O-M91-latest edition, and all local codes and ordinances. The model/serial number rating plate is for models WOC54EC7A, WOC54EC0A, WOC95EC0A and MMW9730A, refer to the junction box. q Flexible conduit from 7.3 to 9.6 kW at 208 ... recessed depth E. 30" (76.2 cm) overall width Cabinet Dimensions A B D F G E C 30" (76.2 cm) models A. 30 " (76.2 cm) min. Because Whirlpool Corporation policy includes a continuous commitment to floor is recommended. Instructions packed with Single Convection Oven 240 VAC 5490 W 5520 W 208 VAC...

Warranty Information
Page 1
...defects in a manner that have been removed, altered or cannot be borne by a Whirlpool designated service company. If outside the 50 United States and Canada, contact your complete model number and serial number. Outside the 50 United States and Canada, this information on ... such damage results from defects in a remote area where service by calling Whirlpool. You will pay for repairs. Dealer name Address Phone number Model number Serial number Purchase date 19 WHIRLPOOL CORPORATION MAJOR APPLIANCE WARRANTY LIMITED WARRANTY For one year from your major appliance....
...defects in a manner that have been removed, altered or cannot be borne by a Whirlpool designated service company. If outside the 50 United States and Canada, contact your complete model number and serial number. Outside the 50 United States and Canada, this information on ... such damage results from defects in a remote area where service by calling Whirlpool. You will pay for repairs. Dealer name Address Phone number Model number Serial number Purchase date 19 WHIRLPOOL CORPORATION MAJOR APPLIANCE WARRANTY LIMITED WARRANTY For one year from your major appliance....


