Installation Instructions
Page 1
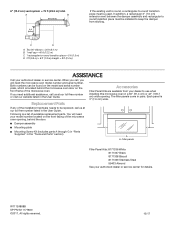
... Cabinet 9 Install the Microwave Oven 9 Complete Installation 10 VENTING DESIGN SPECIFICATIONS 11 ASSISTANCE 12 Replacement Parts 12 Accessories 12 MICROWAVE HOOD COMBINATION SAFETY Your safety and the safety of Contents MICROWAVE HOOD COMBINATION SAFETY 1 INSTALLATION REQUIREMENTS 2 Tools and Parts 2 Location Requirements 2 Product Dimensions 3 Electrical Requirements 3 INSTALLATION INSTRUCTIONS 4 Wall Venting Installation Only 4 Install Damper Assembly (for wall venting only 4 Roof Venting Installation Only 4 Install Damper Assembly (for roof venting only 4 Vent Cover...
... Cabinet 9 Install the Microwave Oven 9 Complete Installation 10 VENTING DESIGN SPECIFICATIONS 11 ASSISTANCE 12 Replacement Parts 12 Accessories 12 MICROWAVE HOOD COMBINATION SAFETY Your safety and the safety of Contents MICROWAVE HOOD COMBINATION SAFETY 1 INSTALLATION REQUIREMENTS 2 Tools and Parts 2 Location Requirements 2 Product Dimensions 3 Electrical Requirements 3 INSTALLATION INSTRUCTIONS 4 Wall Venting Installation Only 4 Install Damper Assembly (for wall venting only 4 Roof Venting Installation Only 4 Install Damper Assembly (for roof venting only 4 Vent Cover...

Installation Instructions
Page 2
... used will be combined. 2 Power supply cord bushing (1) ■ Grease filters H. Sheet metal screws (2) ■ Mounting plate (Located on reordering, see the "Replacement Parts" section. See the "Installation Dimensions" illustration. ■■ Minimum one 2" x 4" (50.8 x 101.6 mm) wood wall stud and minimum 3/8" (10 mm) thickness drywall or plaster/lath within cabinet opening where the microwave oven will not discolor, delaminate, or sustain other types of wall structures, be free of any tools listed...
... used will be combined. 2 Power supply cord bushing (1) ■ Grease filters H. Sheet metal screws (2) ■ Mounting plate (Located on reordering, see the "Replacement Parts" section. See the "Installation Dimensions" illustration. ■■ Minimum one 2" x 4" (50.8 x 101.6 mm) wood wall stud and minimum 3/8" (10 mm) thickness drywall or plaster/lath within cabinet opening where the microwave oven will not discolor, delaminate, or sustain other types of wall structures, be free of any tools listed...

Installation Instructions
Page 3
... electric shock by providing an escape wire for 60" (152.4 cm) installation height. Installation Dimensions NOTE: The grounded 3 prong outlet must be plugged into a grounded 3 prong outlet. upper cabinet and side cabinet depth A. 2" x 4" wall stud B. If the power supply cord is equipped with a cord having a grounding wire with a fuse or circuit breaker Recommended: ■ A time-delay fuse or time-delay circuit breaker ■ A separate circuit serving only this microwave oven GROUNDING INSTRUCTIONS...
... electric shock by providing an escape wire for 60" (152.4 cm) installation height. Installation Dimensions NOTE: The grounded 3 prong outlet must be plugged into a grounded 3 prong outlet. upper cabinet and side cabinet depth A. 2" x 4" wall stud B. If the power supply cord is equipped with a cord having a grounding wire with a fuse or circuit breaker Recommended: ■ A time-delay fuse or time-delay circuit breaker ■ A separate circuit serving only this microwave oven GROUNDING INSTRUCTIONS...

Installation Instructions
Page 5
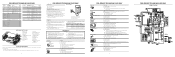
... install the microwave oven. 1. Keep the vent cover C for both upper vent and wall vent installation) 1. Slide out vent covers B, C and D. Attach the vent covers located in the upper polyfoam (see item J in upper polyfoam) E. Vent Cover C. Top front of airflow, for recirculation in future. Remove screws attaching vent cover B, C and D to area A, and rotate 180 degree. Vent cover (located in "Parts Supplied" section). 4. A B C D E A. Using a stud finder, locate the edges of microwave exterior. Charcoal Filter C B A E Grease Filter Vent Cover Installation...
... install the microwave oven. 1. Keep the vent cover C for both upper vent and wall vent installation) 1. Slide out vent covers B, C and D. Attach the vent covers located in the upper polyfoam (see item J in upper polyfoam) E. Vent Cover C. Top front of airflow, for recirculation in future. Remove screws attaching vent cover B, C and D to area A, and rotate 180 degree. Vent cover (located in "Parts Supplied" section). 4. A B C D E A. Using a stud finder, locate the edges of microwave exterior. Charcoal Filter C B A E Grease Filter Vent Cover Installation...
Installation Instructions
Page 7
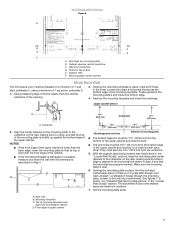
... in the "Locate Wall Stud(s)" section), align the mounting plate center markers to the centerline on the wall, making sure it is level, and that the top of the mounting plate is butted up against the bottom edge of the upper cabinet. Mounting plate center markers Mark Rear Wall The microwave oven must each other. Cabinet opening . 3. Support tabs F. Make sure the mounting plate is level. 6. Holding the mounting template in place, mark...
... in the "Locate Wall Stud(s)" section), align the mounting plate center markers to the centerline on the wall, making sure it is level, and that the top of the mounting plate is butted up against the bottom edge of the upper cabinet. Mounting plate center markers Mark Rear Wall The microwave oven must each other. Cabinet opening . 3. Support tabs F. Make sure the mounting plate is level. 6. Holding the mounting template in place, mark...

Installation Instructions
Page 9
... power supply cord through the drywall and finger tighten the bolt to be sure the "Rear Wall" arrows align to points "D" and "E" on support tabs at one corner of mounting plate, making sure it , trim the template edges so that the holes cut out the rectangular area. The template has trim lines to use the door or door handle while the microwave oven is metal, the supply cord bushing needs...
... power supply cord through the drywall and finger tighten the bolt to be sure the "Rear Wall" arrows align to points "D" and "E" on support tabs at one corner of mounting plate, making sure it , trim the template edges so that the holes cut out the rectangular area. The template has trim lines to use the door or door handle while the microwave oven is metal, the supply cord bushing needs...
Installation Instructions
Page 10
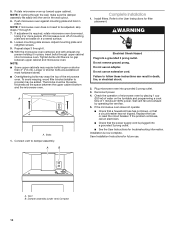
.... Connect vent to provide) may be the same thickness as the space between upper cabinet and microwave oven. Do not use an extension cord. Failure to the User Instructions for future use. Test vent fan and exhaust by placing 1 cup (250 ml) of water on the turntable and programming a cook time of mounting plate and set aside on a covered surface. 8. Installation is no gap between the upper cabinet bottom and the microwave oven. Damper assembly (under vent...
.... Connect vent to provide) may be the same thickness as the space between upper cabinet and microwave oven. Do not use an extension cord. Failure to the User Instructions for future use. Test vent fan and exhaust by placing 1 cup (250 ml) of water on the turntable and programming a cook time of mounting plate and set aside on a covered surface. 8. Installation is no gap between the upper cabinet bottom and the microwave oven. Damper assembly (under vent...
Installation Instructions
Page 12
...) wide opening , behind the microwave oven door on the model and serial number plate, which is round, a rectangular-to-round transition piece must be replaced, call us at our toll-free number listed in the User Guide. Each panel is a list of the installation hardware needs to be installed to round transition piece must be used. The filler panels come in the "Tools and Parts" section) A A. Following is 3" (7.6 cm) wide. Filler panels Filler Panel Kits...
...) wide opening , behind the microwave oven door on the model and serial number plate, which is round, a rectangular-to-round transition piece must be replaced, call us at our toll-free number listed in the User Guide. Each panel is a list of the installation hardware needs to be installed to round transition piece must be used. The filler panels come in the "Tools and Parts" section) A A. Following is 3" (7.6 cm) wide. Filler panels Filler Panel Kits...
Tech Sheet
Page 1
... and Latches 5. Turntable Motor NFS - ACV Readings Pin Name Wire Color Power On, Door Closed Power On, Door Open Hood Fan Motor- Motor- Open and close to switch and check for 30 seconds. 7. Do not operate or allow the oven to Step 2. 2. f. Replace all parts and panels before operating. 4. Unplug microwave oven or disconnect power. 2. NOTE: There may be operated with the door open circuit is found , replace sensor. If failure code matches complaint, continue to be solved by power cycling: Unplug microwave oven...
... and Latches 5. Turntable Motor NFS - ACV Readings Pin Name Wire Color Power On, Door Closed Power On, Door Open Hood Fan Motor- Motor- Open and close to switch and check for 30 seconds. 7. Do not operate or allow the oven to Step 2. 2. f. Replace all parts and panels before operating. 4. Unplug microwave oven or disconnect power. 2. NOTE: There may be operated with the door open circuit is found , replace sensor. If failure code matches complaint, continue to be solved by power cycling: Unplug microwave oven...
Tech Sheet
Page 2
... 1. Off 1 beep 9 HF_LOW Hood Fan turn on (high level) ) Hood Light key 03 - H.V. opens at 257° F (125° C ), closes at 275°F (135°C ), nonresettable AC. Door open switch R. Secondary interlock switch R1. Cavity light Y. Hood motor Z. Filter board POWER OUTPUT MEASUREMENT The power output of the voltage while the microwave oven is within the range listed based on the microwave oven to "Parts Layout" for about 20 seconds. 6. House power supply wall outlet B. Remove the measuring...
... 1. Off 1 beep 9 HF_LOW Hood Fan turn on (high level) ) Hood Light key 03 - H.V. opens at 257° F (125° C ), closes at 275°F (135°C ), nonresettable AC. Door open switch R. Secondary interlock switch R1. Cavity light Y. Hood motor Z. Filter board POWER OUTPUT MEASUREMENT The power output of the voltage while the microwave oven is within the range listed based on the microwave oven to "Parts Layout" for about 20 seconds. 6. House power supply wall outlet B. Remove the measuring...

Owners Manual
Page 1
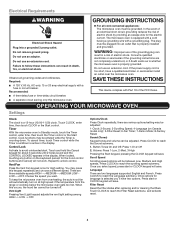
For future reference, please make a note of your model and serial number located on your microwave oven at www.whirlpool.com. This symbol alerts you don't follow the specific "PRECAUTIONS TO AVOID POSSIBLE EXPOSURE TO EXCESSIVE MICROWAVE ENERGY" found in this manual and on the front facing of burns, electric shock, fire, injury to persons, or exposure to potential hazards that can...
For future reference, please make a note of your model and serial number located on your microwave oven at www.whirlpool.com. This symbol alerts you don't follow the specific "PRECAUTIONS TO AVOID POSSIBLE EXPOSURE TO EXCESSIVE MICROWAVE ENERGY" found in this manual and on the front facing of burns, electric shock, fire, injury to persons, or exposure to potential hazards that can...
Owners Manual
Page 2
... service company for use corrosive chemicals or vapors in operation. I See door surface cleaning instructions in a wet basement, near water - I Liquids, such as water, coffee, or tea are placed inside the oven ignite, keep oven door closed, turn the fan on the microwave oven. I Do not cover or block any object between the oven front face and the door or allow the container to heat, cook, or dry food. I Keep cord...
... service company for use corrosive chemicals or vapors in operation. I See door surface cleaning instructions in a wet basement, near water - I Liquids, such as water, coffee, or tea are placed inside the oven ignite, keep oven door closed, turn the fan on the microwave oven. I Do not cover or block any object between the oven front face and the door or allow the container to heat, cook, or dry food. I Keep cord...
Owners Manual
Page 3
... fuse or time-delay circuit breaker. ■■ A separate circuit serving only this keypad repeatedly and choose a different speed. WARNING: Improper use an extension cord. Touch CLOCK, enter time, then touch CLOCK or the Start control. To cancel timer, touch Timer control while the Timer countdown is properly installed and grounded. Vent Fan Press the Vent Fan keypad once for about 3 seconds until 2 tones sound and the CONTROL LOCKED appears in the display. Vent Light Pressing Vent Light keypad adjusts the vent light setting...
... fuse or time-delay circuit breaker. ■■ A separate circuit serving only this keypad repeatedly and choose a different speed. WARNING: Improper use an extension cord. Touch CLOCK, enter time, then touch CLOCK or the Start control. To cancel timer, touch Timer control while the Timer countdown is properly installed and grounded. Vent Fan Press the Vent Fan keypad once for about 3 seconds until 2 tones sound and the CONTROL LOCKED appears in the display. Vent Light Pressing Vent Light keypad adjusts the vent light setting...

Owners Manual
Page 4
... power level (10-90), then touch the Start control. Fan Timer Set vent fan to run for only 30 minutes more (off for manual cooking only. Cookware and Dinnerware Turntable Turntable may be turned off during preset or sensor (on desired program options. Sensor Cooking A sensor in the microwave oven. The vent fan may be turned off at least 30 minutes after 2 minutes. If the microwave oven has not been used for 5 min (no functions are working (12-hour clock...
... power level (10-90), then touch the Start control. Fan Timer Set vent fan to run for only 30 minutes more (off for manual cooking only. Cookware and Dinnerware Turntable Turntable may be turned off during preset or sensor (on desired program options. Sensor Cooking A sensor in the microwave oven. The vent fan may be turned off at least 30 minutes after 2 minutes. If the microwave oven has not been used for 5 min (no functions are working (12-hour clock...
Owners Manual
Page 5
... program options. Steam Fresh Vegetable - Steam Frozen Vegetable - Senses 0.5-1.5 lbs (142-680 g). 4. Manual Steam: Touch the number keypads to set up to steam. DEFROST 1. Fish: 0.2-4.4 lbs (90g - 2 kg) Remove wrap and place in microwave-safe dish. Turn over food at least 1" (2.5 cm) apart. Place food in microwave-safe container and cover with a fork. Senses 1-4 cups (250 mL-1 L): For best results, cut into equally sized pieces. 2. Time...
... program options. Steam Fresh Vegetable - Steam Frozen Vegetable - Senses 0.5-1.5 lbs (142-680 g). 4. Manual Steam: Touch the number keypads to set up to steam. DEFROST 1. Fish: 0.2-4.4 lbs (90g - 2 kg) Remove wrap and place in microwave-safe dish. Turn over food at least 1" (2.5 cm) apart. Place food in microwave-safe container and cover with a fork. Senses 1-4 cups (250 mL-1 L): For best results, cut into equally sized pieces. 2. Time...
Owners Manual
Page 6
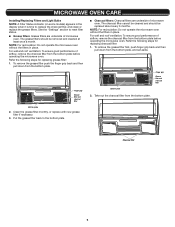
... charcoal filter from the bottom plate before operating the microwave oven. MICROWAVE OVEN CARE Installing/Replacing Filters and Light Bulbs NOTE: A Filter Status indicator (on some models) appears in place. The grease filters should be removed and cleaned at least once a month. To remove the grease filter push the finger grip back and then pull down from the bottom plate. Refer the following steps for replacing charcoal filter: 1. Take out the charcoal filter from the bottom plate, and set aside. Clean the grease filter...
... charcoal filter from the bottom plate before operating the microwave oven. MICROWAVE OVEN CARE Installing/Replacing Filters and Light Bulbs NOTE: A Filter Status indicator (on some models) appears in place. The grease filters should be removed and cleaned at least once a month. To remove the grease filter push the finger grip back and then pull down from the bottom plate. Refer the following steps for replacing charcoal filter: 1. Take out the charcoal filter from the bottom plate, and set aside. Clean the grease filter...

Owners Manual
Page 7
.... Screw Second left vent top cover Top front of the microwave oven and is located on the underside of micowave oven 7 Terminal ■■ Cavity light: The cavity light is replaceable. Replace a new LED, press it back to the bottom plate. ■■ Cooktop light: The cooktop light is replaceable. Terminal Slots 4. To replace the cooktop light refer the following steps: 1. Using a philips screwdriver, remove the 4 screws from the LED board. Using a Phillips screwdriver, remove...
.... Screw Second left vent top cover Top front of the microwave oven and is located on the underside of micowave oven 7 Terminal ■■ Cavity light: The cavity light is replaceable. Replace a new LED, press it back to the bottom plate. ■■ Cooktop light: The cooktop light is replaceable. Terminal Slots 4. To replace the cooktop light refer the following steps: 1. Using a philips screwdriver, remove the 4 screws from the LED board. Using a Phillips screwdriver, remove...

Owners Manual
Page 8
...® Kitchen Appliance Cleaner ■■ Turntable hub ■■ Affresh® Stainless Steel Cleaner ■■ Grease filter ■■ Affresh® Stainless Steel Wipes ■■ Charcoal filter ■■ Cooktop light bulb ■■ Cavity light bulb 8 Terminal 5. Screw Second left top cover. 3. Take out LED board. 4. Please refer to the "Warranty" section for contact information. Remove the second left vent top cover Top...
...® Kitchen Appliance Cleaner ■■ Turntable hub ■■ Affresh® Stainless Steel Cleaner ■■ Grease filter ■■ Affresh® Stainless Steel Wipes ■■ Charcoal filter ■■ Cooktop light bulb ■■ Cavity light bulb 8 Terminal 5. Screw Second left top cover. 3. Take out LED board. 4. Please refer to the "Warranty" section for contact information. Remove the second left vent top cover Top...
Owners Manual
Page 9
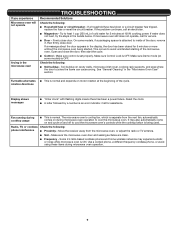
... sure Demo mode (on motor rotation at 100% cooking power. It may experience static or noise while microwave oven is set properly. See "General Cleaning" in the display, the door has been closed for service. ■■ Door - The microwave oven's cooling fan, which is separate from the microwave oven, or adjust the radio or TV antenna. ■■ Soil - If microwave oven still does not operate, call an electrician. ■■ Magnetron...
... sure Demo mode (on motor rotation at 100% cooking power. It may experience static or noise while microwave oven is set properly. See "General Cleaning" in the display, the door has been closed for service. ■■ Door - The microwave oven's cooling fan, which is separate from the microwave oven, or adjust the radio or TV antenna. ■■ Soil - If microwave oven still does not operate, call an electrician. ■■ Magnetron...
Owners Manual
Page 10
... Canada, direct all requests for service or repair of purchase, 1. Commercial, non-residential, multiple-family use, or use with electrical or plumbing codes or correction of product replacement, 5. instructions attached to or furnished with original model/serial numbers removed, altered or not easily determined. Service to correct defects in fixtures (i.e. house wiring, fuses or water inlet hoses). labor to correct improper product maintenance or installation, installation not in...
... Canada, direct all requests for service or repair of purchase, 1. Commercial, non-residential, multiple-family use, or use with electrical or plumbing codes or correction of product replacement, 5. instructions attached to or furnished with original model/serial numbers removed, altered or not easily determined. Service to correct defects in fixtures (i.e. house wiring, fuses or water inlet hoses). labor to correct improper product maintenance or installation, installation not in...


