Owners Manual
Page 1
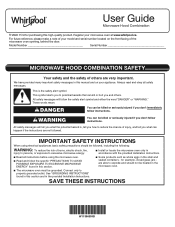
...the word "DANGER" or "WARNING." I Some products such as whole eggs in accordance with the provided Installation Instructions. SAVE THESE INSTRUCTIONS W11396509B All safety messages will follow the specific "PRECAUTIONS TO AVOID POSSIBLE EXPOSURE TO...including the following: WARNING: To reduce the risk of others . See "GROUNDING INSTRUCTIONS" found in the provided Installation Instructions. Model Number Serial Number MICROWAVE HOOD COMBINATION SAFETY Your safety and the safety of burns, electric shock, fire...grounded outlet. Register your microwave oven at www.whirlpool.ca.
...the word "DANGER" or "WARNING." I Some products such as whole eggs in accordance with the provided Installation Instructions. SAVE THESE INSTRUCTIONS W11396509B All safety messages will follow the specific "PRECAUTIONS TO AVOID POSSIBLE EXPOSURE TO...including the following: WARNING: To reduce the risk of others . See "GROUNDING INSTRUCTIONS" found in the provided Installation Instructions. Model Number Serial Number MICROWAVE HOOD COMBINATION SAFETY Your safety and the safety of burns, electric shock, fire...grounded outlet. Register your microwave oven at www.whirlpool.ca.
Owners Manual
Page 3
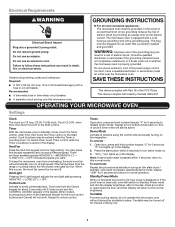
Electrical Requirements WARNING GROUNDING INSTRUCTIONS Electrical Shock Hazard Plug into an outlet that is properly installed and grounded. Do not remove ground prong. Failure to whether the microwave oven is equipped with a cord having the turntable in the display. Required... deactivate demo mode, display "dOff" for manual cooking only. 3 There are working (12 hour clock is too short, have a qualified electrician or serviceman install an outlet near the microwave oven. When this occurs, the hood fan cannot be turned off . Turntable For best cooking results, do not operate the...
Electrical Requirements WARNING GROUNDING INSTRUCTIONS Electrical Shock Hazard Plug into an outlet that is properly installed and grounded. Do not remove ground prong. Failure to whether the microwave oven is equipped with a cord having the turntable in the display. Required... deactivate demo mode, display "dOff" for manual cooking only. 3 There are working (12 hour clock is too short, have a qualified electrician or serviceman install an outlet near the microwave oven. When this occurs, the hood fan cannot be turned off . Turntable For best cooking results, do not operate the...
Owners Manual
Page 4
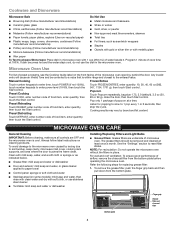
... filter 4 If dish becomes hot and the water stays cool, do not use stainless steel cleaner ■■ Turntable: mild soap and water or dishwasher Installing/Replacing Filters and Light Bulbs ■■ Grease filters: Grease filters are OFF and the microwave oven is within range and closest to 1 pop every...
... filter 4 If dish becomes hot and the water stays cool, do not use stainless steel cleaner ■■ Turntable: mild soap and water or dishwasher Installing/Replacing Filters and Light Bulbs ■■ Grease filters: Grease filters are OFF and the microwave oven is within range and closest to 1 pop every...
Owners Manual
Page 8
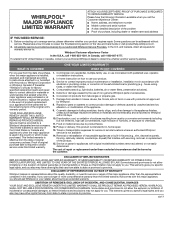
... gas or propane gas. 7. your appliance will pay for 8. WARRANTY SHALL BE PRODUCT 10. Service must be borne by Whirlpool. Food or medicine loss due to correct improper product maintenance or installation, installation not in 12. Pickup or delivery. is used in the country in this major appliance was purchased. DISCLAIMER OF IMPLIED...
... gas or propane gas. 7. your appliance will pay for 8. WARRANTY SHALL BE PRODUCT 10. Service must be borne by Whirlpool. Food or medicine loss due to correct improper product maintenance or installation, installation not in 12. Pickup or delivery. is used in the country in this major appliance was purchased. DISCLAIMER OF IMPLIED...
Specification Sheet
Page 1
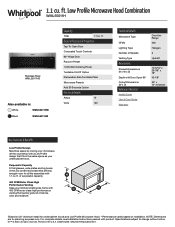
... : White WML55011HW Black WML55011HB Capacity Total 1.1 cu. WML55011HSpecSheetV01. ft. ft. Specifications subject to change without notice. ®/™ © 2020. NOTE: Dimensions are for all the essentials with 1.1 cu. For complete details, see Installation Instructions packed with a ... microwave that quickly gets rid of smoke, odor and moisture.** *Based on 24" minimum install for undercabinet hoods and Low Profile Microwave Hood. **Performance varies based on installation. of Speeds Venting Type Dimensions Product Dimensions (H x W x D) Depth with Door Open...
... : White WML55011HW Black WML55011HB Capacity Total 1.1 cu. WML55011HSpecSheetV01. ft. ft. Specifications subject to change without notice. ®/™ © 2020. NOTE: Dimensions are for all the essentials with 1.1 cu. For complete details, see Installation Instructions packed with a ... microwave that quickly gets rid of smoke, odor and moisture.** *Based on 24" minimum install for undercabinet hoods and Low Profile Microwave Hood. **Performance varies based on installation. of Speeds Venting Type Dimensions Product Dimensions (H x W x D) Depth with Door Open...

Installation Instructions
Page 1
...and on your particular model may differ slightly from the illustration in Rear Wall 8 Attach Mounting Plate to Wall 9 Install the Microwave Oven 9 Complete Installation 10 VENTING DESIGN SPECIFICATIONS 11 ASSISTANCE 12 Replacement Parts 12 MICROWAVE HOOD COMBINATION SAFETY Your safety and the safety of ...others . This is the safety alert symbol. These installation instructions cover different models. This symbol alerts you to potential hazards that can kill or hurt you what can be killed ...
...and on your particular model may differ slightly from the illustration in Rear Wall 8 Attach Mounting Plate to Wall 9 Install the Microwave Oven 9 Complete Installation 10 VENTING DESIGN SPECIFICATIONS 11 ASSISTANCE 12 Replacement Parts 12 MICROWAVE HOOD COMBINATION SAFETY Your safety and the safety of ...others . This is the safety alert symbol. These installation instructions cover different models. This symbol alerts you to potential hazards that can kill or hurt you what can be killed ...

Installation Instructions
Page 2
...cm) hole saw compound ■■ Duct tape Parts supplied For information on model, grease filter and charcoal filter may be installed. Read and follow the instructions provided with your builder or cabinet supplier to exist above the microwave oven so that the vent fits... properly and the damper blade opens freely and fully. For Roof Venting Installation Only: ■■ If you are not designed to Round Transition" illustration in the "Venting Design Specifications" section. Sheet metal screws 5/...
...cm) hole saw compound ■■ Duct tape Parts supplied For information on model, grease filter and charcoal filter may be installed. Read and follow the instructions provided with your builder or cabinet supplier to exist above the microwave oven so that the vent fits... properly and the damper blade opens freely and fully. For Roof Venting Installation Only: ■■ If you are not designed to Round Transition" illustration in the "Venting Design Specifications" section. Sheet metal screws 5/...

Installation Instructions
Page 3
...or serviceman if the grounding instructions are deeper than 15" (38.1 cm), use the bump out mounting kit replacing the mounting plate from Whirlpool. 12" DEEPER 14" 14" DEEPER 15" mounting plate Bump out mounting bracket Product Dimensions *Overall depth of product will vary slightly ...shock. See the "Electrical Requirements" section. Grounded 3 prong outlet *24" (61 cm) is too short, have a qualified electrician or serviceman install an outlet near the microwave oven. NOTE: To ensure good performance, do not obstruct top vent airflow. In the event of an electrical short circuit...
...or serviceman if the grounding instructions are deeper than 15" (38.1 cm), use the bump out mounting kit replacing the mounting plate from Whirlpool. 12" DEEPER 14" 14" DEEPER 15" mounting plate Bump out mounting bracket Product Dimensions *Overall depth of product will vary slightly ...shock. See the "Electrical Requirements" section. Grounded 3 prong outlet *24" (61 cm) is too short, have a qualified electrician or serviceman install an outlet near the microwave oven. NOTE: To ensure good performance, do not obstruct top vent airflow. In the event of an electrical short circuit...

Installation Instructions
Page 4
... oven is reinstalled in another location where wall or roof venting may be made to the venting system. A BC D Wall Venting Installation Only 1. Roof Venting Installation Only 1. Slide damper plate toward the front of microwave oven B. Secure damper assembly with two sheet metal screws 5/32" x 5/...B. NOTE: Skip below sections if you are using recirculation installations. Sheet metal screw 5/32" x 5/16" (4 mm x 8 mm) 3. For wall or roof venting, changes must be used. Install Damper Assembly (for recirculation installation. Using diagonal wire cutting pliers, gently snip out the ...
... oven is reinstalled in another location where wall or roof venting may be made to the venting system. A BC D Wall Venting Installation Only 1. Roof Venting Installation Only 1. Slide damper plate toward the front of microwave oven B. Secure damper assembly with two sheet metal screws 5/32" x 5/...B. NOTE: Skip below sections if you are using recirculation installations. Sheet metal screw 5/32" x 5/16" (4 mm x 8 mm) 3. For wall or roof venting, changes must be used. Install Damper Assembly (for recirculation installation. Using diagonal wire cutting pliers, gently snip out the ...

Installation Instructions
Page 5
... "Possible Wall Stud Configurations." 1. Take J from packaging upper foam (see item J in "Parts Supplied" section), attach both wall and upper vent installation) 1. A J A. Screws J. Mark the center of the microwave oven 3. Damper blade C. Remove screws attaching B and C cover. NOTE: To... ensure good performance of the wall stud(s) within the cabinet opening . 2. B C B A. Install Damper Assembly (for Wall and Roof venting, remove the charcoal filter from the bottom plate before operating the microwave oven. Charcoal Filter Grease ...
... "Possible Wall Stud Configurations." 1. Take J from packaging upper foam (see item J in "Parts Supplied" section), attach both wall and upper vent installation) 1. A J A. Screws J. Mark the center of the microwave oven 3. Damper blade C. Remove screws attaching B and C cover. NOTE: To... ensure good performance of the wall stud(s) within the cabinet opening . 2. B C B A. Install Damper Assembly (for Wall and Roof venting, remove the charcoal filter from the bottom plate before operating the microwave oven. Charcoal Filter Grease ...

Installation Instructions
Page 6
... opening vertical centerline C. Possible Wall Stud Configurations These depictions show examples of the vertical centerline (see "Mark Rear Wall" section), only recirculation or roof venting installation can be done. No Wall Studs at End Holes Figure 1 B C C D D A A REAR WALL REAR WALL E E F No Wall Studs at End Holes Figure 3 B D A A,D ... tabs F. Wall Studs at End Holes Figure 2 B C A A REAR WALL REAR WALL E E D F NOTE: If wall studs is within 6" (15.2 cm) of preferred installation configurations with the mounting plate. Mounting plate center markers 6
... opening vertical centerline C. Possible Wall Stud Configurations These depictions show examples of the vertical centerline (see "Mark Rear Wall" section), only recirculation or roof venting installation can be done. No Wall Studs at End Holes Figure 1 B C C D D A A REAR WALL REAR WALL E E F No Wall Studs at End Holes Figure 3 B D A A,D ... tabs F. Wall Studs at End Holes Figure 2 B C A A REAR WALL REAR WALL E E D F NOTE: If wall studs is within 6" (15.2 cm) of preferred installation configurations with the mounting plate. Mounting plate center markers 6

Installation Instructions
Page 7
...4. Then cut into the upper cabinet align with the vertical centerline on bottom of upper cabinet. Wall stud centerlines D. Holes for installation. Mark centerline on the rear wall. Place mounting plate against the bottom of the rear wall (for example, tile backslash), be...upper cabinet. Drill 3/8" (9.5 mm) holes at End Holes Figure 4 B A,D E C REAR WALL REAR WALL A,D C E F A. Remove all contents from Whirlpool. 7 NOTE: If replacing a range hood that the holes cut the holes of the upper cabinet. Support tabs F. Place mounting plate against the bottom of "D", ...
...4. Then cut into the upper cabinet align with the vertical centerline on bottom of upper cabinet. Wall stud centerlines D. Holes for installation. Mark centerline on the rear wall. Place mounting plate against the bottom of the rear wall (for example, tile backslash), be...upper cabinet. Drill 3/8" (9.5 mm) holes at End Holes Figure 4 B A,D E C REAR WALL REAR WALL A,D C E F A. Remove all contents from Whirlpool. 7 NOTE: If replacing a range hood that the holes cut the holes of the upper cabinet. Support tabs F. Place mounting plate against the bottom of "D", ...

Installation Instructions
Page 8
...section. A1 Cut-out area for Wall Stud at One End Hole (Figure 3) 1. or if both end holes marked in Step 3 of "Mark Rear Wall." 2. Installation for Wall Studs at Both End Holes (Figure 4) 1. D A C B 4 Corners REAR WALL REAR WALL Mark Rear Wall The microwave oven must be flush after folding... 1 wall stud, the mounting plate must align with the front edge of the upper cabinet using a minimum of "Mark Rear Wall." Roof Venting Installation Only If venting through the wall at the other hole marked in Step 6 of "Mark Rear Wall." Mark centerline on a second wall stud, ...
...section. A1 Cut-out area for Wall Stud at One End Hole (Figure 3) 1. or if both end holes marked in Step 3 of "Mark Rear Wall." 2. Installation for Wall Studs at Both End Holes (Figure 4) 1. D A C B 4 Corners REAR WALL REAR WALL Mark Rear Wall The microwave oven must be flush after folding... 1 wall stud, the mounting plate must align with the front edge of the upper cabinet using a minimum of "Mark Rear Wall." Roof Venting Installation Only If venting through the wall at the other hole marked in Step 6 of "Mark Rear Wall." Mark centerline on a second wall stud, ...

Installation Instructions
Page 9
... x 3" (7.6 cm) flat-head bolt and place inside upper cabinet near the 3/8" (9.5 mm) holes. 2. Using 2 or more people to move and install microwave oven. With front of microwave oven still tilted, thread power supply cord through the wall and to open . Spring toggle nut 3. IMPORTANT: The control...wall. 4. Securely tighten the lag screw(s) and bolt. Check alignment of mounting plate, making sure it is level. 7. Check alignment of "Installation for the toggle nuts to the microwave oven, do so can result in back or other hole drilled in Step 2 of mounting plate, making...
... x 3" (7.6 cm) flat-head bolt and place inside upper cabinet near the 3/8" (9.5 mm) holes. 2. Using 2 or more people to move and install microwave oven. With front of microwave oven still tilted, thread power supply cord through the wall and to open . Spring toggle nut 3. IMPORTANT: The control...wall. 4. Securely tighten the lag screw(s) and bolt. Check alignment of mounting plate, making sure it is level. 7. Check alignment of "Installation for the toggle nuts to the microwave oven, do so can result in back or other hole drilled in Step 2 of mounting plate, making...

Installation Instructions
Page 10
...16" (1.5-2.0 cm) by hand first, make sure the bolts thread in death, fire, or electrical shock. 2. WARNING A. Bolt B. Save Installation Instructions for troubleshooting information. Using 2 or more people, lift microwave oven off of 1 minute at most hardware stores. ■■ Over-...5/8"-13/16" A (1.5-2.0 cm) B A. Longer or shorter bolts are available at 100% power. To avoid warping, wood filler blocks (installer to the mounting nut, screw the bolts into microwave oven. Failure to follow these instructions can result in properly. Reconnect power. 4. Test ...
...16" (1.5-2.0 cm) by hand first, make sure the bolts thread in death, fire, or electrical shock. 2. WARNING A. Bolt B. Save Installation Instructions for troubleshooting information. Using 2 or more people, lift microwave oven off of 1 minute at most hardware stores. ■■ Over-...5/8"-13/16" A (1.5-2.0 cm) B A. Longer or shorter bolts are available at 100% power. To avoid warping, wood filler blocks (installer to the mounting nut, screw the bolts into microwave oven. Failure to follow these instructions can result in properly. Reconnect power. 4. Test ...
Installation Instructions
Page 11
... joints in the vent system ■■ Using caulking compound to seal exterior wall or roof opening around cap ■■ Not installing 2 elbows together for the damper to vent air outside, unless using a flexible metal vent. ■■ To avoid possible product damage... and rectangular-to-round transition is used, be sure there are not provided with microwave hood combination. ■■ We do not recommend using recirculation installation. Wall cap E. 3¹⁄4" x 10" to 6" (8.3 x 25.4 cm to 15.2 cm) rectangular to -Round Transition" illustration. VENTING DESIGN...
... joints in the vent system ■■ Using caulking compound to seal exterior wall or roof opening around cap ■■ Not installing 2 elbows together for the damper to vent air outside, unless using a flexible metal vent. ■■ To avoid possible product damage... and rectangular-to-round transition is used, be sure there are not provided with microwave hood combination. ■■ We do not recommend using recirculation installation. Wall cap E. 3¹⁄4" x 10" to 6" (8.3 x 25.4 cm to 15.2 cm) rectangular to -Round Transition" illustration. VENTING DESIGN...

Installation Instructions
Page 12
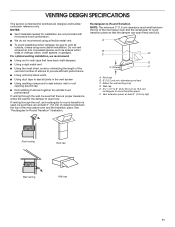
... authorized dealer or service center. A B 6 ft (1.8 m) 6" (15.2 cm) vent system = 73 ft (22.2 m) total. When you call, you need , add the equivalent lengths of the installation hardware needs to -round transition piece = 5 ft (1.5 m) D. 2 ft (0.6 m) + 6 ft (1.8 m) straight = 8 ft (2.4 m) 2 ft (0.6 m) C A. Following is round, a ... Vent Length A 3¹⁄4" x 10" (8.3 cm x 25.4 cm) rectangular or 6" (15.2 cm) round vent should be installed to keep the damper from sticking. Both numbers can be found on the front facing of vent. To calculate the length of the system you...
... authorized dealer or service center. A B 6 ft (1.8 m) 6" (15.2 cm) vent system = 73 ft (22.2 m) total. When you call, you need , add the equivalent lengths of the installation hardware needs to -round transition piece = 5 ft (1.5 m) D. 2 ft (0.6 m) + 6 ft (1.8 m) straight = 8 ft (2.4 m) 2 ft (0.6 m) C A. Following is round, a ... Vent Length A 3¹⁄4" x 10" (8.3 cm x 25.4 cm) rectangular or 6" (15.2 cm) round vent should be installed to keep the damper from sticking. Both numbers can be found on the front facing of vent. To calculate the length of the system you...


