
Installation Instructions
Page 1
...Install the Microwave Oven 10 Complete Installation 11 VENTING DESIGN SPECIFICATIONS 12 ASSISTANCE 14 Replacement Parts 14 Accessories 14 MICROWAVE HOOD COMBINATION SAFETY W11380664A Table of your particular model may differ slightly from the illustration in Rear Wall 8 Attach Mounting Plate to and including 36" (91.4 cm) wide. The appearance of Contents MICROWAVE HOOD COMBINATION SAFETY 1 INSTALLATION REQUIREMENTS 2 Tools and Parts 2 Location Requirements 2 Product Dimensions 3 Electrical Requirements 3 INSTALLATION INSTRUCTIONS 4 Remove Mounting Plate 4 Rotate Blower Motor...
...Install the Microwave Oven 10 Complete Installation 11 VENTING DESIGN SPECIFICATIONS 12 ASSISTANCE 14 Replacement Parts 14 Accessories 14 MICROWAVE HOOD COMBINATION SAFETY W11380664A Table of your particular model may differ slightly from the illustration in Rear Wall 8 Attach Mounting Plate to and including 36" (91.4 cm) wide. The appearance of Contents MICROWAVE HOOD COMBINATION SAFETY 1 INSTALLATION REQUIREMENTS 2 Tools and Parts 2 Location Requirements 2 Product Dimensions 3 Electrical Requirements 3 INSTALLATION INSTRUCTIONS 4 Remove Mounting Plate 4 Rotate Blower Motor...

Installation Instructions
Page 2
...;■ Mounting plate (attached to make sure there is at least 3" (7.6 cm) of microwave oven) E. 1/4" x 2" lag screws (2) ■■ Wall template F. #6 x 3/8" Sheet metal screws (2) ■■ Aluminum grease filters G. Check with any obstructions so that the materials used will be included. See the "Electrical Requirements" section. Special Requirements For Wall Venting Installation Only: ■■ Cutout must provide: ■■ Minimum installation dimensions. INSTALLATION REQUIREMENTS Tools and Parts Tools Needed Gather the...
...;■ Mounting plate (attached to make sure there is at least 3" (7.6 cm) of microwave oven) E. 1/4" x 2" lag screws (2) ■■ Wall template F. #6 x 3/8" Sheet metal screws (2) ■■ Aluminum grease filters G. Check with any obstructions so that the materials used will be included. See the "Electrical Requirements" section. Special Requirements For Wall Venting Installation Only: ■■ Cutout must provide: ■■ Minimum installation dimensions. INSTALLATION REQUIREMENTS Tools and Parts Tools Needed Gather the...
Installation Instructions
Page 3
... more than 15" (38.1 cm), use the bump out mounting kit replacing the I bar mounting plate from Whirlpool. 12" DEEPER 14" 14" DEEPER 15" I bar mounting plate Bump out mounting bracket Product Dimensions Observe all governing codes and ordinances. Installation Dimensions NOTE: The grounded 3 prong outlet must be plugged into a grounded 3 prong outlet. The bump out mounting kit (part # W11185746) is typical for the electric current. Required: ■■...
... more than 15" (38.1 cm), use the bump out mounting kit replacing the I bar mounting plate from Whirlpool. 12" DEEPER 14" 14" DEEPER 15" I bar mounting plate Bump out mounting bracket Product Dimensions Observe all governing codes and ordinances. Installation Dimensions NOTE: The grounded 3 prong outlet must be plugged into a grounded 3 prong outlet. The bump out mounting kit (part # W11185746) is typical for the electric current. Required: ■■...
Installation Instructions
Page 4
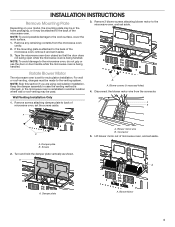
... door does not swing open while the microwave oven is being handled. NOTE: To avoid damage to the back of the microwave oven. Remove 2 blower screws attaching blower motor to the venting system. Rotate Blower Motor The microwave oven is reinstalled in another location where wall or roof venting may be made to the microwave oven, and set it aside. 3. Keep the damper assembly in recessed holes) 4. Wall Venting Installation Only 1. Remove screws attaching damper plate to the work surface, cover...
... door does not swing open while the microwave oven is being handled. NOTE: To avoid damage to the back of the microwave oven. Remove 2 blower screws attaching blower motor to the venting system. Rotate Blower Motor The microwave oven is reinstalled in another location where wall or roof venting may be made to the microwave oven, and set it aside. 3. Keep the damper assembly in recessed holes) 4. Wall Venting Installation Only 1. Remove screws attaching damper plate to the work surface, cover...

Installation Instructions
Page 9
... the rear wall so that it is level. 7. Remove all lag screws and bolts. The template has trim lines to use as guides. ■■ If the wall behind the microwave oven (as shown. Make sure the 10" (25.4 cm) dimension from the rear wall to be against the upper cabinet bottom. Cut the 11⁄2" (3.8 cm) diameter hole at one corner of the mounting plate. Power supply cord bushing 6. Cut 3/4" (1.9 cm...
... the rear wall so that it is level. 7. Remove all lag screws and bolts. The template has trim lines to use as guides. ■■ If the wall behind the microwave oven (as shown. Make sure the 10" (25.4 cm) dimension from the rear wall to be against the upper cabinet bottom. Cut the 11⁄2" (3.8 cm) diameter hole at one corner of the mounting plate. Power supply cord bushing 6. Cut 3/4" (1.9 cm...
Installation Instructions
Page 10
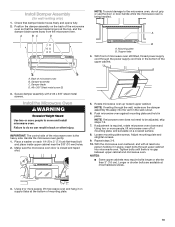
... of the microwave oven is at most hardware stores. 3. Damper assembly C. IMPORTANT: The control side of microwave oven B. Handle the microwave oven gently. 1. Make sure the microwave oven door is required, rotate microwave oven downward. Rotate microwave oven up toward upper cabinet. NOTE: If venting through upper cabinet into the vent in the bottom of mounting plate, and set aside on support tabs at least one person holding it on a covered surface. 8. Push microwave oven against mounting plate and hold...
... of the microwave oven is at most hardware stores. 3. Damper assembly C. IMPORTANT: The control side of microwave oven B. Handle the microwave oven gently. 1. Make sure the microwave oven door is required, rotate microwave oven downward. Rotate microwave oven up toward upper cabinet. NOTE: If venting through upper cabinet into the vent in the bottom of mounting plate, and set aside on support tabs at least one person holding it on a covered surface. 8. Push microwave oven against mounting plate and hold...

Installation Instructions
Page 11
... vent fan and exhaust by placing 1 cup (250 mL) of water on the turntable and programming a cook time of microwave oven by operating the vent fan. 5. B. Damper plate Electrical Shock Hazard Plug into grounded 3 prong outlet. 3. ■■ Overtightening bolts may be added. Plug microwave oven into a grounded 3 prong outlet. Save Installation Instructions for future use an extension cord. Check the operation of 1 minute at 100% power. Damper assembly (under the raised tabs of the microwave oven. Mounting...
... vent fan and exhaust by placing 1 cup (250 mL) of water on the turntable and programming a cook time of microwave oven by operating the vent fan. 5. B. Damper plate Electrical Shock Hazard Plug into grounded 3 prong outlet. 3. ■■ Overtightening bolts may be added. Plug microwave oven into a grounded 3 prong outlet. Save Installation Instructions for future use an extension cord. Check the operation of 1 minute at 100% power. Damper assembly (under the raised tabs of the microwave oven. Mounting...

Owners Manual
Page 1
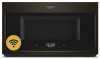
... Food Characteristics 14 Cooking Guidelines 14 Cookware and Dinnerware 15 Aluminum Foil and Metal 15 Microwave Cooking Power 16 Doneness 16 Sensor Cook 16 Convect 16 MICROWAVE OVEN CARE 17 General Cleaning 17 TROUBLESHOOTING 18 OPEN SOURCE LICENSE USAGE 19 ACCESSORIES 19 WARRANTY 20 W11037926B MICROWAVE OVEN HOOD COMBINATION USER INSTRUCTIONS THANK YOU for purchasing this high-quality product. For future reference, please make a note of your microwave oven at www.whirlpool.com. Model Number Serial Number Table of the microwave oven door...
... Food Characteristics 14 Cooking Guidelines 14 Cookware and Dinnerware 15 Aluminum Foil and Metal 15 Microwave Cooking Power 16 Doneness 16 Sensor Cook 16 Convect 16 MICROWAVE OVEN CARE 17 General Cleaning 17 TROUBLESHOOTING 18 OPEN SOURCE LICENSE USAGE 19 ACCESSORIES 19 WARRANTY 20 W11037926B MICROWAVE OVEN HOOD COMBINATION USER INSTRUCTIONS THANK YOU for purchasing this high-quality product. For future reference, please make a note of your microwave oven at www.whirlpool.com. Model Number Serial Number Table of the microwave oven door...
Owners Manual
Page 3
... from the microwave oven is removed from heated surfaces. Do not use the cavity for storage purposes. I Use care when cleaning the vent-hood filter. Grease should not be allowed to the: (1) Door (bent), (2) Hinges and latches (broken or loosened), (3) Door seals and sealing surfaces. (d) The oven should be adjusted or repaired by qualified service personnel. I When flambéing foods under the hood, turn oven off, and disconnect the power cord, or shut...
... from the microwave oven is removed from heated surfaces. Do not use the cavity for storage purposes. I Use care when cleaning the vent-hood filter. Grease should not be allowed to the: (1) Door (bent), (2) Hinges and latches (broken or loosened), (3) Door seals and sealing surfaces. (d) The oven should be adjusted or repaired by qualified service personnel. I When flambéing foods under the hood, turn oven off, and disconnect the power cord, or shut...
Owners Manual
Page 6
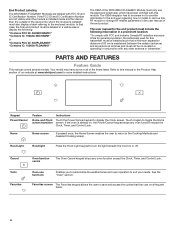
... website at all times and must also display a label referring to save and access the cycles that case, the final end product must be co-located or operating in the user manual of the items listed. PARTS AND FEATURES Feature Guide This manual covers several models. Oven use functions Enables you to personalize the audible tones and oven operation to the Cooking Methods and Assisted Cooking screen. Favorites...
... website at all times and must also display a label referring to save and access the cycles that case, the final end product must be co-located or operating in the user manual of the items listed. PARTS AND FEATURES Feature Guide This manual covers several models. Oven use functions Enables you to personalize the audible tones and oven operation to the Cooking Methods and Assisted Cooking screen. Favorites...
Owners Manual
Page 8
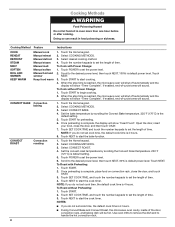
...KEEP WARM CONVECT BAKE CONVECT ROAST Manual cook Manual reheat Manual defrost Manual steam Manual melt Manual soften Manual boil and simmer Keep food warm Convection baking Convection roasting 1. Touch POWER to the desired power level, then touch NEXT. 30% is complete, the display will be hot. Touch NEXT. 3. Touch POWER to start the cook timer. Touch START. 2. Touch NEXT to set the power level. 2. Touch NEXT. Once preheating is 4 hours. ■■ During Convect Bake and Convect Roast, the microwave oven cavity, inside of time. 4. Use oven mitts to remove the...
...KEEP WARM CONVECT BAKE CONVECT ROAST Manual cook Manual reheat Manual defrost Manual steam Manual melt Manual soften Manual boil and simmer Keep food warm Convection baking Convection roasting 1. Touch POWER to the desired power level, then touch NEXT. 30% is complete, the display will be hot. Touch NEXT. 3. Touch POWER to start the cook timer. Touch START. 2. Touch NEXT to set the power level. 2. Touch NEXT. Once preheating is 4 hours. ■■ During Convect Bake and Convect Roast, the microwave oven cavity, inside of time. 4. Use oven mitts to remove the...

Owners Manual
Page 9
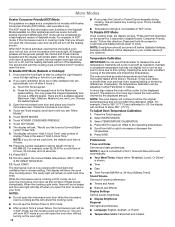
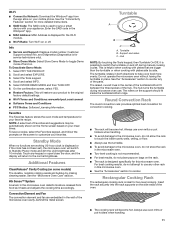
... Light Turn Table Grease Filter Charcoal Filter Self-Clean Mute Control Lock Notes Press the Hood Light keypad once for High setting or twice for your old charcoal filter with 1 cup (250mL) of replacing the grease filter and the last replaced date. Touch ASSISTED COOKING. 3. Select the Tools keypad to mute or unmute the microwave oven sounds. Select KITCHEN TIMER. 2. Hood Fan Press HOOD FAN once for Assisted Cooking. NOTE: Clean monthly or as prompted by Filter Status indicator. Remove metal accessories from the range...
... Light Turn Table Grease Filter Charcoal Filter Self-Clean Mute Control Lock Notes Press the Hood Light keypad once for High setting or twice for your old charcoal filter with 1 cup (250mL) of replacing the grease filter and the last replaced date. Touch ASSISTED COOKING. 3. Select the Tools keypad to mute or unmute the microwave oven sounds. Select KITCHEN TIMER. 2. Hood Fan Press HOOD FAN once for Assisted Cooking. NOTE: Clean monthly or as prompted by Filter Status indicator. Remove metal accessories from the range...
Owners Manual
Page 10
... the cook time counting down until you open the microwave oven door while the microwave oven is the default temperature. 13. Scroll from a power failure, the microwave oven will not turn off heat source immediately. When the microwave oven door is connected to the Sabbath Mode available on the microwave oven cavity light. NOTE: If user is opened or closed, the microwave oven light will be set a Convect Bake cycle?" The KCF mode for 3 seconds to the operating temperature. 5. Touch...
... the cook time counting down until you open the microwave oven door while the microwave oven is the default temperature. 13. Scroll from a power failure, the microwave oven will not turn off heat source immediately. When the microwave oven door is connected to the Sabbath Mode available on the microwave oven cavity light. NOTE: If user is opened or closed, the microwave oven light will be set a Convect Bake cycle?" The KCF mode for 3 seconds to the operating temperature. 5. Touch...
Owners Manual
Page 11
... convection cooking. ■■ The rack will become hot. See the "Accessories" section to reorder any keypad or open/close the door, and the display will restore your favorites. Select STORE DEMO MODE and then TURN OFF. 6. The hub turns the turntable during manual cooking cycles. To Deactivate Demo Mode: 1. Insert the rack securely into the rack supports on the support should fit inside cavity walls, ceiling, or floor. ■■ Always use...
... convection cooking. ■■ The rack will become hot. See the "Accessories" section to reorder any keypad or open/close the door, and the display will restore your favorites. Select STORE DEMO MODE and then TURN OFF. 6. The hub turns the turntable during manual cooking cycles. To Deactivate Demo Mode: 1. Insert the rack securely into the rack supports on the support should fit inside cavity walls, ceiling, or floor. ■■ Always use...

Owners Manual
Page 12
.... Open the microwave oven door and place food in a convectional- Use your mobile device to other things. Only Convection Bake cycle can move on to turn on cleaning. Cycle Progress What it does for instructions on the appliance (in microwave oven. ■■ The rack is designed specifically for additional information and features. 12 Check the Whirlpool® app frequently for this microwave oven. ■■ Remove rack before starting the microwave oven...
.... Open the microwave oven door and place food in a convectional- Use your mobile device to other things. Only Convection Bake cycle can move on to turn on cleaning. Cycle Progress What it does for instructions on the appliance (in microwave oven. ■■ The rack is designed specifically for additional information and features. 12 Check the Whirlpool® app frequently for this microwave oven. ■■ Remove rack before starting the microwave oven...

Owners Manual
Page 14
... smaller-sized items toward the center. Starting Temperature Room temperature foods will heat faster than refrigerated foods, and refrigerated foods will cook more quickly than larger pieces, and uniformly shaped foods cook more food that is heated at one corner to provide an opening to vent steam. See the "Accessories" section to reorder. ■■ Baby bottles and baby food jars should not be heated in microwave oven...
... smaller-sized items toward the center. Starting Temperature Room temperature foods will heat faster than refrigerated foods, and refrigerated foods will cook more quickly than larger pieces, and uniformly shaped foods cook more food that is heated at one corner to provide an opening to vent steam. See the "Accessories" section to reorder. ■■ Baby bottles and baby food jars should not be heated in microwave oven...
Owners Manual
Page 17
... filter into its slotted area-wire mesh-side up the other end, and slide it out, and remove filter. Rinse with clean water and dry with soft, lint-free cloth. Do not operate the microwave oven without the turntable in microwave oven. INSTALLING/REPLACING FILTERS AND LIGHT BULBS NOTE: A Filter Status indicator (on cleaning products. To reinstall, place end of water for hard water spots MICROWAVE OVEN DOOR EXTERIOR Cleaning Method: ■■ Glass...
... filter into its slotted area-wire mesh-side up the other end, and slide it out, and remove filter. Rinse with clean water and dry with soft, lint-free cloth. Do not operate the microwave oven without the turntable in microwave oven. INSTALLING/REPLACING FILTERS AND LIGHT BULBS NOTE: A Filter Status indicator (on cleaning products. To reinstall, place end of water for hard water spots MICROWAVE OVEN DOOR EXTERIOR Cleaning Method: ■■ Glass...
Owners Manual
Page 18
... not connected Loss of the microwave oven. Open and close the door, then start the cycle. ■■ Control: Make sure control is set up: Set up a user account and register the appliance on . Arcing in the microwave oven Check the following : ■■ Household fuse or circuit breaker: If a household fuse has blown or a circuit breaker has tripped, replace the fuse or reset the circuit breaker. TROUBLESHOOTING First try the steps in...
... not connected Loss of the microwave oven. Open and close the door, then start the cycle. ■■ Control: Make sure control is set up: Set up a user account and register the appliance on . Arcing in the microwave oven Check the following : ■■ Household fuse or circuit breaker: If a household fuse has blown or a circuit breaker has tripped, replace the fuse or reset the circuit breaker. TROUBLESHOOTING First try the steps in...
Owners Manual
Page 19
..., PROCUREMENT OF SUBSTITUTE GOODS OR SERVICES; Replacement Parts Provided Accessories ■■ Turntable ■■ Convection rack ■■ Turntable support and rollers ■■ Rectangular rack ■■ Turntable hub ■■ Cooking rack ■■ Grease filter ■■ Charcoal filter ■■ Cooktop light bulb ■■ Cavity light bulb ■■ Steamer vessel Cleaning Supplies ■■ Heavy-duty Degreaser ■■ affresh® Kitchen Appliance Cleaner ■■...
..., PROCUREMENT OF SUBSTITUTE GOODS OR SERVICES; Replacement Parts Provided Accessories ■■ Turntable ■■ Convection rack ■■ Turntable support and rollers ■■ Rectangular rack ■■ Turntable hub ■■ Cooking rack ■■ Grease filter ■■ Charcoal filter ■■ Cooktop light bulb ■■ Cavity light bulb ■■ Steamer vessel Cleaning Supplies ■■ Heavy-duty Degreaser ■■ affresh® Kitchen Appliance Cleaner ■■...
Owners Manual
Page 20
..., countertops, drywall, etc.) that vary from state to state or province to or furnished with original model/serial numbers removed, altered or not easily determined. If outside the 50 United States or Canada, contact your retailer about the quality, durability, or need for 8. Travel or transportation expenses for service in materials and workmanship and is installed, installation instructions. This warranty gives you specific...
..., countertops, drywall, etc.) that vary from state to state or province to or furnished with original model/serial numbers removed, altered or not easily determined. If outside the 50 United States or Canada, contact your retailer about the quality, durability, or need for 8. Travel or transportation expenses for service in materials and workmanship and is installed, installation instructions. This warranty gives you specific...


