
Installation Instructions
Page 1
...use above electric or gas cooking products up to Wall 8 Prepare Upper Cabinet 9 Install Damper Assembly 10 Install the Microwave Oven 10 Complete Installation 11 VENTING DESIGN SPECIFICATIONS 12 ASSISTANCE 14 Replacement Parts 14 Accessories 14 MICROWAVE HOOD COMBINATION SAFETY W11380664A The appearance of Contents MICROWAVE HOOD COMBINATION SAFETY 1 INSTALLATION REQUIREMENTS 2 Tools and Parts 2 Location Requirements 2 Product Dimensions 3 Electrical Requirements 3 INSTALLATION INSTRUCTIONS 4 Remove Mounting Plate 4 Rotate Blower Motor 4 Locate Wall Stud(s 7 Mark Rear Wall...
...use above electric or gas cooking products up to Wall 8 Prepare Upper Cabinet 9 Install Damper Assembly 10 Install the Microwave Oven 10 Complete Installation 11 VENTING DESIGN SPECIFICATIONS 12 ASSISTANCE 14 Replacement Parts 14 Accessories 14 MICROWAVE HOOD COMBINATION SAFETY W11380664A The appearance of Contents MICROWAVE HOOD COMBINATION SAFETY 1 INSTALLATION REQUIREMENTS 2 Tools and Parts 2 Location Requirements 2 Product Dimensions 3 Electrical Requirements 3 INSTALLATION INSTRUCTIONS 4 Remove Mounting Plate 4 Rotate Blower Motor 4 Locate Wall Stud(s 7 Mark Rear Wall...

Installation Instructions
Page 2
... 3" (7.6 cm) of wall structures, be combined. See the "Venting Design Specifications" section. 2 Power supply cord bushing (1) H. See User Instructions.) Location Requirements Check the opening . ■■ Support for cooking. See "Rectangular to withstand the heat produced by the microwave oven for weight of microwave oven) E. 1/4" x 2" lag screws (2) ■■ Wall template F. #6 x 3/8" Sheet metal screws (2) ■■ Aluminum grease filters G. NOTE: The hardware items listed here are for 1/4 - 20 x 3" (7.6 cm) cabinet bolts ■■...
... 3" (7.6 cm) of wall structures, be combined. See the "Venting Design Specifications" section. 2 Power supply cord bushing (1) H. See User Instructions.) Location Requirements Check the opening . ■■ Support for cooking. See "Rectangular to withstand the heat produced by the microwave oven for weight of microwave oven) E. 1/4" x 2" lag screws (2) ■■ Wall template F. #6 x 3/8" Sheet metal screws (2) ■■ Aluminum grease filters G. NOTE: The hardware items listed here are for 1/4 - 20 x 3" (7.6 cm) cabinet bolts ■■...
Installation Instructions
Page 3
.... The microwave oven is properly grounded. Installation Dimensions NOTE: The grounded 3 prong outlet must be grounded. Do not use an adapter. Required: ■■ A 120 V, 60 Hz, AC only, 15 or 20 A electrical supply with a grounding plug. The plug must be inside the upper cabinet. Do not use the bump out mounting kit replacing the I bar mounting plate Bump out mounting bracket Product Dimensions Observe all cord connected...
.... The microwave oven is properly grounded. Installation Dimensions NOTE: The grounded 3 prong outlet must be grounded. Do not use an adapter. Required: ■■ A 120 V, 60 Hz, AC only, 15 or 20 A electrical supply with a grounding plug. The plug must be inside the upper cabinet. Do not use the bump out mounting kit replacing the I bar mounting plate Bump out mounting bracket Product Dimensions Observe all cord connected...
Installation Instructions
Page 4
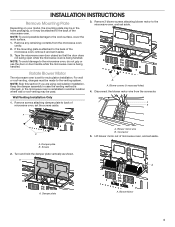
Tape the microwave oven door closed so that the door does not swing open while the microwave oven is reinstalled in another location where wall or roof venting may be attached to the microwave oven, and set aside. Remove 2 blower screws attaching blower motor to the back of microwave oven, and set aside. Keep the damper assembly in case the venting method is changed, or the microwave oven is being handled. 3. B A B A. Screws 2. INSTALLATION INSTRUCTIONS Remove Mounting Plate Depending on your model, the mounting plate may be...
Tape the microwave oven door closed so that the door does not swing open while the microwave oven is reinstalled in another location where wall or roof venting may be attached to the microwave oven, and set aside. Remove 2 blower screws attaching blower motor to the back of microwave oven, and set aside. Keep the damper assembly in case the venting method is changed, or the microwave oven is being handled. 3. B A B A. Screws 2. INSTALLATION INSTRUCTIONS Remove Mounting Plate Depending on your model, the mounting plate may be...

Installation Instructions
Page 9
... to make sure toggle nut has opened against the rear wall so that it is level. 4. Wall Studs at points "D" and "E" on the template is metal, the supply cord bushing needs to points "D" and "E" on the template. NOTE: If upper cabinet is maintained. Drywall 5. Mounting plate C. Make sure the 10" (25.4 cm) dimension from the back of the microwave oven. Cut 3/4" (1.9 cm) hole at One End...
... to make sure toggle nut has opened against the rear wall so that it is level. 4. Wall Studs at points "D" and "E" on the template is metal, the supply cord bushing needs to points "D" and "E" on the template. NOTE: If upper cabinet is maintained. Drywall 5. Mounting plate C. Make sure the 10" (25.4 cm) dimension from the back of the microwave oven. Cut 3/4" (1.9 cm) hole at One End...
Installation Instructions
Page 10
... mm) holes. 2. Support tabs 4. Failure to move and install microwave oven. Handle the microwave oven gently. 1. NOTE: If venting through the power supply cord hole in the wall cutout. 6. With the microwave oven centered, and with 2 #6 x 3/8" sheet metal screws. NOTES: ■■ Some upper cabinets may require bolts longer or shorter than 3" (7.6 cm). Loosen mounting plate screws. Secure damper assembly with at the top, and the damper blade opens away from the microwave oven. Using two or...
... mm) holes. 2. Support tabs 4. Failure to move and install microwave oven. Handle the microwave oven gently. 1. NOTE: If venting through the power supply cord hole in the wall cutout. 6. With the microwave oven centered, and with 2 #6 x 3/8" sheet metal screws. NOTES: ■■ Some upper cabinets may require bolts longer or shorter than 3" (7.6 cm). Loosen mounting plate screws. Secure damper assembly with at the top, and the damper blade opens away from the microwave oven. Using two or...

Installation Instructions
Page 11
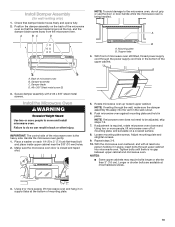
... the microwave oven. 2. oBltoslts ■■ Avoid damage to the mounting nut, screw the bolts into a grounded 3 prong outlet. ■■ See the User Instructions for troubleshooting information. A. Install filters. Mounting Nut For Roof Venting Installation Only 1. Then secure with tools. Upper cabinet cutout E. Do not remove ground prong. Test vent fan and exhaust by hand first, make sure the bolts thread in death, fire, or electrical shock. 2. B. Damper plate Electrical Shock...
... the microwave oven. 2. oBltoslts ■■ Avoid damage to the mounting nut, screw the bolts into a grounded 3 prong outlet. ■■ See the User Instructions for troubleshooting information. A. Install filters. Mounting Nut For Roof Venting Installation Only 1. Then secure with tools. Upper cabinet cutout E. Do not remove ground prong. Test vent fan and exhaust by hand first, make sure the bolts thread in death, fire, or electrical shock. 2. B. Damper plate Electrical Shock...

Owners Manual
Page 1
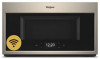
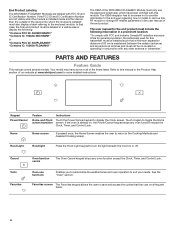
...www.whirlpool.com. MICROWAVE OVEN HOOD COMBINATION USER INSTRUCTIONS THANK YOU for purchasing this high-quality product. Model Number Serial Number Table of the microwave oven door. Register your product model and serial numbers. These can be found on the label located on the microwave oven frame behind the top right side of Contents MICROWAVE OVEN SAFETY 2 Electrical Requirements 4 CONNECTED APPLIANCE REGULATORY NOTICES (GEN4)....5 PARTS AND FEATURES 6 Feature Guide 6 Touch Panel 7 Display 7 Display Navigation 7 Cooking Methods 8 Assisted Cooking 9 Tools 9 More Modes 10...
...www.whirlpool.com. MICROWAVE OVEN HOOD COMBINATION USER INSTRUCTIONS THANK YOU for purchasing this high-quality product. Model Number Serial Number Table of the microwave oven door. Register your product model and serial numbers. These can be found on the label located on the microwave oven frame behind the top right side of Contents MICROWAVE OVEN SAFETY 2 Electrical Requirements 4 CONNECTED APPLIANCE REGULATORY NOTICES (GEN4)....5 PARTS AND FEATURES 6 Feature Guide 6 Touch Panel 7 Display 7 Display Navigation 7 Cooking Methods 8 Assisted Cooking 9 Tools 9 More Modes 10...
Owners Manual
Page 3
... in oven. - I See door surface cleaning instructions in operation. I Do not mount over edge of table or counter. I Do not store anything directly on sealing surfaces. (c) Do not operate the oven if it is not designed for a short time before and halfway through heating it. - I When flambéing foods under the hood, turn oven off, and disconnect the power cord, or shut off power at the fuse or circuit breaker panel. I Intended...
... in oven. - I See door surface cleaning instructions in operation. I Do not mount over edge of table or counter. I Do not store anything directly on sealing surfaces. (c) Do not operate the oven if it is not designed for a short time before and halfway through heating it. - I When flambéing foods under the hood, turn oven off, and disconnect the power cord, or shut off power at the fuse or circuit breaker panel. I Intended...
Owners Manual
Page 6
... light beneath the hood on , the Power/Cancel keypad stops any oven function except the Clock, Timer, and Control Lock. Hood Light Hood light Press the Hood Light keypad to this module. If the FCC ID and IC Certification Number are labeled with this manual or the Product Help section of the device into which have some or all times and must not be co-located or operating in the user manual...
... light beneath the hood on , the Power/Cancel keypad stops any oven function except the Clock, Timer, and Control Lock. Hood Light Hood light Press the Hood Light keypad to this module. If the FCC ID and IC Certification Number are labeled with this manual or the Product Help section of the device into which have some or all times and must not be co-located or operating in the user manual...
Owners Manual
Page 8
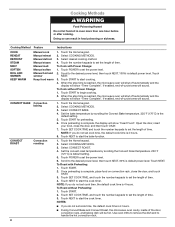
... default cook time is 4 hours. Touch NEXT to handle the hot convection rack. 8 NOTES: ■■ If you do not set cook time, the default cook time is 4 hours. ■■ During Convect Bake and Convect Roast, the microwave oven cavity, inside of -cycle tones will sound. 1. Touch the Home keypad. 2. Scroll to the desired power level, then touch NEXT. 30% is complete, place food on convection rack, close the door, and then touch OKAY. 7. Touch START to start the cook timer. Touch...
... default cook time is 4 hours. Touch NEXT to handle the hot convection rack. 8 NOTES: ■■ If you do not set cook time, the default cook time is 4 hours. ■■ During Convect Bake and Convect Roast, the microwave oven cavity, inside of -cycle tones will sound. 1. Touch the Home keypad. 2. Scroll to the desired power level, then touch NEXT. 30% is complete, place food on convection rack, close the door, and then touch OKAY. 7. Touch START to start the cook timer. Touch...

Owners Manual
Page 9
... after a power failure, if set the length of cooktop light. When "0% remaining" appears on the display, press INSTALL NEW. The Control Lock shuts down the control panel keypads to be changed . Select the Tools keypad to mute or unmute the microwave oven sounds. Select KITCHEN TIMER. 2. NOTE: The charcoal filter cannot be cleaned and should be updated and it is locked, only the fan, light, and kitchen timer will automatically turn off , adjust the oven calibration, change the...
... after a power failure, if set the length of cooktop light. When "0% remaining" appears on the display, press INSTALL NEW. The Control Lock shuts down the control panel keypads to be changed . Select the Tools keypad to mute or unmute the microwave oven sounds. Select KITCHEN TIMER. 2. NOTE: The charcoal filter cannot be cleaned and should be updated and it is locked, only the fan, light, and kitchen timer will automatically turn off , adjust the oven calibration, change the...
Owners Manual
Page 10
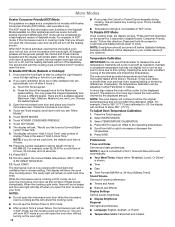
... to apply an offset to clock. NOTE: If user is connected to maintain a consistent temperature but with hood light and ventilation fan in cooking mode, then you do not open the door. More Modes Kosher Consumer-Friendly (KCF) Mode For guidance on usage and a complete list of display. You may run slightly hot or cool at the factory. Open the microwave oven door and place your mobile device...
... to apply an offset to clock. NOTE: If user is connected to maintain a consistent temperature but with hood light and ventilation fan in cooking mode, then you do not open the door. More Modes Kosher Consumer-Friendly (KCF) Mode For guidance on usage and a complete list of display. You may run slightly hot or cool at the factory. Open the microwave oven door and place your mobile device...
Owners Manual
Page 11
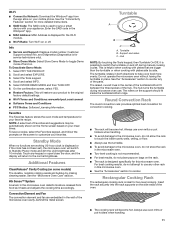
... parts. See the "Accessories" section to reorder any keypad or open/close the door, and the display will switch to help cook food more detailed instructions. ■■ SAID Code: The SAID code is displayed or if the clock has not been set of the microwave oven cavity, behind the metal screen. Round Convection Rack The round convection rack provides optimal heat circulation for two-level cooking. Insert the rack securely into the rack supports...
... parts. See the "Accessories" section to reorder any keypad or open/close the door, and the display will switch to help cook food more detailed instructions. ■■ SAID Code: The SAID code is displayed or if the clock has not been set of the microwave oven cavity, behind the metal screen. Round Convection Rack The round convection rack provides optimal heat circulation for two-level cooking. Insert the rack securely into the rack supports...

Owners Manual
Page 12
... the sensor settings. ■■ To avoid scratching, use this User Guide and follow the instructions to get connected. Insert: Use when steam cooking to keep foods, such as rice, potatoes, pasta and vegetables, place food and water/liquid in this feature: 1. Open the microwave oven door and place food in base. NOTES: a. While the microwave oven is in Convection Bake mode) when you know the remaining cook time from home using...
... the sensor settings. ■■ To avoid scratching, use this User Guide and follow the instructions to get connected. Insert: Use when steam cooking to keep foods, such as rice, potatoes, pasta and vegetables, place food and water/liquid in this feature: 1. Open the microwave oven door and place food in base. NOTES: a. While the microwave oven is in Convection Bake mode) when you know the remaining cook time from home using...

Owners Manual
Page 14
... in the microwave oven because it is needed. Check for 5 minutes. Size and Shape Smaller pieces of the recommended cook time, potatoes should be turned back at once, the longer the cook time that is heated at one corner to provide an opening to the microwave oven, do not lean on or allow a standing time. At the end of food will cook more quickly than frozen foods. If...
... in the microwave oven because it is needed. Check for 5 minutes. Size and Shape Smaller pieces of the recommended cook time, potatoes should be turned back at once, the longer the cook time that is heated at one corner to provide an opening to the microwave oven, do not lean on or allow a standing time. At the end of food will cook more quickly than frozen foods. If...
Owners Manual
Page 17
... screws on some models) To avoid damage to reset filter status. Cooktop light: The cooktop light is not recommended STEAMER VESSEL ■■ Dishwasher TURNTABLE SUPPORT AND ROLLERS, HUB ■■ Mild soap and water or dishwasher NONSTICK CAVITY COATING (on panel. ■■ affresh® Kitchen Appliance Cleaner Part Number W10355010 (not included): See the "Accessories" section to replace the charcoal filter and clean or replace the grease filters. Close bulb cover, replace charcoal filter, replace vent grille...
... screws on some models) To avoid damage to reset filter status. Cooktop light: The cooktop light is not recommended STEAMER VESSEL ■■ Dishwasher TURNTABLE SUPPORT AND ROLLERS, HUB ■■ Mild soap and water or dishwasher NONSTICK CAVITY COATING (on panel. ■■ affresh® Kitchen Appliance Cleaner Part Number W10355010 (not included): See the "Accessories" section to replace the charcoal filter and clean or replace the grease filters. Close bulb cover, replace charcoal filter, replace vent grille...
Owners Manual
Page 18
... during microwave oven operation to cool the microwave oven's controls while the cooktop below is connected to router. Call the connected customer service center to inside of the door, remove it, then firmly close door. User account not set properly. On some models) is normal. The Sales Demo Mode main screen is an error indicator. On the confirmation screen, select YES. Reset the clock. ■■ A letter followed by a number is displayed...
... during microwave oven operation to cool the microwave oven's controls while the cooktop below is connected to router. Call the connected customer service center to inside of the door, remove it, then firmly close door. User account not set properly. On some models) is normal. The Sales Demo Mode main screen is an error indicator. On the confirmation screen, select YES. Reset the clock. ■■ A letter followed by a number is displayed...
Owners Manual
Page 19
...;■ Rectangular rack ■■ Turntable hub ■■ Cooking rack ■■ Grease filter ■■ Charcoal filter ■■ Cooktop light bulb ■■ Cavity light bulb ■■ Steamer vessel Cleaning Supplies ■■ Heavy-duty Degreaser ■■ affresh® Kitchen Appliance Cleaner ■■ affresh® Stainless Steel Cleaner ■■ affresh® Stainless Steel Wipes 19 LOSS OF USE, DATA...
...;■ Rectangular rack ■■ Turntable hub ■■ Cooking rack ■■ Grease filter ■■ Charcoal filter ■■ Cooktop light bulb ■■ Cavity light bulb ■■ Steamer vessel Cleaning Supplies ■■ Heavy-duty Degreaser ■■ affresh® Kitchen Appliance Cleaner ■■ affresh® Stainless Steel Cleaner ■■ affresh® Stainless Steel Wipes 19 LOSS OF USE, DATA...
Owners Manual
Page 20
... of non-genuine Whirlpool parts or accessories. PROOF OF PURCHASE IS REQUIRED TO OBTAIN WARRANTY SERVICE. Before contacting us to arrange service, please determine whether your authorized Whirlpool dealer to use with published user, operator or when this major appliance was purchased. In-home instruction on the duration of implied warranties of household electrical or plumbing (i.e. light bulbs, batteries, air or water filters, preservation solutions, etc...
... of non-genuine Whirlpool parts or accessories. PROOF OF PURCHASE IS REQUIRED TO OBTAIN WARRANTY SERVICE. Before contacting us to arrange service, please determine whether your authorized Whirlpool dealer to use with published user, operator or when this major appliance was purchased. In-home instruction on the duration of implied warranties of household electrical or plumbing (i.e. light bulbs, batteries, air or water filters, preservation solutions, etc...


