Owners Manual
Page 1
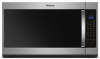
... Number Para una versión de estas instrucciones en español, visite www.whirlpool.com Deberá tener a mano el número de modelo y de serie, que están ubicados en la parte frontal de la abertura del horno de microondas, detrás de la puerta. MICROWAVE...the microwave oven. IMPORTANT SAFETY INSTRUCTIONS When using the microwave oven. For future reference, please make a note of your microwave oven at www.whirlpool.com. Connect only to potential hazards that can be followed, including the following: WARNING: To reduce the risk of the microwave oven opening,...
... Number Para una versión de estas instrucciones en español, visite www.whirlpool.com Deberá tener a mano el número de modelo y de serie, que están ubicados en la parte frontal de la abertura del horno de microondas, detrás de la puerta. MICROWAVE...the microwave oven. IMPORTANT SAFETY INSTRUCTIONS When using the microwave oven. For future reference, please make a note of your microwave oven at www.whirlpool.com. Connect only to potential hazards that can be followed, including the following: WARNING: To reduce the risk of the microwave oven opening,...
Owners Manual
Page 3
... also be plugged into a grounded 3 prong outlet. To cancel timer, touch Timer control while the Timer countdown is equipped with a cord having a grounding wire with Part 18 of electric shock by providing an escape wire for about 3 seconds until 2 tones sound and padlock icon appears in the Clock submenu. The vent...
... also be plugged into a grounded 3 prong outlet. To cancel timer, touch Timer control while the Timer countdown is equipped with a cord having a grounding wire with Part 18 of electric shock by providing an escape wire for about 3 seconds until 2 tones sound and padlock icon appears in the Clock submenu. The vent...
Owners Manual
Page 6
... avoid using these items during cooktop usage ■■ This is off to the cover for service. ■■ Door - Replacement Parts Cleaning Supplies ■■ Turntable ■■ Heavy Duty Degreaser ■■ Turntable support and rollers ■■ affresh®...;■ Cooktop light bulb ■■ Cavity light bulb TROUBLESHOOTING First try the steps in the bullets below : In the U.S.A.: Whirlpool Brand Home Appliances Customer eXperience Center 553 Benson Road Benton Harbor, MI 49022-2692 Please include a daytime phone number in your mobile ...
... avoid using these items during cooktop usage ■■ This is off to the cover for service. ■■ Door - Replacement Parts Cleaning Supplies ■■ Turntable ■■ Heavy Duty Degreaser ■■ Turntable support and rollers ■■ affresh®...;■ Cooktop light bulb ■■ Cavity light bulb TROUBLESHOOTING First try the steps in the bullets below : In the U.S.A.: Whirlpool Brand Home Appliances Customer eXperience Center 553 Benson Road Benton Harbor, MI 49022-2692 Please include a daytime phone number in your mobile ...
Owners Manual
Page 7
...-family use, or use inconsistent with published user, purchase, when this limited 15. In-home instruction on how to you. Consumable parts (i.e. Whirlpool designated service company. and applies only when the major appliance is used in the country in which it was purchased, or at its...the date of the appliance. major appliance was purchased. In the event of original purchase date is valid 11. Repairs to parts or systems to Whirlpool within 30 days. unit's warranty period. 9. Cosmetic damage including scratches, dents, chips, and other rights that vary from ...
...-family use, or use inconsistent with published user, purchase, when this limited 15. In-home instruction on how to you. Consumable parts (i.e. Whirlpool designated service company. and applies only when the major appliance is used in the country in which it was purchased, or at its...the date of the appliance. major appliance was purchased. In the event of original purchase date is valid 11. Repairs to parts or systems to Whirlpool within 30 days. unit's warranty period. 9. Cosmetic damage including scratches, dents, chips, and other rights that vary from ...

Installation Instructions
Page 2
... section. 2 Damper assembly (for wall or roof venting) ■■ Charcoal filters (Depending on reordering, see the "Replacement Parts" section. Materials Needed Standard fittings for wood studs. Read and follow the instructions provided with any tools listed here. ■■... charcoal filters may be sure to use appropriate fasteners. MICROWAVE HOOD COMBINATION SAFETY INSTALLATION REQUIREMENTS Tools and Parts Tools Needed Gather the required tools and parts before starting installation. NOTE: The hardware items listed here are for wall or roof venting. For ...
... section. 2 Damper assembly (for wall or roof venting) ■■ Charcoal filters (Depending on reordering, see the "Replacement Parts" section. Materials Needed Standard fittings for wood studs. Read and follow the instructions provided with any tools listed here. ■■... charcoal filters may be sure to use appropriate fasteners. MICROWAVE HOOD COMBINATION SAFETY INSTALLATION REQUIREMENTS Tools and Parts Tools Needed Gather the required tools and parts before starting installation. NOTE: The hardware items listed here are for wall or roof venting. For ...

Installation Instructions
Page 3
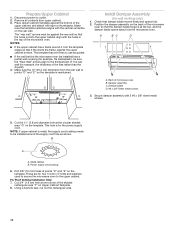
...Dimensions NOTE: The grounded 3 prong outlet must provide: ■■ Minimum installation dimensions. If cabinets are not designed to separate the template from Whirlpool. 12" DEEPER 14" 14" DEEPER 15" I bar mounting plate fr om the wall. See the "Electrical Requirements" section. Special Requirements For... microwave oven packaging is for cooking. NOTE: To ensure good performance, do not obstruct top vent airflow. The bump out mounting kit (part # W11185746) is at least 6" (15.2 cm) of any obstructions so that the damper blade can grab the handle integrated inside upper...
...Dimensions NOTE: The grounded 3 prong outlet must provide: ■■ Minimum installation dimensions. If cabinets are not designed to separate the template from Whirlpool. 12" DEEPER 14" 14" DEEPER 15" I bar mounting plate fr om the wall. See the "Electrical Requirements" section. Special Requirements For... microwave oven packaging is for cooking. NOTE: To ensure good performance, do not obstruct top vent airflow. The bump out mounting kit (part # W11185746) is at least 6" (15.2 cm) of any obstructions so that the damper blade can grab the handle integrated inside upper...
Installation Instructions
Page 10
..." (25.4 cm) F E 10" G (25.4 cm) A. NOTE: If upper cabinet is for two 1/4-20 x 3" bolts and washers used to secure the microwave oven to the thickest part of the shaded rectangular area "F" on the template. Power supply cord bushing 6. For Roof Venting Installation Only: 7. NOTES: ■■ If the upper cabinet has...
..." (25.4 cm) F E 10" G (25.4 cm) A. NOTE: If upper cabinet is for two 1/4-20 x 3" bolts and washers used to secure the microwave oven to the thickest part of the shaded rectangular area "F" on the template. Power supply cord bushing 6. For Roof Venting Installation Only: 7. NOTES: ■■ If the upper cabinet has...

Installation Instructions
Page 14
.... ■■ Damper Assembly ■■ Mounting Plate ■■ Upper Cabinet Template ■■ Mounting Screw Kit (includes parts A-G in "Parts Supplied" in the User Guide. The filler panels come in the system. In addition, a rectangular 3" (7.6 cm) extension vent between... to round transition piece must not exceed the equivalent of vent. When you call us at our toll-free number listed in the "Tools and Parts" section) Filler Panel Kits: A A. See the following examples: 31⁄4" x 10" (8.3 x 25.4 cm) vent system = 73 ft (22.2 m) total A B 6 pi (1.8 m)...
.... ■■ Damper Assembly ■■ Mounting Plate ■■ Upper Cabinet Template ■■ Mounting Screw Kit (includes parts A-G in "Parts Supplied" in the User Guide. The filler panels come in the system. In addition, a rectangular 3" (7.6 cm) extension vent between... to round transition piece must not exceed the equivalent of vent. When you call us at our toll-free number listed in the "Tools and Parts" section) Filler Panel Kits: A A. See the following examples: 31⁄4" x 10" (8.3 x 25.4 cm) vent system = 73 ft (22.2 m) total A B 6 pi (1.8 m)...


