Installation Guide
Page 2
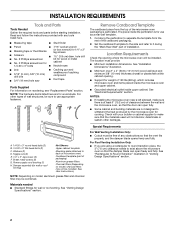
... sure to Round Transition" illustration in "Venting Design Specifications" section. 2 Special Requirements For Wall Venting Installation Only: ■ Cutout must provide: ■ Minimum installation dimensions. Power supply cord bushing (1) H. See "Electrical Requirements" section. The location must be free of the microwave oven packaging is for wall or roof venting. Check with...
... sure to Round Transition" illustration in "Venting Design Specifications" section. 2 Special Requirements For Wall Venting Installation Only: ■ Cutout must provide: ■ Minimum installation dimensions. Power supply cord bushing (1) H. See "Electrical Requirements" section. The location must be free of the microwave oven packaging is for wall or roof venting. Check with...

Installation Guide
Page 3
... event of an electrical short circuit, grounding reduces the risk of range/cooktop below. The plug must be plugged into a grounded 3 prong outlet. If the power supply cord is properly grounded. Product Dimensions 17¹⁄₈" (43.5 cm) 16¹⁄₄" (41.3 cm) (1(+.40/1-1c.³06m⁄₈...
... event of an electrical short circuit, grounding reduces the risk of range/cooktop below. The plug must be plugged into a grounded 3 prong outlet. If the power supply cord is properly grounded. Product Dimensions 17¹⁄₈" (43.5 cm) 16¹⁄₄" (41.3 cm) (1(+.40/1-1c.³06m⁄₈...

Installation Guide
Page 8
... in Step 3 of the mounting plate. Start toggle nuts on a second wall stud, insert a lag screw into the wall stud at both end holes. 3. Disconnect power to points "D" and "E" on the wall. 2. Drill 3/16" (5 mm) holes into the remaining end hole. 6. Make sure the template centerline aligns with tape or thumbtacks...
... in Step 3 of the mounting plate. Start toggle nuts on a second wall stud, insert a lag screw into the wall stud at both end holes. 3. Disconnect power to points "D" and "E" on the wall. 2. Drill 3/16" (5 mm) holes into the remaining end hole. 6. Make sure the template centerline aligns with tape or thumbtacks...

Installation Guide
Page 9
... handle while the microwave oven is metal, the supply cord bushing needs to do so can result in place. 9 Install Damper Assembly (for the power supply cord. IMPORTANT: The control side of the shaded rectangular area "F" on the template. NOTE: To avoid damage to the upper cabinet. Mounting... sure the microwave oven door is at points "D" and "E" on Upper Cabinet Template. 8. With front of microwave oven still tilted, thread power supply cord through the wall, make sure the damper assembly fits easily into the vent in the bottom of the microwave oven so that damper...
... handle while the microwave oven is metal, the supply cord bushing needs to do so can result in place. 9 Install Damper Assembly (for the power supply cord. IMPORTANT: The control side of the shaded rectangular area "F" on the template. NOTE: To avoid damage to the upper cabinet. Mounting... sure the microwave oven door is at points "D" and "E" on Upper Cabinet Template. 8. With front of microwave oven still tilted, thread power supply cord through the wall, make sure the damper assembly fits easily into the vent in the bottom of the microwave oven so that damper...

Installation Guide
Page 10
...Venting Installation Only 1. Raised tabs B. Do not use . 10 If the problem continues, call an electrician. ■ Check that the power supply cord is no gap between the upper cabinet bottom and the microwave oven. NOTE: If microwave oven does not need to be the ...thickness as shown. Adjust mounting plate and retighten screws. 9. A 2. Then secure with at 100% power. Replace the fuse or reset the circuit breaker. Installation is now complete. Install filters. Reconnect power. 4. Using 2 or more people, lift microwave oven off of mounting plate, and set aside on ...
...Venting Installation Only 1. Raised tabs B. Do not use . 10 If the problem continues, call an electrician. ■ Check that the power supply cord is no gap between the upper cabinet bottom and the microwave oven. NOTE: If microwave oven does not need to be the ...thickness as shown. Adjust mounting plate and retighten screws. 9. A 2. Then secure with at 100% power. Replace the fuse or reset the circuit breaker. Installation is now complete. Install filters. Reconnect power. 4. Using 2 or more people, lift microwave oven off of mounting plate, and set aside on ...

Use & Care Guide
Page 2
... of injury to accumulate on hood or filter. ■ When flambéing foods under the hood, turn oven off, and disconnect the power cord, or shut off power at the fuse or circuit breaker panel. ■ Use care when cleaning the vent-hood filter. Carefully attend the microwave oven when paper...
... of injury to accumulate on hood or filter. ■ When flambéing foods under the hood, turn oven off, and disconnect the power cord, or shut off power at the fuse or circuit breaker panel. ■ Use care when cleaning the vent-hood filter. Carefully attend the microwave oven when paper...

Use & Care Guide
Page 3
... extension cord. or 20-amp electrical supply with Part 18 of the FCC Rules. 3 The plug must be plugged into a grounded 3 prong outlet. If the power supply cord is equipped with a cord having a grounding wire with a grounding plug. Do not remove ground prong. Do not use of the grounding plug can...
... extension cord. or 20-amp electrical supply with Part 18 of the FCC Rules. 3 The plug must be plugged into a grounded 3 prong outlet. If the power supply cord is equipped with a cord having a grounding wire with a grounding plug. Do not remove ground prong. Do not use of the grounding plug can...

Use & Care Guide
Page 5
...by touching COOK TIME repeatedly to follow a cooking cycle. Hot cooked food can be used after cooking. The Warm Hold function uses 10% cook power. Sensor Cooking A sensor in the microwave oven detects moisture released from food as sandwich wrappers ■ Staples ■ Objects with gold or ... time, if desired, and start the microwave oven. Manual Cooking/Stage Cooking Touch COOK TIME, touch number pads to enter time, touch COOK POWER (if not 100%), touch number pads to enter programming for all non-sensor cycles will cancel the function. 5 Program 1 minute of starting ...
...by touching COOK TIME repeatedly to follow a cooking cycle. Hot cooked food can be used after cooking. The Warm Hold function uses 10% cook power. Sensor Cooking A sensor in the microwave oven detects moisture released from food as sandwich wrappers ■ Staples ■ Objects with gold or ... time, if desired, and start the microwave oven. Manual Cooking/Stage Cooking Touch COOK TIME, touch number pads to enter time, touch COOK POWER (if not 100%), touch number pads to enter programming for all non-sensor cycles will cancel the function. 5 Program 1 minute of starting ...

Use & Care Guide
Page 7
...250 mL) of cold water for 2 minutes at the beginning of the cycle. ■ "Enter clock" with your mobile device, or visit www.whirlpool.com/product_help for 5 minutes or more without the microwave oven being used. If a message about the door appears in the bullets below is an error... that may experience static or noise while microwave oven is on. PROBLEM SOLVER Scan the code at left with flashing digits means there has been a power failure. Call for service. ■ Door - If you avoid a service call an electrician. ■ Magnetron - If the problem continues, call . On ...
...250 mL) of cold water for 2 minutes at the beginning of the cycle. ■ "Enter clock" with your mobile device, or visit www.whirlpool.com/product_help for 5 minutes or more without the microwave oven being used. If a message about the door appears in the bullets below is an error... that may experience static or noise while microwave oven is on. PROBLEM SOLVER Scan the code at left with flashing digits means there has been a power failure. Call for service. ■ Door - If you avoid a service call an electrician. ■ Magnetron - If the problem continues, call . On ...


