Installation Guide
Page 1
...de 36" (91,4 cm) de largeur ou moins. Ces instructions d'installation sont valables pour plusieurs modèles. W10823832A Always read and obey all safety messages. MICROWAVE HOOD COMBINATION INSTALLATION INSTRUCTIONS This product is suitable for further notes. All safety messages will...injury, and tell you what can kill or hurt you don't follow instructions. These installation instructions cover different models. Voir la section "Exigences d'installation" pour d'autres remarques. See "Installation Requirements" section for use above electric or gas cooking products up to ...
...de 36" (91,4 cm) de largeur ou moins. Ces instructions d'installation sont valables pour plusieurs modèles. W10823832A Always read and obey all safety messages. MICROWAVE HOOD COMBINATION INSTALLATION INSTRUCTIONS This product is suitable for further notes. All safety messages will...injury, and tell you what can kill or hurt you don't follow instructions. These installation instructions cover different models. Voir la section "Exigences d'installation" pour d'autres remarques. See "Installation Requirements" section for use above electric or gas cooking products up to ...

Installation Guide
Page 2
... items listed here are not designed to use as a rear wall template. 1. See User Instructions.) NOTE: Depending on model, aluminum grease filter and charcoal filter may not be included. The piece inside upper cabinet. See "Installation Dimensions" illustration. ■■ Minimum one 2" x 4" (50.8 x 101.6 mm... oven will not discolor, delaminate or sustain other types of the microwave oven packaging is perforated. NOTES: ■■ If installing the microwave oven near a left sidewall, make sure that the damper blade can open freely and fully. See "Rectangular to ...
... items listed here are not designed to use as a rear wall template. 1. See User Instructions.) NOTE: Depending on model, aluminum grease filter and charcoal filter may not be included. The piece inside upper cabinet. See "Installation Dimensions" illustration. ■■ Minimum one 2" x 4" (50.8 x 101.6 mm... oven will not discolor, delaminate or sustain other types of the microwave oven packaging is perforated. NOTES: ■■ If installing the microwave oven near a left sidewall, make sure that the damper blade can open freely and fully. See "Rectangular to ...

Installation Guide
Page 3
... not use an extension cord. or 20-amp electrical supply with a grounding plug. WARNING: Improper use an adapter. GROUNDING INSTRUCTIONS I For all governing codes and ordinances. Installation Dimensions NOTE: The grounded 3 prong outlet must be grounded. Required: ■■ A 120 volt, 60 Hz, AC only, 15- Recommended: ■■ A time-delay fuse...
... not use an extension cord. or 20-amp electrical supply with a grounding plug. WARNING: Improper use an adapter. GROUNDING INSTRUCTIONS I For all governing codes and ordinances. Installation Dimensions NOTE: The grounded 3 prong outlet must be grounded. Required: ■■ A 120 volt, 60 Hz, AC only, 15- Recommended: ■■ A time-delay fuse...
Installation Guide
Page 4
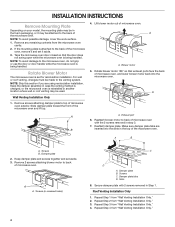
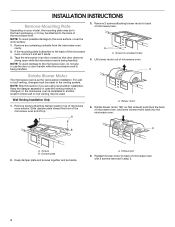
... Step 1. Slide damper plate toward the front of microwave oven. Reattach damper plate. Make sure damper plate tabs are using recirculation installation. Damper plate B. NOTE: To avoid possible damage, cover the work surface. 1. Rotate Blower Motor The microwave oven is being ...Rotate blower motor 180° so that the door does not swing open while the microwave oven is being handled. A B A. A A. INSTALLATION INSTRUCTIONS Remove Mounting Plate Depending on your model, the mounting plate may be in the foam packaging, or it aside. 3. Remove any remaining contents ...
... Step 1. Slide damper plate toward the front of microwave oven. Reattach damper plate. Make sure damper plate tabs are using recirculation installation. Damper plate B. NOTE: To avoid possible damage, cover the work surface. 1. Rotate Blower Motor The microwave oven is being ...Rotate blower motor 180° so that the door does not swing open while the microwave oven is being handled. A B A. A A. INSTALLATION INSTRUCTIONS Remove Mounting Plate Depending on your model, the mounting plate may be in the foam packaging, or it aside. 3. Remove any remaining contents ...
Installation Guide
Page 10
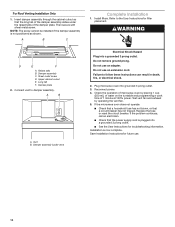
... vent) Electrical Shock Hazard Plug into grounded 3 prong outlet. 3. Then secure with sheet metal screw. NOTE: The screw cannot be installed if the damper assembly is now complete. Refer to the User Instructions for troubleshooting information. Damper assembly C. Long tab F. Damper plate 2. Vent B. Do not use an extension cord. Test vent fan... and programming a cook time of the damper plate. If the problem continues, call an electrician. ■■ Check that a circuit breaker has not tripped. Save Installation Instructions for future use. 10
... vent) Electrical Shock Hazard Plug into grounded 3 prong outlet. 3. Then secure with sheet metal screw. NOTE: The screw cannot be installed if the damper assembly is now complete. Refer to the User Instructions for troubleshooting information. Damper assembly C. Long tab F. Damper plate 2. Vent B. Do not use an extension cord. Test vent fan... and programming a cook time of the damper plate. If the problem continues, call an electrician. ■■ Check that a circuit breaker has not tripped. Save Installation Instructions for future use. 10
Dimension Guide
Page 1
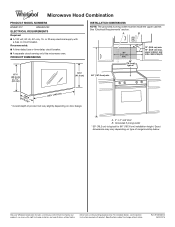
....2 cm) is typical for planning purposes only. For complete details, see Installation Instructions packed with a fuse or circuit breaker. Specifications subject to change without notice. PRODUCT DIMENSIONS INSTALLATION DIMENSIONS NOTE: The grounded 3 prong outlet must be inside the upper cabinet. Because Whirlpool Corporation includes a continuous commitment to improve our products, we reserve the right...
....2 cm) is typical for planning purposes only. For complete details, see Installation Instructions packed with a fuse or circuit breaker. Specifications subject to change without notice. PRODUCT DIMENSIONS INSTALLATION DIMENSIONS NOTE: The grounded 3 prong outlet must be inside the upper cabinet. Because Whirlpool Corporation includes a continuous commitment to improve our products, we reserve the right...
Installation Guide
Page 1
... suitable for further notes. Always read and obey all safety messages. W10823831A These words mean: DANGER You can kill or hurt you don't follow instructions. These installation instructions cover different models. This symbol alerts you to reduce the chance of injury, and tell you don't immediately follow the safety alert symbol and either...
... suitable for further notes. Always read and obey all safety messages. W10823831A These words mean: DANGER You can kill or hurt you don't follow instructions. These installation instructions cover different models. This symbol alerts you to reduce the chance of injury, and tell you don't immediately follow the safety alert symbol and either...
Installation Guide
Page 2
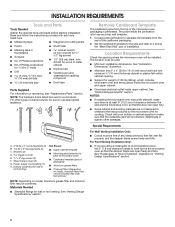
... not discolor, delaminate or sustain other types of installation. Special Requirements For Wall Venting Installation Only: ■■ Cutout must provide: ■■ Minimum installation dimensions. See User Instructions.) NOTE: Depending on reordering, see "Replacement Parts...flat-head bolts (2) C. Z\v" x 2" lag screws (2) F. Materials Needed ■■ Standard fittings for wood studs. The location must be installed. See "Electrical Requirements" section. See "Rectangular to exist above the microwave oven so that the vent fits properly, and the damper blade opens ...
... not discolor, delaminate or sustain other types of installation. Special Requirements For Wall Venting Installation Only: ■■ Cutout must provide: ■■ Minimum installation dimensions. See User Instructions.) NOTE: Depending on reordering, see "Replacement Parts...flat-head bolts (2) C. Z\v" x 2" lag screws (2) F. Materials Needed ■■ Standard fittings for wood studs. The location must be installed. See "Electrical Requirements" section. See "Rectangular to exist above the microwave oven so that the vent fits properly, and the damper blade opens ...
Installation Guide
Page 3
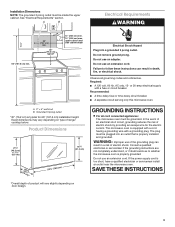
... adapter. If the power supply cord is typical for the electric current. SAVE THESE INSTRUCTIONS 3 Grounded 3 prong outlet *30" (76.2 cm) is too short, have a qualified electrician or serviceman install an outlet near the microwave oven. Exact dimensions may vary depending on type of product... will vary slightly depending on door design. GROUNDING INSTRUCTIONS I For all governing codes and ordinances. In the event of an ...
... adapter. If the power supply cord is typical for the electric current. SAVE THESE INSTRUCTIONS 3 Grounded 3 prong outlet *30" (76.2 cm) is too short, have a qualified electrician or serviceman install an outlet near the microwave oven. Exact dimensions may vary depending on type of product... will vary slightly depending on door design. GROUNDING INSTRUCTIONS I For all governing codes and ordinances. In the event of an ...
Installation Guide
Page 4
... Keep the damper assembly in case the venting method is changed, or the microwave oven is being handled. 3. Wall Venting Installation Only 1. Remove screws attaching damper plate to back of microwave oven with 2 screws removed in another location where wall or roof... Reattach blower motor to top of the microwave oven and lift up. Screws B. Screws (in the foam packaging, or it aside. 3. INSTALLATION INSTRUCTIONS Remove Mounting Plate Depending on your model, the mounting plate may be in recessed holes) 4. Tape the microwave oven door closed so that exhaust...
... Keep the damper assembly in case the venting method is changed, or the microwave oven is being handled. 3. Wall Venting Installation Only 1. Remove screws attaching damper plate to back of microwave oven with 2 screws removed in another location where wall or roof... Reattach blower motor to top of the microwave oven and lift up. Screws B. Screws (in the foam packaging, or it aside. 3. INSTALLATION INSTRUCTIONS Remove Mounting Plate Depending on your model, the mounting plate may be in recessed holes) 4. Tape the microwave oven door closed so that exhaust...

Installation Guide
Page 10
... A 2. WARNING A. Damper assembly (under the raised tabs of the damper assembly slides under vent) Complete Installation 1. Sheet metal screw D. Save Installation Instructions for filter placement. Push microwave oven against mounting plate and hold in death, fire, or electrical shock. 2. Long ...tab F. Install filters. Check the operation of microwave oven by operating the vent fan. 5. Adjust ...
... A 2. WARNING A. Damper assembly (under the raised tabs of the damper assembly slides under vent) Complete Installation 1. Sheet metal screw D. Save Installation Instructions for filter placement. Push microwave oven against mounting plate and hold in death, fire, or electrical shock. 2. Long ...tab F. Install filters. Check the operation of microwave oven by operating the vent fan. 5. Adjust ...

Use & Care Guide
Page 1
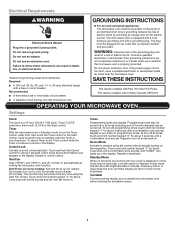
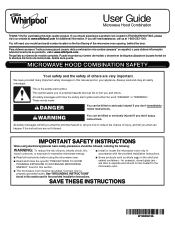
... alerts you don't follow the specific "PRECAUTIONS TO AVOID POSSIBLE EXPOSURE TO EXCESSIVE MICROWAVE ENERGY" found in the provided Installation Instructions. All safety messages will tell you what can be killed or seriously injured if you to explode and should be ...Install or locate the microwave oven only in this high-quality product. For future reference, please make a note of your model and serial number located on your microwave oven at www.whirlpool.ca. See "GROUNDING INSTRUCTIONS" found in this section and in this section. SAVE THESE INSTRUCTIONS...
... alerts you don't follow the specific "PRECAUTIONS TO AVOID POSSIBLE EXPOSURE TO EXCESSIVE MICROWAVE ENERGY" found in the provided Installation Instructions. All safety messages will tell you what can be killed or seriously injured if you to explode and should be ...Install or locate the microwave oven only in this high-quality product. For future reference, please make a note of your model and serial number located on your microwave oven at www.whirlpool.ca. See "GROUNDING INSTRUCTIONS" found in this section and in this section. SAVE THESE INSTRUCTIONS...
Use & Care Guide
Page 3
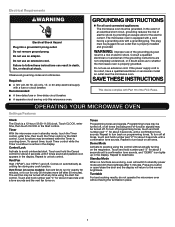
... fan turns on the magnetron. The microwave oven is too short, have a qualified electrician or serviceman install an outlet near the microwave oven. Consult a qualified electrician or serviceman if the grounding instructions are working (12-hour clock is displayed or if the clock has not been set), oven will...00-11:59) clock. Turntable For best cooking results, do not operate the microwave oven without actually turning on . Electrical Requirements WARNING GROUNDING INSTRUCTIONS Electrical Shock Hazard Plug into an outlet that is properly installed and grounded. To turn off .
... fan turns on the magnetron. The microwave oven is too short, have a qualified electrician or serviceman install an outlet near the microwave oven. Consult a qualified electrician or serviceman if the grounding instructions are working (12-hour clock is displayed or if the clock has not been set), oven will...00-11:59) clock. Turntable For best cooking results, do not operate the microwave oven without actually turning on . Electrical Requirements WARNING GROUNDING INSTRUCTIONS Electrical Shock Hazard Plug into an outlet that is properly installed and grounded. To turn off .

Use & Care Guide
Page 4
...dish becomes hot and the water stays cool, do not use stainless steel cleaner. ■■ Turntable: mild soap and water or dishwasher Installing/Replacing Filters and Light Bulbs ■■ Grease filters: Grease filters are OFF and the microwave oven is cool. If programming additional stages, ...to the side of water beside it to the right, and secure with screws. 4 Preset Defrosting Pizza (reheat) Unwrap food. Always follow label instructions on the vent grille, slide the vent grille to the left , tilt it forward, lift it to enter power level (10-90), then ...
...dish becomes hot and the water stays cool, do not use stainless steel cleaner. ■■ Turntable: mild soap and water or dishwasher Installing/Replacing Filters and Light Bulbs ■■ Grease filters: Grease filters are OFF and the microwave oven is cool. If programming additional stages, ...to the side of water beside it to the right, and secure with screws. 4 Preset Defrosting Pizza (reheat) Unwrap food. Always follow label instructions on the vent grille, slide the vent grille to the left , tilt it forward, lift it to enter power level (10-90), then ...
Use & Care Guide
Page 6
... unauthorized service, the remaining term of the original unit's alteration or modification of incidental or consequential damages, so these excluded circumstances shall be provided by Whirlpool. DISCLAIMER OF IMPLIED WARRANTIES IMPLIED WARRANTIES, INCLUDING ANY IMPLIED WARRANTY OF MERCHANTABILITY OR IMPLIED WARRANTY OF FITNESS FOR A PARTICULAR PURPOSE, ARE LIMITED TO ONE YEAR... you also may have the following information available when you also may have other rights that vary from defects in materials and workmanship and is installed, installation instructions.
... unauthorized service, the remaining term of the original unit's alteration or modification of incidental or consequential damages, so these excluded circumstances shall be provided by Whirlpool. DISCLAIMER OF IMPLIED WARRANTIES IMPLIED WARRANTIES, INCLUDING ANY IMPLIED WARRANTY OF MERCHANTABILITY OR IMPLIED WARRANTY OF FITNESS FOR A PARTICULAR PURPOSE, ARE LIMITED TO ONE YEAR... you also may have the following information available when you also may have other rights that vary from defects in materials and workmanship and is installed, installation instructions.
Warranty Information
Page 1
.... light bulbs, batteries, air or water filters, preservation solutions, etc.). 5. This product is installed, operated and maintained according to instructions attached to obtain service under these limitations and exclusions may have the following information available when you should ask Whirlpool or your product requires repair. Some states and provinces do not allow the...
.... light bulbs, batteries, air or water filters, preservation solutions, etc.). 5. This product is installed, operated and maintained according to instructions attached to obtain service under these limitations and exclusions may have the following information available when you should ask Whirlpool or your product requires repair. Some states and provinces do not allow the...
Use & Care Guide
Page 1
...de microondas, detrás de la puerta. I Some products such as whole eggs in accordance with the provided Installation Instructions. SAVE THESE INSTRUCTIONS W10835574A All safety messages will tell you what can be killed or seriously injured if you and others are able...ón adicional acerca de su producto, visite: www.whirlpool.com Tenga listo su número de modelo completo. I Install or locate the microwave oven only in the shell and sealed containers - IMPORTANT SAFETY INSTRUCTIONS When using the microwave oven. User Guide Microwave Hood Combination...
...de microondas, detrás de la puerta. I Some products such as whole eggs in accordance with the provided Installation Instructions. SAVE THESE INSTRUCTIONS W10835574A All safety messages will tell you what can be killed or seriously injured if you and others are able...ón adicional acerca de su producto, visite: www.whirlpool.com Tenga listo su número de modelo completo. I Install or locate the microwave oven only in the shell and sealed containers - IMPORTANT SAFETY INSTRUCTIONS When using the microwave oven. User Guide Microwave Hood Combination...
Use & Care Guide
Page 3
... back on the magnetron. Turntable For best cooking results, do not operate the microwave oven without actually turning on programming tones. GROUNDING INSTRUCTIONS I For all tones, touch and hold the Cancel control for about 3 seconds until a tone sounds and the vent fan turns ...Tones Programming tones and signals. To turn off after 5 minutes. Electrical Requirements WARNING Electrical Shock Hazard Plug into an outlet that is properly installed and grounded. Do not remove ground prong. Do not use an adapter. Recommended: ■■ A time-delay fuse or time-delay...
... back on the magnetron. Turntable For best cooking results, do not operate the microwave oven without actually turning on programming tones. GROUNDING INSTRUCTIONS I For all tones, touch and hold the Cancel control for about 3 seconds until a tone sounds and the vent fan turns ...Tones Programming tones and signals. To turn off after 5 minutes. Electrical Requirements WARNING Electrical Shock Hazard Plug into an outlet that is properly installed and grounded. Do not remove ground prong. Do not use an adapter. Recommended: ■■ A time-delay fuse or time-delay...

Use & Care Guide
Page 4
...see the Cooking Guide label on the front facing of the microwave oven, and is replaceable. Pizza (reheat) Touch PIZZA. Always follow label instructions on the vent grille, tilt the grille forward, lift it toward the tab area. ■■ Charcoal filter: The charcoal filter is ... CARE General Cleaning IMPORTANT: Before cleaning, make sure all controls are on the vent grille, tilt the grille forward, and lift it . Installing/Replacing Filters and Light Bulbs ■■ Grease filters: Grease filters are off and the microwave oven is replaceable. Remove two screws on the...
...see the Cooking Guide label on the front facing of the microwave oven, and is replaceable. Pizza (reheat) Touch PIZZA. Always follow label instructions on the vent grille, tilt the grille forward, lift it toward the tab area. ■■ Charcoal filter: The charcoal filter is ... CARE General Cleaning IMPORTANT: Before cleaning, make sure all controls are on the vent grille, tilt the grille forward, and lift it . Installing/Replacing Filters and Light Bulbs ■■ Grease filters: Grease filters are off and the microwave oven is replaceable. Remove two screws on the...

Use & Care Guide
Page 6
... number ■ A clear, detailed description of the problem ■ Proof of non-genuine Whirlpool parts or accessories. 6. If outside the 50 United States or Canada, contact your appliance will pay for appliances with published user, operator or installation instructions. 2. This limited warranty is valid only in the United States or Canada and applies...
... number ■ A clear, detailed description of the problem ■ Proof of non-genuine Whirlpool parts or accessories. 6. If outside the 50 United States or Canada, contact your appliance will pay for appliances with published user, operator or installation instructions. 2. This limited warranty is valid only in the United States or Canada and applies...


