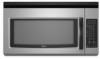
User Instructions
Page 1
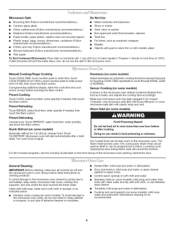
... INSTRUCTIONS W10182518A You will follow instructions. This symbol alerts you to properly grounded outlet. IMPORTANT SAFETY INSTRUCTIONS When using the microwave oven. Connect only to potential hazards that can be killed or seriously injured if you should experience a problem not covered... eggs in the provided Installation Instructions. m Read and follow instructions. All safety messages will need assistance, call us at www.whirlpool.com for additional information. See "GROUNDING INSTRUCTIONS" found in this section and in the shell and sealed containers - If you don...
... INSTRUCTIONS W10182518A You will follow instructions. This symbol alerts you to properly grounded outlet. IMPORTANT SAFETY INSTRUCTIONS When using the microwave oven. Connect only to potential hazards that can be killed or seriously injured if you should experience a problem not covered... eggs in the provided Installation Instructions. m Read and follow instructions. All safety messages will need assistance, call us at www.whirlpool.com for additional information. See "GROUNDING INSTRUCTIONS" found in this section and in the shell and sealed containers - If you don...
User Instructions
Page 2
...91.44 cm). [] Clean Ventilating Hoods Frequently - Stir the liquid both gas and electric cooking equipment. [] Intended to be boiling. Carefully attend the microwave oven when paper, plastic, or other part of electric shock. [] Suitable for use above ranges with metal foil. If materials ...SAVE THESE INSTRUCTIONS PRECAUTIONS TO AVOID POSSIBLE EXPOSURE TO EXCESSIVE MICROWAVE ENERGY (a) Do not attempt to operate this oven when not in use. [] Do not store anything directly on . [] Use care when cleaning the vent-hood filter. Call an authorized service company for examination, repair...
...91.44 cm). [] Clean Ventilating Hoods Frequently - Stir the liquid both gas and electric cooking equipment. [] Intended to be boiling. Carefully attend the microwave oven when paper, plastic, or other part of electric shock. [] Suitable for use above ranges with metal foil. If materials ...SAVE THESE INSTRUCTIONS PRECAUTIONS TO AVOID POSSIBLE EXPOSURE TO EXCESSIVE MICROWAVE ENERGY (a) Do not attempt to operate this oven when not in use. [] Do not store anything directly on . [] Use care when cleaning the vent-hood filter. Call an authorized service company for examination, repair...
User Instructions
Page 3
...30 minutes more (off after 30 minutes). CLEANRELEASE ® Cavity Coating (on automatically as to run for exactly 30 minutes, or to whether the microwave oven is a 12-hour (12:00-11:59) clock, with a grounding plug. Failure to turn tones off . Consult a qualified electrician ... replacing and/or cleaning the filters. Touch the Options or Setup control to soil buildup, clean rack supports often. To avoid damage to the microwave oven due to reach the "Scroll Speed" submenu, and select the scroll speed. Recommended: • A time-delay fuse or time-delay circuit...
...30 minutes more (off after 30 minutes). CLEANRELEASE ® Cavity Coating (on automatically as to run for exactly 30 minutes, or to whether the microwave oven is a 12-hour (12:00-11:59) clock, with a grounding plug. Failure to turn tones off . Consult a qualified electrician ... replacing and/or cleaning the filters. Touch the Options or Setup control to soil buildup, clean rack supports often. To avoid damage to the microwave oven due to reach the "Scroll Speed" submenu, and select the scroll speed. Recommended: • A time-delay fuse or time-delay circuit...
User Instructions
Page 4
...Preset Reheating Touch REHEAT,select food item, enter quantity if needed , then touch the Start control. Warm Hold (on the front facing of the microwave oven opening, behind the door. Always follow a cooking cycle. If dish becomes hot and the water stays cool, do not use metal or sharp...filter: mild soap and water or dishwasher. • Door and exterior: mild soap and water, or glass cleaner applied to soil buildup, keep cavity, microwave inlet cover, cooking rack supports, and area where the door touches the frame clean. Touch COOK, select food item, enter quantity if needed , then ...
...Preset Reheating Touch REHEAT,select food item, enter quantity if needed , then touch the Start control. Warm Hold (on the front facing of the microwave oven opening, behind the door. Always follow a cooking cycle. If dish becomes hot and the water stays cool, do not use metal or sharp...filter: mild soap and water or dishwasher. • Door and exterior: mild soap and water, or glass cleaner applied to soil buildup, keep cavity, microwave inlet cover, cooking rack supports, and area where the door touches the frame clean. Touch COOK, select food item, enter quantity if needed , then ...
User Instructions
Page 5
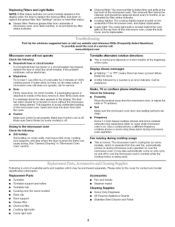
... Stainless Steel Cleaner and Polish 5 Please refer to heat 1 cup (250 mL) of cold water for 5 minutes or more without the microwave oven being used. If the problem continues, call for contact and model identification information. If water does not heat, try the solutions suggested here...It may also automatically come on and cycle on and off . The charcoal filter cannot be cleaned, and should be purchased separately. www.whirlpool.com Microwave oven will not operate Check the following: • Household fuse or circuit breaker If a household fuse has blown or a circuit breaker ...
... Stainless Steel Cleaner and Polish 5 Please refer to heat 1 cup (250 mL) of cold water for 5 minutes or more without the microwave oven being used. If the problem continues, call for contact and model identification information. If water does not heat, try the solutions suggested here...It may also automatically come on and cycle on and off . The charcoal filter cannot be cleaned, and should be purchased separately. www.whirlpool.com Microwave oven will not operate Check the following: • Household fuse or circuit breaker If a household fuse has blown or a circuit breaker ...
User Instructions
Page 6
... the customer. Expenses for travel and transportation for product service if your major appliance is located in -home service is covered by Whirlpool. 5. WHIRLPOOL SHALL NOT BE LIABLE FOR INCIDENTAL OR CONSEQUENTIAL DAMAGES. If outside the 50 United States and Canada, contact your model number and...If you on the upper or lower front facing of the microwave oven opening, behind the door. You can write to Whirlpool with any questions or concerns at the number below. W10182518A SP PN W10182523A © 2008 Whirlpool Corporation. Service calls to correct the installation of your major ...
... the customer. Expenses for travel and transportation for product service if your major appliance is located in -home service is covered by Whirlpool. 5. WHIRLPOOL SHALL NOT BE LIABLE FOR INCIDENTAL OR CONSEQUENTIAL DAMAGES. If outside the 50 United States and Canada, contact your model number and...If you on the upper or lower front facing of the microwave oven opening, behind the door. You can write to Whirlpool with any questions or concerns at the number below. W10182518A SP PN W10182523A © 2008 Whirlpool Corporation. Service calls to correct the installation of your major ...
Installation Instructions
Page 1
...Cabinet 8.. You can kill or hurt you and others are not followed. The appearance of your appliance. Tableof Contents MICROWAVE HOOD COMBINATION SAFETY 1 INSTALLATION REQUIREMENTS 2. This symbol alerts you don't immediately follow instructions. These words mean: You can happen if... further notes. These installation instructions cover different models. Location Requirements 2.. INSTALLATION INSTRUCTIONS 4. Rotate Blower Motor 4.. Install the Microwave Oven 9. This is , tell you how to potential hazards that can be killed or seriously injured if you to ...
...Cabinet 8.. You can kill or hurt you and others are not followed. The appearance of your appliance. Tableof Contents MICROWAVE HOOD COMBINATION SAFETY 1 INSTALLATION REQUIREMENTS 2. This symbol alerts you don't immediately follow instructions. These words mean: You can happen if... further notes. These installation instructions cover different models. Location Requirements 2.. INSTALLATION INSTRUCTIONS 4. Rotate Blower Motor 4.. Install the Microwave Oven 9. This is , tell you how to potential hazards that can be killed or seriously injured if you to ...
Installation Instructions
Page 2
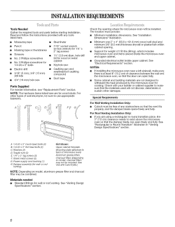
..."Venting Design Specifications" section. For Roof Venting Installation Only: • If you are not designed to back of 150 Ibs (68 kg), which includes microwave oven and items placed inside upper cabinet. Toggle nuts (2) E. 1/4" x 2" lag screws (2) F. See "Venting Design Specifications" section. 2 Support for... other types of wall structures, be free of clearance between the wall and the microwave oven, so that the materials used will be combined. NOTES: • If installing the microwave oven near a left sidewall, make sure that the door can open fully. Special...
..."Venting Design Specifications" section. For Roof Venting Installation Only: • If you are not designed to back of 150 Ibs (68 kg), which includes microwave oven and items placed inside upper cabinet. Toggle nuts (2) E. 1/4" x 2" lag screws (2) F. See "Venting Design Specifications" section. 2 Support for... other types of wall structures, be free of clearance between the wall and the microwave oven, so that the materials used will be combined. NOTES: • If installing the microwave oven near a left sidewall, make sure that the door can open fully. Special...
Installation Instructions
Page 3
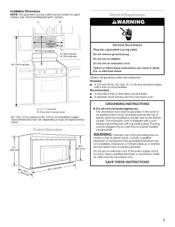
...an extension cord. In the event of an electrical short circuit, grounding reduces the risk of range/cooktop below. See "Electrical Requirements" section. Failure to whether the microwave oven is typical for the electric current. If the power supply cord is properly installed and ...66" (167.6 crn) rnin. T 171/4" (43 8 crn' T 16¼" 111.3 cm) GROUNDING iNSTRUCTiONS [] For all governing codes and ordinances. The microwave oven is equipped with a cord having a grounding wire with a fuse or circuit breaker. Exact dimensions may vary depending on type of electric shock by providing...
...an extension cord. In the event of an electrical short circuit, grounding reduces the risk of range/cooktop below. See "Electrical Requirements" section. Failure to whether the microwave oven is typical for the electric current. If the power supply cord is properly installed and ...66" (167.6 crn) rnin. T 171/4" (43 8 crn' T 16¼" 111.3 cm) GROUNDING iNSTRUCTiONS [] For all governing codes and ordinances. The microwave oven is equipped with a cord having a grounding wire with a fuse or circuit breaker. Exact dimensions may vary depending on type of electric shock by providing...
Installation Instructions
Page 4
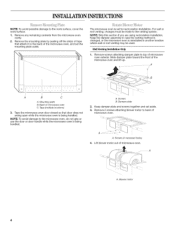
... if you are using recirculation installation. Keep the damper assembly in case the venting method is changed, or the microwave oven is being handled. Back of the microwave oven and lift up. -9 A B C A. A. Wall Venting Installation Only 1. Keep damper plate and screws...cover the work surface. 1. Mounting plate B. The microwave oven is being handled. INSTALLATIONINSTRUCTIONS NOTE: To avoid possible damage to back of microwave oven. Damper plate 2. Remove any remaining contents from the microwave oven cavity. 2. Remove screws attaching damper plate to ...
... if you are using recirculation installation. Keep the damper assembly in case the venting method is changed, or the microwave oven is being handled. Back of the microwave oven and lift up. -9 A B C A. A. Wall Venting Installation Only 1. Keep damper plate and screws...cover the work surface. 1. Mounting plate B. The microwave oven is being handled. INSTALLATIONINSTRUCTIONS NOTE: To avoid possible damage to back of microwave oven. Damper plate 2. Remove any remaining contents from the microwave oven cavity. 2. Remove screws attaching damper plate to ...
Installation Instructions
Page 5
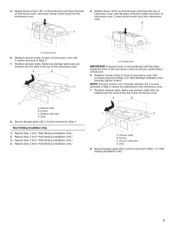
... Only 1. Repeat Step 1 from "Wall Venting Installation Only." NOTE: If blower motor is not positioned with flat sides facing the back of microwave oven with 2 screws removed in Step 3 of "Wall Venting Installation Only." Reattach damper plate. Reattach damper plate. Make sure damper plate tabs...in Step 3 cannot be poor. 6. 5. Rotate blower motor 180 ° so that exhaust ports face the back of microwave oven and lower blower motor back into microwave oven. A. Damper plate tabs D. Repeat Step 2 from "Wall Venting Installation Only." 4. Repeat Step 3 from "Wall Venting...
... Only 1. Repeat Step 1 from "Wall Venting Installation Only." NOTE: If blower motor is not positioned with flat sides facing the back of microwave oven with 2 screws removed in Step 3 of "Wall Venting Installation Only." Reattach damper plate. Reattach damper plate. Make sure damper plate tabs...in Step 3 cannot be poor. 6. 5. Rotate blower motor 180 ° so that exhaust ports face the back of microwave oven and lower blower motor back into microwave oven. A. Damper plate tabs D. Repeat Step 2 from "Wall Venting Installation Only." 4. Repeat Step 3 from "Wall Venting...
Installation Instructions
Page 7
...." Drill 3/16" (5 mm) holes into the wall stud at least 1 wall stud, the mounting plate must align with the front edge of the cabinet. The microwave oven must be installed on both sides of the centerline, and mark. 8. Installation for Wall Studs at least 1, preferably 2, hole(s) through the marks made in...
...." Drill 3/16" (5 mm) holes into the wall stud at least 1 wall stud, the mounting plate must align with the front edge of the cabinet. The microwave oven must be installed on both sides of the centerline, and mark. 8. Installation for Wall Studs at least 1, preferably 2, hole(s) through the marks made in...
Installation Instructions
Page 8
... in Rear Wall" section. 7. Start toggle nuts on a second wall stud, insert a lag screw into the upper cabinet align with the front edge of the microwave oven. // // .// // A. 1/4-20 x 3" round-head bolt B. Mounting plate C. Check alignment of mounting plate, making sure that it is level. 4. Spring toggle nut 1. With the support tabs...
... in Rear Wall" section. 7. Start toggle nuts on a second wall stud, insert a lag screw into the upper cabinet align with the front edge of the microwave oven. // // .// // A. 1/4-20 x 3" round-head bolt B. Mounting plate C. Check alignment of mounting plate, making sure that it is level. 4. Spring toggle nut 1. With the support tabs...
Installation Instructions
Page 9
...damper blade moves freely, and opens fully. 2. NOTE: If upper cabinet is metal, the supply cord bushing needs to move and install microwave oven. Power supply cord bushing 6. Cut 3/4" (19 mm) hole at the circular shaded area "G" on the back of the shaded rectangular... Cabinet Template. 8. Place a washer on the template. Damper assembly C. Mounting plate B. A. For Roof Venting Installation Only 7. Handle the microwave oven gently. 1. Make sure the microwave oven door is closed and taped shut. !! 1= Check that the damper blade hinge is for two 1/4-20 x 3" bolts and washers ...
...damper blade moves freely, and opens fully. 2. NOTE: If upper cabinet is metal, the supply cord bushing needs to move and install microwave oven. Power supply cord bushing 6. Cut 3/4" (19 mm) hole at the circular shaded area "G" on the back of the shaded rectangular... Cabinet Template. 8. Place a washer on the template. Damper assembly C. Mounting plate B. A. For Roof Venting Installation Only 7. Handle the microwave oven gently. 1. Make sure the microwave oven door is closed and taped shut. !! 1= Check that the damper blade hinge is for two 1/4-20 x 3" bolts and washers ...
Installation Instructions
Page 10
...Loosemn ountinpglatescrewsA.djusmt ountinpglateand retightesncrews. 9. Damper assembly (under the raised tabs of 1 minute at 100% power. Upper cabinet cutout E. Plug microwave oven into your model. [ lq A. Installation is not positioned as shown. See the Use and Care Guide for future use. 10 ... outlet. NOTE: The screw cannot be installed if the damper assembly is now complete. Reconnect power. 4. Check the operation of microwave oven by operating the vent fan. 5. Replace the fuse or reset the circuit breaker. Check that a circuit breaker has not tripped...
...Loosemn ountinpglatescrewsA.djusmt ountinpglateand retightesncrews. 9. Damper assembly (under the raised tabs of 1 minute at 100% power. Upper cabinet cutout E. Plug microwave oven into your model. [ lq A. Installation is not positioned as shown. See the Use and Care Guide for future use. 10 ... outlet. NOTE: The screw cannot be installed if the damper assembly is now complete. Reconnect power. 4. Check the operation of microwave oven by operating the vent fan. 5. Replace the fuse or reset the circuit breaker. Check that a circuit breaker has not tripped...
Installation Instructions
Page 11
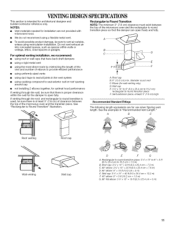
...through the wall, be sure there is at least 3" (7.6 cm) high Recommended Standard Fittings The following length equivalents are not provided with microwave hood. A B C Roof venting Roof cap Wall venting Wall cap D E F G A. VENTINGDESIGNSPECIFICATIONS This section is used, be sure ... wall venting only) D. D E F A. diameter round vent C. Wall cap: 3 ¼" x 10" = 40 ft (8.3 x 25.4 cm = 12.2 m) E 45 ° elbow: 6" = 5 ft (15.2 cm = 1.5 m) G. 90 ° flat elbow: 3 ¼" x 10" = 10 ft (8.3 x 25.4 cm = 3 m) 11 Wall cap E. 3 ¼" x lO" to 6" (8.3x25.4 cm to...
...through the wall, be sure there is at least 3" (7.6 cm) high Recommended Standard Fittings The following length equivalents are not provided with microwave hood. A B C Roof venting Roof cap Wall venting Wall cap D E F G A. VENTINGDESIGNSPECIFICATIONS This section is used, be sure ... wall venting only) D. D E F A. diameter round vent C. Wall cap: 3 ¼" x 10" = 40 ft (8.3 x 25.4 cm = 12.2 m) E 45 ° elbow: 6" = 5 ft (15.2 cm = 1.5 m) G. 90 ° flat elbow: 3 ¼" x 10" = 10 ft (8.3 x 25.4 cm = 3 m) 11 Wall cap E. 3 ¼" x lO" to 6" (8.3x25.4 cm to...
Installation Instructions
Page 12
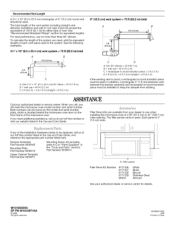
...Template Part Number 8205871 A A. Filler Panel Kits are available from sticking. If any of the microwave oven. Damper Assembly Part Number 8206442 Mounting Plate Part Number 8206315 Mounting Screw Kit (includes parts ...10" (8.3 x 25.4 cm) vent system = 73 ft (22.2 m) total A B 6 ft (I .8 m) (0.6m) C A. One 3 ¼" x 10" (8.3 x 25.4 cm) 90 ° elbow = 25 ft (7.6 m) B. 1 waft cap = 40 ft (12.2 m) C. 2 ft (O.6 m) + 6 ft (1.8 m) straight = 8 ft (2.4 m) 6" (15.2 cm) vent system = 73 ft (22.2 m) total A B 4 6 ft (1.8 m) _..i.........2..f.t.......T (0.8m_ C D A. In addition,...
...Template Part Number 8205871 A A. Filler Panel Kits are available from sticking. If any of the microwave oven. Damper Assembly Part Number 8206442 Mounting Plate Part Number 8206315 Mounting Screw Kit (includes parts ...10" (8.3 x 25.4 cm) vent system = 73 ft (22.2 m) total A B 6 ft (I .8 m) (0.6m) C A. One 3 ¼" x 10" (8.3 x 25.4 cm) 90 ° elbow = 25 ft (7.6 m) B. 1 waft cap = 40 ft (12.2 m) C. 2 ft (O.6 m) + 6 ft (1.8 m) straight = 8 ft (2.4 m) 6" (15.2 cm) vent system = 73 ft (22.2 m) total A B 4 6 ft (1.8 m) _..i.........2..f.t.......T (0.8m_ C D A. In addition,...


