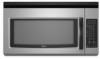
User Instructions
Page 1
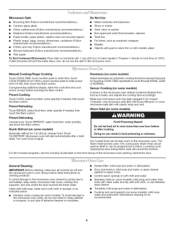
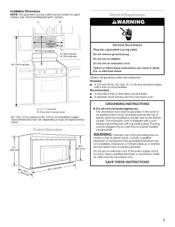
... be followed, including the following: WARNING: To reduce the risk of the microwave oven opening, behind the door. All safety messages will need assistance, call us at www.whirlpool.com for additional information. IMPORTANT SAFETY INSTRUCTIONS When using the microwave oven. SAVE THESE INSTRUCTIONS W10182518A THANK YOU for purchasing this manual and on...
... be followed, including the following: WARNING: To reduce the risk of the microwave oven opening, behind the door. All safety messages will need assistance, call us at www.whirlpool.com for additional information. IMPORTANT SAFETY INSTRUCTIONS When using the microwave oven. SAVE THESE INSTRUCTIONS W10182518A THANK YOU for purchasing this manual and on...
User Instructions
Page 2
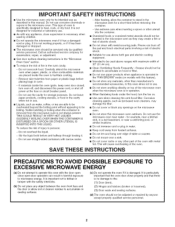
...Do not leave paper products, cooking utensils, or food in the cavity when not in the "Microwave Oven Care" section. Pieces can result in operation. [] When flambeing foods under the hood, turn oven off, and disconnect the power cord, or shut off the pad and touch ...Suitable for use above ranges with maximum width of injury to heat, cook, or dry food. SAVE THESE INSTRUCTIONS PRECAUTIONS TO AVOID POSSIBLE EXPOSURE TO EXCESSIVE MICROWAVE ENERGY (a) Do not attempt to microwave energy. This will cause overheating of the microwave oven when the microwave oven is not designed...
...Do not leave paper products, cooking utensils, or food in the cavity when not in the "Microwave Oven Care" section. Pieces can result in operation. [] When flambeing foods under the hood, turn oven off, and disconnect the power cord, or shut off the pad and touch ...Suitable for use above ranges with maximum width of injury to heat, cook, or dry food. SAVE THESE INSTRUCTIONS PRECAUTIONS TO AVOID POSSIBLE EXPOSURE TO EXCESSIVE MICROWAVE ENERGY (a) Do not attempt to microwave energy. This will cause overheating of the microwave oven when the microwave oven is not designed...
User Instructions
Page 3
... activate reset. Recommended: • A time-delay fuse or time-delay circuit breaker. • A separate circuit serving only this microwave oven. In the event of an electrical short circuit, grounding reduces the risk of electric shock by providing an escape wire for 2-level cooking...3 seconds until 2 tones sound and padlock icon appears in death, fire, or electrical shock. GROUNDING INSTRUCTIONS [] For all cord connected appliances: The microwave oven must be plugged into a grounded 3 prong outlet. WARNING; or RM. Do not remove ground prong. Required: • A 120 Volt,...
... activate reset. Recommended: • A time-delay fuse or time-delay circuit breaker. • A separate circuit serving only this microwave oven. In the event of an electrical short circuit, grounding reduces the risk of electric shock by providing an escape wire for 2-level cooking...3 seconds until 2 tones sound and padlock icon appears in death, fire, or electrical shock. GROUNDING INSTRUCTIONS [] For all cord connected appliances: The microwave oven must be plugged into a grounded 3 prong outlet. WARNING; or RM. Do not remove ground prong. Required: • A 120 Volt,...
User Instructions
Page 4
...touching the Start control. The Warm Hold function uses 10% cook power. Always follow a cooking cycle. To avoid damage to the microwave oven caused by touching COOK TIME repeatedly to paper towel. • Control panel: sponge or soft cloth and water. • Stainless..., enter quantity, and touch the Start control. General Cleaning IMPORTANT: Before cleaning, make sure all controls are off and the microwave oven is not recommended. 4 Microwave-Safe Do Not Use • Browning dish (Follow manufacturer recommendations.) • Ceramic glass, glass • Metal cookware and ...
...touching the Start control. The Warm Hold function uses 10% cook power. Always follow a cooking cycle. To avoid damage to the microwave oven caused by touching COOK TIME repeatedly to paper towel. • Control panel: sponge or soft cloth and water. • Stainless..., enter quantity, and touch the Start control. General Cleaning IMPORTANT: Before cleaning, make sure all controls are off and the microwave oven is not recommended. 4 Microwave-Safe Do Not Use • Browning dish (Follow manufacturer recommendations.) • Ceramic glass, glass • Metal cookware and ...
User Instructions
Page 5
...phone or avoid using these items during microwave oven operation to cool the microwave oven. Following is a list of available parts and supplies which is separate from the vent fan, automatically comes on during microwave oven operation. www.whirlpool.com Microwave oven will not operate Check the following ...: • Soil buildup Soil buildup on cavity walls, microwave inlet cover, cooking rack supports, and area where the door...
...phone or avoid using these items during microwave oven operation to cool the microwave oven. Following is a list of available parts and supplies which is separate from the vent fan, automatically comes on during microwave oven operation. www.whirlpool.com Microwave oven will not operate Check the following ...: • Soil buildup Soil buildup on cavity walls, microwave inlet cover, cooking rack supports, and area where the door...
User Instructions
Page 6
... Repairs when your major appliance, to replace or repair house fuses, or to instruct you on the upper or lower front facing of the microwave oven opening, behind the door. Costs associated with electrical or plumbing codes, or use your major appliance is used in a manner that have... access to the Internet and you need further assistance, you may contact Whirlpool at : Whirlpool Brand Home Appliances Customer eXperience Center 553 Benson Road Benton Harbor, MI 49022-2692 Please include a daytime phone number in -home service ...
... Repairs when your major appliance, to replace or repair house fuses, or to instruct you on the upper or lower front facing of the microwave oven opening, behind the door. Costs associated with electrical or plumbing codes, or use your major appliance is used in a manner that have... access to the Internet and you need further assistance, you may contact Whirlpool at : Whirlpool Brand Home Appliances Customer eXperience Center 553 Benson Road Benton Harbor, MI 49022-2692 Please include a daytime phone number in -home service ...
Installation Instructions
Page 1
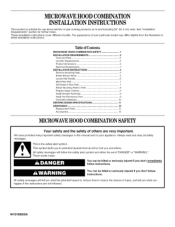
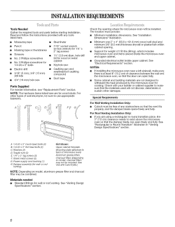
Tableof Contents MICROWAVE HOOD COMBINATION SAFETY 1 INSTALLATION REQUIREMENTS 2. INSTALLATION INSTRUCTIONS 4. Mark RearWall 7.. Attach Mounting Plate to reduce the chance of others . ...have provided many important safety messages in these installation instructions. Rotate Blower Motor 4.. Product Dimensions 3.. Drill Holes in RearWall 7.. Install the Microwave Oven 9. This symbol alerts you don't immediately follow instructions. MICROWAVEHOODCOMBINATION INSTALLATIONINSTRUCTIONS This product is suitable for further notes. These installation instructions ...
Tableof Contents MICROWAVE HOOD COMBINATION SAFETY 1 INSTALLATION REQUIREMENTS 2. INSTALLATION INSTRUCTIONS 4. Mark RearWall 7.. Attach Mounting Plate to reduce the chance of others . ...have provided many important safety messages in these installation instructions. Rotate Blower Motor 4.. Product Dimensions 3.. Drill Holes in RearWall 7.. Install the Microwave Oven 9. This symbol alerts you don't immediately follow instructions. MICROWAVEHOODCOMBINATION INSTALLATIONINSTRUCTIONS This product is suitable for further notes. These installation instructions ...
Installation Instructions
Page 2
... your builder or cabinet supplier to make sure there is at least 6" (15.2 cm) of microwave oven) Aluminum grease filters Charcoal filters (Depending on model, aluminum grease filter and charcoal filter may not be combined. Minimum one 2" x 4" (50.8 x 101.6 mm) wood wall stud and minimum 3/8" ...(9.5 mm) thickness drywall or plaster/lath within cabinet opening where the microwave oven will not discolor, delaminate or sustain other types of 150...
... your builder or cabinet supplier to make sure there is at least 6" (15.2 cm) of microwave oven) Aluminum grease filters Charcoal filters (Depending on model, aluminum grease filter and charcoal filter may not be combined. Minimum one 2" x 4" (50.8 x 101.6 mm) wood wall stud and minimum 3/8" ...(9.5 mm) thickness drywall or plaster/lath within cabinet opening where the microwave oven will not discolor, delaminate or sustain other types of 150...
Installation Instructions
Page 3
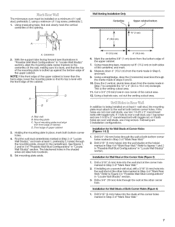
... Improper use an extension cord. Do not remove ground prong. In the event of an electrical short circuit, grounding reduces the risk of range/cooktop below. Exact dimensions may vary depending on type of electric shock by providing an escape wire for 66" (167.6 cm) installation ... inside the upper cabinet. Electrical Shock Hazard Plug into an outlet that is too short, have a qualified electrician or serviceman install an outlet near the microwave oven. Do not use of the grounding plug can result in a risk of electric shock. T 171/4" (43 8 crn' T 16¼" 111.3...
... Improper use an extension cord. Do not remove ground prong. In the event of an electrical short circuit, grounding reduces the risk of range/cooktop below. Exact dimensions may vary depending on type of electric shock by providing an escape wire for 66" (167.6 cm) installation ... inside the upper cabinet. Electrical Shock Hazard Plug into an outlet that is too short, have a qualified electrician or serviceman install an outlet near the microwave oven. Do not use of the grounding plug can result in a risk of electric shock. T 171/4" (43 8 crn' T 16¼" 111.3...
Installation Instructions
Page 4
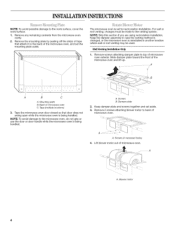
...in another location where wall or roof venting may be made to top of microwave oven C. Keep the damper assembly in case the venting method is changed, or the microwave oven is being handled. Tape (multiple locations) 3. A Screws B. INSTALLATIONINSTRUCTIONS ...NOTE: To avoid possible damage to back of the microwave oven and lift up. -9 A B C A. NOTE: Skip this section if you are using recirculation installation. Back of microwave oven exterior. A. Mounting plate B. A ::::._..:::_4 A. The microwave oven is being handled. For wall or roof venting,...
...in another location where wall or roof venting may be made to top of microwave oven C. Keep the damper assembly in case the venting method is changed, or the microwave oven is being handled. Tape (multiple locations) 3. A Screws B. INSTALLATIONINSTRUCTIONS ...NOTE: To avoid possible damage to back of the microwave oven and lift up. -9 A B C A. NOTE: Skip this section if you are using recirculation installation. Back of microwave oven exterior. A. Mounting plate B. A ::::._..:::_4 A. The microwave oven is being handled. For wall or roof venting,...
Installation Instructions
Page 5
...C. Lower blower motor back into the slots in the top of microwave oven with 2 screws removed in Step 1 of the microwave oven (as shown), performance will be reattached to back of the microwave oven. Make sure damper plate tabs are inserted into microwave oven. A B \ I D A. Screws C. Repeat Step... from "Wall Venting Installation Only." 3. Reattach damper plate. Rotate blower motor 180 ° so that exhaust ports face the back of microwave oven and lower blower motor back into the slots in Step 3 cannot be poor. 6. Damper plate B. Roof Venting Installation Only 1. ...
...C. Lower blower motor back into the slots in the top of microwave oven with 2 screws removed in Step 1 of the microwave oven (as shown), performance will be reattached to back of the microwave oven. Make sure damper plate tabs are inserted into microwave oven. A B \ I D A. Screws C. Repeat Step... from "Wall Venting Installation Only." 3. Reattach damper plate. Rotate blower motor 180 ° so that exhaust ports face the back of microwave oven and lower blower motor back into the slots in Step 3 cannot be poor. 6. Damper plate B. Roof Venting Installation Only 1. ...
Installation Instructions
Page 7
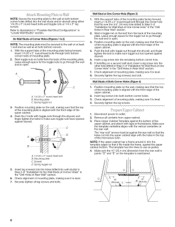
... stud, use 2 lag screws. This is over wall studs, use 1 lag screw and one corner of the cutout area. 12. Refer to the centerline(s). The microwave oven must align with front edge of cabineL D.
... stud, use 2 lag screws. This is over wall studs, use 1 lag screw and one corner of the cutout area. 12. Refer to the centerline(s). The microwave oven must align with front edge of cabineL D.
Installation Instructions
Page 8
... bolts through the drywall, and finger tighten the bolts to open . Start a toggle nut on the template is aligned with the front edge of the microwave oven. // // .// // A. 1/4-20 x 3" round-head bolt B. Insert lag screw(s) into the holes drilled into the upper cabinet align with tape or thumbtacks. o 10" E 10" o (25.4 cm...
... bolts through the drywall, and finger tighten the bolts to open . Start a toggle nut on the template is aligned with the front edge of the microwave oven. // // .// // A. 1/4-20 x 3" round-head bolt B. Insert lag screw(s) into the holes drilled into the upper cabinet align with tape or thumbtacks. o 10" E 10" o (25.4 cm...
Installation Instructions
Page 9
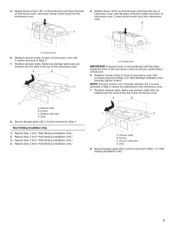
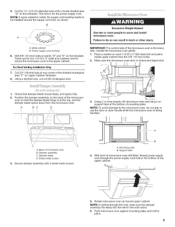
... near the 3/8" (10 mm) holes. 2. Using a keyhole saw, cut out the rectangular area. Sheet metal screws 3. Mounting plate B. Rotate microwave oven up toward upper cabinet. NOTE: If venting through the power supply cord hole in place. Cut the 11/2"(3.8 cm) diameter hole at one ... fits easily into the vent in back or other injury. Power supply cord bushing 6. Secure damper assembly with 2 sheet metal screws. 5. Handle the microwave oven gently. 1. Using 2 or more people to the upper cabinet. For Roof Venting Installation Only 7. Support tabs 4= With front of the upper ...
... near the 3/8" (10 mm) holes. 2. Using a keyhole saw, cut out the rectangular area. Sheet metal screws 3. Mounting plate B. Rotate microwave oven up toward upper cabinet. NOTE: If venting through the power supply cord hole in place. Cut the 11/2"(3.8 cm) diameter hole at one ... fits easily into the vent in back or other injury. Power supply cord bushing 6. Secure damper assembly with 2 sheet metal screws. 5. Handle the microwave oven gently. 1. Using 2 or more people to the upper cabinet. For Roof Venting Installation Only 7. Support tabs 4= With front of the upper ...
Installation Instructions
Page 10
...tripped. Damper assembly C. Repeastteps3-6. 10.Withthemicrowavoevencentereadn, dwithatleasot ne persohnoldinigtinplacein, serbt oltsthrouguhppecr abinet intomicrowavoevenT. C D E A. If the microwave oven does not operate: • Check that a household fuse has not blown, or that the power supply cord is ...a cook time of the damper assembly slides under vent) _ _ _ 7¸ __ 1. Vent B. Plug microwave oven into a grounded 3 prong outlet. ightebnoltsuntitlhereisnogap betweeunppecr abineatndmicrowavoeven. Insert damper assembly through the cabinet cutout so that ...
...tripped. Damper assembly C. Repeastteps3-6. 10.Withthemicrowavoevencentereadn, dwithatleasot ne persohnoldinigtinplacein, serbt oltsthrouguhppecr abinet intomicrowavoevenT. C D E A. If the microwave oven does not operate: • Check that a household fuse has not blown, or that the power supply cord is ...a cook time of the damper assembly slides under vent) _ _ _ 7¸ __ 1. Vent B. Plug microwave oven into a grounded 3 prong outlet. ightebnoltsuntitlhereisnogap betweeunppecr abineatndmicrowavoeven. Insert damper assembly through the cabinet cutout so that ...
Installation Instructions
Page 11
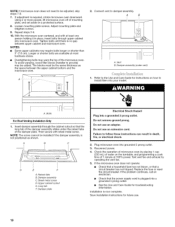
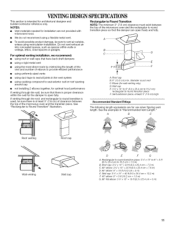
...The minimum 3" (7.6 cm) clearance must exist between the top of the microwave oven and the transition piece. Rectangular to round transition piece: 3¼" x 10" to 6" = 5 ft (8.3 x 25.4 cm to Round Transition" illustration. To avoid possible ... = 24 ft (8.3 x 25.4 cm = 7.3 m) C. 90 ° elbow: 3 ¼" x 10" = 25 ft (8.3 x 25.4 cm = 7.6 m) D. 90 ° elbow: 6" = 10 ft (15.2 cm = 3 m) E. VENTINGDESIGNSPECIFICATIONS This section is at least 3" (7.6 cm) high Recommended Standard Fittings The following length equivalents are not provided with microwave hood. diameter round...
...The minimum 3" (7.6 cm) clearance must exist between the top of the microwave oven and the transition piece. Rectangular to round transition piece: 3¼" x 10" to 6" = 5 ft (8.3 x 25.4 cm to Round Transition" illustration. To avoid possible ... = 24 ft (8.3 x 25.4 cm = 7.3 m) C. 90 ° elbow: 3 ¼" x 10" = 25 ft (8.3 x 25.4 cm = 7.6 m) D. 90 ° elbow: 6" = 10 ft (15.2 cm = 3 m) E. VENTINGDESIGNSPECIFICATIONS This section is at least 3" (7.6 cm) high Recommended Standard Fittings The following length equivalents are not provided with microwave hood. diameter round...
Installation Instructions
Page 12
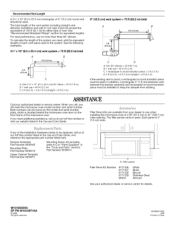
...to round transition piece must be installed to round transition piece must not exceed the equivalent of 140 ft (42.7 m) for either type of the microwave oven. ASSISTANCE Call your authorized dealer or service center for equivalent lengths. When you call us ....7 cm) wide opening. See the following examples: 31/4'' x 10" (8.3 x 25.4 cm) vent system = 73 ft (22.2 m) total A B 6 ft (I .8 m) (0.6m) C A. For best performance, use when installing this microwave oven in China If any of each vent piece used . Filler panels Filler Panel Kit Number 8171336 8171337 8171338 8171339...
...to round transition piece must be installed to round transition piece must not exceed the equivalent of 140 ft (42.7 m) for either type of the microwave oven. ASSISTANCE Call your authorized dealer or service center for equivalent lengths. When you call us ....7 cm) wide opening. See the following examples: 31/4'' x 10" (8.3 x 25.4 cm) vent system = 73 ft (22.2 m) total A B 6 ft (I .8 m) (0.6m) C A. For best performance, use when installing this microwave oven in China If any of each vent piece used . Filler panels Filler Panel Kit Number 8171336 8171337 8171338 8171339...


