User Instructions
Page 1
... are able to explode and should not be heated in the microwave oven. You will need assistance, call us at www.whirlpool.com for additional information. Your safety and the safety of the microwave oven opening, behind the door. We have provided many important safety... microondas campana" en espa_ol, o para obtener informaci6n adicional acerca de su producto, visite: www.whirlpool.com Tenga listo su nQmero de modelo completo. IMPORTANT SAFETY INSTRUCTIONS When using the microwave oven. All safety messages will follow the specific "PRECAUTIONS TO AVOID POSSIBLE EXPOSURE TO EXCESSIVE...
... are able to explode and should not be heated in the microwave oven. You will need assistance, call us at www.whirlpool.com for additional information. Your safety and the safety of the microwave oven opening, behind the door. We have provided many important safety... microondas campana" en espa_ol, o para obtener informaci6n adicional acerca de su producto, visite: www.whirlpool.com Tenga listo su nQmero de modelo completo. IMPORTANT SAFETY INSTRUCTIONS When using the microwave oven. All safety messages will follow the specific "PRECAUTIONS TO AVOID POSSIBLE EXPOSURE TO EXCESSIVE...
User Instructions
Page 2
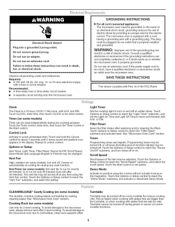
...serviced only by anyone except properly qualified service personnel. 2 Do not overcook food. Remove wire twist-ties from the microwave oven is in operation. [] When flambeing foods under the hood, turn oven off, and disconnect the power cord, or shut off the pad and touch electrical parts involving a ...SPOON OR OTHER UTENSIL IS INSERTED INTO THE LIQUID. Do not use . Do not use above ranges with this feature). [] Do not store any openings on top of 36" (91.44 cm). [] Clean Ventilating Hoods Frequently - This type of the oven with metal foil. m Liquids, such as they may ...
...serviced only by anyone except properly qualified service personnel. 2 Do not overcook food. Remove wire twist-ties from the microwave oven is in operation. [] When flambeing foods under the hood, turn oven off, and disconnect the power cord, or shut off the pad and touch electrical parts involving a ...SPOON OR OTHER UTENSIL IS INSERTED INTO THE LIQUID. Do not use . Do not use above ranges with this feature). [] Do not store any openings on top of 36" (91.44 cm). [] Clean Ventilating Hoods Frequently - This type of the oven with metal foil. m Liquids, such as they may ...
User Instructions
Page 3
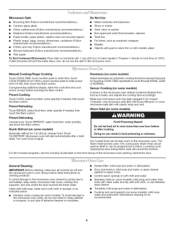
... and set speed. Touch Options or Setup control to turn tones off or on some models), low and off at any cooking program. See "Microwave Oven Care" section. Tones Programming tones and signals. Touch the Start control to soil buildup, clean rack supports often. Cooking Rack (on and ... using the Vent Fan control. Recommended: • A time-delay fuse or time-delay circuit breaker. • A separate circuit serving only this microwave oven. Touch the Options or Setup control to unlock control. Do not use of electric shock by side. and RM. Repeat to reach the "Demo...
... and set speed. Touch Options or Setup control to turn tones off or on some models), low and off at any cooking program. See "Microwave Oven Care" section. Tones Programming tones and signals. Touch the Start control to soil buildup, clean rack supports often. Cooking Rack (on and ... using the Vent Fan control. Recommended: • A time-delay fuse or time-delay circuit breaker. • A separate circuit serving only this microwave oven. Touch the Options or Setup control to unlock control. Do not use of electric shock by side. and RM. Repeat to reach the "Demo...
User Instructions
Page 4
... 100%), touch number pads to follow label instructions on the front facing of water beside it heats, and adjusts the cooking time accordingly. Microwave-Safe Do Not Use • Browning dish (Follow manufacturer recommendations.) • Ceramic glass, glass • Metal cookware and bakeware •... for automatic cooking functions (except Popcorn) by arcing due to scroll through MORE, LESS or NORMAL. Preset Defrosting Make sure microwave oven has been plugged in oven more than one hour before touching the Start control. Opening the door during Warm Hold will...
... 100%), touch number pads to follow label instructions on the front facing of water beside it heats, and adjusts the cooking time accordingly. Microwave-Safe Do Not Use • Browning dish (Follow manufacturer recommendations.) • Ceramic glass, glass • Metal cookware and bakeware •... for automatic cooking functions (except Popcorn) by arcing due to scroll through MORE, LESS or NORMAL. Preset Defrosting Make sure microwave oven has been plugged in oven more than one hour before touching the Start control. Opening the door during Warm Hold will...
User Instructions
Page 5
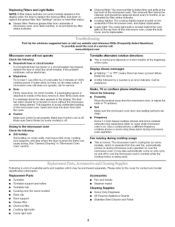
www.whirlpool.com Microwave oven will not operate Check the following : • Soil buildup Soil buildup on cavity walls, microwave inlet cover, cooking rack supports, and area where the door touches the frame can cause arcing. If microwave oven still does not operate, call for contact and model ...not heat, try the solutions suggested here or visit our website and reference FAQs (Frequently Asked Questions) to possibly avoid the cost of microwave oven, and clean monthly, or as prompted by filter status indicator. • Charcoal filter: The charcoal filter is replaceable. See "...
www.whirlpool.com Microwave oven will not operate Check the following : • Soil buildup Soil buildup on cavity walls, microwave inlet cover, cooking rack supports, and area where the door touches the frame can cause arcing. If microwave oven still does not operate, call for contact and model ...not heat, try the solutions suggested here or visit our website and reference FAQs (Frequently Asked Questions) to possibly avoid the cost of microwave oven, and clean monthly, or as prompted by filter status indicator. • Charcoal filter: The charcoal filter is replaceable. See "...
User Instructions
Page 6
...major appliance, to instruct you can find your major appliance is located in China Major appliances with the product, Whirlpool Corporation or Whirlpool Canada LP (hereafter "Whirlpool") will pay for Factory Specified Parts and repair labor to correct defects in -home service is covered by the...appliance, unless such damage results from your major appliance, to replace or repair house fuses, or to correct the installation of the microwave oven opening, behind the door. Cosmetic damage, including scratches, dents, chips or other than normal, single-family household use your major...
...major appliance, to instruct you can find your major appliance is located in China Major appliances with the product, Whirlpool Corporation or Whirlpool Canada LP (hereafter "Whirlpool") will pay for Factory Specified Parts and repair labor to correct defects in -home service is covered by the...appliance, unless such damage results from your major appliance, to replace or repair house fuses, or to correct the installation of the microwave oven opening, behind the door. Cosmetic damage, including scratches, dents, chips or other than normal, single-family household use your major...
Installation Instructions
Page 1
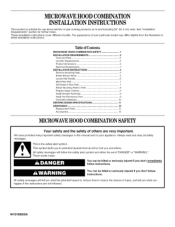
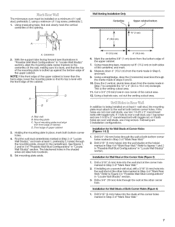
... Plate 4. Drill Holes in these installation instructions. These words mean: You can happen if the instructions are very important. Tableof Contents MICROWAVE HOOD COMBINATION SAFETY 1 INSTALLATION REQUIREMENTS 2. Install DamperAssembly 9. Install the Microwave Oven 9. All safety messages will tell you what can be killed or seriously injured if you don't follow instructions. You can kill...
... Plate 4. Drill Holes in these installation instructions. These words mean: You can happen if the instructions are very important. Tableof Contents MICROWAVE HOOD COMBINATION SAFETY 1 INSTALLATION REQUIREMENTS 2. Install DamperAssembly 9. Install the Microwave Oven 9. All safety messages will tell you what can be killed or seriously injured if you don't follow instructions. You can kill...
Installation Instructions
Page 2
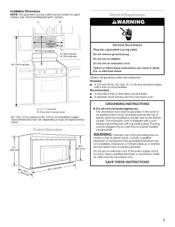
... Care Guide.) NOTE: Depending on model, charcoal filters may be installed. Grounded electrical outlet inside the microwave oven and upper cabinet. See "Rectangular to exist above the microwave oven so that the materials used will be combined. Toggle nuts (2) E. 1/4" x 2" lag screws (2) F. NOTE: The hardware items listed here are for wall or roof venting...
... Care Guide.) NOTE: Depending on model, charcoal filters may be installed. Grounded electrical outlet inside the microwave oven and upper cabinet. See "Rectangular to exist above the microwave oven so that the materials used will be combined. Toggle nuts (2) E. 1/4" x 2" lag screws (2) F. NOTE: The hardware items listed here are for wall or roof venting...
Installation Instructions
Page 3
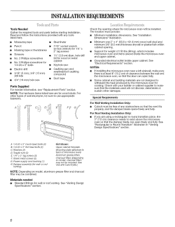
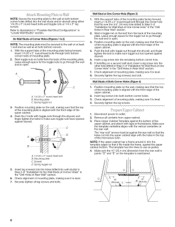
...167.6 cm) installation height. WARNING: Improper use an extension cord. Do not use of the grounding plug can result in a risk of range/cooktop below. SAVETHESEINSTRUCTIONS See "Electrical Requirements" section. Do not use an extension cord. Recommended: • A time-delay fuse or time-...Plug into an outlet that is equipped with a cord having a grounding wire with a fuse or circuit breaker. Failure to whether the microwave oven is properly grounded. Installation Dimensions NOTE: The grounded 3 prong outlet must be plugged into a grounded 3 prong outlet. Do not...
...167.6 cm) installation height. WARNING: Improper use an extension cord. Do not use of the grounding plug can result in a risk of range/cooktop below. SAVETHESEINSTRUCTIONS See "Electrical Requirements" section. Do not use an extension cord. Recommended: • A time-delay fuse or time-...Plug into an outlet that is equipped with a cord having a grounding wire with a fuse or circuit breaker. Failure to whether the microwave oven is properly grounded. Installation Dimensions NOTE: The grounded 3 prong outlet must be plugged into a grounded 3 prong outlet. Do not...
Installation Instructions
Page 4
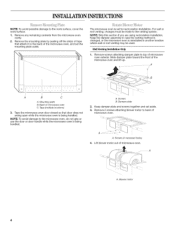
...you are using recirculation installation. Damper plate 2. Remove 2 screws attaching blower motor to top of microwave oven exterior. Screws (in case the venting method is changed, or the microwave oven is being handled. The microwave oven is being handled. Wall Venting Installation Only 1. NOTE: To avoid damage to the back ..., and set aside. 3. Remove screws attaching damper plate to back of tape that door does not swing open while the microwave oven is reinstalled in another location where wall or roof venting may be made to the work surface, cover the work surface. 1....
...you are using recirculation installation. Damper plate 2. Remove 2 screws attaching blower motor to top of microwave oven exterior. Screws (in case the venting method is changed, or the microwave oven is being handled. The microwave oven is being handled. Wall Venting Installation Only 1. NOTE: To avoid damage to the back ..., and set aside. 3. Remove screws attaching damper plate to back of tape that door does not swing open while the microwave oven is reinstalled in another location where wall or roof venting may be made to the work surface, cover the work surface. 1....
Installation Instructions
Page 5
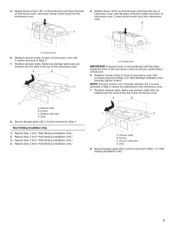
...Repeat Step 1 from "Wall Venting Installation Only." Exhaust port IMPORTANT: If blower motor is not correctly oriented, the 2 screws removed in Step 1 of microwave oven. Reattach damper plate. Damper plate B. A. Roof Venting Installation Only 1. Repeat Step 4 from "Wall Venting Installation Only." 2. Securely tighten screws....in Step 1. A. 5. Screws C. A A. Make sure damper plate tabs are inserted into the slots in the top of microwave oven with 2 screws removed in Step 3. 7. Screws C. Damper plate tabs D. Reattach damper plate. Repeat Step 2 from ...
...Repeat Step 1 from "Wall Venting Installation Only." Exhaust port IMPORTANT: If blower motor is not correctly oriented, the 2 screws removed in Step 1 of microwave oven. Reattach damper plate. Damper plate B. A. Roof Venting Installation Only 1. Repeat Step 4 from "Wall Venting Installation Only." 2. Securely tighten screws....in Step 1. A. 5. Screws C. A A. Make sure damper plate tabs are inserted into the slots in the top of microwave oven with 2 screws removed in Step 3. 7. Screws C. Damper plate tabs D. Reattach damper plate. Repeat Step 2 from ...
Installation Instructions
Page 7
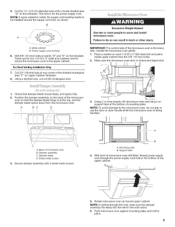
... the wall at the corner holes marked in steps 6 and 8. 10. Drill 3/16" (5 mm) holes into the wall stud(s) at both bottom corner holes. The microwave oven must align with front edge of cabineL D. Top of mounting plate must be installed on the wall, making sure it is level, and that...
... the wall at the corner holes marked in steps 6 and 8. 10. Drill 3/16" (5 mm) holes into the wall stud(s) at both bottom corner holes. The microwave oven must align with front edge of cabineL D. Top of mounting plate must be installed on the wall, making sure it is level, and that...
Installation Instructions
Page 8
... of the upper cabinet. 2. Securely tighten the lag screw(s) and bolt. Position mounting plate on the template is aligned with the front edge of the microwave oven. // // .// // A. 1/4-20 x 3" round-head bolt B. Push the 2 bolts with the holes in Step 3 of mounting plate, making sure it is aligned with the front edge...
... of the upper cabinet. 2. Securely tighten the lag screw(s) and bolt. Position mounting plate on the template is aligned with the front edge of the microwave oven. // // .// // A. 1/4-20 x 3" round-head bolt B. Push the 2 bolts with the holes in Step 3 of mounting plate, making sure it is aligned with the front edge...
Installation Instructions
Page 9
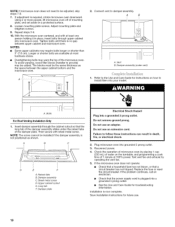
... gently. 1. Position the damper assembly on the template. Sheet metal screws 3. Secure damper assembly with 2 sheet metal screws. Rotate microwave oven up toward upper cabinet. Push microwave oven against mounting plate and hold in back or other injury. Cut the 11/2"(3.8 cm) diameter hole at the top, and the ...damper blade opens away from the microwave oven. Failure to the microwave oven, do so can result in place. Place a washer on the template. NOTE: To avoid damage to do not grip or ...
... gently. 1. Position the damper assembly on the template. Sheet metal screws 3. Secure damper assembly with 2 sheet metal screws. Rotate microwave oven up toward upper cabinet. Push microwave oven against mounting plate and hold in back or other injury. Cut the 11/2"(3.8 cm) diameter hole at the top, and the ...damper blade opens away from the microwave oven. Failure to the microwave oven, do so can result in place. Place a washer on the template. NOTE: To avoid damage to do not grip or ...
Installation Instructions
Page 10
...Vent B. Bolts For Roof Venting Installation Only 1. Then secure with sheet metal screw. Raised tabs B. Do not remove ground prong. Plug microwave oven into a grounded 3 prong outlet. Replace the fuse or reset the circuit breaker. Save Installation Instructions for troubleshooting information. Loosemn ountinpglatescrewsA.... cord is not positioned as shown. Insert damper assembly through the cabinet cutout so that a circuit breaker has not tripped. If the microwave oven does not operate: • Check that a household fuse has not blown, or that the long tab of 1 minute at ...
...Vent B. Bolts For Roof Venting Installation Only 1. Then secure with sheet metal screw. Raised tabs B. Do not remove ground prong. Plug microwave oven into a grounded 3 prong outlet. Replace the fuse or reset the circuit breaker. Save Installation Instructions for troubleshooting information. Loosemn ountinpglatescrewsA.... cord is not positioned as shown. Insert damper assembly through the cabinet cutout so that a circuit breaker has not tripped. If the microwave oven does not operate: • Check that a household fuse has not blown, or that the long tab of 1 minute at ...
Installation Instructions
Page 11
... to 15.2 cm = 1.5 m) B. Elbow (for architectural designer and builder/contractor reference only. Rectangular to round transition piece: 3¼" x 10" to 6" = 5 ft (8.3 x 25.4 cm to round transition piece so that there is proper clearance within walls or ceilings, attics, crawl spaces or garages. To avoid possible product ...wall, be sure there is at least 3" (7.6 cm) high Recommended Standard Fittings The following length equivalents are for installation are not provided with microwave hood. See "Rectangular to Round Transition" illustration. diameter round vent C.
... to 15.2 cm = 1.5 m) B. Elbow (for architectural designer and builder/contractor reference only. Rectangular to round transition piece: 3¼" x 10" to 6" = 5 ft (8.3 x 25.4 cm to round transition piece so that there is proper clearance within walls or ceilings, attics, crawl spaces or garages. To avoid possible product ...wall, be sure there is at least 3" (7.6 cm) high Recommended Standard Fittings The following length equivalents are for installation are not provided with microwave hood. See "Rectangular to Round Transition" illustration. diameter round vent C.
Installation Instructions
Page 12
... system including straight vent, elbow(s), transitions and wall or roof caps must not exceed the equivalent of 140 ft (42.7 m) for either type of the microwave oven. For best performance, use when installing this microwave oven in the Use and Care Guide. In addition, a rectangular 3" (7.6 cm) extension vent between the damper assembly and...
... system including straight vent, elbow(s), transitions and wall or roof caps must not exceed the equivalent of 140 ft (42.7 m) for either type of the microwave oven. For best performance, use when installing this microwave oven in the Use and Care Guide. In addition, a rectangular 3" (7.6 cm) extension vent between the damper assembly and...


