Use & Care Guide
Page 1
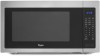
W10434259C MICROWAVE OVEN Use & Care Guide For questions about features, operation/performance, parts, accessories or service, call: 1-800-253-1301. or visit our website at... www.whirlpool.com Table of Contents 2 Model WMC50522
W10434259C MICROWAVE OVEN Use & Care Guide For questions about features, operation/performance, parts, accessories or service, call: 1-800-253-1301. or visit our website at... www.whirlpool.com Table of Contents 2 Model WMC50522
Use & Care Guide
Page 2
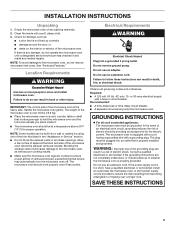
TABLE OF CONTENTS MICROWAVE OVEN SAFETY 3 INSTALLATION INSTRUCTIONS 5 Unpacking 5 Location Requirements 5 Electrical Requirements 5 PARTS AND FEATURES 6 Turntable 6 MICROWAVE OVEN CONTROL 6 Display 7 Start 7 Add 30 Seconds 7 Cancel 7 Tones 7 Clock 7 Timer 7 Control Lock 7 Language 7 Weight Entry Mode 7 MICROWAVE OVEN USE 8 Food ... Menu (sensor and non-sensor 11 Weight Defrost / Timed Defrost 12 MICROWAVE OVEN CARE 13 General Cleaning 13 TROUBLESHOOTING 14 ASSISTANCE OR SERVICE 15 Replacement Parts 15 Built-In Kits 15 WARRANTY 15 2
TABLE OF CONTENTS MICROWAVE OVEN SAFETY 3 INSTALLATION INSTRUCTIONS 5 Unpacking 5 Location Requirements 5 Electrical Requirements 5 PARTS AND FEATURES 6 Turntable 6 MICROWAVE OVEN CONTROL 6 Display 7 Start 7 Add 30 Seconds 7 Cancel 7 Tones 7 Clock 7 Timer 7 Control Lock 7 Language 7 Weight Entry Mode 7 MICROWAVE OVEN USE 8 Food ... Menu (sensor and non-sensor 11 Weight Defrost / Timed Defrost 12 MICROWAVE OVEN CARE 13 General Cleaning 13 TROUBLESHOOTING 14 ASSISTANCE OR SERVICE 15 Replacement Parts 15 Built-In Kits 15 WARRANTY 15 2
Use & Care Guide
Page 4
... not attempt to persons: - It is particularly important that the oven door close properly and that there is important not to defeat or tamper with Part 18 of injury to operate this oven with narrow necks. -
... not attempt to persons: - It is particularly important that the oven door close properly and that there is important not to defeat or tamper with Part 18 of injury to operate this oven with narrow necks. -
Use & Care Guide
Page 5
... oven must be at the back and side of electric shock. Required: ■ A 120 volt, 60 Hz, AC only, 15- Check for proper operation. See "Parts and Features." Allow a few inches of space at a temperature above 50°F (10°C) for damage, such as to ensure proper airflow. Blocking the exhaust...
... oven must be at the back and side of electric shock. Required: ■ A 120 volt, 60 Hz, AC only, 15- Check for proper operation. See "Parts and Features." Allow a few inches of space at a temperature above 50°F (10°C) for damage, such as to ensure proper airflow. Blocking the exhaust...
Use & Care Guide
Page 6
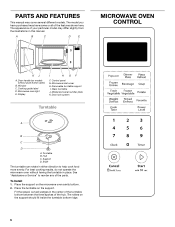
... should fit inside the turntable bottom ridge. 6 Shaft The turntable can rotate in the center of the turntable bottom between the three spokes of the parts. Window C. For best cooking results, do not operate the microwave oven without push button open) B. The rollers on models without having the turntable in this... manual. Cooking guide label D. Fit the raised, curved wedges in either direction to reorder any of the hub. Microwave inlet cover H. Hub C. PARTS AND FEATURES This manual may cover several different models.
... should fit inside the turntable bottom ridge. 6 Shaft The turntable can rotate in the center of the turntable bottom between the three spokes of the parts. Window C. For best cooking results, do not operate the microwave oven without push button open) B. The rollers on models without having the turntable in this... manual. Cooking guide label D. Fit the raised, curved wedges in either direction to reorder any of the hub. Microwave inlet cover H. Hub C. PARTS AND FEATURES This manual may cover several different models.

Use & Care Guide
Page 8
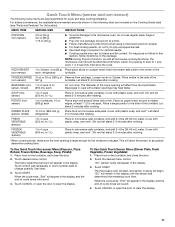
.... 8 At the end of the recommended cook time, potatoes should not be used. Arranging If heating irregularly shaped or different sized foods, arrange the thinner parts and smaller sized items toward the center.
.... 8 At the end of the recommended cook time, potatoes should not be used. Arranging If heating irregularly shaped or different sized foods, arrange the thinner parts and smaller sized items toward the center.
Use & Care Guide
Page 11
... to slow to change quantity. The diameter of -cycle tones will appear in the following menu items are included on the Cooking Guide label (see "Parts and Features" for the moisture to the microwave oven, do not try to the side of the (non-sensor) 567 g) turntable. Stir and let stand...
... to slow to change quantity. The diameter of -cycle tones will appear in the following menu items are included on the Cooking Guide label (see "Parts and Features" for the moisture to the microwave oven, do not try to the side of the (non-sensor) 567 g) turntable. Stir and let stand...
Use & Care Guide
Page 12
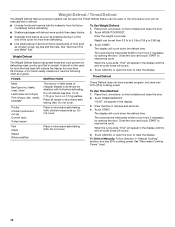
... 0.3 lb to 6.3 lbs (136 g to defrost. ■ Unwrap foods and remove lids (for more even defrosting. ■ Use small pieces of aluminum foil to shield parts of -cycle tones will count down the defrost time. See "Aluminum Foil and Metal" first. The display will sound. 5. The cycle may be shielded with...
... 0.3 lb to 6.3 lbs (136 g to defrost. ■ Unwrap foods and remove lids (for more even defrosting. ■ Use small pieces of aluminum foil to shield parts of -cycle tones will count down the defrost time. See "Aluminum Foil and Metal" first. The display will sound. 5. The cycle may be shielded with...
Use & Care Guide
Page 13
...; Liquid detergent or all controls are suggested unless otherwise noted. Microwave Inlet Cover To avoid arcing and microwave oven damage, the microwave inlet cover (see "Parts and Features") should be kept clean. Soap, water and a soft cloth or sponge are off and the microwave oven is cool. Rub in direction of...
...; Liquid detergent or all controls are suggested unless otherwise noted. Microwave Inlet Cover To avoid arcing and microwave oven damage, the microwave inlet cover (see "Parts and Features") should be kept clean. Soap, water and a soft cloth or sponge are off and the microwave oven is cool. Rub in direction of...
Use & Care Guide
Page 15
... specifications on our full line of a service call us to better respond to build every new WHIRLPOOL® appliance. FSP® replacement parts will help , follow the instructions below . If replaced, the unit will , at : Whirlpool Brand Home Appliances Customer eXperience Center 553 Benson Road Benton Harbor, MI 49022-2692 Please include a daytime...
... specifications on our full line of a service call us to better respond to build every new WHIRLPOOL® appliance. FSP® replacement parts will help , follow the instructions below . If replaced, the unit will , at : Whirlpool Brand Home Appliances Customer eXperience Center 553 Benson Road Benton Harbor, MI 49022-2692 Please include a daytime...
Use & Care Guide
Page 16
... excluded from accident, alteration, misuse, abuse, fire, flood, acts of God, improper installation, installation not in -warranty service. Whirlpool will advise whether the microwave qualifies for insurance and freight to you. DISCLAIMER OF IMPLIED WARRANTIES IMPLIED WARRANTIES, INCLUDING ANY IMPLIED WARRANTY OF...appliance. You can be shipped to correct house wiring or plumbing. 2. Consumable parts are responsible for repair or replacement. 4. Damage resulting from warranty coverage. 3. Repairs to parts or systems resulting from the date of repair, you also may not apply to...
... excluded from accident, alteration, misuse, abuse, fire, flood, acts of God, improper installation, installation not in -warranty service. Whirlpool will advise whether the microwave qualifies for insurance and freight to you. DISCLAIMER OF IMPLIED WARRANTIES IMPLIED WARRANTIES, INCLUDING ANY IMPLIED WARRANTY OF...appliance. You can be shipped to correct house wiring or plumbing. 2. Consumable parts are responsible for repair or replacement. 4. Damage resulting from warranty coverage. 3. Repairs to parts or systems resulting from the date of repair, you also may not apply to...

Warranty Information
Page 1
... date of the original unit. It may save you use only FSP® replacement parts. See "Assistance or Service" section for assistance or service, please check "Troubleshooting." WHIRLPOOL CORPORATION COUNTERTOP MICROWAVE LIMITED WARRANTY ONE YEAR LIMITED WARRANTY For one -year limited warranty of... trained to correct defects in which it was purchased. FSP® replacement parts will help , follow the instructions below . Call the Whirlpool Customer eXperience Center toll free: 1-800-253-1301. Whirlpool designated service technicians are made with any (electric or gas) built-in your...
... date of the original unit. It may save you use only FSP® replacement parts. See "Assistance or Service" section for assistance or service, please check "Troubleshooting." WHIRLPOOL CORPORATION COUNTERTOP MICROWAVE LIMITED WARRANTY ONE YEAR LIMITED WARRANTY For one -year limited warranty of... trained to correct defects in which it was purchased. FSP® replacement parts will help , follow the instructions below . Call the Whirlpool Customer eXperience Center toll free: 1-800-253-1301. Whirlpool designated service technicians are made with any (electric or gas) built-in your...

Warranty Information
Page 2
...not apply. Dealer name Address Phone number Model number Serial number Purchase date W10434259C SP PN W10434279B ®/™ © 2013 Whirlpool. Service calls to microwave product failure. 8. Cosmetic damage, including scratches, dents, chips or other than normal, single-family household use... is void if the factory applied serial number has been altered or removed from warranty coverage. 3. LIMITATION OF REMEDIES; Consumable parts are responsible for repair or replacement. 4. In the event of repair, you need to the designated service center. DISCLAIMER OF...
...not apply. Dealer name Address Phone number Model number Serial number Purchase date W10434259C SP PN W10434279B ®/™ © 2013 Whirlpool. Service calls to microwave product failure. 8. Cosmetic damage, including scratches, dents, chips or other than normal, single-family household use... is void if the factory applied serial number has been altered or removed from warranty coverage. 3. LIMITATION OF REMEDIES; Consumable parts are responsible for repair or replacement. 4. In the event of repair, you need to the designated service center. DISCLAIMER OF...

Installation Guide
Page 1
... ou à gaz, jusqu'à 30" (76,2 cm) de largeur Table of Contents / Table des matières MICROWAVE OVEN SAFETY 1 INSTALLATION INSTRUCTIONS 2 Tools and Parts 2 Location Requirements 2 Required Cutout Dimensions 2 Trim Kit Frame Dimensions 2 Electrical Requirements 3 Prepare Microwave Oven 3 Prepare Cutout/Cabinet Opening 3 Install the Microwave Oven 4 Install Trim Kit...
... ou à gaz, jusqu'à 30" (76,2 cm) de largeur Table of Contents / Table des matières MICROWAVE OVEN SAFETY 1 INSTALLATION INSTRUCTIONS 2 Tools and Parts 2 Location Requirements 2 Required Cutout Dimensions 2 Trim Kit Frame Dimensions 2 Electrical Requirements 3 Prepare Microwave Oven 3 Prepare Cutout/Cabinet Opening 3 Install the Microwave Oven 4 Install Trim Kit...
Installation Guide
Page 2
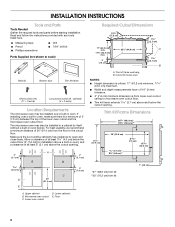
... any tools listed here. ■ Measuring tape ■ Pencil ■ Phillips screwdriver ■ Drill ■ 7/64" drill bit Parts Supplied (not shown to open and close freely. painted) (4 + 2 extra) Location Requirements The microwave oven may also be installed over... 13 33.2 cm) *27" (68.6 cm) trim kit **30" (76.2 cm) trim kit 1" (2.5 cm) 2 INSTALLATION INSTRUCTIONS Tools and Parts Tools Needed Gather the required tools and parts before starting installation. Floor 2" (5.1 cm) 3" (7.6 cm) Required Cutout Dimensions 22³⁄₄" (57.8 cm) 1 2.7 cm) 17" (...
... any tools listed here. ■ Measuring tape ■ Pencil ■ Phillips screwdriver ■ Drill ■ 7/64" drill bit Parts Supplied (not shown to open and close freely. painted) (4 + 2 extra) Location Requirements The microwave oven may also be installed over... 13 33.2 cm) *27" (68.6 cm) trim kit **30" (76.2 cm) trim kit 1" (2.5 cm) 2 INSTALLATION INSTRUCTIONS Tools and Parts Tools Needed Gather the required tools and parts before starting installation. Floor 2" (5.1 cm) 3" (7.6 cm) Required Cutout Dimensions 22³⁄₄" (57.8 cm) 1 2.7 cm) 17" (...


