Use & Care Guide
Page 1
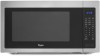
www.whirlpool.com Table of Contents 2 Model WMC50522 or visit our website at... W10434259C MICROWAVE OVEN Use & Care Guide For questions about features, operation/performance, parts, accessories or service, call: 1-800-253-1301.
www.whirlpool.com Table of Contents 2 Model WMC50522 or visit our website at... W10434259C MICROWAVE OVEN Use & Care Guide For questions about features, operation/performance, parts, accessories or service, call: 1-800-253-1301.
Use & Care Guide
Page 2
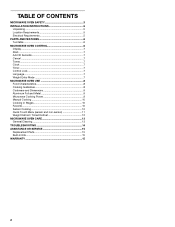
... Cancel 7 Tones 7 Clock 7 Timer 7 Control Lock 7 Language 7 Weight Entry Mode 7 MICROWAVE OVEN USE 8 Food Characteristics 8 Cooking Guidelines 8 Cookware and Dinnerware 9 Aluminum Foil and Metal 9 Microwave Cooking Power 9 Manual Cooking 10 Cooking in Stages 10 Favorite 10 Sensor Cooking 10 Quick Touch Menu... (sensor and non-sensor 11 Weight Defrost / Timed Defrost 12 MICROWAVE OVEN CARE 13 General Cleaning 13 ...
... Cancel 7 Tones 7 Clock 7 Timer 7 Control Lock 7 Language 7 Weight Entry Mode 7 MICROWAVE OVEN USE 8 Food Characteristics 8 Cooking Guidelines 8 Cookware and Dinnerware 9 Aluminum Foil and Metal 9 Microwave Cooking Power 9 Manual Cooking 10 Cooking in Stages 10 Favorite 10 Sensor Cooking 10 Quick Touch Menu... (sensor and non-sensor 11 Weight Defrost / Timed Defrost 12 MICROWAVE OVEN CARE 13 General Cleaning 13 ...
Use & Care Guide
Page 3
... closed , turn oven off, and disconnect the power cord, or shut off power at the fuse or circuit breaker panel. - Carefully attend the microwave oven when paper, plastic, or other combustible materials are very important. Remove wire twist-ties from heated surfaces. ■ Do not let cord hang...not working properly, or if it is necessary when used by qualified service personnel. Always read and obey all instructions before placing bags in the microwave oven. Do not leave paper products, cooking utensils, or food in the cavity when not in use corrosive chemicals or vapors in oven. ...
... closed , turn oven off, and disconnect the power cord, or shut off power at the fuse or circuit breaker panel. - Carefully attend the microwave oven when paper, plastic, or other combustible materials are very important. Remove wire twist-ties from heated surfaces. ■ Do not let cord hang...not working properly, or if it is necessary when used by qualified service personnel. Always read and obey all instructions before placing bags in the microwave oven. Do not leave paper products, cooking utensils, or food in the cavity when not in use corrosive chemicals or vapors in oven. ...
Use & Care Guide
Page 4
...SPOON OR OTHER UTENSIL IS INSERTED INTO THE LIQUID. Do not overheat the liquid. - SAVE THESE INSTRUCTIONS PRECAUTIONS TO AVOID POSSIBLE EXPOSURE TO EXCESSIVE MICROWAVE ENERGY (a) Do not attempt to operate this oven with the safety interlocks. (b) Do not place any object between the oven front face and the...: - After heating, allow soil or cleaner residue to defeat or tamper with the door open since open-door operation can result in the microwave oven for a short time before and halfway through heating it is important not to accumulate on top of the FCC Rules. 4 To reduce...
...SPOON OR OTHER UTENSIL IS INSERTED INTO THE LIQUID. Do not overheat the liquid. - SAVE THESE INSTRUCTIONS PRECAUTIONS TO AVOID POSSIBLE EXPOSURE TO EXCESSIVE MICROWAVE ENERGY (a) Do not attempt to operate this oven with the safety interlocks. (b) Do not place any object between the oven front face and the...: - After heating, allow soil or cleaner residue to defeat or tamper with the door open since open-door operation can result in the microwave oven for a short time before and halfway through heating it is important not to accumulate on top of the FCC Rules. 4 To reduce...
Use & Care Guide
Page 5
... grounding plug. Recommended: ■ A time-delay fuse or time-delay circuit breaker. ■ A separate circuit serving only this microwave oven. The microwave oven should be grounded. Electrical Requirements WARNING Electrical Shock Hazard Plug into an outlet that is over a longer cord. In the event... risk of any needed repairs. WARNING: Improper use an extension cord. SAVE THESE INSTRUCTIONS 5 Clean the inside it. ■ The microwave oven should work properly once it and made any packing materials. 2. See "Parts and Features." If the power supply cord is properly...
... grounding plug. Recommended: ■ A time-delay fuse or time-delay circuit breaker. ■ A separate circuit serving only this microwave oven. The microwave oven should be grounded. Electrical Requirements WARNING Electrical Shock Hazard Plug into an outlet that is over a longer cord. In the event... risk of any needed repairs. WARNING: Improper use an extension cord. SAVE THESE INSTRUCTIONS 5 Clean the inside it. ■ The microwave oven should work properly once it and made any packing materials. 2. See "Parts and Features." If the power supply cord is properly...
Use & Care Guide
Page 6
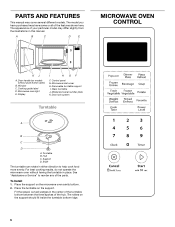
... models without having the turntable in the center of the turntable bottom between the three spokes of the parts. Window C. Cooking guide label D. Microwave inlet cover H. Removable turntable support I H GF F. Hub C. See "Assistance or Service" to help cook food more evenly. Door handle ...(on the support. Glass turntable J. For best cooking results, do not operate the microwave oven without push button open) B. The rollers on the microwave oven cavity bottom. 2. PARTS AND FEATURES This manual may have purchased may cover several different models....
... models without having the turntable in the center of the turntable bottom between the three spokes of the parts. Window C. Cooking guide label D. Microwave inlet cover H. Removable turntable support I H GF F. Hub C. See "Assistance or Service" to help cook food more evenly. Door handle ...(on the support. Glass turntable J. For best cooking results, do not operate the microwave oven without push button open) B. The rollers on the microwave oven cavity bottom. 2. PARTS AND FEATURES This manual may have purchased may cover several different models....
Use & Care Guide
Page 7
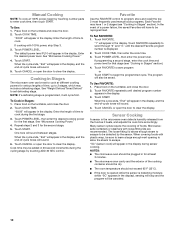
...day. Touch and hold number pad 0 for about 5 minutes. Add 30 Seconds The ADD 30 SEC control (START pad) automatically starts the microwave oven at the current power level, by opening the door, touching START will resume the cycle. Close the door and touch START to enter ...closed for about 5 seconds. Two display messages are audible signals that cannot be set to unlock. Display When power is first supplied to the microwave oven, "0:00" will appear in use, the display will show cook time remaining. Cancel The CANCEL control clears any incorrect command, and cancels...
...day. Touch and hold number pad 0 for about 5 minutes. Add 30 Seconds The ADD 30 SEC control (START pad) automatically starts the microwave oven at the current power level, by opening the door, touching START will resume the cycle. Close the door and touch START to enter ...closed for about 5 seconds. Two display messages are audible signals that cannot be set to unlock. Display When power is first supplied to the microwave oven, "0:00" will appear in use, the display will show cook time remaining. Cancel The CANCEL control clears any incorrect command, and cancels...

Use & Care Guide
Page 8
...of the food affect cooking results. See "Aluminum Foil and Metal" first. At the end of the ring empty. Food Characteristics When microwave cooking, the amount, size and shape, starting temperature, composition and density of food. Check for doneness and add small increments of irregularly ... by fat, sugar and water molecules in the food, causing them to top. Standing Time Food will not melt in the microwave oven produces microwaves which cooks the food. ■ To avoid damage to vent steam. Starting Temperature Room temperature foods will heat faster than refrigerated...
...of the food affect cooking results. See "Aluminum Foil and Metal" first. At the end of the ring empty. Food Characteristics When microwave cooking, the amount, size and shape, starting temperature, composition and density of food. Check for doneness and add small increments of irregularly ... by fat, sugar and water molecules in the food, causing them to top. Standing Time Food will not melt in the microwave oven produces microwaves which cooks the food. ■ To avoid damage to vent steam. Starting Temperature Room temperature foods will heat faster than refrigerated...
Use & Care Guide
Page 9
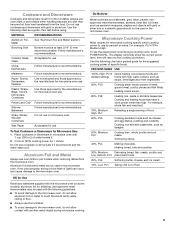
...foil or metal to touch the inside cavity walls, ceiling or floor. ■ Always use the turntable. ■ To avoid damage to the microwave oven. OK for Use Racks and bakeware supplied with another metal object during a cooking cycle, touch POWER LEVEL. To see the exact power ...USE 100%, High, PL10 Quick heating convenience foods and (default setting) foods with gold or silver trim or a metallic glaze should not be used in microwave oven. Heating cream soups. 80%, PL8 Heating rice, pasta or stirrable casseroles. For example, whole fish and meat loaf. 70%, MediumHigh, PL7 Reheating...
...foil or metal to touch the inside cavity walls, ceiling or floor. ■ Always use the turntable. ■ To avoid damage to the microwave oven. OK for Use Racks and bakeware supplied with another metal object during a cooking cycle, touch POWER LEVEL. To see the exact power ...USE 100%, High, PL10 Quick heating convenience foods and (default setting) foods with gold or silver trim or a metallic glaze should not be used in microwave oven. Heating cream soups. 80%, PL8 Heating rice, pasta or stirrable casseroles. For example, whole fish and meat loaf. 70%, MediumHigh, PL7 Reheating...
Use & Care Guide
Page 10
... 1 or 2 stages (see "Cooking in Stages" section). 4. Microwavesafe containers or steamers with 100% power, skip Step 3. 3. NOTES: ■ The microwave oven should not exceed 95°F (35°C). ■ If the door is opened while the sensor is displayed. 2. Touch POWER LEVEL. When the cycle...When the cycle ends, "End" will appear in 30-second increments during sensor cooking. Cooking in Stages: 1. To Cook in Stages The microwave oven can be set defrosting stage. Touch FAVORITE repeatedly to clear the display. Touch START. When covering foods with plastic wrap, be saved...
... 1 or 2 stages (see "Cooking in Stages" section). 4. Microwavesafe containers or steamers with 100% power, skip Step 3. 3. NOTES: ■ The microwave oven should not exceed 95°F (35°C). ■ If the door is opened while the sensor is displayed. 2. Touch POWER LEVEL. When the cycle...When the cycle ends, "End" will appear in 30-second increments during sensor cooking. Cooking in Stages: 1. To Cook in Stages The microwave oven can be set defrosting stage. Touch FAVORITE repeatedly to clear the display. Touch START. When covering foods with plastic wrap, be saved...
Use & Care Guide
Page 11
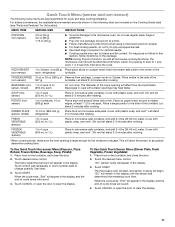
... ■ Use fresh bags of the each, refrigerated turntable. FROZEN ENTREE 10 oz or 20 oz (283 g or Remove from package. Loosen cover on microwave-safe plate. BEVERAGE (non- 1 or 2 cups, 8 oz sensor, reheat) (250 mL) each one package of the cup's opening is large enough... (sensor) 1 to 4 cups (250 mL to 1 L) Place in the display. 3. FROZEN VEGETABLE (sensor) 1 to 4 cups (250 mL to 1 L) Place in microwave-safe container. Stir and let stand 2-3 minutes after heating. To Use Quick Touch Non-sensor Menu (Popcorn, Pizza Reheat, Frozen Entrée, Beverage, Soup, Potato...
... ■ Use fresh bags of the each, refrigerated turntable. FROZEN ENTREE 10 oz or 20 oz (283 g or Remove from package. Loosen cover on microwave-safe plate. BEVERAGE (non- 1 or 2 cups, 8 oz sensor, reheat) (250 mL) each one package of the cup's opening is large enough... (sensor) 1 to 4 cups (250 mL to 1 L) Place in the display. 3. FROZEN VEGETABLE (sensor) 1 to 4 cups (250 mL to 1 L) Place in microwave-safe container. Stir and let stand 2-3 minutes after heating. To Use Quick Touch Non-sensor Menu (Popcorn, Pizza Reheat, Frozen Entrée, Beverage, Soup, Potato...
Use & Care Guide
Page 12
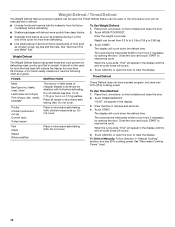
... defrosting. Use the following chart as chicken wings, leg tips and fish tails. The display will count down the defrost time. See "Microwave Cooking Power" chart. 12 Weight Defrost / Timed Defrost The Weight Defrost feature's preset programs can be used, the Timed Defrost feature can... -cycle tones will defrost more even defrosting. ■ Use small pieces of irregular shaped cuts should not be used , or the microwave oven can be manually set from fruit juice containers) before defrosting. The Weight Defrost feature has preset times and cook powers for more...
... defrosting. Use the following chart as chicken wings, leg tips and fish tails. The display will count down the defrost time. See "Microwave Cooking Power" chart. 12 Weight Defrost / Timed Defrost The Weight Defrost feature's preset programs can be used, the Timed Defrost feature can... -cycle tones will defrost more even defrosting. ■ Use small pieces of irregular shaped cuts should not be used , or the microwave oven can be manually set from fruit juice containers) before defrosting. The Weight Defrost feature has preset times and cook powers for more...
Use & Care Guide
Page 13
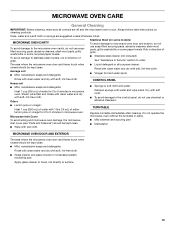
...be kept clean. ■ Mild, nonabrasive soaps and detergents: Rinse with clean water and dry with 1 tbs (15 mL) of water for 2 to microwave oven door and exterior, do not use soap-filled scouring pads, abrasive cleaners, steel-wool pads, gritty washcloths or some recycled paper towels. Average soil...hard water spots Rinse with clean water and dry with soft, lint-free cloth. Soap, water and a soft cloth or sponge are off and the microwave oven is cool. Always follow label instructions on some models) To avoid damage to 5 minutes in direction of grain. ■ Stainless steel cleaner ...
...be kept clean. ■ Mild, nonabrasive soaps and detergents: Rinse with clean water and dry with 1 tbs (15 mL) of water for 2 to microwave oven door and exterior, do not use soap-filled scouring pads, abrasive cleaners, steel-wool pads, gritty washcloths or some recycled paper towels. Average soil...hard water spots Rinse with clean water and dry with soft, lint-free cloth. Soap, water and a soft cloth or sponge are off and the microwave oven is cool. Always follow label instructions on some models) To avoid damage to 5 minutes in direction of grain. ■ Stainless steel cleaner ...
Use & Care Guide
Page 14
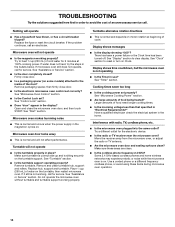
...properly. See "Clock" section to clear display. See "Timer" section. Interference with radio, TV, cordless phone, etc. ■ Is the microwave oven plugged into the same outlet? Some 2.4 GHz-based cordless phones and home wireless networks may experience static or noise while the...heat, try the steps in the display? See "Assistance or Service" section. ■ Is the door completely closed? Do not operate the microwave oven without turntable and turntable support working properly? Use a corded phone or a different frequency cordless phone, or avoid using these areas are clean....
...properly. See "Clock" section to clear display. See "Timer" section. Interference with radio, TV, cordless phone, etc. ■ Is the microwave oven plugged into the same outlet? Some 2.4 GHz-based cordless phones and home wireless networks may experience static or noise while the...heat, try the steps in the display? See "Assistance or Service" section. ■ Is the door completely closed? Do not operate the microwave oven without turntable and turntable support working properly? Use a corded phone or a different frequency cordless phone, or avoid using these areas are clean....
Use & Care Guide
Page 15
.... This limited warranty is valid in the United States or Canada and applies only when the microwave is installed, operated and maintained according to instructions attached to Whirlpool Corporation with the same precision used in the country in your request. If you use only .... If you need replacement parts If you need help us or your nearest Whirlpool designated service center. Call the Whirlpool Customer eXperience Center toll free: 1-800-253-1301. WHIRLPOOL CORPORATION COUNTERTOP MICROWAVE LIMITED WARRANTY ONE YEAR LIMITED WARRANTY For one year from the original date of...
.... This limited warranty is valid in the United States or Canada and applies only when the microwave is installed, operated and maintained according to instructions attached to Whirlpool Corporation with the same precision used in the country in your request. If you use only .... If you need replacement parts If you need help us or your nearest Whirlpool designated service center. Call the Whirlpool Customer eXperience Center toll free: 1-800-253-1301. WHIRLPOOL CORPORATION COUNTERTOP MICROWAVE LIMITED WARRANTY ONE YEAR LIMITED WARRANTY For one year from the original date of...
Use & Care Guide
Page 16
... determined. call 1-800-807-6777. 9/12 Keep this warranty does not apply. Write down the following information about your Whirlpool® Countertop Microwave should be properly packaged to avoid damage in accordance with electrical or plumbing codes, or use of ownership: 1. You can...warranty service. In the U.S.A. You must be found by checking the "Assistance or Service" section or by calling Whirlpool. Service calls to the appliance. 9. Your microwave must provide proof of repair, you also may be responsible for repair or replacement. 4. Outside the 50 United...
... determined. call 1-800-807-6777. 9/12 Keep this warranty does not apply. Write down the following information about your Whirlpool® Countertop Microwave should be properly packaged to avoid damage in accordance with electrical or plumbing codes, or use of ownership: 1. You can...warranty service. In the U.S.A. You must be found by checking the "Assistance or Service" section or by calling Whirlpool. Service calls to the appliance. 9. Your microwave must provide proof of repair, you also may be responsible for repair or replacement. 4. Outside the 50 United...

Warranty Information
Page 1
...maintained according to instructions attached to local dealers, repair parts distributors and service companies. WHIRLPOOL CORPORATION COUNTERTOP MICROWAVE LIMITED WARRANTY ONE YEAR LIMITED WARRANTY For one of your nearest Whirlpool designated service center. When calling, please know the purchase date and the complete model ... and work right because they are trained to build every new WHIRLPOOL® appliance. This limited warranty is valid in the United States or Canada and applies only when the microwave is effective from the dealer or can be installed over any ...
...maintained according to instructions attached to local dealers, repair parts distributors and service companies. WHIRLPOOL CORPORATION COUNTERTOP MICROWAVE LIMITED WARRANTY ONE YEAR LIMITED WARRANTY For one of your nearest Whirlpool designated service center. When calling, please know the purchase date and the complete model ... and work right because they are trained to build every new WHIRLPOOL® appliance. This limited warranty is valid in the United States or Canada and applies only when the microwave is effective from the dealer or can be installed over any ...

Warranty Information
Page 2
...user or operator instructions and/or installation instructions. 5. Repairs or replacement when your Whirlpool® Countertop Microwave should be properly packaged to a Whirlpool designated service center. If you . Whirlpool will not be directed to forward the product to avoid damage in transit as... Phone number Model number Serial number Purchase date W10434259C SP PN W10434279B ®/™ © 2013 Whirlpool. Repairs to the finish of your microwave, unless such damage results from defects in China In the U.S.A. Please include your sales slip together for...
...user or operator instructions and/or installation instructions. 5. Repairs or replacement when your Whirlpool® Countertop Microwave should be properly packaged to a Whirlpool designated service center. If you . Whirlpool will not be directed to forward the product to avoid damage in transit as... Phone number Model number Serial number Purchase date W10434259C SP PN W10434279B ®/™ © 2013 Whirlpool. Repairs to the finish of your microwave, unless such damage results from defects in China In the U.S.A. Please include your sales slip together for...

Installation Guide
Page 1
...;paration de l'ouverture d'encastrement/dans le placard............9 Installation du four à micro-ondes 10 Installation du cadre de la trousse de garniture 11 MICROWAVE OVEN SAFETY Your safety and the safety of injury, and tell you what can be killed or seriously injured if you and others are not... followed. W10434148A MICROWAVE OVEN BUILT-IN TRIM KIT INSTALLATION INSTRUCTIONS Built-In Trim Kit Models MK2227 MK2220 UL listed for use over any electric or gas built...
...;paration de l'ouverture d'encastrement/dans le placard............9 Installation du four à micro-ondes 10 Installation du cadre de la trousse de garniture 11 MICROWAVE OVEN SAFETY Your safety and the safety of injury, and tell you what can be killed or seriously injured if you and others are not... followed. W10434148A MICROWAVE OVEN BUILT-IN TRIM KIT INSTALLATION INSTRUCTIONS Built-In Trim Kit Models MK2227 MK2220 UL listed for use over any electric or gas built...
Installation Guide
Page 2
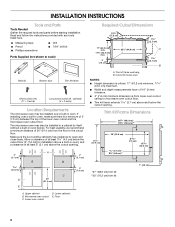
... may also be installed over a built-in oven), and a clearance of at least 2" (5.1 cm) above the cutout opening . Microwave oven cutout C. Trim kit frame overhang B. The microwave oven may be installed in a cabinet by itself (without a built-in oven. Floor 2" (5.1 cm) 3" (7.6 cm) Required Cutout ...cm) A 1 2.7 cm) B A. For best usability, we recommend a minimum distance of 36" (91.4 cm) from lower oven cutout ceiling to microwave oven cutout floor. ■ Trim kit frame extends 1 2.7 cm) above a built-in oven, make sure there is from the floor to the cutout...
... may also be installed over a built-in oven), and a clearance of at least 2" (5.1 cm) above the cutout opening . Microwave oven cutout C. Trim kit frame overhang B. The microwave oven may be installed in a cabinet by itself (without a built-in oven. Floor 2" (5.1 cm) 3" (7.6 cm) Required Cutout ...cm) A 1 2.7 cm) B A. For best usability, we recommend a minimum distance of 36" (91.4 cm) from lower oven cutout ceiling to microwave oven cutout floor. ■ Trim kit frame extends 1 2.7 cm) above a built-in oven, make sure there is from the floor to the cutout...


