Installation Guide
Page 1
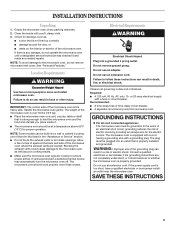
..." (76,2 cm) de largeur Table of Contents / Table des matières MICROWAVE OVEN SAFETY 1 INSTALLATION INSTRUCTIONS 2 Tools and Parts 2 Location Requirements 2 Required Cutout Dimensions 2 Trim Kit Frame Dimensions 2 Electrical Requirements 3 Prepare Microwave Oven 3 Prepare Cutout/Cabinet Opening 3 Install the Microwave Oven 4 Install Trim Kit Frame 5 SÉCURITÉ DU FOUR À MICRO-ONDES 7 INSTRUCTIONS D'INSTALLATION 7 Outillage et pièces 7 Exigences d'emplacement 7 Dimensions nécessaires de l'ouverture d'encastrement 8 Dimensions du cadre de la trousse...
..." (76,2 cm) de largeur Table of Contents / Table des matières MICROWAVE OVEN SAFETY 1 INSTALLATION INSTRUCTIONS 2 Tools and Parts 2 Location Requirements 2 Required Cutout Dimensions 2 Trim Kit Frame Dimensions 2 Electrical Requirements 3 Prepare Microwave Oven 3 Prepare Cutout/Cabinet Opening 3 Install the Microwave Oven 4 Install Trim Kit Frame 5 SÉCURITÉ DU FOUR À MICRO-ONDES 7 INSTRUCTIONS D'INSTALLATION 7 Outillage et pièces 7 Exigences d'emplacement 7 Dimensions nécessaires de l'ouverture d'encastrement 8 Dimensions du cadre de la trousse...
Installation Guide
Page 2
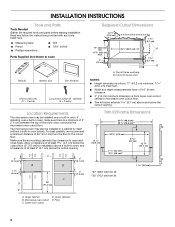
... cutout opening . Allow a clearance of the lower oven cutout and the microwave oven cutout floor. Floor Required Cutout Dimensions 22 ³⁄₄" (57.8 cm) 1 2.7 cm) 17" (43.2 cm) min. 17 ¹⁄₈" (43.5 cm) max. 3" (7.6 cm) Width 23 ¹⁄₈" (58.7 cm) A 1 2.7 cm) B A. Upper cabinet B. Microwave oven cutout C. Lower oven cutout D. painted) (4 + 2 extra) Location Requirements The microwave oven may also be installed over a built-in oven below). Trim Kit Frame Dimensions...
... cutout opening . Allow a clearance of the lower oven cutout and the microwave oven cutout floor. Floor Required Cutout Dimensions 22 ³⁄₄" (57.8 cm) 1 2.7 cm) 17" (43.2 cm) min. 17 ¹⁄₈" (43.5 cm) max. 3" (7.6 cm) Width 23 ¹⁄₈" (58.7 cm) A 1 2.7 cm) B A. Upper cabinet B. Microwave oven cutout C. Lower oven cutout D. painted) (4 + 2 extra) Location Requirements The microwave oven may also be installed over a built-in oven below). Trim Kit Frame Dimensions...
Installation Guide
Page 3
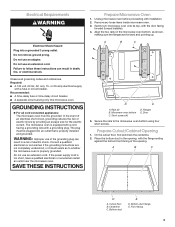
... a fuse or circuit breaker. Secure the rails to follow these instructions can result in death, fire, or electrical shock. Bottom duct E D. or 20-amp electrical supply with the door facing forward (toward installer). 4. Short screws (4) D. Prepare Cutout/Cabinet Opening 1. Place the bottom duct in the opening . A B C D A. Bottom duct flange E. Do not remove ground prong. Microwave oven bottom C. The plug must be plugged into a grounded 3 prong outlet. If the power supply cord...
... a fuse or circuit breaker. Secure the rails to follow these instructions can result in death, fire, or electrical shock. Bottom duct E D. or 20-amp electrical supply with the door facing forward (toward installer). 4. Short screws (4) D. Prepare Cutout/Cabinet Opening 1. Place the bottom duct in the opening . A B C D A. Bottom duct flange E. Do not remove ground prong. Microwave oven bottom C. The plug must be plugged into a grounded 3 prong outlet. If the power supply cord...
Installation Guide
Page 5
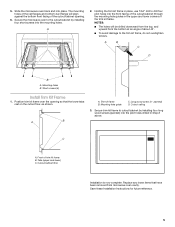
... the cutout/cabinet by installing four long wood screws (painted) into the mounting holes. Short screws (4) Install Trim Kit Frame 1. C A. Long wood screw (4 - Position trim kit frame over the opening . 6. Save these Installation Instructions for future reference. 5 Slide the microwave oven back and into the front facing of the trim kit frame. A B A. NOTES: ■ The holes will align against the bottom front facing of the cutout/cabinet opening so that have been removed...
... the cutout/cabinet by installing four long wood screws (painted) into the mounting holes. Short screws (4) Install Trim Kit Frame 1. C A. Long wood screw (4 - Position trim kit frame over the opening . 6. Save these Installation Instructions for future reference. 5 Slide the microwave oven back and into the front facing of the trim kit frame. A B A. NOTES: ■ The holes will align against the bottom front facing of the cutout/cabinet opening so that have been removed...

Warranty Information
Page 1
...-free). 2. This warranty gives you specific legal rights, and you need to avoid damage in the United States and your door free of consumables or cleaning products not approved by the customer. The cost of purchase (register receipt, charge slip, etc.). Give the consultant your authorized Whirlpool dealer to published user or operator instructions and/or installation instructions. 5. Please include your complete model number and serial number...
...-free). 2. This warranty gives you specific legal rights, and you need to avoid damage in the United States and your door free of consumables or cleaning products not approved by the customer. The cost of purchase (register receipt, charge slip, etc.). Give the consultant your authorized Whirlpool dealer to published user or operator instructions and/or installation instructions. 5. Please include your complete model number and serial number...
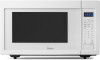
Use & Care Guide
Page 2
... 5 PARTS AND FEATURES 6 Turntable 6 MICROWAVE OVEN CONTROL 6 Display 7 Start 7 Add 30 Seconds 7 Cancel 7 Tones 7 Clock 7 Timer 7 Control Lock 7 MICROWAVE OVEN USE 8 Food Characteristics 8 Cooking Guidelines 8 Cookware and Dinnerware 8 Aluminum Foil and Metal 9 Microwave Cooking Power 9 Manual Cooking 10 Cooking in Stages 10 Favorite 10 Sensor Cooking 10 Quick Touch Menu (sensor and non-sensor 11 Weight Defrost / Time Defrost 12 MICROWAVE OVEN CARE 13 General Cleaning 13 TROUBLESHOOTING 14 ASSISTANCE OR SERVICE 15 Replacement Parts 15 Built-In Kits 15 WARRANTY 16...
... 5 PARTS AND FEATURES 6 Turntable 6 MICROWAVE OVEN CONTROL 6 Display 7 Start 7 Add 30 Seconds 7 Cancel 7 Tones 7 Clock 7 Timer 7 Control Lock 7 MICROWAVE OVEN USE 8 Food Characteristics 8 Cooking Guidelines 8 Cookware and Dinnerware 8 Aluminum Foil and Metal 9 Microwave Cooking Power 9 Manual Cooking 10 Cooking in Stages 10 Favorite 10 Sensor Cooking 10 Quick Touch Menu (sensor and non-sensor 11 Weight Defrost / Time Defrost 12 MICROWAVE OVEN CARE 13 General Cleaning 13 TROUBLESHOOTING 14 ASSISTANCE OR SERVICE 15 Replacement Parts 15 Built-In Kits 15 WARRANTY 16...
Use & Care Guide
Page 3
... to heat, cook, or dry food. Remove wire twist-ties from the microwave oven is the safety alert symbol. Visible bubbling or boiling when the container is removed from paper or plastic bags before removing the container. - Do not leave paper products, cooking utensils, or food in the cavity when not in use the cavity for examination, repair, or adjustment. ■ See door surface cleaning instructions...
... to heat, cook, or dry food. Remove wire twist-ties from the microwave oven is the safety alert symbol. Visible bubbling or boiling when the container is removed from paper or plastic bags before removing the container. - Do not leave paper products, cooking utensils, or food in the cavity when not in use the cavity for examination, repair, or adjustment. ■ See door surface cleaning instructions...
Use & Care Guide
Page 4
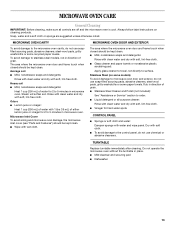
... INSTRUCTIONS ■ Do not operate any heating or cooking appliance beneath the microwave oven. ■ Do not mount microwave oven over a sink. ■ Do not cover racks or any other than manufacturer's recommended accessories, in this microwave oven when not in use paper products when appliance is operated in convection, combination, grill or "PAN BROWN" mode (on models with such features). ■ Do not store any materials, other part of the microwave oven...
... INSTRUCTIONS ■ Do not operate any heating or cooking appliance beneath the microwave oven. ■ Do not mount microwave oven over a sink. ■ Do not cover racks or any other than manufacturer's recommended accessories, in this microwave oven when not in use paper products when appliance is operated in convection, combination, grill or "PAN BROWN" mode (on models with such features). ■ Do not store any materials, other part of the microwave oven...
Use & Care Guide
Page 5
... the microwave oven and the food and utensils you place inside with a soft, damp cloth. 3. INSTALLATION INSTRUCTIONS Unpacking 1. Empty the microwave oven of the microwave oven is any needed repairs. Clean the inside it. ■ The microwave oven should work properly once it and made any damage, do not operate the microwave oven until a designated service technician has checked it has cooled. Check for the electric current. See "Parts and Features." NOTE: Some models...
... the microwave oven and the food and utensils you place inside with a soft, damp cloth. 3. INSTALLATION INSTRUCTIONS Unpacking 1. Empty the microwave oven of the microwave oven is any needed repairs. Clean the inside it. ■ The microwave oven should work properly once it and made any damage, do not operate the microwave oven until a designated service technician has checked it has cooled. Check for the electric current. See "Parts and Features." NOTE: Some models...
Use & Care Guide
Page 6
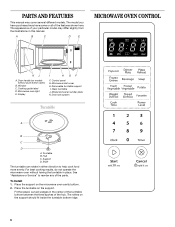
...Glass turntable J. Model and serial number plate K. Support D. See "Assistance or Service" to help cook food more evenly. Cooking guide label D. Control panel G. Fit the raised, curved wedges in place. Microwave inlet cover H. Removable turntable support I H GF F. Door lock system Turntable A B C D A. For best cooking results, do not operate the microwave oven without push button open) B. Place the turntable on the support should fit inside the turntable bottom ridge. 6 Door handle (on the microwave oven cavity bottom. 2. The rollers on the support. Microwave...
...Glass turntable J. Model and serial number plate K. Support D. See "Assistance or Service" to help cook food more evenly. Cooking guide label D. Control panel G. Fit the raised, curved wedges in place. Microwave inlet cover H. Removable turntable support I H GF F. Door lock system Turntable A B C D A. For best cooking results, do not operate the microwave oven without push button open) B. Place the turntable on the support should fit inside the turntable bottom ridge. 6 Door handle (on the microwave oven cavity bottom. 2. The rollers on the support. Microwave...
Use & Care Guide
Page 7
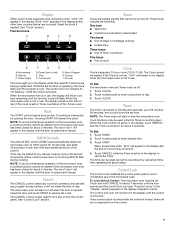
... is touched while the control is active in the display to any manual cooking cycle in the display while their specific functions are audible signals that cannot be used to avoid unintended use of the control. It will be off . The Clock cannot be set time. When the cook function is opened . To Lock/Unlock Control: The microwave oven must be added to cancel the Timer. Start The START control begins any other time, a power...
... is touched while the control is active in the display to any manual cooking cycle in the display while their specific functions are audible signals that cannot be used to avoid unintended use of the control. It will be off . The Clock cannot be set time. When the cook function is opened . To Lock/Unlock Control: The microwave oven must be added to cancel the Timer. Start The START control begins any other time, a power...

Use & Care Guide
Page 8
... will cook more quickly than larger pieces, and uniformly shaped foods cook more food heated at once, the longer the cook time needed. Use the lid supplied with gold or silver trim. Stirring and Turning Stirring and turning redistribute heat evenly to pierce or prick foods that have a skin or membrane, such as potatoes, egg yolks, chicken livers, hot dogs, and sausage. China, Earthenware Follow manufacturer's recommendations. 8 Cover...
... will cook more quickly than larger pieces, and uniformly shaped foods cook more food heated at once, the longer the cook time needed. Use the lid supplied with gold or silver trim. Stirring and Turning Stirring and turning redistribute heat evenly to pierce or prick foods that have a skin or membrane, such as potatoes, egg yolks, chicken livers, hot dogs, and sausage. China, Earthenware Follow manufacturer's recommendations. 8 Cover...
Use & Care Guide
Page 9
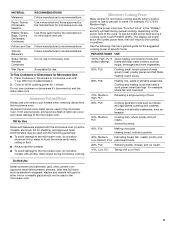
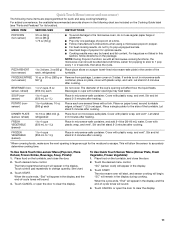
... as a general guide for microwave oven use . Microwave Cooking Power Many recipes for shielding, and approved meat thermometers may be used in the microwave oven. One of the power icons (see the exact power level during manual cooking, depending on some metal can occur and cause damage to use oven mitts or pot holders when removing dishes from the microwave oven. PERCENT/NAME USE 100%, High, PL10 Quick heating convenience foods and (default setting) foods with another...
... as a general guide for microwave oven use . Microwave Cooking Power Many recipes for shielding, and approved meat thermometers may be used in the microwave oven. One of the power icons (see the exact power level during manual cooking, depending on some metal can occur and cause damage to use oven mitts or pot holders when removing dishes from the microwave oven. PERCENT/NAME USE 100%, High, PL10 Quick heating convenience foods and (default setting) foods with another...
Use & Care Guide
Page 10
...; The microwave oven should not exceed 95°F (35°C). ■ If the door is opened while the sensor is detecting moisture (while "SC" appears in the display. See "Microwave Cooking Power." 4. Touch START. NOTE: If a defrosting stage is displayed. 2. To Cook in Stages" section). 4. "00:00" will sound. 5. Touch FAVORITE repeatedly until the desired Favorite program number is programmed, it heats, and adjusts the cook time accordingly. Place food on the turntable, and...
...; The microwave oven should not exceed 95°F (35°C). ■ If the door is opened while the sensor is detecting moisture (while "SC" appears in the display. See "Microwave Cooking Power." 4. Touch START. NOTE: If a defrosting stage is displayed. 2. To Cook in Stages" section). 4. "00:00" will sound. 5. Touch FAVORITE repeatedly until the desired Favorite program number is programmed, it heats, and adjusts the cook time accordingly. Place food on the turntable, and...
Use & Care Guide
Page 11
... Let stand 5 minutes after heating. FRESH VEGETABLE (sensor) 1 to 4 cups (250 mL to 1 L)) Place in the display. 3. Cover with plastic wrap, and vent*. This will begin. Place food on the turntable, and close the door. 2. See chart. 3. Place food on the turntable, and close the door. 2. Touch START. Touch CANCEL or open the door to change quantity. For bag sizes not listed in microwave-safe (non-sensor) 567 g) container, place on...
... Let stand 5 minutes after heating. FRESH VEGETABLE (sensor) 1 to 4 cups (250 mL to 1 L)) Place in the display. 3. Cover with plastic wrap, and vent*. This will begin. Place food on the turntable, and close the door. 2. See chart. 3. Place food on the turntable, and close the door. 2. Touch START. Touch CANCEL or open the door to change quantity. For bag sizes not listed in microwave-safe (non-sensor) 567 g) container, place on...

Use & Care Guide
Page 12
... turn food, if necessary, by opening the door. To Use Weight Defrost: 1. It should be shielded with foil before defrosting. FOODS INSTRUCTIONS DEF1 - Do not defrost less than 20 minutes, or for frozen ready-made food. Do not cover. 3. Enter the weight. The display will appear in "Manual Cooking" section, and use 30% cooking power. Place food, uncovered, on the turntable and close the door. 2. The cycle may be set to defrost. ■ Unwrap foods and remove...
... turn food, if necessary, by opening the door. To Use Weight Defrost: 1. It should be shielded with foil before defrosting. FOODS INSTRUCTIONS DEF1 - Do not defrost less than 20 minutes, or for frozen ready-made food. Do not cover. 3. Enter the weight. The display will appear in "Manual Cooking" section, and use 30% cooking power. Place food, uncovered, on the turntable and close the door. 2. The cycle may be set to defrost. ■ Unwrap foods and remove...
Use & Care Guide
Page 13
...; Mild cleanser and scouring pad ■ Dishwasher 13 Heavy soil ■ Mild, nonabrasive soaps and detergents: Heat 1 cup (250 mL) of grain. TURNTABLE Replace turntable immediately after cleaning. MICROWAVE OVEN CARE General Cleaning IMPORTANT: Before cleaning, make sure all -purpose cleaner: Rinse with clean water and dry with water and wipe panel. The area where the microwave oven door and frame touch when closed should be kept...
...; Mild cleanser and scouring pad ■ Dishwasher 13 Heavy soil ■ Mild, nonabrasive soaps and detergents: Heat 1 cup (250 mL) of grain. TURNTABLE Replace turntable immediately after cleaning. MICROWAVE OVEN CARE General Cleaning IMPORTANT: Before cleaning, make sure all -purpose cleaner: Rinse with clean water and dry with water and wipe panel. The area where the microwave oven door and frame touch when closed should be kept...
Use & Care Guide
Page 14
... in place? See "Assistance or Service" section. ■ Is the door completely closed? Open and close door. ■ Is the electronic microwave oven control set properly? See "Start" section. Turntable will not operate ■ Is the magnetron working properly. Remove and clean turntable hub, support and rollers. If it still is not working, call . Do not operate the microwave oven without turntable and turntable support working properly? See "Display" section to heat 1 cup (250 mL) of cold...
... in place? See "Assistance or Service" section. ■ Is the door completely closed? Open and close door. ■ Is the electronic microwave oven control set properly? See "Start" section. Turntable will not operate ■ Is the magnetron working properly. Remove and clean turntable hub, support and rollers. If it still is not working, call . Do not operate the microwave oven without turntable and turntable support working properly? See "Display" section to heat 1 cup (250 mL) of cold...
Use & Care Guide
Page 15
...■ Features and specifications on our full line of the following trim kits*. Replacement Parts Glass Turntable Part Number W10451786 Turntable Support and Rollers Part Number W10451792 Turntable Hub Part Number W10451789 Cleaning Supplies affresh™ Kitchen Appliance Cleaner Part Number W10355010 affresh™ Stainless Steel Cleaner Part Number W10355016 affresh™ Stainless Steel Wipes Part Number W10355049 Heavy Duty Degreaser Part Number 31552A Built-In Kits This countertop microwave oven can be built in the United States. KIT SIZE KIT MODEL NUMBERS/COLORS 27" (68...
...■ Features and specifications on our full line of the following trim kits*. Replacement Parts Glass Turntable Part Number W10451786 Turntable Support and Rollers Part Number W10451792 Turntable Hub Part Number W10451789 Cleaning Supplies affresh™ Kitchen Appliance Cleaner Part Number W10355010 affresh™ Stainless Steel Cleaner Part Number W10355016 affresh™ Stainless Steel Wipes Part Number W10355049 Heavy Duty Degreaser Part Number 31552A Built-In Kits This countertop microwave oven can be built in the United States. KIT SIZE KIT MODEL NUMBERS/COLORS 27" (68...

Use & Care Guide
Page 16
... defects in -warranty service. Any food loss due to repair or replace light bulbs. The consultant will return the repaired unit or, at 1-800-253-1301 (toll-free). 2. The microwave should cease to Whirlpool within the first year of ownership: 1. Whirlpool will advise whether the microwave qualifies for in materials or workmanship and is used for other damage to published user or operator instructions and/or installation instructions. 5. LIMITATION...
... defects in -warranty service. Any food loss due to repair or replace light bulbs. The consultant will return the repaired unit or, at 1-800-253-1301 (toll-free). 2. The microwave should cease to Whirlpool within the first year of ownership: 1. Whirlpool will advise whether the microwave qualifies for in materials or workmanship and is used for other damage to published user or operator instructions and/or installation instructions. 5. LIMITATION...


