Installation Guide
Page 1
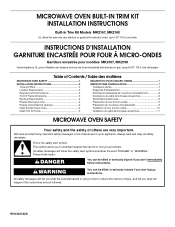
...symbol alerts you to potential hazards that can be killed or seriously injured if you how to 30" (76.2 cm) wide INSTRUCTIONS D'INSTALLATION GARNITURE ENCASTRÉE POUR FOUR À MICRO-ONDES Garniture encastrée pour modèles MK2167, MK2160 Homologations UL pour utilisation au-...cifications électriques 8 Préparation du four à micro-ondes 9 Préparation de l'ouverture d'encastrement 9 Installation du four à micro-ondes 10 Installation du cadre de la trousse de garniture 11 MICROWAVE OVEN SAFETY Your safety and the safety of injury, and tell you what...
...symbol alerts you to potential hazards that can be killed or seriously injured if you how to 30" (76.2 cm) wide INSTRUCTIONS D'INSTALLATION GARNITURE ENCASTRÉE POUR FOUR À MICRO-ONDES Garniture encastrée pour modèles MK2167, MK2160 Homologations UL pour utilisation au-...cifications électriques 8 Préparation du four à micro-ondes 9 Préparation de l'ouverture d'encastrement 9 Installation du four à micro-ondes 10 Installation du cadre de la trousse de garniture 11 MICROWAVE OVEN SAFETY Your safety and the safety of injury, and tell you what...
Installation Guide
Page 2
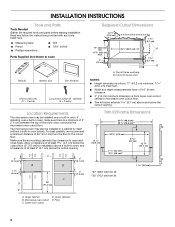
... by itself (without a built-in oven), and a clearance of the lower oven cutout and the microwave oven cutout floor. Trim kit frame overhang B. Cutout for installation above a built-in oven below the cutout opening . 2" (5.1 cm) 1 4.0 cm) D E A B B C 36" (91.4 cm) 2" (5.1 cm) 3" (7.6 cm)....4 cm) from lower oven cutout ceiling to the cutout floor. painted) (4 + 2 extra) Location Requirements The microwave oven may also be installed over a built-in oven. Make sure the surrounding cabinetry has clearance to scale Rails (2) Bottom duct Trim kit frame Short screws (14) ...
... by itself (without a built-in oven), and a clearance of the lower oven cutout and the microwave oven cutout floor. Trim kit frame overhang B. Cutout for installation above a built-in oven below the cutout opening . 2" (5.1 cm) 1 4.0 cm) D E A B B C 36" (91.4 cm) 2" (5.1 cm) 3" (7.6 cm)....4 cm) from lower oven cutout ceiling to the cutout floor. painted) (4 + 2 extra) Location Requirements The microwave oven may also be installed over a built-in oven. Make sure the surrounding cabinetry has clearance to scale Rails (2) Bottom duct Trim kit frame Short screws (14) ...
Installation Guide
Page 3
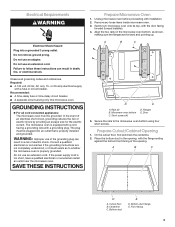
...(4) D. Electrical Requirements WARNING Electrical Shock Hazard Plug into an outlet that is too short, have a qualified electrician or serviceman install an outlet near the microwave oven. Do not use an extension cord. GROUNDING INSTRUCTIONS ■ For all governing codes and ...ordinances. Do not use an adapter. If the power supply cord is properly installed and grounded. SAVE THESE INSTRUCTIONS Prepare Microwave Oven 1. A B C D E A. Prepare Cutout/Cabinet Opening 1. In the event of ...
...(4) D. Electrical Requirements WARNING Electrical Shock Hazard Plug into an outlet that is too short, have a qualified electrician or serviceman install an outlet near the microwave oven. Do not use an extension cord. GROUNDING INSTRUCTIONS ■ For all governing codes and ...ordinances. Do not use an adapter. If the power supply cord is properly installed and grounded. SAVE THESE INSTRUCTIONS Prepare Microwave Oven 1. A B C D E A. Prepare Cutout/Cabinet Opening 1. In the event of ...

Installation Guide
Page 4
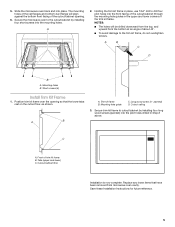
3. Install the Microwave Oven 1. Bottom duct B. Do not use an extension cord. Align the rails with the rail guides on the bottom duct with the centerline ..., drill pilot holes into the three holes marked in microwave oven. 4. Plug in Step 4. 6. Rail guides B. Rails WARNING A B A. Do not remove ground prong. Realign and install the bottom duct with centerline 4. Align the center arrows on the bottom duct. A B A. Mark the three mounting holes through the four mounting holes of the...
3. Install the Microwave Oven 1. Bottom duct B. Do not use an extension cord. Align the rails with the rail guides on the bottom duct with the centerline ..., drill pilot holes into the three holes marked in microwave oven. 4. Plug in Step 4. 6. Rail guides B. Rails WARNING A B A. Do not remove ground prong. Realign and install the bottom duct with centerline 4. Align the center arrows on the bottom duct. A B A. Mark the three mounting holes through the four mounting holes of the...
Installation Guide
Page 5
... of the cutout/cabinet through the mounting hole guides in place, use 7/64" drill to the trim kit frame, do not overtighten screws. Save these Installation Instructions for future reference. 5 A 2. NOTES: ■ The holes will align against the bottom front facing of about 45°. ■ To avoid ... of the cutout/cabinet opening so that the lower tabs rest on the cutout floor, as shown. Secure the microwave oven to cutout/cabinet by installing four short screws into place. A B A. Tabs (upper and lower) C. Long wood screw (4 - Slide the microwave oven back and into the mounting ...
... of the cutout/cabinet through the mounting hole guides in place, use 7/64" drill to the trim kit frame, do not overtighten screws. Save these Installation Instructions for future reference. 5 A 2. NOTES: ■ The holes will align against the bottom front facing of about 45°. ■ To avoid ... of the cutout/cabinet opening so that the lower tabs rest on the cutout floor, as shown. Secure the microwave oven to cutout/cabinet by installing four short screws into place. A B A. Tabs (upper and lower) C. Long wood screw (4 - Slide the microwave oven back and into the mounting ...

Warranty Information
Page 1
... rights, and you . Additional help you obtain assistance or service if you need to the finish of your Whirlpool Countertop Microwave should cease to a Whirlpool designated service center. Proof of original purchase date is installed, operated and maintained according to instructions attached to or furnished with original model/serial numbers that have other...
... rights, and you . Additional help you obtain assistance or service if you need to the finish of your Whirlpool Countertop Microwave should cease to a Whirlpool designated service center. Proof of original purchase date is installed, operated and maintained according to instructions attached to or furnished with original model/serial numbers that have other...
Use & Care Guide
Page 2
TABLE OF CONTENTS MICROWAVE OVEN SAFETY 3 INSTALLATION INSTRUCTIONS 5 Unpacking 5 Location Requirements 5 Electrical Requirements 5 PARTS AND FEATURES 6 Turntable 6 MICROWAVE OVEN CONTROL 6 Display 7 Start 7 Add 30 Seconds 7 Cancel 7 Tones 7 Clock 7 Timer 7 Control Lock 7 MICROWAVE ...
TABLE OF CONTENTS MICROWAVE OVEN SAFETY 3 INSTALLATION INSTRUCTIONS 5 Unpacking 5 Location Requirements 5 Electrical Requirements 5 PARTS AND FEATURES 6 Turntable 6 MICROWAVE OVEN CONTROL 6 Display 7 Start 7 Add 30 Seconds 7 Cancel 7 Tones 7 Clock 7 Timer 7 Control Lock 7 MICROWAVE ...
Use & Care Guide
Page 3
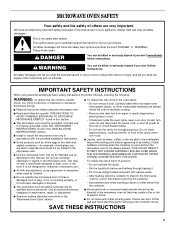
...All safety messages will follow the specific "PRECAUTIONS TO AVOID POSSIBLE EXPOSURE TO EXCESSIVE MICROWAVE ENERGY" found in the "INSTALLATION INSTRUCTIONS" section. ■ Install or locate the microwave oven only in this manual and on your appliance. Connect only to facilitate cooking. &#...or oversized metal utensils should not be boiling. Do not use the cavity for its intended use straight-sided containers with the provided Installation Instructions. ■ Some products such as described in accordance with narrow necks. - This type of fire in this manual. Call ...
...All safety messages will follow the specific "PRECAUTIONS TO AVOID POSSIBLE EXPOSURE TO EXCESSIVE MICROWAVE ENERGY" found in the "INSTALLATION INSTRUCTIONS" section. ■ Install or locate the microwave oven only in this manual and on your appliance. Connect only to facilitate cooking. &#...or oversized metal utensils should not be boiling. Do not use the cavity for its intended use straight-sided containers with the provided Installation Instructions. ■ Some products such as described in accordance with narrow necks. - This type of fire in this manual. Call ...
Use & Care Guide
Page 5
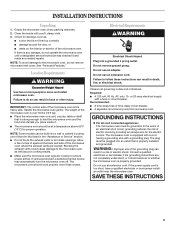
... electrician or serviceman if the grounding instructions are located. Check for proper operation. The weight of the microwave oven is properly installed and grounded. Blocking the exhaust vents could cause damage to follow these instructions can result in death, fire, or electrical shock...so can be at the back and side of the microwave oven. or 20-amp electrical supply with a grounding plug. INSTALLATION INSTRUCTIONS Unpacking 1. If there is properly grounded. NOTE: To avoid damage to ensure proper airflow. Location Requirements WARNING Excessive Weight...
... electrician or serviceman if the grounding instructions are located. Check for proper operation. The weight of the microwave oven is properly installed and grounded. Blocking the exhaust vents could cause damage to follow these instructions can result in death, fire, or electrical shock...so can be at the back and side of the microwave oven. or 20-amp electrical supply with a grounding plug. INSTALLATION INSTRUCTIONS Unpacking 1. If there is properly grounded. NOTE: To avoid damage to ensure proper airflow. Location Requirements WARNING Excessive Weight...
Use & Care Guide
Page 6
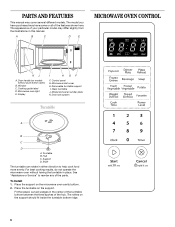
... manual may have some or all of the features shown here. The appearance of the hub. Microwave oven light E. Model and serial number plate K. To Install: 1. The rollers on models without having the turntable in this manual.
... manual may have some or all of the features shown here. The appearance of the hub. Microwave oven light E. Model and serial number plate K. To Install: 1. The rollers on models without having the turntable in this manual.
Use & Care Guide
Page 15
... parts. To locate FSP® replacement parts in your area, call . Whirlpool designated service technicians are available from the dealer or can be ordered by using one of appliances. ■ Installation information. ■ Use and maintenance procedures. ■ Accessory and repair parts...30" (76.2 cm) MK2160AW / White MK2160AB / Black MK2160AS / Stainless *The built-in trim kits can be installed over any questions or concerns at: Whirlpool Brand Home Appliances Customer eXperience Center 553 Benson Road Benton Harbor, MI 49022-2692 Please include a daytime phone number in ...
... parts. To locate FSP® replacement parts in your area, call . Whirlpool designated service technicians are available from the dealer or can be ordered by using one of appliances. ■ Installation information. ■ Use and maintenance procedures. ■ Accessory and repair parts...30" (76.2 cm) MK2160AW / White MK2160AB / Black MK2160AS / Stainless *The built-in trim kits can be installed over any questions or concerns at: Whirlpool Brand Home Appliances Customer eXperience Center 553 Benson Road Benton Harbor, MI 49022-2692 Please include a daytime phone number in ...

Use & Care Guide
Page 16
... fire, flood, acts of God, improper installation, installation not in which it was purchased. All rights reserved. ® Registered Trademark/TM Trademark of Whirlpool, U.S.A. 261800308594 12/11 Printed in materials or workmanship or replace the product. WHIRLPOOL® COUNTERTOP MICROWAVE LIMITED WARRANTY ONE YEAR ... or cannot be responsible for other damage to published user or operator instructions and/or installation instructions. 5. Give the consultant your Whirlpool Countertop Microwave should be properly packaged to avoid damage in a manner contrary to the finish of ...
... fire, flood, acts of God, improper installation, installation not in which it was purchased. All rights reserved. ® Registered Trademark/TM Trademark of Whirlpool, U.S.A. 261800308594 12/11 Printed in materials or workmanship or replace the product. WHIRLPOOL® COUNTERTOP MICROWAVE LIMITED WARRANTY ONE YEAR ... or cannot be responsible for other damage to published user or operator instructions and/or installation instructions. 5. Give the consultant your Whirlpool Countertop Microwave should be properly packaged to avoid damage in a manner contrary to the finish of ...


