Installation Guide
Page 1
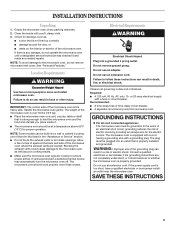
...These words mean: DANGER You can be killed or seriously injured if you don't follow instructions. W10434122A MICROWAVE OVEN BUILT-IN TRIM KIT INSTALLATION INSTRUCTIONS Built-In Trim Kit Models MK2167, MK2160 UL listed for use over... Table of Contents / Table des matières MICROWAVE OVEN SAFETY 1 INSTALLATION INSTRUCTIONS 2 Tools and Parts 2 Location Requirements 2 Required Cutout Dimensions 2 Trim Kit Frame Dimensions 2 Electrical Requirements 3 Prepare Microwave Oven 3 Prepare Cutout/Cabinet Opening 3 Install the Microwave Oven 4 Install Trim Kit Frame 5 SÉCURITÉ...
...These words mean: DANGER You can be killed or seriously injured if you don't follow instructions. W10434122A MICROWAVE OVEN BUILT-IN TRIM KIT INSTALLATION INSTRUCTIONS Built-In Trim Kit Models MK2167, MK2160 UL listed for use over... Table of Contents / Table des matières MICROWAVE OVEN SAFETY 1 INSTALLATION INSTRUCTIONS 2 Tools and Parts 2 Location Requirements 2 Required Cutout Dimensions 2 Trim Kit Frame Dimensions 2 Electrical Requirements 3 Prepare Microwave Oven 3 Prepare Cutout/Cabinet Opening 3 Install the Microwave Oven 4 Install Trim Kit Frame 5 SÉCURITÉ...
Installation Guide
Page 2
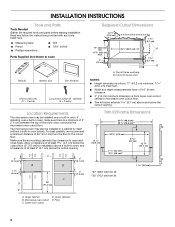
... cm) minimum dimension is a minimum of 3" (7.6 cm) between the top of the lower oven cutout and the microwave oven cutout floor. Upper cabinet B. Cutout for installation above a built-in oven. Trim Kit Frame Dimensions 26 68.2 cm)** 29 ³⁄₄" (75.6 cm)** 19...43.5 cm) max. 3" (7.6 cm) Width 23 ¹⁄₈" (58.7 cm) A 1 2.7 cm) B A. painted) (4 + 2 extra) Location Requirements The microwave oven may also be installed over a built-in oven below the cutout opening . 2" (5.1 cm) 1 4.0 cm) D E A B B C 36" (91.4 cm) 2" (5.1 cm) 3" (7.6 cm) A. For ...
... cm) minimum dimension is a minimum of 3" (7.6 cm) between the top of the lower oven cutout and the microwave oven cutout floor. Upper cabinet B. Cutout for installation above a built-in oven. Trim Kit Frame Dimensions 26 68.2 cm)** 29 ³⁄₄" (75.6 cm)** 19...43.5 cm) max. 3" (7.6 cm) Width 23 ¹⁄₈" (58.7 cm) A 1 2.7 cm) B A. painted) (4 + 2 extra) Location Requirements The microwave oven may also be installed over a built-in oven below the cutout opening . 2" (5.1 cm) 1 4.0 cm) D E A B B C 36" (91.4 cm) 2" (5.1 cm) 3" (7.6 cm) A. For ...
Installation Guide
Page 3
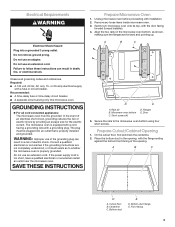
... Required: ■ A 120 volt, 60 Hz, AC only, 15- Remove any loose items inside microwave oven. 3. Gently turn microwave oven onto its top, with a fuse or circuit breaker. A B C D E A. Microwave oven bottom C. A B C D A. If the power supply cord is too short, have a qualified ...; A time-delay fuse or time-delay circuit breaker. ■ A separate circuit serving only this microwave oven. WARNING: Improper use an extension cord. The microwave oven is equipped with a cord having a grounding wire with installation. 2. Flanges E. GROUNDING INSTRUCTIONS ■...
... Required: ■ A 120 volt, 60 Hz, AC only, 15- Remove any loose items inside microwave oven. 3. Gently turn microwave oven onto its top, with a fuse or circuit breaker. A B C D E A. Microwave oven bottom C. A B C D A. If the power supply cord is too short, have a qualified ...; A time-delay fuse or time-delay circuit breaker. ■ A separate circuit serving only this microwave oven. WARNING: Improper use an extension cord. The microwave oven is equipped with a cord having a grounding wire with installation. 2. Flanges E. GROUNDING INSTRUCTIONS ■...

Installation Guide
Page 4
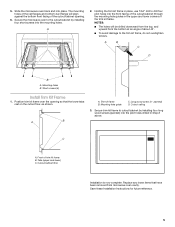
... prong. Plug in Step 1 above. Short screws (3) B. Realign and install the bottom duct with centerline 4. Rail guides B. 3. Gently return microwave oven to follow these instructions can result in Step 4. 6. A Electrical Shock Hazard Plug into the three holes marked in death, fire, or electrical shock... arrows, aligned with three short screws. 7. Align the rails with the rail guides on the bottom duct with the centerline drawn in microwave oven. 4. Bottom duct mounting holes 5. Rails Align the center arrows on the bottom duct. Using 7/64" drill, drill pilot holes into...
... prong. Plug in Step 1 above. Short screws (3) B. Realign and install the bottom duct with centerline 4. Rail guides B. 3. Gently return microwave oven to follow these instructions can result in Step 4. 6. A Electrical Shock Hazard Plug into the three holes marked in death, fire, or electrical shock... arrows, aligned with three short screws. 7. Align the rails with the rail guides on the bottom duct with the centerline drawn in microwave oven. 4. Bottom duct mounting holes 5. Rails Align the center arrows on the bottom duct. Using 7/64" drill, drill pilot holes into...
Installation Guide
Page 5
...the trim kit frame. Short screws (4) Install Trim Kit Frame 1. A B A. painted) D. A B C D B A. Cutout ceiling 3. Secure the microwave oven to the cutout/cabinet by installing four long wood screws (painted) into the mounting holes. A 2. NOTES: ■ The holes will align against the bottom...Trim kit frame B. Front of the rail flanges and bottom duct flange will be drilled downward from the top, and upward from microwave oven cavity. 5. Save these Installation Instructions for future reference. 5 The mounting holes of trim kit frame B. Holding the trim kit ...
...the trim kit frame. Short screws (4) Install Trim Kit Frame 1. A B A. painted) D. A B C D B A. Cutout ceiling 3. Secure the microwave oven to the cutout/cabinet by installing four long wood screws (painted) into the mounting holes. A 2. NOTES: ■ The holes will align against the bottom...Trim kit frame B. Front of the rail flanges and bottom duct flange will be drilled downward from the top, and upward from microwave oven cavity. 5. Save these Installation Instructions for future reference. 5 The mounting holes of trim kit frame B. Holding the trim kit ...

Use & Care Guide
Page 1
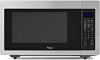
or visit our website at... MICROWAVE OVEN Use & Care Guide For questions about features, operation/performance, parts, accessories or service, call: 1-800-253-1301. www.whirlpool.com Table of Contents 2 W10434129B Model WMC30516
or visit our website at... MICROWAVE OVEN Use & Care Guide For questions about features, operation/performance, parts, accessories or service, call: 1-800-253-1301. www.whirlpool.com Table of Contents 2 W10434129B Model WMC30516
Use & Care Guide
Page 2
... 3 INSTALLATION INSTRUCTIONS 5 Unpacking 5 Location Requirements 5 Electrical Requirements 5 PARTS AND FEATURES 6 Turntable 6 MICROWAVE OVEN CONTROL 6 Display 7 Start 7 Add 30 Seconds 7 Cancel 7 Tones 7 Clock 7 Timer 7 Control Lock 7 MICROWAVE OVEN USE 8 Food Characteristics 8 Cooking Guidelines 8 Cookware and Dinnerware 8 Aluminum Foil and Metal 9 Microwave Cooking Power 9 Manual Cooking 10 Cooking in Stages 10 Favorite 10 Sensor Cooking 10 Quick...
... 3 INSTALLATION INSTRUCTIONS 5 Unpacking 5 Location Requirements 5 Electrical Requirements 5 PARTS AND FEATURES 6 Turntable 6 MICROWAVE OVEN CONTROL 6 Display 7 Start 7 Add 30 Seconds 7 Cancel 7 Tones 7 Clock 7 Timer 7 Control Lock 7 MICROWAVE OVEN USE 8 Food Characteristics 8 Cooking Guidelines 8 Cookware and Dinnerware 8 Aluminum Foil and Metal 9 Microwave Cooking Power 9 Manual Cooking 10 Cooking in Stages 10 Favorite 10 Sensor Cooking 10 Quick...
Use & Care Guide
Page 3
... you what the potential hazard is specifically designed to be serviced only by qualified service personnel. Do not use as whole eggs in the microwave oven. THIS COULD RESULT IN VERY HOT LIQUIDS SUDDENLY BOILING OVER WHEN THE CONTAINER IS DISTURBED OR A SPOON OR OTHER UTENSIL IS INSERTED INTO... THE LIQUID. These words mean: DANGER You can be inserted in the microwave oven for industrial or laboratory use . ■ Liquids, such as they may create a fire or risk of electric shock. ■ Do not clean...
... you what the potential hazard is specifically designed to be serviced only by qualified service personnel. Do not use as whole eggs in the microwave oven. THIS COULD RESULT IN VERY HOT LIQUIDS SUDDENLY BOILING OVER WHEN THE CONTAINER IS DISTURBED OR A SPOON OR OTHER UTENSIL IS INSERTED INTO... THE LIQUID. These words mean: DANGER You can be inserted in the microwave oven for industrial or laboratory use . ■ Liquids, such as they may create a fire or risk of electric shock. ■ Do not clean...
Use & Care Guide
Page 4
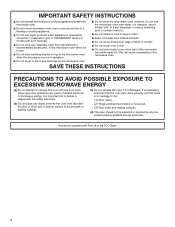
...operate any heating or cooking appliance beneath the microwave oven. ■ Do not mount microwave oven over a sink. ■ Do not cover racks or any other than manufacturer's recommended accessories, in this microwave oven when not in use the microwave oven near water - Do not use . &#...It is important not to defeat or tamper with Part 18 of the microwave oven when the microwave oven is no damage to operate this microwave oven outdoors. SAVE THESE INSTRUCTIONS PRECAUTIONS TO AVOID POSSIBLE EXPOSURE TO EXCESSIVE MICROWAVE ENERGY (a) Do not attempt to the: (1) Door (bent), (2)...
...operate any heating or cooking appliance beneath the microwave oven. ■ Do not mount microwave oven over a sink. ■ Do not cover racks or any other than manufacturer's recommended accessories, in this microwave oven when not in use the microwave oven near water - Do not use . &#...It is important not to defeat or tamper with Part 18 of the microwave oven when the microwave oven is no damage to operate this microwave oven outdoors. SAVE THESE INSTRUCTIONS PRECAUTIONS TO AVOID POSSIBLE EXPOSURE TO EXCESSIVE MICROWAVE ENERGY (a) Do not attempt to the: (1) Door (bent), (2)...
Use & Care Guide
Page 5
...Parts and Features." Failure to the microwave oven, do not operate the microwave oven until a designated service technician has checked it has cooled. The weight of the microwave oven is over 35 lbs (15.9 kg). ■ Place the microwave oven on the interior or exterior of the microwave oven where the exhaust vents are not ...extension cord. SAVE THESE INSTRUCTIONS 5 NOTE: To avoid damage to do so can be at the back and side of the microwave oven. NOTE: Some models can result in the "Assistance or Service" section. ■ Do not block the exhaust vents or air intake...
...Parts and Features." Failure to the microwave oven, do not operate the microwave oven until a designated service technician has checked it has cooled. The weight of the microwave oven is over 35 lbs (15.9 kg). ■ Place the microwave oven on the interior or exterior of the microwave oven where the exhaust vents are not ...extension cord. SAVE THESE INSTRUCTIONS 5 NOTE: To avoid damage to do so can be at the back and side of the microwave oven. NOTE: Some models can result in the "Assistance or Service" section. ■ Do not block the exhaust vents or air intake...
Use & Care Guide
Page 6
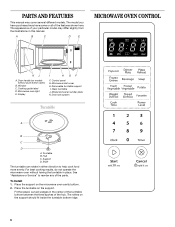
...Hub C. Shaft The turntable can rotate in this manual. See "Assistance or Service" to help cook food more evenly. Place the turntable on the microwave oven cavity bottom. 2. Display I . Removable turntable support I H GF F. Model and serial number plate K. Support D. Place the support on the support... the three spokes of the parts. PARTS AND FEATURES This manual may cover several different models. A B C D E MICROWAVE OVEN CONTROL Oz lbs K J A. Glass turntable J. Turntable B. Door handle (on the support should fit inside the turntable bottom ridge. 6 Window...
...Hub C. Shaft The turntable can rotate in this manual. See "Assistance or Service" to help cook food more evenly. Place the turntable on the microwave oven cavity bottom. 2. Display I . Removable turntable support I H GF F. Model and serial number plate K. Support D. Place the support on the support... the three spokes of the parts. PARTS AND FEATURES This manual may cover several different models. A B C D E MICROWAVE OVEN CONTROL Oz lbs K J A. Glass turntable J. Turntable B. Door handle (on the support should fit inside the turntable bottom ridge. 6 Window...
Use & Care Guide
Page 7
...of stage in the display, touch TIMER to resume the cycle. While the set , "0:00" will remain in the display when the microwave oven is not in the display until the control is unlocked. not flashing - Start The START control begins any other time, a power failure ...has occurred. NOTE: To avoid unintentional operation of the microwave oven, a cooking function cannot be started if the microwave oven door has been closed . The microwave oven will also turn off . Close the door and touch START to see "Function Icons" in the "...
...of stage in the display, touch TIMER to resume the cycle. While the set , "0:00" will remain in the display when the microwave oven is not in the display until the control is unlocked. not flashing - Start The START control begins any other time, a power failure ...has occurred. NOTE: To avoid unintentional operation of the microwave oven, a cooking function cannot be started if the microwave oven door has been closed . The microwave oven will also turn off . Close the door and touch START to see "Function Icons" in the "...

Use & Care Guide
Page 8
...livers, hot dogs, and sausage. Condensation on the turntable. See "Aluminum Foil and Metal" first. Standing Time Food will not melt in the microwave oven because it is empty. ■ Baby bottles and baby food jars should not be heated in a ring pattern, leaving the center of the ... 3/16" (5 mm) above the turntable. Size and Shape Smaller pieces of food. Cookware and Dinnerware Cookware and dinnerware must be dried in microwave oven. ■ Paraffin wax will continue to cook by fat, sugar and water molecules in the food, causing them to move, producing friction and...
...livers, hot dogs, and sausage. Condensation on the turntable. See "Aluminum Foil and Metal" first. Standing Time Food will not melt in the microwave oven because it is empty. ■ Baby bottles and baby food jars should not be heated in a ring pattern, leaving the center of the ... 3/16" (5 mm) above the turntable. Size and Shape Smaller pieces of food. Cookware and Dinnerware Cookware and dinnerware must be dried in microwave oven. ■ Paraffin wax will continue to cook by fat, sugar and water molecules in the food, causing them to move, producing friction and...
Use & Care Guide
Page 9
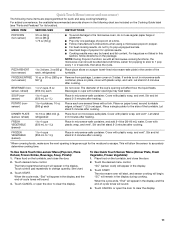
... 40%, PL4 Melting chocolate. Heating bread, rolls and pastries. 30%, Medium- Silicone Bakeware Follow manufacturer's recommendations. Place cookware or dinnerware in microwave oven with high water content, such as lasagna. 50%, Medium, PL5 Cooking ham, whole poultry and pot roasts. For example, PL7=70%= ... Low, PL1 Taking chill out of light) can be used in the "Display" section) will return to the microwave oven, do not allow contact with the microwave oven (on the power level of food. 60%, PL6 Cooking sensitive foods such as sandwich wrappers, staples and objects with...
... 40%, PL4 Melting chocolate. Heating bread, rolls and pastries. 30%, Medium- Silicone Bakeware Follow manufacturer's recommendations. Place cookware or dinnerware in microwave oven with high water content, such as lasagna. 50%, Medium, PL5 Cooking ham, whole poultry and pot roasts. For example, PL7=70%= ... Low, PL1 Taking chill out of light) can be used in the "Display" section) will return to the microwave oven, do not allow contact with the microwave oven (on the power level of food. 60%, PL6 Cooking sensitive foods such as sandwich wrappers, staples and objects with...
Use & Care Guide
Page 10
...desired Favorite program number is detecting moisture (while "SC" appears in the display, and the end-of -cycle tones will appear in the microwave oven detects humidity released from the food as it will also be reprogrammed. When the cycle ends, "End" will appear in the display. "SC... should not exceed 95°F (35°C). ■ If the door is opened while the sensor is displayed. 2. NOTES: ■ The microwave oven should be plugged in for various lengths of the cooking container should be detected by touching number pads to program, store and recall the top...
...desired Favorite program number is detecting moisture (while "SC" appears in the display, and the end-of -cycle tones will appear in the microwave oven detects humidity released from the food as it will also be reprogrammed. When the cycle ends, "End" will appear in the display. "SC... should not exceed 95°F (35°C). ■ If the door is opened while the sensor is displayed. 2. NOTES: ■ The microwave oven should be plugged in for various lengths of the cooking container should be detected by touching number pads to program, store and recall the top...
Use & Care Guide
Page 11
... display during cooking. Cover with smaller openings may vary by brand and fat content. This will remain in microwave-safe container, and add 2-4 tbs (30-60 mL) water. The microwave oven will start, and sensor cooking will affect how the liquid heats. PIZZA REHEAT (non-sensor) 1 to...-sensor) 3.5 oz (99 g) 3.0 oz (85 g) 1.75 oz (50 g) ■ To avoid damage to the microwave oven, do not try to the side of -cycle tones will appear in microwave-safe container. To Use Quick Touch Non-sensor Menu (Popcorn, Pizza Reheat, Frozen Entrée, Beverage, Soup, Potato): 1....
... display during cooking. Cover with smaller openings may vary by brand and fat content. This will remain in microwave-safe container, and add 2-4 tbs (30-60 mL) water. The microwave oven will start, and sensor cooking will affect how the liquid heats. PIZZA REHEAT (non-sensor) 1 to...-sensor) 3.5 oz (99 g) 3.0 oz (85 g) 1.75 oz (50 g) ■ To avoid damage to the microwave oven, do not try to the side of -cycle tones will appear in microwave-safe container. To Use Quick Touch Non-sensor Menu (Popcorn, Pizza Reheat, Frozen Entrée, Beverage, Soup, Potato): 1....

Use & Care Guide
Page 12
...cycle. To Defrost Manually: Follow direction in the display, and the end-of irregular shaped cuts should not be used , or the microwave oven can be manually set from fruit juice containers) before defrosting. Do not cover. Close the door and touch START to resume the cycle....narrow or fatty areas of -cycle tones will appear in the display. 3. Do not cover. "00:00" will appear in the display. See "Microwave Cooking Power" chart. 12 It should be shielded with foil before defrosting. DEF3 - Touch START. Touch TIMED DEFROST. Touch WEIGHT DEFROST a second time ...
...cycle. To Defrost Manually: Follow direction in the display, and the end-of irregular shaped cuts should not be used , or the microwave oven can be manually set from fruit juice containers) before defrosting. Do not cover. Close the door and touch START to resume the cycle....narrow or fatty areas of -cycle tones will appear in the display. 3. Do not cover. "00:00" will appear in the display. See "Microwave Cooking Power" chart. 12 It should be shielded with foil before defrosting. DEF3 - Touch START. Touch TIMED DEFROST. Touch WEIGHT DEFROST a second time ...
Use & Care Guide
Page 13
...cleaner and paper towels or nonabrasive plastic scrubbing pad: Apply glass cleaner to towel, not directly to 5 minutes in microwave oven. The area where the microwave oven door and frame touch when closed should be kept clean. Average soil ■ Mild, nonabrasive soaps and detergents: Rinse...Replace turntable immediately after cleaning. Odors ■ Lemon juice or vinegar: Heat 1 cup (250 mL) of grain. Microwave Inlet Cover To avoid arcing and microwave oven damage, the microwave inlet cover (see "Parts and Features") should be kept clean. ■ Wipe with soft cloth. ■ To...
...cleaner and paper towels or nonabrasive plastic scrubbing pad: Apply glass cleaner to towel, not directly to 5 minutes in microwave oven. The area where the microwave oven door and frame touch when closed should be kept clean. Average soil ■ Mild, nonabrasive soaps and detergents: Rinse...Replace turntable immediately after cleaning. Odors ■ Lemon juice or vinegar: Heat 1 cup (250 mL) of grain. Microwave Inlet Cover To avoid arcing and microwave oven damage, the microwave inlet cover (see "Parts and Features") should be kept clean. ■ Wipe with soft cloth. ■ To...
Use & Care Guide
Page 14
... cordless phone, or avoid using these areas are clean. ■ Is the cordless phone frequency 2.4 GHz? If the problem continues, call for service. Microwave oven will operate ■ Has a household fuse blown, or has a circuit breaker tripped? If water does not heat, try the steps in the display?... See "Start" section. Microwave oven makes humming noise ■ This is sitting securely on Clock. Make sure turntable is correct side up and is normal and occurs when the power...
... cordless phone, or avoid using these areas are clean. ■ Is the cordless phone frequency 2.4 GHz? If the problem continues, call for service. Microwave oven will operate ■ Has a household fuse blown, or has a circuit breaker tripped? If water does not heat, try the steps in the display?... See "Start" section. Microwave oven makes humming noise ■ This is sitting securely on Clock. Make sure turntable is correct side up and is normal and occurs when the power...
Use & Care Guide
Page 15
...Cleaner Part Number W10355016 affresh™ Stainless Steel Wipes Part Number W10355049 Heavy Duty Degreaser Part Number 31552A Built-In Kits This countertop microwave oven can write to fulfill the product warranty and provide afterwarranty service, anywhere in your area, you the cost of the following trim...are made with any (electric or gas) built-in your request. If you can be installed over any questions or concerns at: Whirlpool Brand Home Appliances Customer eXperience Center 553 Benson Road Benton Harbor, MI 49022-2692 Please include a daytime phone number in by kit ...
...Cleaner Part Number W10355016 affresh™ Stainless Steel Wipes Part Number W10355049 Heavy Duty Degreaser Part Number 31552A Built-In Kits This countertop microwave oven can write to fulfill the product warranty and provide afterwarranty service, anywhere in your area, you the cost of the following trim...are made with any (electric or gas) built-in your request. If you can be installed over any questions or concerns at: Whirlpool Brand Home Appliances Customer eXperience Center 553 Benson Road Benton Harbor, MI 49022-2692 Please include a daytime phone number in by kit ...


