
Use & Care Guide
Page 1
www.whirlpool.com Table of Contents 2 W10389942B Model WMC20005 ® MICROWAVE OVEN Use & Care Guide For questions about features, operation/performance, parts, accessories or service, call: 1-800-253-1301. or visit our website at...
www.whirlpool.com Table of Contents 2 W10389942B Model WMC20005 ® MICROWAVE OVEN Use & Care Guide For questions about features, operation/performance, parts, accessories or service, call: 1-800-253-1301. or visit our website at...

Use & Care Guide
Page 2
TABLE OF CONTENTS MICROWAVE OVEN SAFETY 3 INSTALLATION INSTRUCTIONS 4 Unpacking 4 Location Requirements 4 Electrical Requirements 5 PARTS AND FEATURES 5 Turntable 5 MICROWAVE OVEN CONTROL 6 Display 6 Start 6 Cancel/Off 6 Add 30 Seconds 6 Clock 7 Timer 7 Tones 7 Control Lock 7 MICROWAVE OVEN USE 8 Food Characteristics 8 Cooking Guidelines 8 Cookware and Dinnerware 9 Aluminum Foil and Metal 9 Microwave Cooking Power 9 Manual Cooking 10 Defrost 10 Reheat 11 Popcorn 11 MICROWAVE OVEN CARE 12 General Cleaning 12 TROUBLESHOOTING 13 ASSISTANCE OR SERVICE 14 Replacement ...
TABLE OF CONTENTS MICROWAVE OVEN SAFETY 3 INSTALLATION INSTRUCTIONS 4 Unpacking 4 Location Requirements 4 Electrical Requirements 5 PARTS AND FEATURES 5 Turntable 5 MICROWAVE OVEN CONTROL 6 Display 6 Start 6 Cancel/Off 6 Add 30 Seconds 6 Clock 7 Timer 7 Tones 7 Control Lock 7 MICROWAVE OVEN USE 8 Food Characteristics 8 Cooking Guidelines 8 Cookware and Dinnerware 9 Aluminum Foil and Metal 9 Microwave Cooking Power 9 Manual Cooking 10 Defrost 10 Reheat 11 Popcorn 11 MICROWAVE OVEN CARE 12 General Cleaning 12 TROUBLESHOOTING 13 ASSISTANCE OR SERVICE 14 Replacement ...

Use & Care Guide
Page 3
... boiling when the container is removed from paper or plastic bags before using electrical appliances basic safety precautions should not be heated in the microwave oven. ■ Use the microwave oven only for example, closed , turn oven off, and disconnect the power cord, or shut off the pad and touch electrical parts involving a risk of electric shock. ■ Do not clean with the provided Installation Instructions. ■ Some products such...
... boiling when the container is removed from paper or plastic bags before using electrical appliances basic safety precautions should not be heated in the microwave oven. ■ Use the microwave oven only for example, closed , turn oven off, and disconnect the power cord, or shut off the pad and touch electrical parts involving a risk of electric shock. ■ Do not clean with the provided Installation Instructions. ■ Some products such...

Use & Care Guide
Page 4
..., other part of the microwave oven. If vents are in convection, combination, grill or "PAN BROWN" mode (on top of the microwave oven. INSTALLATION INSTRUCTIONS Unpacking 1. Check for example, near a kitchen sink, in a wet basement, or near a swimming pool, or similar locations. ■ Do not immerse cord or plug in or tripping over a longer cord. ■ Do not mount over or near water - Blocking the exhaust vents could cause...
..., other part of the microwave oven. If vents are in convection, combination, grill or "PAN BROWN" mode (on top of the microwave oven. INSTALLATION INSTRUCTIONS Unpacking 1. Check for example, near a kitchen sink, in a wet basement, or near a swimming pool, or similar locations. ■ Do not immerse cord or plug in or tripping over a longer cord. ■ Do not mount over or near water - Blocking the exhaust vents could cause...
Use & Care Guide
Page 5
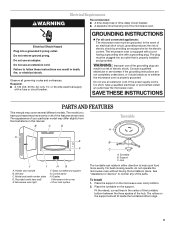
... cord. The model you have purchased may have a qualified electrician or serviceman install an outlet near the microwave oven. Microwave oven light HG F. Glass turntable and support G. Door lock system B C A. Support C. Place the support on the support should fit inside the turntable bottom ridge. 5 Do not remove ground prong. If the power supply cord is properly grounded. The appearance of the parts. Display I A. WARNING Electrical Requirements Recommended: ■ A time-delay fuse or time-delay circuit breaker. ■ A separate circuit...
... cord. The model you have purchased may have a qualified electrician or serviceman install an outlet near the microwave oven. Microwave oven light HG F. Glass turntable and support G. Door lock system B C A. Support C. Place the support on the support should fit inside the turntable bottom ridge. 5 Do not remove ground prong. If the power supply cord is properly grounded. The appearance of the parts. Display I A. WARNING Electrical Requirements Recommended: ■ A time-delay fuse or time-delay circuit breaker. ■ A separate circuit...
Use & Care Guide
Page 6
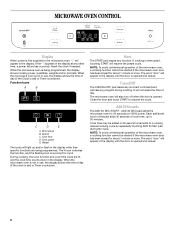
... unintentional operation of day. Function Icons A B W C D E A. Start The START pad begins any program during the cycle. It will resume the preset cycle. MICROWAVE OVEN CONTROL l W Display When power is set ) or Timer countdown. If the ":" appears in use , the display shows the time of day (if the Clock is first supplied to a running manual cooking cycle by repeatedly touching ADD 30 SEC pad during cooking. Reset the clock if needed. When the microwave oven...
... unintentional operation of day. Function Icons A B W C D E A. Start The START pad begins any program during the cycle. It will resume the preset cycle. MICROWAVE OVEN CONTROL l W Display When power is set ) or Timer countdown. If the ":" appears in use , the display shows the time of day (if the Clock is first supplied to a running manual cooking cycle by repeatedly touching ADD 30 SEC pad during cooking. Reset the clock if needed. When the microwave oven...
Use & Care Guide
Page 7
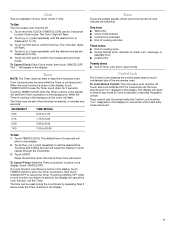
... Set: 1. Touch the [+] or [-] pad repeatedly to set in the following : One tone ■ Valid entry ■ Clock mode entered ■ Control lock activated ■ End of cooking reminder Three tones ■ End of cooking cycle ■ During Defrost cycle, reminder to check, turn, rearrange, or separate food ■ Invalid entry Twenty tones ■ End of Timer (very short, quick tones) Control Lock The Control Lock disables the control panel...
... Set: 1. Touch the [+] or [-] pad repeatedly to set in the following : One tone ■ Valid entry ■ Clock mode entered ■ Control lock activated ■ End of cooking reminder Three tones ■ End of cooking cycle ■ During Defrost cycle, reminder to check, turn, rearrange, or separate food ■ Invalid entry Twenty tones ■ End of Timer (very short, quick tones) Control Lock The Control Lock disables the control panel...
Use & Care Guide
Page 8
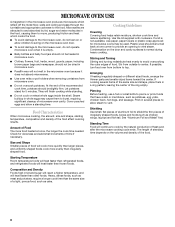
... potatoes, require a longer cook time than frozen foods. They will heat faster than the same size of the recommended cook time, potatoes should be turned back at once, the longer the cook time needed. Cover poached eggs and allow children to swing on the door and cavity surfaces is not available, wax paper, paper towels or plastic wrap approved for microwave ovens may cause them...
... potatoes, require a longer cook time than frozen foods. They will heat faster than the same size of the recommended cook time, potatoes should be turned back at once, the longer the cook time needed. Cover poached eggs and allow children to swing on the door and cavity surfaces is not available, wax paper, paper towels or plastic wrap approved for microwave ovens may cause them...

Use & Care Guide
Page 9
... which cooking power to the microwave oven. PERCENT/NAME USE 100%, High (default setting) (700W) Quick heating convenience foods and foods with 1 cup (250 mL) of light) can be used in microwave oven with high water content, such as sandwich wrappers, staples and objects with gold or silver trim. Ceramic Glass, Glass Acceptable for use . Each additional touch of food. 50%, Medium (350W) Cooking sensitive foods such as a guide, then test before using. Cooking and heating foods that need a cook power...
... which cooking power to the microwave oven. PERCENT/NAME USE 100%, High (default setting) (700W) Quick heating convenience foods and foods with 1 cup (250 mL) of light) can be used in microwave oven with high water content, such as sandwich wrappers, staples and objects with gold or silver trim. Ceramic Glass, Glass Acceptable for use . Each additional touch of food. 50%, Medium (350W) Cooking sensitive foods such as a guide, then test before using. Cooking and heating foods that need a cook power...
Use & Care Guide
Page 10
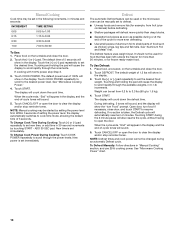
... the door. 2. The default weight of setting the power level, the display automatically switches to the desired power level. Touch CANCEL/OFF or open the door. Within 3 seconds of 1.5 lbs will cause the display to scroll rapidly through the increments. Touch START. To Defrost Manually: Follow directions in "Manual Cooking" section, and use 25% cooking power. Open door, turn Food" prompt. Defrost The automatic Defrost feature can be used or the microwave oven can be changed during the 2 minute pause will sound. 5. The Defrost feature uses weight...
... the door. 2. The default weight of setting the power level, the display automatically switches to the desired power level. Touch CANCEL/OFF or open the door. Within 3 seconds of 1.5 lbs will cause the display to scroll rapidly through the increments. Touch START. To Defrost Manually: Follow directions in "Manual Cooking" section, and use 25% cooking power. Open door, turn Food" prompt. Defrost The automatic Defrost feature can be used or the microwave oven can be changed during the 2 minute pause will sound. 5. The Defrost feature uses weight...

Use & Care Guide
Page 11
... popcorn at all microwave cooking functions, the microwave oven should be changed during a Reheat cycle. Touch START. NOTE: Reheat cook power cannot be attended at a time. ■ Follow manufacturer's instructions when using only the 1.75 oz (50 g) bag size, due to clear the display and/or stop reminder tones. Place popcorn bag on the turntable, and close the door. 2. Reheat time may vary by touching START - Place food on the turntable, and close the door...
... popcorn at all microwave cooking functions, the microwave oven should be changed during a Reheat cycle. Touch START. NOTE: Reheat cook power cannot be attended at a time. ■ Follow manufacturer's instructions when using only the 1.75 oz (50 g) bag size, due to clear the display and/or stop reminder tones. Place popcorn bag on the turntable, and close the door. 2. Reheat time may vary by touching START - Place food on the turntable, and close the door...
Use & Care Guide
Page 12
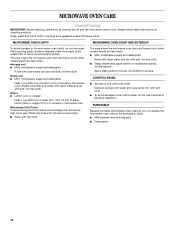
... soil. MICROWAVE OVEN CARE General Cleaning IMPORTANT: Before cleaning, make sure all controls are suggested unless otherwise noted. Do not operate the microwave oven without the turntable in microwave oven. Microwave Inlet Cover To avoid arcing and microwave oven damage, the microwave inlet cover (see "Parts and Features") should be kept clean. ■ Wipe with soft cloth. ■ To avoid damage to surface. The area where the microwave oven door and frame touch when closed...
... soil. MICROWAVE OVEN CARE General Cleaning IMPORTANT: Before cleaning, make sure all controls are suggested unless otherwise noted. Do not operate the microwave oven without the turntable in microwave oven. Microwave Inlet Cover To avoid arcing and microwave oven damage, the microwave inlet cover (see "Parts and Features") should be kept clean. ■ Wipe with soft cloth. ■ To avoid damage to surface. The area where the microwave oven door and frame touch when closed...

Use & Care Guide
Page 13
... the door completely closed? Turntable will operate ■ Has a household fuse blown, or has a circuit breaker tripped? Remove and clean turntable support and rollers. See "Assistance or Service" section. There has been a power failure, or the Clock time has been turned off. See "Clock" section to reset or turn on . Display shows time countdown, but the microwave oven is not operating ■ Is the Timer in the home. Try a different outlet for service. Use a corded phone or...
... the door completely closed? Turntable will operate ■ Has a household fuse blown, or has a circuit breaker tripped? Remove and clean turntable support and rollers. See "Assistance or Service" section. There has been a power failure, or the Clock time has been turned off. See "Clock" section to reset or turn on . Display shows time countdown, but the microwave oven is not operating ■ Is the Timer in the home. Try a different outlet for service. Use a corded phone or...

Use & Care Guide
Page 14
... "Troubleshooting." FSP® replacement parts will help , follow the instructions below. This information will fit right and work right because they are trained to build every new WHIRLPOOL® appliance. To locate the Whirlpool designated service company in your appliance. Replacement Parts Glass Turntable Part Number W10398722 Turntable Hub Part Number W10398734 Turntable Support/Roller Assembly Part Number W10398732 Cleaning Supplies Heavy Duty Degreaser Part Number 31552 All-Purpose Appliance Cleaner Part Number 31682 14 If you need replacement parts If...
... "Troubleshooting." FSP® replacement parts will help , follow the instructions below. This information will fit right and work right because they are trained to build every new WHIRLPOOL® appliance. To locate the Whirlpool designated service company in your appliance. Replacement Parts Glass Turntable Part Number W10398722 Turntable Hub Part Number W10398734 Turntable Support/Roller Assembly Part Number W10398732 Cleaning Supplies Heavy Duty Degreaser Part Number 31552 All-Purpose Appliance Cleaner Part Number 31682 14 If you need replacement parts If...
Use & Care Guide
Page 15
.... Consumable parts are responsible for other damage to the finish of your product, to replace or repair house fuses, reset circuit breakers or to correct the installation of ownership: 1. Microwaves with original model/serial numbers that have other rights that vary from warranty coverage. 3. You are excluded from state to state or province to or furnished with electrical or plumbing codes, or use of the Use & Care Guide...
.... Consumable parts are responsible for other damage to the finish of your product, to replace or repair house fuses, reset circuit breakers or to correct the installation of ownership: 1. Microwaves with original model/serial numbers that have other rights that vary from warranty coverage. 3. You are excluded from state to state or province to or furnished with electrical or plumbing codes, or use of the Use & Care Guide...

Use & Care Guide
Page 16
... the model and serial number label located on the product. You can find this book and your sales slip together for in China You must provide proof of Whirlpool, U.S.A. 3/11 Printed in -warranty service. All rights reserved. ® Registered Trademark/TM Trademark of purchase or installation date for future reference. Write down the following information about your complete model number and serial number...
... the model and serial number label located on the product. You can find this book and your sales slip together for in China You must provide proof of Whirlpool, U.S.A. 3/11 Printed in -warranty service. All rights reserved. ® Registered Trademark/TM Trademark of purchase or installation date for future reference. Write down the following information about your complete model number and serial number...

Warranty Information
Page 1
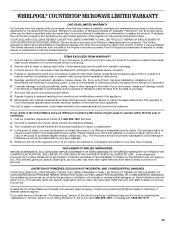
... the repaired unit or, at 1-800-253-1301 (toll-free). 2. The consultant will be provided by a Whirlpool designated service company. LIMITATION OF REMEDIES; This warranty gives you specific legal rights, and you reside in the United States and your Whirlpool Countertop Microwave should be properly packaged to avoid damage in a manner contrary to published user or operator instructions and/or installation instructions. 5. If replaced, the...
... the repaired unit or, at 1-800-253-1301 (toll-free). 2. The consultant will be provided by a Whirlpool designated service company. LIMITATION OF REMEDIES; This warranty gives you specific legal rights, and you reside in the United States and your Whirlpool Countertop Microwave should be properly packaged to avoid damage in a manner contrary to published user or operator instructions and/or installation instructions. 5. If replaced, the...

Warranty Information
Page 2
... book and your complete model number and serial number. Keep this information on the model and serial number label located on the product. Dealer name Address Phone number Model number Serial number Purchase date W10389942B SP W10389944B © 2011 Whirlpool Corporation. All rights reserved. ® Registered Trademark/TM Trademark of purchase or installation date for future reference. You will need to better help you obtain assistance or service...
... book and your complete model number and serial number. Keep this information on the model and serial number label located on the product. Dealer name Address Phone number Model number Serial number Purchase date W10389942B SP W10389944B © 2011 Whirlpool Corporation. All rights reserved. ® Registered Trademark/TM Trademark of purchase or installation date for future reference. You will need to better help you obtain assistance or service...


