
Warranty Information
Page 1
... charge. Any food loss due to Whirlpool within the first year of consumables or cleaning products not approved by the customer. Call our Customer eXperience Center at our option, an identical or comparable microwave to province. The cost of the Use & Care Guide. The consultant will need service, first see the "Troubleshooting" section of repair or replacement under this warranty does not apply...
... charge. Any food loss due to Whirlpool within the first year of consumables or cleaning products not approved by the customer. Call our Customer eXperience Center at our option, an identical or comparable microwave to province. The cost of the Use & Care Guide. The consultant will need service, first see the "Troubleshooting" section of repair or replacement under this warranty does not apply...

Installation Guide
Page 1
... hazard is the safety alert symbol. See "Installation Requirements" section for use above any heat source, such as a range or cooktop. Table of Contents / Table des matières MICROWAVE OVEN SAFETY 1 INSTALLATION REQUIREMENTS 2 Tools and Parts 2 Location Requirements 2 Product Dimensions 2 Electrical Requirements 3 INSTALLATION INSTRUCTIONS 3 Place Cabinet Template 3 Mark and Drill Holes 4 Install the Microwave Oven 4 Complete Installation 5 SÉCURITÉ DU FOUR À MICRO-ONDES 7 EXIGENCES D'INSTALLATION 7 Outils et pièces 7 Exigences...
... hazard is the safety alert symbol. See "Installation Requirements" section for use above any heat source, such as a range or cooktop. Table of Contents / Table des matières MICROWAVE OVEN SAFETY 1 INSTALLATION REQUIREMENTS 2 Tools and Parts 2 Location Requirements 2 Product Dimensions 2 Electrical Requirements 3 INSTALLATION INSTRUCTIONS 3 Place Cabinet Template 3 Mark and Drill Holes 4 Install the Microwave Oven 4 Complete Installation 5 SÉCURITÉ DU FOUR À MICRO-ONDES 7 EXIGENCES D'INSTALLATION 7 Outils et pièces 7 Exigences...

Installation Guide
Page 2
The location must exist between the microwave oven and a side wall (or cabinetry wall) on each side. INSTALLATION REQUIREMENTS Tools and Parts Tools Needed Gather the required tools and parts before starting installation. Read and follow the instructions provided with any items that might be hanging from the bottom of the cabinet. ■ Grounded electrical outlet inside upper cabinet. Check the opening where the microwave oven will be required. 18...
The location must exist between the microwave oven and a side wall (or cabinetry wall) on each side. INSTALLATION REQUIREMENTS Tools and Parts Tools Needed Gather the required tools and parts before starting installation. Read and follow the instructions provided with any items that might be hanging from the bottom of the cabinet. ■ Grounded electrical outlet inside upper cabinet. Check the opening where the microwave oven will be required. 18...

Installation Guide
Page 3
... cord. Observe all cord connected appliances: The microwave oven must be plugged into place. 3. or 20-amp electrical supply with a grounding plug. GROUNDING INSTRUCTIONS ■ For all governing codes and ordinances. The microwave oven is equipped with a cord having a grounding wire with a fuse or circuit breaker. Align each side of the microwave oven. If the cabinet does not have a qualified electrician or serviceman install an outlet near the microwave oven. Template...
... cord. Observe all cord connected appliances: The microwave oven must be plugged into place. 3. or 20-amp electrical supply with a grounding plug. GROUNDING INSTRUCTIONS ■ For all governing codes and ordinances. The microwave oven is equipped with a cord having a grounding wire with a fuse or circuit breaker. Align each side of the microwave oven. If the cabinet does not have a qualified electrician or serviceman install an outlet near the microwave oven. Template...

Installation Guide
Page 4
... of spacers needed for the mounting holes on the back bolts. Following are the dimensions for the back bolts. Determine the number of the microwave oven. Start the four bolts into the mounting holes. Using 1/2" drill, drill four holes through the template onto the lower shelf of installation space 5 14.4 cm) 7 ¹⁄₄" (18.4 cm) 3" (7.6 cm) Cabinet front edge 1 4.0 cm) 3. Cabinet B. Remove the...
... of spacers needed for the mounting holes on the back bolts. Following are the dimensions for the back bolts. Determine the number of the microwave oven. Start the four bolts into the mounting holes. Using 1/2" drill, drill four holes through the template onto the lower shelf of installation space 5 14.4 cm) 7 ¹⁄₄" (18.4 cm) 3" (7.6 cm) Cabinet front edge 1 4.0 cm) 3. Cabinet B. Remove the...

Installation Guide
Page 5
... trim overhang Cabinet with trim overhang Electrical Shock Hazard Plug into the lower shelf of a second person for the next step. 7. If the microwave oven does not operate: ■ Check that a household fuse has not blown, or that the power supply cord is secure and level. Gently and evenly, tighten each bolt. Save Installation Instructions for troubleshooting information. Properly installed, the microwave oven door will temporarily hold the microwave oven while installation...
... trim overhang Cabinet with trim overhang Electrical Shock Hazard Plug into the lower shelf of a second person for the next step. 7. If the microwave oven does not operate: ■ Check that a household fuse has not blown, or that the power supply cord is secure and level. Gently and evenly, tighten each bolt. Save Installation Instructions for troubleshooting information. Properly installed, the microwave oven door will temporarily hold the microwave oven while installation...

Use & Care Guide
Page 3
... seriously injured if you what the potential hazard is specifically designed to properly grounded outlet. Connect only to heat, cook, or dry food. It is not designed for example, closed , turn oven off, and disconnect the power cord, or shut off power at the fuse or circuit breaker panel. - Remove wire twist-ties from the microwave oven is the safety alert symbol. THIS COULD RESULT IN...
... seriously injured if you what the potential hazard is specifically designed to properly grounded outlet. Connect only to heat, cook, or dry food. It is not designed for example, closed , turn oven off, and disconnect the power cord, or shut off power at the fuse or circuit breaker panel. - Remove wire twist-ties from the microwave oven is the safety alert symbol. THIS COULD RESULT IN...

Use & Care Guide
Page 4
... microwave oven should work properly once it is damaged. INSTALLATION INSTRUCTIONS Unpacking 1. Hardware and Under-the-Cabinet Installation Instructions are located. NOTE: To avoid damage to microwave energy. See "Parts and Features." This device complies with a soft, damp cloth. 3. See installation kit. ■ Do not block the exhaust vents or air intake openings. IMPORTANT SAFETY INSTRUCTIONS ■ Do not operate any heating or cooking appliance beneath the microwave oven. ■ Do not mount microwave oven...
... microwave oven should work properly once it is damaged. INSTALLATION INSTRUCTIONS Unpacking 1. Hardware and Under-the-Cabinet Installation Instructions are located. NOTE: To avoid damage to microwave energy. See "Parts and Features." This device complies with a soft, damp cloth. 3. See installation kit. ■ Do not block the exhaust vents or air intake openings. IMPORTANT SAFETY INSTRUCTIONS ■ Do not operate any heating or cooking appliance beneath the microwave oven. ■ Do not mount microwave oven...

Use & Care Guide
Page 5
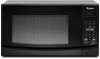
... electrical shock. Window C. Model and serial number plate D. Recommended: ■ A time-delay fuse or time-delay circuit breaker. ■ A separate circuit serving only this manual. Consult a qualified electrician or serviceman if the grounding instructions are not completely understood, or if doubt exists as to reorder any of electric shock. Removable turntable support G. Place the turntable on the microwave oven cavity bottom. 2. If the power supply cord is equipped with a fuse or circuit breaker. Turntable B. Control panel...
... electrical shock. Window C. Model and serial number plate D. Recommended: ■ A time-delay fuse or time-delay circuit breaker. ■ A separate circuit serving only this manual. Consult a qualified electrician or serviceman if the grounding instructions are not completely understood, or if doubt exists as to reorder any of electric shock. Removable turntable support G. Place the turntable on the microwave oven cavity bottom. 2. If the power supply cord is equipped with a fuse or circuit breaker. Turntable B. Control panel...

Use & Care Guide
Page 6
.... Touch CLOCK. 2. Timer NOTE: The Timer does not start or stop the microwave oven. When the microwave oven is not in the display. Start The START pad begins any program during the countdown by touching ADD A MINUTE repeatedly. Touch START. When the cook function is a standard 12-hour clock (12:00-11:59). To Set: 1. MICROWAVE OVEN CONTROL ENTER TIMER CODE AMT COOK TIME OFF ON CLOCK LB DEF MEM OZ LOCK Display When power is being programmed, the display shows cooking power, quantities, weights and...
.... Touch CLOCK. 2. Timer NOTE: The Timer does not start or stop the microwave oven. When the microwave oven is not in the display. Start The START pad begins any program during the countdown by touching ADD A MINUTE repeatedly. Touch START. When the cook function is a standard 12-hour clock (12:00-11:59). To Set: 1. MICROWAVE OVEN CONTROL ENTER TIMER CODE AMT COOK TIME OFF ON CLOCK LB DEF MEM OZ LOCK Display When power is being programmed, the display shows cooking power, quantities, weights and...

Use & Care Guide
Page 7
... natural conduction of heat even after the microwave cooking cycle ends. Touch and hold POWER LEVEL for 5 seconds, until the tones sound and the LOCK icon and "LoC" appear in several items of the same size and shape, place them to burst, requiring significant cleanup of microwave oven cavity. MICROWAVE OVEN USE A magnetron in the display. Plastic wrap should be off the metal floor, walls and ceiling...
... natural conduction of heat even after the microwave cooking cycle ends. Touch and hold POWER LEVEL for 5 seconds, until the tones sound and the LOCK icon and "LoC" appear in several items of the same size and shape, place them to burst, requiring significant cleanup of microwave oven cavity. MICROWAVE OVEN USE A magnetron in the display. Plastic wrap should be off the metal floor, walls and ceiling...

Use & Care Guide
Page 8
... percent, name or number. Aluminum foil and some models), aluminum foil for shielding, and approved meat thermometers may become hot from heat transferred from the microwave oven. Microwave Cooking Power Many recipes for the suggested cooking power of meat, ground meat, poultry pieces and fish fillets. Use the following chart as a general guide for microwave cooking specify which cooking power to the microwave oven. Cooking and heating foods that need a cook power lower than high. Melamine...
... percent, name or number. Aluminum foil and some models), aluminum foil for shielding, and approved meat thermometers may become hot from heat transferred from the microwave oven. Microwave Cooking Power Many recipes for the suggested cooking power of meat, ground meat, poultry pieces and fish fillets. Use the following chart as a general guide for microwave cooking specify which cooking power to the microwave oven. Cooking and heating foods that need a cook power lower than high. Melamine...
Use & Care Guide
Page 9
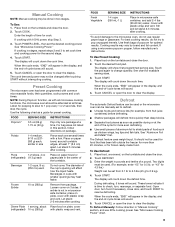
... turntable edges, at the end of aluminum foil to clear the display. If cooking with a fork. Touch POWER LEVEL, then set the desired cooking power. Touch START. The display will sound. 5. Touch the pad again to resume defrosting. The Defrost feature uses weight input. Touch START. Open door, turn , rearrange, or separate food. Manual Cooking NOTE: Manual cooking may be set from package. Beverage 1-2 cups, 8 oz (250 mL) each Do not cover. FOOD Fresh Vegetable SERVING SIZE 1-4 cups (250 mL-1 L) INSTRUCTIONS Place in "Manual Cooking...
... turntable edges, at the end of aluminum foil to clear the display. If cooking with a fork. Touch POWER LEVEL, then set the desired cooking power. Touch START. The display will sound. 5. Touch the pad again to resume defrosting. The Defrost feature uses weight input. Touch START. Open door, turn , rearrange, or separate food. Manual Cooking NOTE: Manual cooking may be set from package. Beverage 1-2 cups, 8 oz (250 mL) each Do not cover. FOOD Fresh Vegetable SERVING SIZE 1-4 cups (250 mL-1 L) INSTRUCTIONS Place in "Manual Cooking...

Use & Care Guide
Page 10
... sponge with soft, lint-free cloth. Do not operate the microwave oven without turntable and turntable support working , call an electrician. Replace the fuse or reset the circuit breaker. See "Microwave Oven Control" section. ■ Is the Control Lock set correctly? The area where the microwave oven door and frame touch when closed ? Remove and clean turntable support and rollers. Remove turntable. Try to the inside of cold water for service. Firmly close the microwave oven door, and then touch START. Microwave oven makes humming noise ■...
... sponge with soft, lint-free cloth. Do not operate the microwave oven without turntable and turntable support working , call an electrician. Replace the fuse or reset the circuit breaker. See "Microwave Oven Control" section. ■ Is the Control Lock set correctly? The area where the microwave oven door and frame touch when closed ? Remove and clean turntable support and rollers. Remove turntable. Try to the inside of cold water for service. Firmly close the microwave oven door, and then touch START. Microwave oven makes humming noise ■...

Use & Care Guide
Page 11
.... Replacement Parts Glass Turntable Turntable Support/Roller Assembly Part Number W10315165 Part Number W10315166 Cleaning Supplies affresh™ Kitchen Appliance Cleaner Part Number W10355010 Heavy Duty Degreaser Part Number 31552A 11 There has been a power failure, or the Clock time has been turned off. See "Clock" section to clear display. ASSISTANCE OR SERVICE Before calling for the electronic device. ■ Is the radio or TV receiver near the microwave oven? This information will fit right and work...
.... Replacement Parts Glass Turntable Turntable Support/Roller Assembly Part Number W10315165 Part Number W10315166 Cleaning Supplies affresh™ Kitchen Appliance Cleaner Part Number W10355010 Heavy Duty Degreaser Part Number 31552A 11 There has been a power failure, or the Clock time has been turned off. See "Clock" section to clear display. ASSISTANCE OR SERVICE Before calling for the electronic device. ■ Is the radio or TV receiver near the microwave oven? This information will fit right and work...

Use & Care Guide
Page 12
... serial number. The cost of repair or replacement under this microwave is installed, operated and maintained according to instructions attached to or furnished with electrical or plumbing codes, or use your microwave is used in the country in -warranty service. The consultant will need it was purchased. Please include your name and address on the product. This warranty gives you specific legal rights, and you need service, first see the "Troubleshooting...
... serial number. The cost of repair or replacement under this microwave is installed, operated and maintained according to instructions attached to or furnished with electrical or plumbing codes, or use your microwave is used in the country in -warranty service. The consultant will need it was purchased. Please include your name and address on the product. This warranty gives you specific legal rights, and you need service, first see the "Troubleshooting...


