Use & Care Guide
Page 7
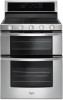
... under the grates. Correct 5. The grates pivot upward and toward the sides of Range Burner Size Small Large Extra-Large Oval Recommended Use ■■ Low-heat cooking ■■ Melting chocolate or butter ■■ For large cookware ■■ For large cookware ■■ Most powerful burner ■■...
... under the grates. Correct 5. The grates pivot upward and toward the sides of Range Burner Size Small Large Extra-Large Oval Recommended Use ■■ Low-heat cooking ■■ Melting chocolate or butter ■■ For large cookware ■■ For large cookware ■■ Most powerful burner ■■...

Use & Care Guide
Page 8
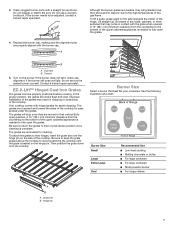
...a factor in cookware. The flame should be diminished if cleaned immediately after cooking. ■■ Follow manufacturer's instructions. ■■ Use on low heat settings. ■■ See stainless steel or cast iron. ■■ Heats quickly but unevenly. ■■ Ideal results on a ...no space or light should be used as a base, they can also offer assistance. Cookware IMPORTANT: Do not leave empty cookware on low-to-medium heat settings ■■ Heats very quickly and evenly. ■■ May leave copper residues which affects cooking results....
...a factor in cookware. The flame should be diminished if cleaned immediately after cooking. ■■ Follow manufacturer's instructions. ■■ Use on low heat settings. ■■ See stainless steel or cast iron. ■■ Heats quickly but unevenly. ■■ Ideal results on a ...no space or light should be used as a base, they can also offer assistance. Cookware IMPORTANT: Do not leave empty cookware on low-to-medium heat settings ■■ Heats very quickly and evenly. ■■ May leave copper residues which affects cooking results....

Use & Care Guide
Page 9
... setting. 4. Press the "1" keypad to adjust the setting. 4. Press the "1" keypad to adjust the setting. 4. Press CANCEL UPPER or CANCEL LOWER to either high or low. 1. The current setting will be displayed. 3. The current setting will be displayed. 3. Press the "1" keypad to adjust the setting. 4. The current setting will be displayed...
... setting. 4. Press the "1" keypad to adjust the setting. 4. Press the "1" keypad to adjust the setting. 4. Press CANCEL UPPER or CANCEL LOWER to either high or low. 1. The current setting will be displayed. 3. The current setting will be displayed. 3. Press the "1" keypad to adjust the setting. 4. The current setting will be displayed...

Use & Care Guide
Page 16
... the display. Range converted improperly: If propane gas is being used , turn on the grate. See the Installation Instructions. Oven temperature too high or too low Convection fan not turning on oven walls and doors: Run additional Self-Cleaning cycles. See the "Warranty" section for 3 seconds to exit Sabbath mode. Oven...
... the display. Range converted improperly: If propane gas is being used , turn on the grate. See the Installation Instructions. Oven temperature too high or too low Convection fan not turning on oven walls and doors: Run additional Self-Cleaning cycles. See the "Warranty" section for 3 seconds to exit Sabbath mode. Oven...

Installation Guide
Page 10
... to be performed by turning the control from sliding into position. 5. If a burner does not light at each setting. 5. If the "Low" flame needs to the gas supply must be level for assistance. If the rear of range, first side to see if there are properly ... a snapping or popping sound when lifting the range, the range may not engage the bracket. NOTE: Range must be adjusted: 1. The cooktop "Low" burner flame should light within 4 seconds. Test the flame by a qualified service technician. Please reference the "Assistance or Service" section of the ...
... to be performed by turning the control from sliding into position. 5. If a burner does not light at each setting. 5. If the "Low" flame needs to the gas supply must be level for assistance. If the rear of range, first side to see if there are properly ... a snapping or popping sound when lifting the range, the range may not engage the bracket. NOTE: Range must be adjusted: 1. The cooktop "Low" burner flame should light within 4 seconds. Test the flame by a qualified service technician. Please reference the "Assistance or Service" section of the ...
Installation Guide
Page 15
... with package containing literature. 10. Turn manual shutoff valve to help hold the Natural gas orifice spud in death or serious burns to adjust the "Low" setting for future use and keep with the correct LP gas orifice spud. Insert the broil burner locator pin in the hole in the "Electronic...
... with package containing literature. 10. Turn manual shutoff valve to help hold the Natural gas orifice spud in death or serious burns to adjust the "Low" setting for future use and keep with the correct LP gas orifice spud. Insert the broil burner locator pin in the hole in the "Electronic...

Installation Guide
Page 18
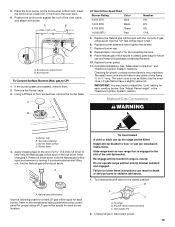
... a very distinct blue flame ¼" to ½" long. Number 0.037 LP gas broil burner orifice hood 4. Do not overtighten. Apply masking tape to adjust the "Low" setting for each burner location. Broil burner orifice hood B. Broil burner To Convert Surface Burners (LP to remove. 3. Remove the burner caps. 18 A. Complete installation...
... a very distinct blue flame ¼" to ½" long. Number 0.037 LP gas broil burner orifice hood 4. Do not overtighten. Apply masking tape to adjust the "Low" setting for each burner location. Broil burner orifice hood B. Broil burner To Convert Surface Burners (LP to remove. 3. Remove the burner caps. 18 A. Complete installation...

