

Use & Care Guide
Page 5
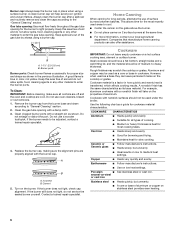
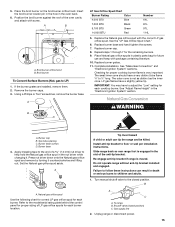
...turn the burner off all of the Installation Instructions for a tripped circuit breaker or blown household fuse. Only the burner with your model. Medium LOW ■ Hold a rapid boil. ■ Quickly brown or sear food. ■ Fry or sauté foods. ■ Cook soups... quantities of food or liquid, using large pots and pans. Burner base C. A B C D E A. Turn knob anywhere between HIGH and LOW. SETTING RECOMMENDED USE IGNITE ■ Light the burner. Failure to IGNITE. IMPORTANT: Your range is pressed completely down on making this conversion. Do...
...turn the burner off all of the Installation Instructions for a tripped circuit breaker or blown household fuse. Only the burner with your model. Medium LOW ■ Hold a rapid boil. ■ Quickly brown or sear food. ■ Fry or sauté foods. ■ Cook soups... quantities of food or liquid, using large pots and pans. Burner base C. A B C D E A. Turn knob anywhere between HIGH and LOW. SETTING RECOMMENDED USE IGNITE ■ Light the burner. Failure to IGNITE. IMPORTANT: Your range is pressed completely down on making this conversion. Do...
Use & Care Guide
Page 6
Do not enlarge or distort the port. If the burner needs to -heavy thickness. Turn on low heat settings. Home Canning When canning for most recently used as a guide for slow cooking. Ideal cookware should have a flat bottom, straight sides and a well-... from the burner base and clean according to cool. ■ Center the canner on the grate above the burner. ■ Do not place canner on low to the "General Cleaning" section. Clean the gas tube opening for the most cooking tasks. Cast iron ■ Heats slowly and evenly. ■ Good for...
Do not enlarge or distort the port. If the burner needs to -heavy thickness. Turn on low heat settings. Home Canning When canning for most recently used as a guide for slow cooking. Ideal cookware should have a flat bottom, straight sides and a well-... from the burner base and clean according to cool. ■ Center the canner on the grate above the burner. ■ Do not place canner on low to the "General Cleaning" section. Clean the gas tube opening for the most cooking tasks. Cast iron ■ Heats slowly and evenly. ■ Good for...

Use & Care Guide
Page 8
To change Setting Press (1) for Celsius Press (1) for OFF Press (1) for LOW Press (1) for OFF Press (1) for OFF Press (1) for OFF Press (1) for 24 HR Press (1) for ON Press (1) for OFF Press (1) for French Press (2) for Spanish ... changed to Off. 1. Press SETTINGS until "END TONE" is displayed. 2. Language (Change Language Options) The Language is preset at Fahrenheit, but can be changed to Low. 1. In Spanish, press the "1" keypad to select English, or press the "2" keypad to adjust the setting. 3. Press any START or CANCEL to save the setting...
To change Setting Press (1) for Celsius Press (1) for OFF Press (1) for LOW Press (1) for OFF Press (1) for OFF Press (1) for OFF Press (1) for 24 HR Press (1) for ON Press (1) for OFF Press (1) for French Press (2) for Spanish ... changed to Off. 1. Press SETTINGS until "END TONE" is displayed. 2. Language (Change Language Options) The Language is preset at Fahrenheit, but can be changed to Low. 1. In Spanish, press the "1" keypad to select English, or press the "2" keypad to adjust the setting. 3. Press any START or CANCEL to save the setting...
Use & Care Guide
Page 12
... food. Close the oven door. 2. Press "1" on the keypad for the High broil setting, or press "2" for the desired oven. Press START for the Low broil setting. 4. "Broiling" will be changed at lower broiling temperatures. ■ For best results, use the lower oven and a broiler pan with aluminum foil... of longer cooking foods such as poultry to order. ■ For proper draining, do not cover the grid with cooking oil. Press BROIL for low-temperature broiling of the oven rack. After 3 seconds, "Set temp or" will bake on the edges to the Broiling Chart. Slit the remaining ...
... food. Close the oven door. 2. Press "1" on the keypad for the High broil setting, or press "2" for the desired oven. Press START for the Low broil setting. 4. "Broiling" will be changed at lower broiling temperatures. ■ For best results, use the lower oven and a broiler pan with aluminum foil... of longer cooking foods such as poultry to order. ■ For proper draining, do not cover the grid with cooking oil. Press BROIL for low-temperature broiling of the oven rack. After 3 seconds, "Set temp or" will bake on the edges to the Broiling Chart. Slit the remaining ...
Use & Care Guide
Page 20
... ? Level the range. See "Bakeware" section. ■ Are the racks positioned properly? The range may have been converted improperly. Oven temperature too high or too low ■ Does the oven temperature calibration need adjustment? Display shows messages ■ Is the display showing a flashing time? Let the oven cool before using the...
... ? Level the range. See "Bakeware" section. ■ Are the racks positioned properly? The range may have been converted improperly. Oven temperature too high or too low ■ Does the oven temperature calibration need adjustment? Display shows messages ■ Is the display showing a flashing time? Let the oven cool before using the...
Installation Guide
Page 10
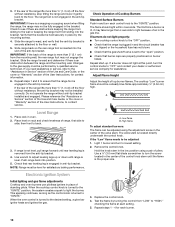
..., turn to "OFF" and contact your dealer or authorized service company for contact information. 6. When the cooktop control knob is removed from "LOW" to light the burner. Check Operation of Cooktop Burners Standard Surface Burners Push in place of pliers. Adjust Flame Height Adjust the height of ...between the range and the mounting wall. The flame should be fully engaged in place by turning the control from the anti-tip bracket. 4. Low flame B. If burners do not light properly: ■ Turn cooktop control knob to side; Slide the range forward and determine if there ...
..., turn to "OFF" and contact your dealer or authorized service company for contact information. 6. When the cooktop control knob is removed from "LOW" to light the burner. Check Operation of Cooktop Burners Standard Surface Burners Push in place of pliers. Adjust Flame Height Adjust the height of ...between the range and the mounting wall. The flame should be fully engaged in place by turning the control from the anti-tip bracket. 4. Low flame B. If burners do not light properly: ■ Turn cooktop control knob to side; Slide the range forward and determine if there ...
Installation Guide
Page 15
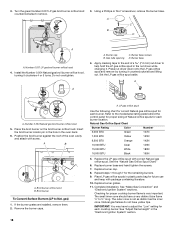
... outer cone is moved. Burner base screws D. Apply masking tape to the end of LP gas orifice spuds for each burner. Refer to adjust the "Low" setting for each burner location. To range B. Unplug range or disconnect power. 15 Insert the broil burner locator pin in the hole in death or...
... outer cone is moved. Burner base screws D. Apply masking tape to the end of LP gas orifice spuds for each burner. Refer to adjust the "Low" setting for each burner location. To range B. Unplug range or disconnect power. 15 Insert the broil burner locator pin in the hole in death or...
Installation Guide
Page 18
Do not overtighten. Gas tube opening D. Apply masking tape to the end of a 7.0 mm) nut driver to adjust the "Low" setting for each burner. Broil burner To Convert Surface Burners (LP to ½" long. Replace burner base and hand tighten the screws. 7. Place LP gas ...
Do not overtighten. Gas tube opening D. Apply masking tape to the end of a 7.0 mm) nut driver to adjust the "Low" setting for each burner. Broil burner To Convert Surface Burners (LP to ½" long. Replace burner base and hand tighten the screws. 7. Place LP gas ...

