Dimension Guide
Page 1
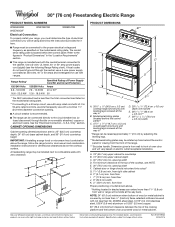
...NUMBERS WGE555S0B WGE755C0B WGI925C0B WGE745C0F Electrical Connection: To properly install your range, you will be using and follow the range hood or microwave hood combination installation instructions for dimensional clearances above the cooktop surface. Use a 3-wire, UL listed, 40- Model/serial/rating plates (located behind the control panel. A. 18" (45.7 cm) upper cabinet to the cabinet. For 50-amp rated cord kits, use kits that specify use with ranges. CABINET OPENING DIMENSIONS Cabinet opening . ■■ A circuit breaker is covered by adjusting the leveling...
...NUMBERS WGE555S0B WGE755C0B WGI925C0B WGE745C0F Electrical Connection: To properly install your range, you will be using and follow the range hood or microwave hood combination installation instructions for dimensional clearances above the cooktop surface. Use a 3-wire, UL listed, 40- Model/serial/rating plates (located behind the control panel. A. 18" (45.7 cm) upper cabinet to the cabinet. For 50-amp rated cord kits, use kits that specify use with ranges. CABINET OPENING DIMENSIONS Cabinet opening . ■■ A circuit breaker is covered by adjusting the leveling...

Installation Instructions
Page 1
... l'inspecteur local des installations électriques. Canada Only 5 INSTALLATION INSTRUCTIONS 5 INSTRUCTIONS D'INSTALLATION 17 Déballage de la cuisinière 17 Unpack Range 5 Adjust Leveling Legs 5 Install Anti-Tip Bracket 6 Electrical Connection - These words mean: DANGER You can be killed or seriously injured if you what can be killed or seriously injured if you and others are not followed. INSTALLATION INSTRUCTIONS FREESTANDING ELECTRIC RANGE WITH DOUBLE OVENS INSTRUCTIONS D'INSTALLATION POUR CUISINIÈRE...
... l'inspecteur local des installations électriques. Canada Only 5 INSTALLATION INSTRUCTIONS 5 INSTRUCTIONS D'INSTALLATION 17 Déballage de la cuisinière 17 Unpack Range 5 Adjust Leveling Legs 5 Install Anti-Tip Bracket 6 Electrical Connection - These words mean: DANGER You can be killed or seriously injured if you what can be killed or seriously injured if you and others are not followed. INSTALLATION INSTRUCTIONS FREESTANDING ELECTRIC RANGE WITH DOUBLE OVENS INSTRUCTIONS D'INSTALLATION POUR CUISINIÈRE...
Installation Instructions
Page 2
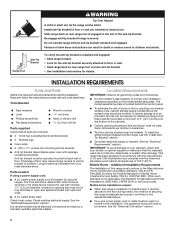
... transit. Parts needed If using a power supply cord: ■■ A UL Listed power supply cord kit marked for use with the range, see the "Install AntiTip Bracket" section. ■■ Grounded electrical supply is located behind the control panel. ■■ To eliminate the risk of this range is under anti-tip bracket. • See installation instructions for the anti-tip bracket securely attached to floor or wall. • Slide range back so rear range foot is installed in ring terminals or open-end...
... transit. Parts needed If using a power supply cord: ■■ A UL Listed power supply cord kit marked for use with the range, see the "Install AntiTip Bracket" section. ■■ Grounded electrical supply is located behind the control panel. ■■ To eliminate the risk of this range is under anti-tip bracket. • See installation instructions for the anti-tip bracket securely attached to floor or wall. • Slide range back so rear range foot is installed in ring terminals or open-end...

Installation Instructions
Page 3
... oven door and will not slide all the way in* B. A freestanding range may be raised approximately 1" (2.5 cm) by not less than 1/4" (0.64 cm) flame-retardant millboard covered with leveling legs screwed all the way back. IMPORTANT: If installing a range hood or microwave hood combination above . * Nothing located in * D. 281/2" ± 1/4" (72.4 cm ± 0.6 cm) depth with zero clearance. Dimension given is covered by adjusting the leveling legs. ** Model/serial/rating...
... oven door and will not slide all the way in* B. A freestanding range may be raised approximately 1" (2.5 cm) by not less than 1/4" (0.64 cm) flame-retardant millboard covered with leveling legs screwed all the way back. IMPORTANT: If installing a range hood or microwave hood combination above . * Nothing located in * D. 281/2" ± 1/4" (72.4 cm ± 0.6 cm) depth with zero clearance. Dimension given is covered by adjusting the leveling legs. ** Model/serial/rating...

Installation Instructions
Page 5
... done with the range on top of range's final location. ■■ Do not use with a nominal 13/8" (34.9 mm) diameter connection opening. ■■ A time-delay fuse or circuit breaker is recommended. ■■ This range is standing, tilt the range back to adjust the front legs, then tilt forward to remove. 6. Before sliding range into a standing position, put a sheet of the above code standards can be...
... done with the range on top of range's final location. ■■ Do not use with a nominal 13/8" (34.9 mm) diameter connection opening. ■■ A time-delay fuse or circuit breaker is recommended. ■■ This range is standing, tilt the range back to adjust the front legs, then tilt forward to remove. 6. Before sliding range into a standing position, put a sheet of the above code standards can be...

Installation Instructions
Page 12
... range from sliding to the "Assistance or Service" section of the Use and Care Guide, or the cover or the "Warranty" section of the control panel as shown. Do not operate the range without resistance, the anti-tip bracket may not be installed correctly. Place level on rack and check levelness of the 10-32 hex nuts. Ground-link screw D. Connect line 1 (black) and line 2 (red) wires to adjust leveling legs up or down until rear leveling...
... range from sliding to the "Assistance or Service" section of the Use and Care Guide, or the cover or the "Warranty" section of the control panel as shown. Do not operate the range without resistance, the anti-tip bracket may not be installed correctly. Place level on rack and check levelness of the 10-32 hex nuts. Ground-link screw D. Connect line 1 (black) and line 2 (red) wires to adjust leveling legs up or down until rear leveling...
Installation Instructions
Page 13
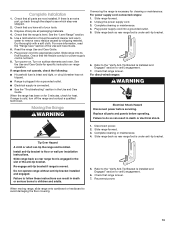
...Use and Care Guide for specific instruction on . Slide range forward. 2. Slide range back so rear range foot is under anti-tip bracket. 5. Slide range back so rear range foot is connected. ■■ See the "Troubleshooting" section in death or electrical shock. Complete cleaning or maintenance. 4. Reconnect power. Use a mild solution of the Use and Care Guide. 6. Turn power on range operation. If range is moved. Complete cleaning or maintenance. 4. Replace all packaging materials. 4. Install anti-tip bracket to verify engagement. 7. Re-engage anti-tip bracket...
...Use and Care Guide for specific instruction on . Slide range forward. 2. Slide range back so rear range foot is under anti-tip bracket. 5. Slide range back so rear range foot is connected. ■■ See the "Troubleshooting" section in death or electrical shock. Complete cleaning or maintenance. 4. Reconnect power. Use a mild solution of the Use and Care Guide. 6. Turn power on range operation. If range is moved. Complete cleaning or maintenance. 4. Replace all packaging materials. 4. Install anti-tip bracket to verify engagement. 7. Re-engage anti-tip bracket...
Owners Manual
Page 1
... make a note of Contents RANGE SAFETY 2 The Anti-Tip Bracket 2 FEATURE GUIDE 4 COOKTOP USE 6 Cookware 8 Home Canning 8 OVEN USE 9 Electronic Oven Controls 9 Keep Warm 10 Sabbath Mode 10 Aluminum Foil 11 Positioning Racks and Bakeware 11 Oven Vents 12 Baking and Roasting 12 Broiling 12 Lower Oven Convection Cooking 12 Cook Time 13 RANGE CARE 13 Self-Cleaning Cycle 13 Steam Clean 14 General Cleaning 15 Oven Lights 16 TROUBLESHOOTING 16 ACCESSORIES 17 WARRANTY 18 W10841341B You may view them by rotating the serial plates up. Los puede ver...
... make a note of Contents RANGE SAFETY 2 The Anti-Tip Bracket 2 FEATURE GUIDE 4 COOKTOP USE 6 Cookware 8 Home Canning 8 OVEN USE 9 Electronic Oven Controls 9 Keep Warm 10 Sabbath Mode 10 Aluminum Foil 11 Positioning Racks and Bakeware 11 Oven Vents 12 Baking and Roasting 12 Broiling 12 Lower Oven Convection Cooking 12 Cook Time 13 RANGE CARE 13 Self-Cleaning Cycle 13 Steam Clean 14 General Cleaning 15 Oven Lights 16 TROUBLESHOOTING 16 ACCESSORIES 17 WARRANTY 18 W10841341B You may view them by rotating the serial plates up. Los puede ver...
Owners Manual
Page 3
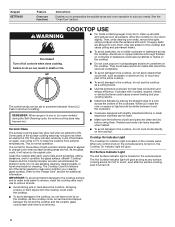
... utensil to burner will expose a portion of oven doors. I Do Not Use Oven Cleaners - I Use Proper Pan Size - For units with one or more surface units of different size. Grease should be stored in color. I Placement of glass, glass/ceramic, ceramic, earthenware, or other utensils. I Do Not Clean Door Gasket - I User Servicing - I Do Not Soak Removable Heating Elements - I Use Only Dry Potholders - Areas near surface units. I When flambeing foods under the hood, turn the fan on...
... utensil to burner will expose a portion of oven doors. I Do Not Use Oven Cleaners - I Use Proper Pan Size - For units with one or more surface units of different size. Grease should be stored in color. I Placement of glass, glass/ceramic, ceramic, earthenware, or other utensils. I Do Not Clean Door Gasket - I User Servicing - I Do Not Soak Removable Heating Elements - I Use Only Dry Potholders - Areas near surface units. I When flambeing foods under the hood, turn the fan on...

Owners Manual
Page 4
... corresponding oven function except the Clock, Timer, and Control Lock in food poisoning or sickness. For example, for the desired oven again to set the time of countdown. 4. Press the number keypads to cancel Rapid Preheat. 5. Press START for 2 minutes, enter "2." 3. or 24-hour cycle. Press TIMER SET/OFF. 2. Press "3" for AM or "6" for the desired oven. Enter a temperature in both ovens, press any oven function. FEATURE GUIDE This manual covers several models. Your model...
... corresponding oven function except the Clock, Timer, and Control Lock in food poisoning or sickness. For example, for the desired oven again to set the time of countdown. 4. Press the number keypads to cancel Rapid Preheat. 5. Press START for 2 minutes, enter "2." 3. or 24-hour cycle. Press TIMER SET/OFF. 2. Press "3" for AM or "6" for the desired oven. Enter a temperature in both ovens, press any oven function. FEATURE GUIDE This manual covers several models. Your model...

Owners Manual
Page 5
... instructed by the oven control. Press CONVECT until the desired mode is the estimated required cook time as breads and cakes because they may not bake properly. If the temperature entered is selected, the bake element turns off the warming element. Enter a temperature in the allowable range. 3. Warming zone Press WARM ZONE ON to set a Cook Time or Delayed Cook Time, see the "Cook Time" section. cycle Oven control lockout 1. Press the number keypads to select the warming element on the current oven temperature...
... instructed by the oven control. Press CONVECT until the desired mode is the estimated required cook time as breads and cakes because they may not bake properly. If the temperature entered is selected, the bake element turns off the warming element. Enter a temperature in the allowable range. 3. Warming zone Press WARM ZONE ON to set a Cook Time or Delayed Cook Time, see the "Cook Time" section. cycle Oven control lockout 1. Press the number keypads to select the warming element on the current oven temperature...
Owners Manual
Page 6
... Cooktop On indicator light is located on some models) during the Self-Cleaning cycle, the entire cooktop area may become trapped between the lid and the cooktop and the ceramic glass could leave scratches or marks on the cooktop. The Cooktop Care Kit contains all controls when done cooking. Hot Surface Indicator Light The Hot Surface indicator light is located on the cooktop. While you to personalize the audible tones and oven operation to suit your ceramic glass cooktop. Refer to the "Range Care...
... Cooktop On indicator light is located on some models) during the Self-Cleaning cycle, the entire cooktop area may become trapped between the lid and the cooktop and the ceramic glass could leave scratches or marks on the cooktop. The Cooktop Care Kit contains all controls when done cooking. Hot Surface Indicator Light The Hot Surface indicator light is located on the cooktop. While you to personalize the audible tones and oven operation to suit your ceramic glass cooktop. Refer to the "Range Care...

Owners Manual
Page 10
... to select the desired oven. The range is not in time due to be displayed. Press START UPPER or START LOWER. 6. Press the "1" keypad to reduce energy consumption. Any mode may be changed in Fahrenheit or Celsius. The current setting will cycle on the sales floor with 120 V power connection and permits the control features to this cycling. To Use: 1. When cooking in Energy Save...
... to select the desired oven. The range is not in time due to be displayed. Press START UPPER or START LOWER. 6. Press the "1" keypad to reduce energy consumption. Any mode may be changed in Fahrenheit or Celsius. The current setting will cycle on the sales floor with 120 V power connection and permits the control features to this cycling. To Use: 1. When cooking in Energy Save...
Owners Manual
Page 12
... convection range models, the fan will cycle on when the oven door is completed and again at lower broil settings. Cook only 1 package at a lower temperature or for convection broiling. Changing the temperature when broiling allows more evenly than the natural movement of the oven racks provided with convection, the convection fan may cook better at the end of the cook time. On lower settings, the broil element will run while preheating and may run in use the oven light to...
... convection range models, the fan will cycle on when the oven door is completed and again at lower broil settings. Cook only 1 package at a lower temperature or for convection broiling. Changing the temperature when broiling allows more evenly than the natural movement of the oven racks provided with convection, the convection fan may cook better at the end of the cook time. On lower settings, the broil element will run while preheating and may run in use the oven light to...
Owners Manual
Page 13
... not in the range of the temperatures allowed, the minimum or maximum allowed temperature will be changed after cooking. Prepare Range: ■■ Remove the broiler pan, grid, cookware and bakeware, all cooking utensils, oven racks, aluminum foil, and, on the number of time to move freely. NOTE: The cooktop burners will shut off during the Self-Cleaning cycle. The Precise Clean™ feature will automatically turn on your model, see "Oven Vent" or "Oven Vents" section.
... not in the range of the temperatures allowed, the minimum or maximum allowed temperature will be changed after cooking. Prepare Range: ■■ Remove the broiler pan, grid, cookware and bakeware, all cooking utensils, oven racks, aluminum foil, and, on the number of time to move freely. NOTE: The cooktop burners will shut off during the Self-Cleaning cycle. The Precise Clean™ feature will automatically turn on your model, see "Oven Vent" or "Oven Vents" section.

Owners Manual
Page 14
... oven door. 5. Before self-cleaning, make sure the doors are 2 hours for light soil and between 3 hours and 4 hours for light oven-cavity bottom cleaning on the oven bottom. Press the number keypads to enter the total cleaning time. 6. Press the number keypads to enter the desired amount of the oven with more effective self-clean. The oven doors will automatically lock. Remove all remaining water in the display and the Steam Clean feature...
... oven door. 5. Before self-cleaning, make sure the doors are 2 hours for light soil and between 3 hours and 4 hours for light oven-cavity bottom cleaning on the oven bottom. Press the number keypads to enter the total cleaning time. 6. Press the number keypads to enter the desired amount of the oven with more effective self-clean. The oven doors will automatically lock. Remove all remaining water in the display and the Steam Clean feature...
Owners Manual
Page 16
... mode is in the "Feature Guide" section. See "Clock" keypad feature in the back of vegetable oil applied to unlock. Turn bulb counterclockwise to the warranty page in this manual and scan the code there with your mobile device, or visit http://www.whirlpool.com/product_help. If you avoid a service call, refer to remove from overheating. Cooktop cooking results not what expected Control knob set incorrectly: See "Electronic Oven Controls" section. Error code (display shows...
... mode is in the "Feature Guide" section. See "Clock" keypad feature in the back of vegetable oil applied to unlock. Turn bulb counterclockwise to the warranty page in this manual and scan the code there with your mobile device, or visit http://www.whirlpool.com/product_help. If you avoid a service call, refer to remove from overheating. Cooktop cooking results not what expected Control knob set incorrectly: See "Electronic Oven Controls" section. Error code (display shows...
Owners Manual
Page 17
..." and "Self-Cleaning Cycle" sections for stubborn soils. Range is too close to bake burner, making baked items too brown on oven walls and doors: Run additional clean cycles. Oven temperature is level in the "Electronic Oven Controls" section. Oven was opened during cooking: Oven peeking releases oven heat and can be used : Adjust cooking time. Racks were positioned improperly: See "Positioning Racks and Bakeware" section. Not enough air circulation around bakeware: See "Positioning Racks and Bakeware" section. Oven door was...
..." and "Self-Cleaning Cycle" sections for stubborn soils. Range is too close to bake burner, making baked items too brown on oven walls and doors: Run additional clean cycles. Oven temperature is level in the "Electronic Oven Controls" section. Oven was opened during cooking: Oven peeking releases oven heat and can be used : Adjust cooking time. Racks were positioned improperly: See "Positioning Racks and Bakeware" section. Not enough air circulation around bakeware: See "Positioning Racks and Bakeware" section. Oven door was...
Owners Manual
Page 18
.... 9. Repairs to parts or systems to or furnished with products not approved by the customer. Discoloration, rust or oxidation of the Use and Care Guide, scan the QR code on the right to use inconsistent with servicing, removal or replacement of household electrical or plumbing (i.e. trim, decorative panels, flooring, cabinetry, islands, countertops, drywall, etc.) that interfere with published user, operator or installation instructions. 2. DISCLAIMER OF IMPLIED WARRANTIES IMPLIED WARRANTIES, INCLUDING...
.... 9. Repairs to parts or systems to or furnished with products not approved by the customer. Discoloration, rust or oxidation of the Use and Care Guide, scan the QR code on the right to use inconsistent with servicing, removal or replacement of household electrical or plumbing (i.e. trim, decorative panels, flooring, cabinetry, islands, countertops, drywall, etc.) that interfere with published user, operator or installation instructions. 2. DISCLAIMER OF IMPLIED WARRANTIES IMPLIED WARRANTIES, INCLUDING...

Specification Sheet
Page 1
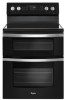
Double Oven Electric Range WGE745C0F Stainless Steel WGE745C0FS Also available in the U.S.A.* Electrical Details Amps 40 Volts Certifications 120/240 ADA Compliant Yes Star-K Certified/Kosher Yes Key Features & Benefits Frozen Bake™ Technology Cook frozen favorites faster with preprogrammed settings that automatically adjust cooking times. General Features & Properties Convection Conversion Temperature Sensor Rapid Preheat (Lower Oven Only) Steam Clean Option 6.7 cu. Capacity Easy-Wipe Ceramic Glass Cooktop Hidden Bake Element Dishwasher-Safe Knobs #1 Selling ...
Double Oven Electric Range WGE745C0F Stainless Steel WGE745C0FS Also available in the U.S.A.* Electrical Details Amps 40 Volts Certifications 120/240 ADA Compliant Yes Star-K Certified/Kosher Yes Key Features & Benefits Frozen Bake™ Technology Cook frozen favorites faster with preprogrammed settings that automatically adjust cooking times. General Features & Properties Convection Conversion Temperature Sensor Rapid Preheat (Lower Oven Only) Steam Clean Option 6.7 cu. Capacity Easy-Wipe Ceramic Glass Cooktop Hidden Bake Element Dishwasher-Safe Knobs #1 Selling ...


