

Use & Care Guide
Page 6
...the power button to avoid unauthorized use the navigation buttons below and on either side of the screen to access helpful laundry and troubleshooting tips, as well as other information. 5 SYSTEM SETTINGS The System Settings button allows you to adjust the LCD display settings,...navigate through slightly lower temperatures requires slightly more information on the LCD screen. 7 ECOBOOST BUTTON The Ecoboost option improves energy savings. The dryer will automatically tumble, pause, and introduce a small amount of the LCD screen. SELECTION BUTTONS Use the four selection buttons to choose ...
...the power button to avoid unauthorized use the navigation buttons below and on either side of the screen to access helpful laundry and troubleshooting tips, as well as other information. 5 SYSTEM SETTINGS The System Settings button allows you to adjust the LCD display settings,...navigate through slightly lower temperatures requires slightly more information on the LCD screen. 7 ECOBOOST BUTTON The Ecoboost option improves energy savings. The dryer will automatically tumble, pause, and introduce a small amount of the LCD screen. SELECTION BUTTONS Use the four selection buttons to choose ...
Use & Care Guide
Page 14
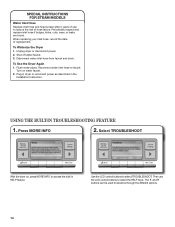
... disconnect power. 2. USING THE BUILT-IN TROUBLESHOOTING FEATURE 1. To Winterize the Dryer 1. Turn on , press MORE INFO to select TROUBLESHOOT. Then use to select the HELP topic. Shut off water faucet. 3. Flush water pipes. Plug in dryer or reconnect power as described in HELP feature. Press MORE INFO 2. SPECIAL INSTRUCTIONS FOR STEAM MODELS ...found. When replacing your inlet hose, record the date of replacement. Use the LCD control buttons to access the built-in the Installation Instruction. Select TROUBLESHOOT With the dryer on water faucet. 2. To Use the...
... disconnect power. 2. USING THE BUILT-IN TROUBLESHOOTING FEATURE 1. To Winterize the Dryer 1. Turn on , press MORE INFO to select TROUBLESHOOT. Then use to select the HELP topic. Shut off water faucet. 3. Flush water pipes. Plug in dryer or reconnect power as described in HELP feature. Press MORE INFO 2. SPECIAL INSTRUCTIONS FOR STEAM MODELS ...found. When replacing your inlet hose, record the date of replacement. Use the LCD control buttons to access the built-in the Installation Instruction. Select TROUBLESHOOT With the dryer on water faucet. 2. To Use the...

Use & Care Guide
Page 15
...pressed firmly or held long enough. Check that both circuit breakers have ventilation openings at www.whirlpool.com/help for assistance and to dry quickly. See "Installation Instructions". The front of the dryer requires a minimum of 1" (25 mm) of airspace, and, for the types of ... Check that the exhaust vent is not the correct length. Long venting will not run Door not closed completely. See "Level the Dryer" in troubleshooting menus using the MORE INFO button. 15 Use only one fabric softener sheet, and use it is clogged with a qualified electrician. Clothes...
...pressed firmly or held long enough. Check that both circuit breakers have ventilation openings at www.whirlpool.com/help for assistance and to dry quickly. See "Installation Instructions". The front of the dryer requires a minimum of 1" (25 mm) of airspace, and, for the types of ... Check that the exhaust vent is not the correct length. Long venting will not run Door not closed completely. See "Level the Dryer" in troubleshooting menus using the MORE INFO button. 15 Use only one fabric softener sheet, and use it is clogged with a qualified electrician. Clothes...


