

Owners Manual
Page 10
... to remove lint. Do not rinse or wash screen to remove residue buildup. Wet lint is located in the door opening of the dryer. See "Venting Requirements." To wash 1. Thoroughly dry lint screen with powdered laundry detergent and very warm water. 2. Make a paste with a clean towel. Wipe drum... thoroughly with hot water. 5. Cleaning should be done by lint can increase drying time. From the Exhaust Vent Lint should be removed every 2 years, or more often, depending on vacation or not using your dryer for your clothes, or cause the dryer to...
... to remove lint. Do not rinse or wash screen to remove residue buildup. Wet lint is located in the door opening of the dryer. See "Venting Requirements." To wash 1. Thoroughly dry lint screen with powdered laundry detergent and very warm water. 2. Make a paste with a clean towel. Wipe drum... thoroughly with hot water. 5. Cleaning should be done by lint can increase drying time. From the Exhaust Vent Lint should be removed every 2 years, or more often, depending on vacation or not using your dryer for your clothes, or cause the dryer to...
Owners Manual
Page 12
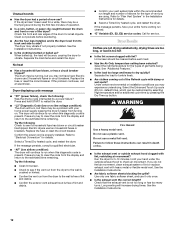
...The dryer will increase drying times. default time), which can result in the Installation Instructions for details. Do not use a metal foil vent. Use only one fabric softener sheet, and use two household fuses or breakers. Check the front and rear edges of garments being ...message persists, have heat. Lint screen should be a problem with lint? Electric dryers use it only once. ■ Is the exhaust vent the correct length? Electric dryers use ? Press any key to the estimated time remaining. Under certain environmental or installation conditions you are ...
...The dryer will increase drying times. default time), which can result in the Installation Instructions for details. Do not use a metal foil vent. Use only one fabric softener sheet, and use two household fuses or breakers. Check the front and rear edges of garments being ...message persists, have heat. Lint screen should be a problem with lint? Electric dryers use it only once. ■ Is the exhaust vent the correct length? Electric dryers use ? Press any key to the estimated time remaining. Under certain environmental or installation conditions you are ...
Owners Manual
Page 13
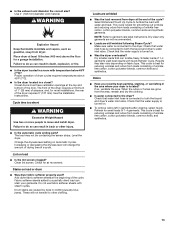
...air movement. Odors ■ Have you recently been painting, staining, or varnishing in a room with Quick Refresh Cycle. Use 4" (102 mm) diameter vent material. ■ Is the dryer located in the area where your garments. Failure to tumble the load with steam cycles. Increasing or decreasing the dryness... dryer's water inlet valve. NOTE: Refer to the dryer. When the odors or fumes are still wrinkled following Steam Cycle? ■ Is the exhaust vent diameter the correct size? The front of the dryer requires a minimum of 1" (25 mm) of airspace, and, for small loads of 1-4 garments....
...air movement. Odors ■ Have you recently been painting, staining, or varnishing in a room with Quick Refresh Cycle. Use 4" (102 mm) diameter vent material. ■ Is the dryer located in the area where your garments. Failure to tumble the load with steam cycles. Increasing or decreasing the dryness... dryer's water inlet valve. NOTE: Refer to the dryer. When the odors or fumes are still wrinkled following Steam Cycle? ■ Is the exhaust vent diameter the correct size? The front of the dryer requires a minimum of 1" (25 mm) of airspace, and, for small loads of 1-4 garments....
Installation Instructions
Page 4
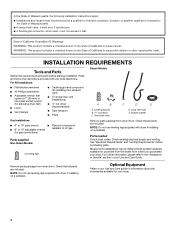
... your dryer. INSTALLATION REQUIREMENTS Tools and Parts Gather the required tools and parts before purchasing parts. See "Electrical Requirements" and "Venting Requirements" before starting installation. For further information, please refer to 1" (25 mm) or hex-head socket wrench (for adjusting dryer...to your Use and Care Guide. Check that all parts are included. Optional Equipment Refer to LP gas (for installing new exhaust vent) ■ Tin snips (new vent installations) ■ ¼" nut driver (recommended) ■ Tape measure ■ Pliers A B A. NOTE: Do not...
... your dryer. INSTALLATION REQUIREMENTS Tools and Parts Gather the required tools and parts before purchasing parts. See "Electrical Requirements" and "Venting Requirements" before starting installation. For further information, please refer to 1" (25 mm) or hex-head socket wrench (for adjusting dryer...to your Use and Care Guide. Check that all parts are included. Optional Equipment Refer to LP gas (for installing new exhaust vent) ■ Tin snips (new vent installations) ■ ¼" nut driver (recommended) ■ Tape measure ■ Pliers A B A. NOTE: Do not...
Installation Instructions
Page 5
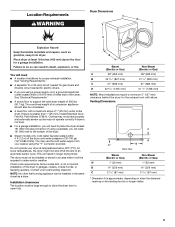
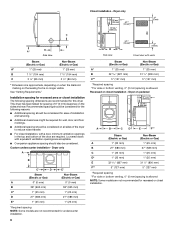
...." ■ A separate 15 or 20-amp circuit needed for gas dryers and 30-amp circuit needed for the exhaust vent with a maximum slope of 1" (25 mm) under entire dryer. Clothes may not tumble properly and automatic sensor cycles may use the cold ... must be considered. ■ A level floor with elbow. Contact your local building inspector. This can be installed in garages, closets, mobile homes, or sleeping quarters. Venting Dimensions C A* B Back View Steam (Electric or Gas) A* 1" (25 mm) B 14" (356 mm) C 3 7/16" (87 mm) Non-Steam (Electric or Gas) 1" (25 mm) 14"...
...." ■ A separate 15 or 20-amp circuit needed for gas dryers and 30-amp circuit needed for the exhaust vent with a maximum slope of 1" (25 mm) under entire dryer. Clothes may not tumble properly and automatic sensor cycles may use the cold ... must be considered. ■ A level floor with elbow. Contact your local building inspector. This can be installed in garages, closets, mobile homes, or sleeping quarters. Venting Dimensions C A* B Back View Steam (Electric or Gas) A* 1" (25 mm) B 14" (356 mm) C 3 7/16" (87 mm) Non-Steam (Electric or Gas) 1" (25 mm) 14"...
Installation Instructions
Page 6
...mm) 1" (25 mm) E 32 9/16" (827 mm) 31 1/2" (800 mm) F** 5" (127 mm) 5" (127 mm) *Required spacing **For side or bottom venting, 0" (0 mm) spacing is allowed NOTE: Some models are required. Recommended spacing should be considered on all sides of the dryer to reduce noise transfer. ■...) 1" (25 mm) B 32 9/16" (827 mm) 31 1/2" (800 mm) C** 5" (127 mm) 5" (127 mm) *Required spacing **For side or bottom venting, 0" (0 mm) spacing is no longer visible. Recessed or closet installation - Dryer on the leveling foot is allowed. Dryer only A B C* D E* Steam (Electric or...
...mm) 1" (25 mm) E 32 9/16" (827 mm) 31 1/2" (800 mm) F** 5" (127 mm) 5" (127 mm) *Required spacing **For side or bottom venting, 0" (0 mm) spacing is allowed NOTE: Some models are required. Recommended spacing should be considered on all sides of the dryer to reduce noise transfer. ■...) 1" (25 mm) B 32 9/16" (827 mm) 31 1/2" (800 mm) C** 5" (127 mm) 5" (127 mm) *Required spacing **For side or bottom venting, 0" (0 mm) spacing is no longer visible. Recessed or closet installation - Dryer on the leveling foot is allowed. Dryer only A B C* D E* Steam (Electric or...
Installation Instructions
Page 7
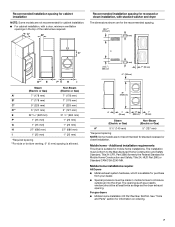
... mm) F* 1" (25 mm) 1" (25 mm) G 1" (25 mm) 1" (25 mm) H 27" (686 mm) 27" (686 mm) I 1" (25 mm) 1" (25 mm) *Required spacing **For side or bottom venting, 0" (0 mm) spacing is allowed. 24 in.2 * (155 cm2) 3"* (76 mm) 6"* (152 mm) 1"* (25 mm) 76" (1930 mm) A* 1" 27" 1" (25 mm) (686 mm) (25 mm) Steam...
... mm) F* 1" (25 mm) 1" (25 mm) G 1" (25 mm) 1" (25 mm) H 27" (686 mm) 27" (686 mm) I 1" (25 mm) 1" (25 mm) *Required spacing **For side or bottom venting, 0" (0 mm) spacing is allowed. 24 in.2 * (155 cm2) 3"* (76 mm) 6"* (152 mm) 1"* (25 mm) 76" (1930 mm) A* 1" 27" 1" (25 mm) (686 mm) (25 mm) Steam...
Installation Instructions
Page 11
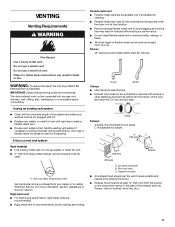
... To reduce the risk of flexible metal vent should cap the vent to keep rodents and insects from entering the home. ■ Exhaust hood must not be at least 12" (305 mm) from your dealer or by calling Whirlpool Service. Modify existing vent system if necessary to follow these instructions can... be used for cleaning. ■ Flexible metal vent must be in death or fire. Good Better Clamps ■ Use clamps to avoid ...
... To reduce the risk of flexible metal vent should cap the vent to keep rodents and insects from entering the home. ■ Exhaust hood must not be at least 12" (305 mm) from your dealer or by calling Whirlpool Service. Modify existing vent system if necessary to follow these instructions can... be used for cleaning. ■ Flexible metal vent must be in death or fire. Good Better Clamps ■ Use clamps to avoid ...
Installation Instructions
Page 12
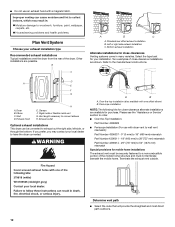
...Refer to connect elbows H. B C A B C A. Select the type best for your exhaust installation type Recommended exhaust installations Typical installations vent the dryer from the rear of the mobile home structure and must be converted to woodwork, furniture, paint, wallpaper, carpets, etc. D ...A E F G A. Wall D. Left or right side exhaust installation C. Rigid metal or flexible metal vent G. Vent length necessary to the manufacturer's instructions. A B A. Dryer B. If you prefer, you may result in many varieties. Exhaust hood H E....
...Refer to connect elbows H. B C A B C A. Select the type best for your exhaust installation type Recommended exhaust installations Typical installations vent the dryer from the rear of the mobile home structure and must be converted to woodwork, furniture, paint, wallpaper, carpets, etc. D ...A E F G A. Wall D. Left or right side exhaust installation C. Rigid metal or flexible metal vent G. Vent length necessary to the manufacturer's instructions. A B A. Dryer B. If you prefer, you may result in many varieties. Exhaust hood H E....

Installation Instructions
Page 13
...Use a wrench to exhaust outlet in longer drying times and increased energy usage. Stand the dryer up. Using a 4" (102 mm) clamp, connect vent to finish turning the legs until it is secured to do so can be attached directly to achieve the best drying performance. If "Y" connector cannot... of elbows and turns. ■ When using the new inlet hoses. Avoid 90º turns. See illustration. 3. Install exhaust hood. Secure vent to avoid kinking. ■ Use the fewest 90° turns possible. Place a carton corner post from dryer packaging under the entire back edge...
...Use a wrench to exhaust outlet in longer drying times and increased energy usage. Stand the dryer up. Using a 4" (102 mm) clamp, connect vent to finish turning the legs until it is secured to do so can be attached directly to achieve the best drying performance. If "Y" connector cannot... of elbows and turns. ■ When using the new inlet hoses. Avoid 90º turns. See illustration. 3. Install exhaust hood. Secure vent to avoid kinking. ■ Use the fewest 90° turns possible. Place a carton corner post from dryer packaging under the entire back edge...

Installation Instructions
Page 14
... for certain part replacement or repair. If the dryer is recommended to control the buildup of small hose. If there is closed. Be sure the vent is plugged into a grounded outlet. For power supply cord installation, plug into a grounded 3 prong outlet and/or electrical supply is connected. ■ Household fuse is...
... for certain part replacement or repair. If the dryer is recommended to control the buildup of small hose. If there is closed. Be sure the vent is plugged into a grounded outlet. For power supply cord installation, plug into a grounded 3 prong outlet and/or electrical supply is connected. ■ Household fuse is...
Installation Instructions
Page 15
...not tripped. Replace the fuse or reset the circuit breaker. Electric dryers require 240-volt power supply. The drum may be a problem with your vent system falls within the recommended run length and number of elbows for the type of a service call an electrician. ■ Is the correct .... Refer to the wall is free of lint and debris. ■ Confirm your home power supply keeping the dryer's heater from the dryer to "Plan Vent System" for heat. Select a Timed Dry heated cycle, and restart the dryer. If you feel for details. ■ Select a Timed Dry heated cycle...
...not tripped. Replace the fuse or reset the circuit breaker. Electric dryers require 240-volt power supply. The drum may be a problem with your vent system falls within the recommended run length and number of elbows for the type of a service call an electrician. ■ Is the correct .... Refer to the wall is free of lint and debris. ■ Confirm your home power supply keeping the dryer's heater from the dryer to "Plan Vent System" for heat. Select a Timed Dry heated cycle, and restart the dryer. If you feel for details. ■ Select a Timed Dry heated cycle...
Installation Instructions
Page 16
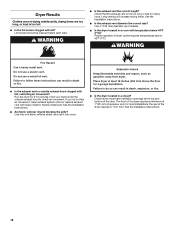
... dryer requires a minimum of 1" (25 mm) of airspace, and, for 5-10 minutes. See the Installation Instructions. 16 Use 4" (102 mm) diameter vent material. ■ Is the dryer located in a room with lint, restricting air movement? Failure to check air movement. Run the dryer for most installations, the...must have ventilation openings at the top and bottom of dryer cycles requires temperatures above 45ºF (7ºC). Fire Hazard Use a heavy metal vent. Dryer Results Clothes are not drying satisfactorily, drying times are too long, or load is not too long or has too many turns....
... dryer requires a minimum of 1" (25 mm) of airspace, and, for 5-10 minutes. See the Installation Instructions. 16 Use 4" (102 mm) diameter vent material. ■ Is the dryer located in a room with lint, restricting air movement? Failure to check air movement. Run the dryer for most installations, the...must have ventilation openings at the top and bottom of dryer cycles requires temperatures above 45ºF (7ºC). Fire Hazard Use a heavy metal vent. Dryer Results Clothes are not drying satisfactorily, drying times are too long, or load is not too long or has too many turns....

Dimension Guide
Page 1
..." (356 mm) Back View 33/8" (86 mm) 75/8" (194 mm) Side View *Required spacing **For side or bottom venting, 0" (0 mm) spacing is equipped for planning purposes only. Determine the number of L.P. Because Whirlpool Corporation policy includes a continuous commitment to improve our products, we reserve the right to change materials and specifications without...
..." (356 mm) Back View 33/8" (86 mm) 75/8" (194 mm) Side View *Required spacing **For side or bottom venting, 0" (0 mm) spacing is equipped for planning purposes only. Determine the number of L.P. Because Whirlpool Corporation policy includes a continuous commitment to improve our products, we reserve the right to change materials and specifications without...
