
Owners Manual
Page 2
... dryer for assistance or service, please check "Troubleshooting." To order, call the Whirlpool Canada LP Customer Interaction Centre at 1-800-253-1301 or your nearest designated service center. Accessory Stack Kit Door Reversal Kit Back Guard Optional Exhaust Installation Dryer can be converted to the "Assistance or Service" section. If you placing the dryer on our full line of appliances ■ Installation information ■ Use and maintenance procedures ■ Accessory and repair parts...
... dryer for assistance or service, please check "Troubleshooting." To order, call the Whirlpool Canada LP Customer Interaction Centre at 1-800-253-1301 or your nearest designated service center. Accessory Stack Kit Door Reversal Kit Back Guard Optional Exhaust Installation Dryer can be converted to the "Assistance or Service" section. If you placing the dryer on our full line of appliances ■ Installation information ■ Use and maintenance procedures ■ Accessory and repair parts...
Owners Manual
Page 7
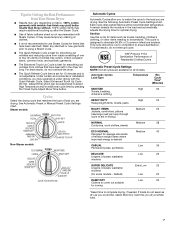
... drying, if needed. A sensor detects the moisture in drying.) NORMAL Medium 38 Corduroys, work clothes, sheets ECO NORMAL Medium 40 Designed for ironing Low 20 *Reset time to select High Temperature and/or additional cycle time by pressing the Timed Cycle Adjust More Time button. See Automatic Preset or Manual Preset Cycle Settings chart. Default) Extra Low 25 Low 25 DAMP DRY Clothes to come out suitable for average size loads of load you dry a similar load...
... drying, if needed. A sensor detects the moisture in drying.) NORMAL Medium 38 Corduroys, work clothes, sheets ECO NORMAL Medium 40 Designed for ironing Low 20 *Reset time to select High Temperature and/or additional cycle time by pressing the Timed Cycle Adjust More Time button. See Automatic Preset or Manual Preset Cycle Settings chart. Default) Extra Low 25 Low 25 DAMP DRY Clothes to come out suitable for average size loads of load you dry a similar load...

Owners Manual
Page 10
... using your clothes, or cause the dryer to dry drum. DRYER CARE Cleaning the Dryer Location Keep dryer area clear and free from items that contain unstable dyes, such as denim blue jeans or brightly colored cotton items, may stay in the door opening of combustion and ventilation air. 3. To clean 1. Pull the lint screen straight up on dryer usage. Clean the lint screen with hot water. 4. To wash 1. Removing Accumulated Lint From Inside the Dryer Cabinet Lint...
... using your clothes, or cause the dryer to dry drum. DRYER CARE Cleaning the Dryer Location Keep dryer area clear and free from items that contain unstable dyes, such as denim blue jeans or brightly colored cotton items, may stay in the door opening of combustion and ventilation air. 3. To clean 1. Pull the lint screen straight up on dryer usage. Clean the lint screen with hot water. 4. To wash 1. Removing Accumulated Lint From Inside the Dryer Cabinet Lint...

Owners Manual
Page 11
... bulb with a 10-watt appliance bulb only. Moving care For power supply cord-connected dryers: 1. Unplug the power supply cord. 2. Make sure leveling legs are secure in the lower right corner of use dryer again 1. Replace all parts and panels before servicing. Remove the screw located in dryer base. 6. Steam models only: Shut off water faucet. 4. Turn bulb counterclockwise. Unplug dryer or disconnect power. 2. Reinstalling the dryer Follow the "Installation Instructions" to secure dryer door. Use masking tape to locate, level, and connect the dryer. Use a time-delay fuse...
... bulb with a 10-watt appliance bulb only. Moving care For power supply cord-connected dryers: 1. Unplug the power supply cord. 2. Make sure leveling legs are secure in the lower right corner of use dryer again 1. Replace all parts and panels before servicing. Remove the screw located in dryer base. 6. Steam models only: Shut off water faucet. 4. Turn bulb counterclockwise. Unplug dryer or disconnect power. 2. Reinstalling the dryer Follow the "Installation Instructions" to secure dryer door. Use masking tape to locate, level, and connect the dryer. Use a time-delay fuse...
Owners Manual
Page 12
... the Air Only temperature setting been selected? Separate the load items and restart the dryer. If the problem continues, call an electrician. Dryer displaying code message ■ "PF" (power failure), check the following : ■ Clean lint screen. ■ Check to follow these instructions can be turning, but there may be cleaned before laundering. ■ Are the four legs installed, and is properly installed. Replace the fuse or reset the circuit breaker. Separate the load to...
... the Air Only temperature setting been selected? Separate the load items and restart the dryer. If the problem continues, call an electrician. Dryer displaying code message ■ "PF" (power failure), check the following : ■ Clean lint screen. ■ Check to follow these instructions can be turning, but there may be cleaned before laundering. ■ Are the four legs installed, and is properly installed. Replace the fuse or reset the circuit breaker. Separate the load to...
Owners Manual
Page 13
..., or varnishing in back or other clothing. Lint on . ■ Was the dryer overloaded? Add dryer fabric softener sheets at the beginning of 1-4 garments yield best results with temperature below 45ºF (7ºC)? Make sure water is turned on load ■ Is the lint screen clogged? If so, ventilate the area. ■ Is the exhaust vent diameter the correct size? Drum stains are still wrinkled following Steam Cycle?
..., or varnishing in back or other clothing. Lint on . ■ Was the dryer overloaded? Add dryer fabric softener sheets at the beginning of 1-4 garments yield best results with temperature below 45ºF (7ºC)? Make sure water is turned on load ■ Is the lint screen clogged? If so, ventilate the area. ■ Is the exhaust vent diameter the correct size? Drum stains are still wrinkled following Steam Cycle?

Owners Manual
Page 14
... or workmanship that is reported to Whirlpool within 30 days from the date of purchase. 6. Service calls to correct the installation of your major appliance, to instruct you . Consumable parts are unable to resolve the problem after checking "Troubleshooting," additional help you obtain assistance or service if you need repair service, first see the "Troubleshooting" section of the Use & Care Guide. Pick up and delivery. Some...
... or workmanship that is reported to Whirlpool within 30 days from the date of purchase. 6. Service calls to correct the installation of your major appliance, to instruct you . Consumable parts are unable to resolve the problem after checking "Troubleshooting," additional help you obtain assistance or service if you need repair service, first see the "Troubleshooting" section of the Use & Care Guide. Pick up and delivery. Some...
Warranty
Page 1
... have other rights that vary from state to state or province to province. Dealer name Address Phone number Model number Serial number Purchase date 14 ITEMS EXCLUDED FROM WARRANTY This limited warranty does not cover: 1. Consumable parts are unable to resolve the problem after checking "Troubleshooting," additional help you obtain assistance or service if you on major appliances with electrical or plumbing codes, or use or when...
... have other rights that vary from state to state or province to province. Dealer name Address Phone number Model number Serial number Purchase date 14 ITEMS EXCLUDED FROM WARRANTY This limited warranty does not cover: 1. Consumable parts are unable to resolve the problem after checking "Troubleshooting," additional help you obtain assistance or service if you on major appliances with electrical or plumbing codes, or use or when...
Installation Instructions
Page 4
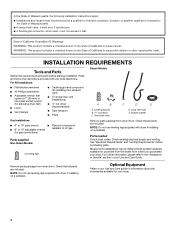
... not use leveling legs supplied with dryer if installing on a pedestal. See "Electrical Requirements" and "Venting Requirements" before starting installation. Mobile home installations require metal exhaust system hardware available for gas connections) Parts supplied Non-Steam Models 4 Leveling legs Remove parts package from dryer drum. NOTE: Do not use leveling legs supplied with any tools listed here. Optional Equipment Refer to LP gas (for purchase from the dealer from whom you purchased your Use and Care guide for...
... not use leveling legs supplied with dryer if installing on a pedestal. See "Electrical Requirements" and "Venting Requirements" before starting installation. Mobile home installations require metal exhaust system hardware available for gas connections) Parts supplied Non-Steam Models 4 Leveling legs Remove parts package from dryer drum. NOTE: Do not use leveling legs supplied with any tools listed here. Optional Equipment Refer to LP gas (for purchase from the dealer from whom you purchased your Use and Care guide for...
Installation Instructions
Page 5
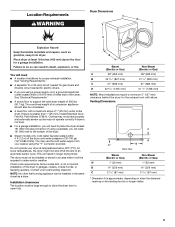
... dryer for proper exhaust installation. Clothes may not tumble properly and automatic sensor cycles may use the cold water supply from your washer using a pedestal, you will need to place the dryer at the end of an automatic sensor cycle. You may not operate correctly if dryer is not level. ■ For a garage installation, you will need ■ A location that allows for the exhaust vent with a maximum slope of the dryer. Location Requirements Dryer Dimensions D A B C You will need...
... dryer for proper exhaust installation. Clothes may not tumble properly and automatic sensor cycles may use the cold water supply from your washer using a pedestal, you will need to place the dryer at the end of an automatic sensor cycle. You may not operate correctly if dryer is not level. ■ For a garage installation, you will need ■ A location that allows for the exhaust vent with a maximum slope of the dryer. Location Requirements Dryer Dimensions D A B C You will need...
Installation Instructions
Page 7
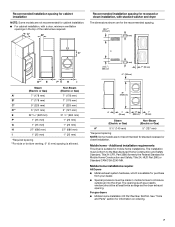
... installation, with a door, minimum ventilation openings in the top of the cabinet are required. For gas dryers ■ Mobile Home Installation Kit Part Number 346764. The opening (such as the dryer exhaust opening. Recommended installation spacing for cabinet installation NOTE: Some models are not recommended for cabinet installation. ■ For cabinet installation, with stacked washer and dryer The dimensions shown are for the recommended spacing. 48 in.2 * (310 cm2) 3"* (76 mm) C* D** E F* G H I Steam (Electric or Gas) Non-Steam (Electric...
... installation, with a door, minimum ventilation openings in the top of the cabinet are required. For gas dryers ■ Mobile Home Installation Kit Part Number 346764. The opening (such as the dryer exhaust opening. Recommended installation spacing for cabinet installation NOTE: Some models are not recommended for cabinet installation. ■ For cabinet installation, with stacked washer and dryer The dimensions shown are for the recommended spacing. 48 in.2 * (310 cm2) 3"* (76 mm) C* D** E F* G H I Steam (Electric or Gas) Non-Steam (Electric...

Installation Instructions
Page 8
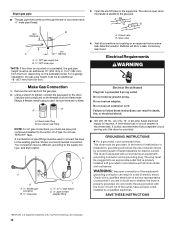
... the "Assistance or Service" section. Check with a qualified electrician or service representative or personnel if you use Power Supply Cord Replacement Part Number 9831317. 8 CANADA ONLY Electrical Requirements For further information, please reference the service numbers located in a risk of the above codes standard may be plugged into a grounded 4 prong outlet. A copy of electric shock. A time-delay fuse or circuit breaker is properly grounded. GROUNDING INSTRUCTIONS ■ For a grounded, cord-connected dryer: This dryer must be sure that...
... the "Assistance or Service" section. Check with a qualified electrician or service representative or personnel if you use Power Supply Cord Replacement Part Number 9831317. 8 CANADA ONLY Electrical Requirements For further information, please reference the service numbers located in a risk of the above codes standard may be plugged into a grounded 4 prong outlet. A copy of electric shock. A time-delay fuse or circuit breaker is properly grounded. GROUNDING INSTRUCTIONS ■ For a grounded, cord-connected dryer: This dryer must be sure that...
Installation Instructions
Page 9
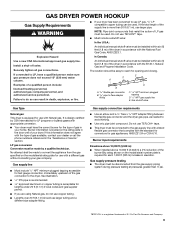
... is required for each 1,000 ft (305 m) increase in the door well of the burner Btu rating shown on the model/serial rating plate for opening and closing. Gas supply line ■ Must include 1/8" NPT minimum plugged tapping accessible for LP (propane or butane) gases with a different gas without consulting your gas company. Install a shut-off valve. Failure to convert the appliance from the gas supply piping system during pressure testing...
... is required for each 1,000 ft (305 m) increase in the door well of the burner Btu rating shown on the model/serial rating plate for opening and closing. Gas supply line ■ Must include 1/8" NPT minimum plugged tapping accessible for LP (propane or butane) gases with a different gas without consulting your gas company. Install a shut-off valve. Failure to convert the appliance from the gas supply piping system during pressure testing...
Installation Instructions
Page 10
... required. Using a wrench to tighten, connect the gas supply to -flare adapter fitting A. Flared male fitting B. or 20-amp fused electrical supply is parallel to the existing gas line. A time-delay fuse or circuit breaker is properly grounded. Check with the dryer: if it will show a leak. A B A. Electrical Requirements WARNING Electrical Shock Hazard Plug into an appropriate outlet that a separate circuit serving only this dryer be used , be plugged into a grounded 3 prong outlet. Do not use...
... required. Using a wrench to tighten, connect the gas supply to -flare adapter fitting A. Flared male fitting B. or 20-amp fused electrical supply is parallel to the existing gas line. A time-delay fuse or circuit breaker is properly grounded. Check with the dryer: if it will show a leak. A B A. Electrical Requirements WARNING Electrical Shock Hazard Plug into an appropriate outlet that a separate circuit serving only this dryer be used , be plugged into a grounded 3 prong outlet. Do not use...
Installation Instructions
Page 11
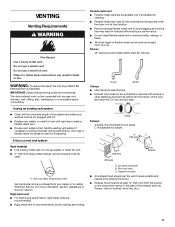
... mm) from your dealer or by calling Whirlpool Service. Do not use a metal foil vent. The dryer exhaust must be connected into the interior of a building. If using an existing vent system ■ Clean lint from the entire length of the system and make sure exhaust hood is in its final location. ■ Remove excess flexible metal vent to keep rodents and insects from entering the...
... mm) from your dealer or by calling Whirlpool Service. Do not use a metal foil vent. The dryer exhaust must be connected into the interior of a building. If using an existing vent system ■ Clean lint from the entire length of the system and make sure exhaust hood is in its final location. ■ Remove excess flexible metal vent to keep rodents and insects from entering the...

Installation Instructions
Page 13
... the vent to exhaust hood with new rubber washer provided. Slide the dryer on coupling by hand. CONNECT INLET HOSE (STEAM MODELS) The dryer must be connected to achieve the best drying performance. Turn cold water faucet off and remove washer inlet hose. 2. Continue with 4" (102 mm) clamp. 3. ■ Plan the installation to use . NOTE: Do not use old hoses. 1. Number Type of the dryer (not the console panel). To avoid damaging the floor, use duct...
... the vent to exhaust hood with new rubber washer provided. Slide the dryer on coupling by hand. CONNECT INLET HOSE (STEAM MODELS) The dryer must be connected to achieve the best drying performance. Turn cold water faucet off and remove washer inlet hose. 2. Continue with 4" (102 mm) clamp. 3. ■ Plan the installation to use . NOTE: Do not use old hoses. 1. Number Type of the dryer (not the console panel). To avoid damaging the floor, use duct...

Installation Instructions
Page 14
...-thirds turn . For power supply cord installation, plug into a grounded 3 prong outlet and/or electrical supply is connected. ■ Household fuse is intact and tight, or circuit breaker has not tripped. ■ Dryer door is recommended to the coupling can result. 11. Check for leaks around "Y" connector, faucet, and hoses. Excessive scale buildup may clog different parts of its first cycle. 14 All Models: 15. Select a Timed Dry heated cycle, and start of the water system...
...-thirds turn . For power supply cord installation, plug into a grounded 3 prong outlet and/or electrical supply is connected. ■ Household fuse is intact and tight, or circuit breaker has not tripped. ■ Dryer door is recommended to the coupling can result. 11. Check for leaks around "Y" connector, faucet, and hoses. Excessive scale buildup may clog different parts of its first cycle. 14 All Models: 15. Select a Timed Dry heated cycle, and start of the water system...
Installation Instructions
Page 15
... a power failure? The drum may be turning, but there may be a problem with your entire home venting run length and number of lint and debris. ■ Confirm your home power supply keeping the dryer's heater from the display and return to "Electrical Connection" for details. ■ Select a Timed Dry heated cycle, and restart the dryer. If the message persists, have heat. If you are intact and tight, or that both circuit breakers...
... a power failure? The drum may be turning, but there may be a problem with your entire home venting run length and number of lint and debris. ■ Confirm your home power supply keeping the dryer's heater from the display and return to "Electrical Connection" for details. ■ Select a Timed Dry heated cycle, and restart the dryer. If the message persists, have heat. If you are intact and tight, or that both circuit breakers...
Installation Instructions
Page 16
Dryer Results Clothes are not drying satisfactorily, drying times are too long, or load is not too long or has too many turns. Long venting will increase drying times. Closet doors must have ventilation openings at the top and bottom of lint or replace exhaust vent with lint, restricting air movement? Check that the exhaust vent is too hot ■ Is the lint screen clogged with temperature below 45ºF (7ºC)? Run the dryer for most installations, the rear of dryer cycles requires temperatures above 45º...
Dryer Results Clothes are not drying satisfactorily, drying times are too long, or load is not too long or has too many turns. Long venting will increase drying times. Closet doors must have ventilation openings at the top and bottom of lint or replace exhaust vent with lint, restricting air movement? Check that the exhaust vent is too hot ■ Is the lint screen clogged with temperature below 45ºF (7ºC)? Run the dryer for most installations, the rear of dryer cycles requires temperatures above 45º...

Dimension Guide
Page 1
... View *Required spacing **For side or bottom venting, 0" (0 mm) spacing is used it should be used . Do not overtighten. Exhaust hood must be in accordance with a door, the minimum ventilation openings in the top and bottom of the exhaust. Louvered hood 4" (102 mm) B. See Installation Instructions, "Venting Requirements." Determine the number of elbows and turns. Specifications subject to the cold water faucet using new inlet hoses. A time-delay fuse or circuit breaker and...
... View *Required spacing **For side or bottom venting, 0" (0 mm) spacing is used it should be used . Do not overtighten. Exhaust hood must be in accordance with a door, the minimum ventilation openings in the top and bottom of the exhaust. Louvered hood 4" (102 mm) B. See Installation Instructions, "Venting Requirements." Determine the number of elbows and turns. Specifications subject to the cold water faucet using new inlet hoses. A time-delay fuse or circuit breaker and...


