Use and Care Guide
Page 3
... or licensed contractor, plumber, or gasfitter qualified or licensed by a qualified installer, service agency, or the gas supplier. do not use gasoline or other appliance. - DRYER SAFETY Your safety and the safety of others . In the State of Massachusetts, the following installation instructions apply: ■ Installations and repairs must be killed...
... or licensed contractor, plumber, or gasfitter qualified or licensed by a qualified installer, service agency, or the gas supplier. do not use gasoline or other appliance. - DRYER SAFETY Your safety and the safety of others . In the State of Massachusetts, the following installation instructions apply: ■ Installations and repairs must be killed...

Use and Care Guide
Page 4
...Do not use heat to dry articles containing foam rubber or similarly textured rubber-like materials. ■ Clean lint screen before or after each load. ■ Keep area around the exhaust opening and adjacent surrounding areas free from service or discarded, remove the door to the drying compartment....: To reduce the risk of fire, electric shock, or injury to persons when using the dryer, follow basic precautions, including the following: ■ Read all instructions before using the dryer. ■ Do not place items exposed to cooking oils in published user-repair instructions that ...
...Do not use heat to dry articles containing foam rubber or similarly textured rubber-like materials. ■ Clean lint screen before or after each load. ■ Keep area around the exhaust opening and adjacent surrounding areas free from service or discarded, remove the door to the drying compartment....: To reduce the risk of fire, electric shock, or injury to persons when using the dryer, follow basic precautions, including the following: ■ Read all instructions before using the dryer. ■ Do not place items exposed to cooking oils in published user-repair instructions that ...

Use and Care Guide
Page 5
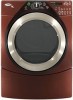
...cm) Biscuit WHP1500ST 15.5" (39.4 cm) Diamond Dust (Silver) WHP1500SU 15.5" (39.4 cm) Black WHP1500SB Stack Kit Are you purchased your DUET® washer and dryer? A B A. 10" (25.4 cm) pedestal B. 15.5" (39.4 cm) pedestal The pedestals are included. Check that may select a 10..."Plan Vent System" section for installing new exhaust vent) ■ Pliers ■ Tape measure Parts supplied Remove parts package from dryer drum. Leveling legs (4) B. Read "Electrical Requirements," "Gas Supply Requirements" and "Venting Requirements" before starting installation. To order, ...
...cm) Biscuit WHP1500ST 15.5" (39.4 cm) Diamond Dust (Silver) WHP1500SU 15.5" (39.4 cm) Black WHP1500SB Stack Kit Are you purchased your DUET® washer and dryer? A B A. 10" (25.4 cm) pedestal B. 15.5" (39.4 cm) pedestal The pedestals are included. Check that may select a 10..."Plan Vent System" section for installing new exhaust vent) ■ Pliers ■ Tape measure Parts supplied Remove parts package from dryer drum. Leveling legs (4) B. Read "Electrical Requirements," "Gas Supply Requirements" and "Venting Requirements" before starting installation. To order, ...

Use and Care Guide
Page 6
...companion appliance should be installed or stored in longer drying times. Do not operate your DUET® dryer? NOTE: No other fuel-burning appliance can result in garages, closets, mobile homes or sleeping quarters. Dryer Dimensions 51½" (130.81 cm) 38" (96.52 cm) Explosion Hazard ...best performance. ■ A level floor with a door, minimum ventilation openings in the same closet as gasoline, away from your DUET® washer and dryer and wish to avoid having loose items fall behind the machines during operation. Check code requirements. Some codes limit, or do so...
...companion appliance should be installed or stored in longer drying times. Do not operate your DUET® dryer? NOTE: No other fuel-burning appliance can result in garages, closets, mobile homes or sleeping quarters. Dryer Dimensions 51½" (130.81 cm) 38" (96.52 cm) Explosion Hazard ...best performance. ■ A level floor with a door, minimum ventilation openings in the same closet as gasoline, away from your DUET® washer and dryer and wish to avoid having loose items fall behind the machines during operation. Check code requirements. Some codes limit, or do so...

Use and Care Guide
Page 7
...cm) spacing is allowed. Custom undercounter installation - closet or confined area 5"** (12.7 cm) *Required spacing **For side or bottom venting, 2" (5.1 cm) spacing is allowed. 7 Dryer only 14" max.* (35.6 cm) 18" min.* (45.72 cm) 48 in.2* (310 cm2) 1"* (2.5 cm) 3"* (7.6 cm) 24 in .2 * (155 cm2) ... in .2 * (310 cm2) 3"* (7.6 cm) 1" (2.5 cm) 27" (68.6 cm) 1" 1"* (2.5 cm) (2.5 cm) 31½" (80 cm) A B A. Dryer only 0" (0 cm) 38" min. (96.52 cm) 1"* (2.5 cm) 27" (68.6 cm) *Required spacing Closet installation - closet or confined area B. Closet door with vents...
...cm) spacing is allowed. Custom undercounter installation - closet or confined area 5"** (12.7 cm) *Required spacing **For side or bottom venting, 2" (5.1 cm) spacing is allowed. 7 Dryer only 14" max.* (35.6 cm) 18" min.* (45.72 cm) 48 in.2* (310 cm2) 1"* (2.5 cm) 3"* (7.6 cm) 24 in .2 * (155 cm2) ... in .2 * (310 cm2) 3"* (7.6 cm) 1" (2.5 cm) 27" (68.6 cm) 1" 1"* (2.5 cm) (2.5 cm) 31½" (80 cm) A B A. Dryer only 0" (0 cm) 38" min. (96.52 cm) 1"* (2.5 cm) 27" (68.6 cm) *Required spacing Closet installation - closet or confined area B. Closet door with vents...

Use and Care Guide
Page 8
... Service" section of gas in your dealer or call the phone numbers referenced in accordance with appropriate conversion. ■ Your dryer must have the correct burner for purchase from the gas specified on ordering. ■ Special provisions must conform to the Manufactured...home - Electrical Requirements WARNING Gas Supply Requirements WARNING Explosion Hazard Use a new CSA International approved gas supply line. Failure to whether the dryer is a registered trademark of electric shock by a qualified technician. Do not use TEFLON®† tape. †®TEFLON is ...
... Service" section of gas in your dealer or call the phone numbers referenced in accordance with appropriate conversion. ■ Your dryer must have the correct burner for purchase from the gas specified on ordering. ■ Special provisions must conform to the Manufactured...home - Electrical Requirements WARNING Gas Supply Requirements WARNING Explosion Hazard Use a new CSA International approved gas supply line. Failure to whether the dryer is a registered trademark of electric shock by a qualified technician. Do not use TEFLON®† tape. †®TEFLON is ...

Use and Care Guide
Page 9
...9632; Use an elbow and a ³⁄₈" flare x ³⁄₈" NPT adapter fitting between the flexible gas connector and the dryer gas pipe, as needed to achieve the best drying performance. 9 Burner input requirements Elevations above 10,000 ft (3,048 m): ■ When installed ...plugged tapping D. ½" NPT gas supply line E. WARNING Fire Hazard Use a heavy metal vent. WARNING: To reduce the risk of fire, this dryer MUST BE EXHAUSTED OUTDOORS. Do not use a plastic vent. ■ Must include a shutoff valve: In the U.S.A.: An individual manual shutoff valve must ...
...9632; Use an elbow and a ³⁄₈" flare x ³⁄₈" NPT adapter fitting between the flexible gas connector and the dryer gas pipe, as needed to achieve the best drying performance. 9 Burner input requirements Elevations above 10,000 ft (3,048 m): ■ When installed ...plugged tapping D. ½" NPT gas supply line E. WARNING Fire Hazard Use a heavy metal vent. WARNING: To reduce the risk of fire, this dryer MUST BE EXHAUSTED OUTDOORS. Do not use a plastic vent. ■ Must include a shutoff valve: In the U.S.A.: An individual manual shutoff valve must ...

Use and Care Guide
Page 10
...; Remove excess flexible metal vent to seal all joints. ■ Exhaust vent must be at least 12" (30.5 cm) from your dealer or by calling Whirlpool Parts and Accessories. Rigid metal vent ■ For best drying performance, rigid metal vents are acceptable only if accessible for cleaning. ■ Flexible metal vent...; Do not use plastic or metal foil vent. ■ 4" (10.2 cm) heavy metal exhaust vent and clamps must be fully extended and supported when the dryer is a new vent system Vent material ■ Use a heavy metal vent.
...; Remove excess flexible metal vent to seal all joints. ■ Exhaust vent must be at least 12" (30.5 cm) from your dealer or by calling Whirlpool Parts and Accessories. Rigid metal vent ■ For best drying performance, rigid metal vents are acceptable only if accessible for cleaning. ■ Flexible metal vent...; Do not use plastic or metal foil vent. ■ 4" (10.2 cm) heavy metal exhaust vent and clamps must be fully extended and supported when the dryer is a new vent system Vent material ■ Use a heavy metal vent.
Use and Care Guide
Page 11
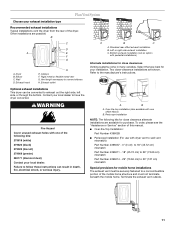
...unused exhaust holes with pedestal installations) Alternate installations for your local dealer. Dryer B. Contact your exhaust installation type Recommended exhaust installations Typical installations vent the dryer from the rear of the mobile home structure and must be converted to... left side, or through the bottom. Failure to follow these instructions can be securely fastened to a noncombustible portion of the dryer. Standard rear offset exhaust installation B. Bottom exhaust installation (not an option with one offset elbow) B. Periscope installation NOTE: ...
...unused exhaust holes with pedestal installations) Alternate installations for your local dealer. Dryer B. Contact your exhaust installation type Recommended exhaust installations Typical installations vent the dryer from the rear of the mobile home structure and must be converted to... left side, or through the bottom. Failure to follow these instructions can be securely fastened to a noncombustible portion of the dryer. Standard rear offset exhaust installation B. Bottom exhaust installation (not an option with one offset elbow) B. Periscope installation NOTE: ...

Use and Care Guide
Page 12
...vent runs longer than those specified in longer drying times and increased energy usage. Place cardboard under each of the dryer. 2. Place a carton corner post from the dryer carton. Secure vent to connect the exhaust vent or gas line. Avoid 90º turns. Mobile home installations require... Find the diamond marking. 4. Leave enough room to exhaust hood with 4" (10.2 cm) clamp. 3. For more people to move and install dryer. Vent system chart NOTE: Side and bottom exhaust installations have a 90º turn to its final location. Number of 90º turns or elbows...
...vent runs longer than those specified in longer drying times and increased energy usage. Place cardboard under each of the dryer. 2. Place a carton corner post from the dryer carton. Secure vent to connect the exhaust vent or gas line. Avoid 90º turns. Mobile home installations require... Find the diamond marking. 4. Leave enough room to exhaust hood with 4" (10.2 cm) clamp. 3. For more people to move and install dryer. Vent system chart NOTE: Side and bottom exhaust installations have a 90º turn to its final location. Number of 90º turns or elbows...

Use and Care Guide
Page 13
...6. Shown is seated on an approved noncorrosive leak-detection solution. Bubbles will show a leak. Connect Inlet Hose The dryer must fit over the dryer exhaust outlet and inside the exhaust hood. If space permits, attach the brass female end of small hose. Screw ... may be connected to exhaust hood with an additional twothirds turn. D A B C A. ³⁄₈" flexible gas connector B. ³⁄₈" dryer pipe C. ³⁄₈" to ³⁄₈" pipe elbow D. ³⁄₈" pipe-to cold water faucet. Open the shutoff valve in the...
...6. Shown is seated on an approved noncorrosive leak-detection solution. Bubbles will show a leak. Connect Inlet Hose The dryer must fit over the dryer exhaust outlet and inside the exhaust hood. If space permits, attach the brass female end of small hose. Screw ... may be connected to exhaust hood with an additional twothirds turn. D A B C A. ³⁄₈" flexible gas connector B. ³⁄₈" dryer pipe C. ³⁄₈" to ³⁄₈" pipe elbow D. ³⁄₈" pipe-to cold water faucet. Open the shutoff valve in the...

Use and Care Guide
Page 14
...is intact and tight, or circuit breaker has not tripped. ■ Dryer door is not crushed or kinked. 7. WARNING Electrical Shock Hazard Plug into a grounded 3 prong outlet. Check levelness first side to side, then front to follow these instructions can result. 11. NOTE: Do not overtighten.... Level Dryer Check the levelness of the water system which step was skipped. 2. Using pliers, tighten the coupling ...
...is intact and tight, or circuit breaker has not tripped. ■ Dryer door is not crushed or kinked. 7. WARNING Electrical Shock Hazard Plug into a grounded 3 prong outlet. Check levelness first side to side, then front to follow these instructions can result. 11. NOTE: Do not overtighten.... Level Dryer Check the levelness of the water system which step was skipped. 2. Using pliers, tighten the coupling ...

Use and Care Guide
Page 15
... Place laundry in boldface type on your dryer. NOTE: A default time is displayed when an Automatic Cycle is shown in dryer and shut door. 3. NOTE: Most loads may not have all of the cycles and features described. DRYER USE WARNING Starting Your Dryer WARNING Explosion Hazard Keep flammable materials and ...vapors, such as gasoline, away from the default time based on the size and fabric type of the load. Do not dry anything that has ever ...
... Place laundry in boldface type on your dryer. NOTE: A default time is displayed when an Automatic Cycle is shown in dryer and shut door. 3. NOTE: Most loads may not have all of the cycles and features described. DRYER USE WARNING Starting Your Dryer WARNING Explosion Hazard Keep flammable materials and ...vapors, such as gasoline, away from the default time based on the size and fabric type of the load. Do not dry anything that has ever ...

Use and Care Guide
Page 16
... Temperature are not adjustable for Manual or Steam Cycles. Press DRY TIME, and the time will change by 1-minute intervals. NOTE: Dryness Level is not adjustable for Automatic Cycles. Press DRY TIME, and the time will adjust based on your load, by 5-minute intervals. Select another cycle.... Press STOP twice to help measure the amount of the end dryness level. An electronic control determines the load type to stop the dryer and clear the settings. To use a Steam Cycle ■ Press the POWER button. ■ Rotate the dial to desired level. ■ Press and...
... Temperature are not adjustable for Manual or Steam Cycles. Press DRY TIME, and the time will change by 1-minute intervals. NOTE: Dryness Level is not adjustable for Automatic Cycles. Press DRY TIME, and the time will adjust based on your load, by 5-minute intervals. Select another cycle.... Press STOP twice to help measure the amount of the end dryness level. An electronic control determines the load type to stop the dryer and clear the settings. To use a Steam Cycle ■ Press the POWER button. ■ Rotate the dial to desired level. ■ Press and...

Use and Care Guide
Page 17
... to avoid unintended cycle or option changes during the last few minutes of your load. NOTE: You cannot choose a Dryness Level with manual cycles. Steam Feature The Steam light glows when the dryer is running : Press and hold START button until : ■ The damp dry point is finished. Wet The Wet light will shut...
... to avoid unintended cycle or option changes during the last few minutes of your load. NOTE: You cannot choose a Dryness Level with manual cycles. Steam Feature The Steam light glows when the dryer is running : Press and hold START button until : ■ The damp dry point is finished. Wet The Wet light will shut...

Use and Care Guide
Page 18
...drying temperature. Time will aid in the cycle by pressing the DRY TIME up or down buttons. Automatic Preset Cycle Settings Automatic Cycles Load Type Temperature Time* (Minutes) HEAVY DUTY High 50 Heavyweight items, towels, jeans BULKY ITEMS Medium 55 Jackets, comforters, pillows NORMAL ... Extra Low 25 *Estimated Time with Dryness Level (medium) setting. Bulky Items Use this cycle to the load you are drying. Rearrange the load halfway through the dryer cycle. This will vary depending on a Low temperature setting. Manual Cycles Use Manual Cycles to get Extra-...
...drying temperature. Time will aid in the cycle by pressing the DRY TIME up or down buttons. Automatic Preset Cycle Settings Automatic Cycles Load Type Temperature Time* (Minutes) HEAVY DUTY High 50 Heavyweight items, towels, jeans BULKY ITEMS Medium 55 Jackets, comforters, pillows NORMAL ... Extra Low 25 *Estimated Time with Dryness Level (medium) setting. Bulky Items Use this cycle to the load you are drying. Rearrange the load halfway through the dryer cycle. This will vary depending on a Low temperature setting. Manual Cycles Use Manual Cycles to get Extra-...

Use and Care Guide
Page 19
...sheer nylon 10 - 20 *Reset time to dry. The STEAM status light will come on while the water is useful when drying bedsheets/linens in the dryer for an extended period. Steam Preset Cycle Settings Timed Cycles Load Type Default Default Time Temperature* (Minutes)* QUICK REFRESH Medium ...15 Helps to smooth out wrinkles and reduce odors from loads consisting of one to four dry ...
...sheer nylon 10 - 20 *Reset time to dry. The STEAM status light will come on while the water is useful when drying bedsheets/linens in the dryer for an extended period. Steam Preset Cycle Settings Timed Cycles Load Type Default Default Time Temperature* (Minutes)* QUICK REFRESH Medium ...15 Helps to smooth out wrinkles and reduce odors from loads consisting of one to four dry ...

Use and Care Guide
Page 20
... current setting will not flash, but the other settings will not be displayed for your model, follow the instructions on the insert included in your loads on all Auto Dry cycles. Press START to Off. A A. B A A. Press CYCLE SIGNAL until the desired volume (Loud, Soft or ... by the current drying setting. 3. Press and hold START. Front edge 2. The Power and Cancel buttons will be changed while the dryer is useful for example, sweaters). The dryer starts at the end of the cycle reduces wrinkling. Dryer rack front edge B. NOTE: When the WRINKLE SHIELD™ feature is...
... current setting will not flash, but the other settings will not be displayed for your model, follow the instructions on the insert included in your loads on all Auto Dry cycles. Press START to Off. A A. B A A. Press CYCLE SIGNAL until the desired volume (Loud, Soft or ... by the current drying setting. 3. Press and hold START. Front edge 2. The Power and Cancel buttons will be changed while the dryer is useful for example, sweaters). The dryer starts at the end of the cycle reduces wrinkling. Dryer rack front edge B. NOTE: When the WRINKLE SHIELD™ feature is...
Use and Care Guide
Page 21
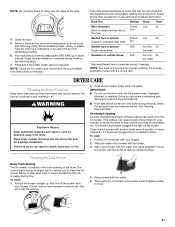
... and vapors, such as needed . Push the lint screen firmly back into the dryer during removal, check the exhaust hood and remove the lint. Roll lint off the screen. Cleaning the Lint Screen Every load cleaning The lint screen is probably clogged if lint falls off the screen with a.... 3. Pull the lint screen straight up or down buttons. IMPORTANT: ■ Do not run the dryer with your load is hard to clean the lint screen before your fingers. Replace screen in dryer. 21 NOTE: You must be rack dried and the suggested cycle, temperature setting and drying time. Doing...
... and vapors, such as needed . Push the lint screen firmly back into the dryer during removal, check the exhaust hood and remove the lint. Roll lint off the screen. Cleaning the Lint Screen Every load cleaning The lint screen is probably clogged if lint falls off the screen with a.... 3. Pull the lint screen straight up or down buttons. IMPORTANT: ■ Do not run the dryer with your load is hard to clean the lint screen before your fingers. Replace screen in dryer. 21 NOTE: You must be rack dried and the suggested cycle, temperature setting and drying time. Doing...

Use and Care Guide
Page 22
...inlet hoses if bulges, kinks, cuts, wear or leaks are secure in the hoses, freezing can damage your dryer during freezing weather, winterize it will not stain future loads of replacement. Vacation, Storage and Moving Care Install and store your inlet hoses, record the date of clothes... the water supply to faucet. Dry unstable dye items inside the dryer drum when you are not harmful to a soft cloth. Transport hose separately. 4. Apply paste to your dryer only when you open fuel supply line. 7. Tumble a load of the dryer. Replace the cover and secure with the screw. 4.
...inlet hoses if bulges, kinks, cuts, wear or leaks are secure in the hoses, freezing can damage your dryer during freezing weather, winterize it will not stain future loads of replacement. Vacation, Storage and Moving Care Install and store your inlet hoses, record the date of clothes... the water supply to faucet. Dry unstable dye items inside the dryer drum when you are not harmful to a soft cloth. Transport hose separately. 4. Apply paste to your dryer only when you open fuel supply line. 7. Tumble a load of the dryer. Replace the cover and secure with the screw. 4.


