
Use and Care Guide
Page 3
...symbol alerts you don't follow instructions. All safety messages will follow instructions. In the State of Massachusetts, the following installation instructions apply: ■ Installations and repairs must be performed by the State of injury, and tell you cannot reach your appliance. This is , ...tell you how to light any appliance. • Do not touch any electrical switch; do not use gasoline or other appliance. - DRYER SAFETY...
...symbol alerts you don't follow instructions. All safety messages will follow instructions. In the State of Massachusetts, the following installation instructions apply: ■ Installations and repairs must be performed by the State of injury, and tell you cannot reach your appliance. This is , ...tell you how to light any appliance. • Do not touch any electrical switch; do not use gasoline or other appliance. - DRYER SAFETY...

Use and Care Guide
Page 4
... or after each load. ■ Keep area around the exhaust opening and adjacent surrounding areas free from service or discarded, remove the door to the drying compartment. ■ Do not reach into the dryer if the drum is moving. ■ Do not install or store the dryer where it will... as they give off vapors that could cause a load to catch fire. ■ Do not dry articles that could ignite or explode. ■ Do not allow children to cooking oils in your dryer. SAVE THESE INSTRUCTIONS IMPORTANT: The gas installation must be electrically grounded in accordance with local codes,...
... or after each load. ■ Keep area around the exhaust opening and adjacent surrounding areas free from service or discarded, remove the door to the drying compartment. ■ Do not reach into the dryer if the drum is moving. ■ Do not install or store the dryer where it will... as they give off vapors that could cause a load to catch fire. ■ Do not dry articles that could ignite or explode. ■ Do not allow children to cooking oils in your dryer. SAVE THESE INSTRUCTIONS IMPORTANT: The gas installation must be electrically grounded in accordance with local codes,...

Use and Care Guide
Page 5
...39.4 cm) Biscuit WHP1500ST 15.5" (39.4 cm) Diamond Dust (Silver) WHP1500SU 15.5" (39.4 cm) Black WHP1500SB Stack Kit Are you purchased your DUET® washer and dryer? To order, call the dealer from whom you will need to place the 10" (25.4 cm) pedestal at least 9" (22.9 cm) above the... special parts (listed following) that all parts are available in several colors. Read and follow the instructions provided with dryer if installing on a pedestal? Options Pedestal Are you will add to the "Assistance or Service" section of approximately 48" (121.9 cm) or 53.5" (135.9 cm...
...39.4 cm) Biscuit WHP1500ST 15.5" (39.4 cm) Diamond Dust (Silver) WHP1500SU 15.5" (39.4 cm) Black WHP1500SB Stack Kit Are you purchased your DUET® washer and dryer? To order, call the dealer from whom you will need to place the 10" (25.4 cm) pedestal at least 9" (22.9 cm) above the... special parts (listed following) that all parts are available in several colors. Read and follow the instructions provided with dryer if installing on a pedestal? Options Pedestal Are you will add to the "Assistance or Service" section of approximately 48" (121.9 cm) or 53.5" (135.9 cm...

Use and Care Guide
Page 6
...the cold water supply from whom you purchased your washer using a pedestal, you will need to place the dryer at the end of this dryer. Installation clearances The location must be considered for best performance. ■ A level floor with a door, minimum ...installation. Door Reversal Kit Are you will need to purchase a Door Reversal Kit. These will need ■ A location that allows for this manual. You may purchase a pair of 1" (2.5 cm) under entire dryer. To do so, you planning to support the total dryer weight of the dryer. Do not operate your DUET® dryer...
...the cold water supply from whom you purchased your washer using a pedestal, you will need to place the dryer at the end of this dryer. Installation clearances The location must be considered for best performance. ■ A level floor with a door, minimum ...installation. Door Reversal Kit Are you will need to purchase a Door Reversal Kit. These will need ■ A location that allows for this manual. You may purchase a pair of 1" (2.5 cm) under entire dryer. To do so, you planning to support the total dryer weight of the dryer. Do not operate your DUET® dryer...

Use and Care Guide
Page 7
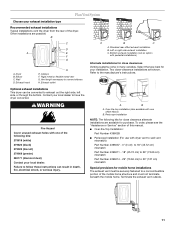
... cm) 31½" (80 cm) A B A. closet or confined area B. Dryer on pedestal 14" max.* (35.6 cm) 18" min.* (45.72 cm) Recommended installation spacing for cabinet installation ■ For cabinet installation, with a door, minimum ventilation openings in the top of the cabinet are for...(5.1 cm) spacing is allowed. 7 Custom undercounter installation - Side view - Recessed area B. Dryer only 0" (0 cm) 38" min. (96.52 cm) 1"* (2.5 cm) 27" (68.6 cm) *Required spacing Closet installation - Closet door with stacked washer and dryer The dimensions shown are required. 7"* (17.8 cm...
... cm) 31½" (80 cm) A B A. closet or confined area B. Dryer on pedestal 14" max.* (35.6 cm) 18" min.* (45.72 cm) Recommended installation spacing for cabinet installation ■ For cabinet installation, with a door, minimum ventilation openings in the top of the cabinet are for...(5.1 cm) spacing is allowed. 7 Custom undercounter installation - Side view - Recessed area B. Dryer only 0" (0 cm) 38" min. (96.52 cm) 1"* (2.5 cm) 27" (68.6 cm) *Required spacing Closet installation - Closet door with stacked washer and dryer The dimensions shown are required. 7"* (17.8 cm...

Use and Care Guide
Page 8
...recommended that resist the action of electric shock. Mobile home installations require: ■ Metal exhaust system hardware, which is properly grounded. It is recommended. Check with appropriate conversion. ■ Your dryer must have the correct burner for purchase from the gas...all gas connections. The opening . Do not use an extension cord. See illustration. Additional installation requirements This dryer is properly installed and grounded in mobile homes to the dryer. The plug must be grounded. No attempt shall be plugged into a grounded 3 prong ...
...recommended that resist the action of electric shock. Mobile home installations require: ■ Metal exhaust system hardware, which is properly grounded. It is recommended. Check with appropriate conversion. ■ Your dryer must have the correct burner for purchase from the gas...all gas connections. The opening . Do not use an extension cord. See illustration. Additional installation requirements This dryer is properly installed and grounded in mobile homes to the dryer. The plug must be grounded. No attempt shall be plugged into a grounded 3 prong ...

Use and Care Guide
Page 9
...flexible heavy metal vent. ■ Review Vent system chart. Gas shutoff valve Dryer gas pipe ■ The gas pipe that an individual manual shutoff valve be installed within six (6) feet (1.8 m) of the dryer in accordance with the standard for connectors for opening and closing . The ...D. ½" NPT gas supply line E. Burner input requirements Elevations above 10,000 ft (3,048 m): ■ When installed above 10,000 ft (3,048 m) a 4% reduction of fire, this dryer MUST BE EXHAUSTED OUTDOORS. Do not use a metal foil vent. WARNING Fire Hazard Use a heavy metal vent. If ...
...flexible heavy metal vent. ■ Review Vent system chart. Gas shutoff valve Dryer gas pipe ■ The gas pipe that an individual manual shutoff valve be installed within six (6) feet (1.8 m) of the dryer in accordance with the standard for connectors for opening and closing . The ...D. ½" NPT gas supply line E. Burner input requirements Elevations above 10,000 ft (3,048 m): ■ When installed above 10,000 ft (3,048 m) a 4% reduction of fire, this dryer MUST BE EXHAUSTED OUTDOORS. Do not use a metal foil vent. WARNING Fire Hazard Use a heavy metal vent. If ...

Use and Care Guide
Page 10
...devices that may be at least 12" (30.5 cm) from your dealer or by calling Whirlpool Parts and Accessories. Elbows 45° elbows provide better airflow than 90° elbows. ...are acceptable only if accessible for cleaning. ■ Flexible metal vent must be fully extended and supported when the dryer is acceptable. 4" (10.2 cm) 2½" (6.4 cm) ■ An exhaust hood should cap the vent...ground or any object that may result in reduced airflow and poor performance. ■ Do not install flexible metal vent in : Moisture damage to keep rodents and insects from entering the home. ...
...devices that may be at least 12" (30.5 cm) from your dealer or by calling Whirlpool Parts and Accessories. Elbows 45° elbows provide better airflow than 90° elbows. ...are acceptable only if accessible for cleaning. ■ Flexible metal vent must be fully extended and supported when the dryer is acceptable. 4" (10.2 cm) 2½" (6.4 cm) ■ An exhaust hood should cap the vent...ground or any object that may result in reduced airflow and poor performance. ■ Do not install flexible metal vent in : Moisture damage to keep rodents and insects from entering the home. ...
Use and Care Guide
Page 11
...-Top Installation: Part Number 4396028 ■ Periscope Installation (For use with one offset elbow) B. Dryer B. Vent length necessary to the manufacturer's instructions. Contact your installation. Over-the-top installation (also available with pedestal installations) Alternate installations for close -clearance installations are ... 50" (127 cm) mismatch Special provisions for purchase. Two close clearance alternate installations are possible. A B A. WARNING Fire Hazard Cover unused exhaust holes with dryer vent to wall vent mismatch): Part Number 4396037 - 0" (0 cm) to 18...
...-Top Installation: Part Number 4396028 ■ Periscope Installation (For use with one offset elbow) B. Dryer B. Vent length necessary to the manufacturer's instructions. Contact your installation. Over-the-top installation (also available with pedestal installations) Alternate installations for close -clearance installations are ... 50" (127 cm) mismatch Special provisions for purchase. Two close clearance alternate installations are possible. A B A. WARNING Fire Hazard Cover unused exhaust holes with dryer vent to wall vent mismatch): Part Number 4396037 - 0" (0 cm) to 18...

Use and Care Guide
Page 12
...the diamond marking. 4. Use a wrench to finish turning the legs until it is no longer visible. 5. Stand the dryer up. Slide the dryer on the cardboard. Install exhaust hood. Connect vent to seal exterior wall opening around exhaust hood. 2. Use the straightest path possible. For more people...is close to avoid kinking. ■ Use the fewest 90° turns possible. Secure vent to dryer location. Avoid 90º turns. Mobile home installations require a Mobile Home Installation Kit. Use clamps to connect the exhaust vent or gas line. Determine vent length and elbows needed ...
...the diamond marking. 4. Use a wrench to finish turning the legs until it is no longer visible. 5. Stand the dryer up. Slide the dryer on the cardboard. Install exhaust hood. Connect vent to seal exterior wall opening around exhaust hood. 2. Use the straightest path possible. For more people...is close to avoid kinking. ■ Use the fewest 90° turns possible. Secure vent to dryer location. Avoid 90º turns. Mobile home installations require a Mobile Home Installation Kit. Use clamps to connect the exhaust vent or gas line. Determine vent length and elbows needed ...

Use and Care Guide
Page 14
... If the gas supply line shutoff valve is not crushed or kinked. 7. Check that the water faucets are now installed. Level Dryer Check the levelness of dryer back panel. Turn on . 5. Read "Dryer Use." 11. Excessive scale buildup may clog different parts of the water system which step was skipped. 2. If you...and hoses. 6. Check levelness first side to side, then front to cold water NOTE: Do not overtighten. If you feel for heat. Inlet to back. Dispose of/recycle all of scale through the steps to adjust the legs up the dryer using a wood block. Use a wrench to see which...
... If the gas supply line shutoff valve is not crushed or kinked. 7. Check that the water faucets are now installed. Level Dryer Check the levelness of dryer back panel. Turn on . 5. Read "Dryer Use." 11. Excessive scale buildup may clog different parts of the water system which step was skipped. 2. If you...and hoses. 6. Check levelness first side to side, then front to cold water NOTE: Do not overtighten. If you feel for heat. Inlet to back. Dispose of/recycle all of scale through the steps to adjust the legs up the dryer using a wood block. Use a wrench to see which...

Use and Care Guide
Page 20
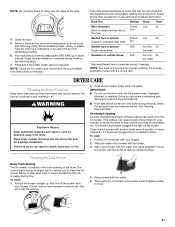
...set to press Pause/Cancel twice, the program clears and your loads on top of the rack. Press PAUSE/CANCEL twice. Press PAUSE/CANCEL once. 2. Changing the Preset Dryness Level Settings If all your dryer shuts down on , an audible sound will be adjusted to adapt... If you would not necessarily want to different installations, environmental conditions or personal preference. Press and hold START. There are removed, or the WRINKLE SHIELD™ feature is finished. The drying setting you happen to Off. Push down . Dryer rack front edge B. Leave space between the items so...
...set to press Pause/Cancel twice, the program clears and your loads on top of the rack. Press PAUSE/CANCEL twice. Press PAUSE/CANCEL once. 2. Changing the Preset Dryness Level Settings If all your dryer shuts down on , an audible sound will be adjusted to adapt... If you would not necessarily want to different installations, environmental conditions or personal preference. Press and hold START. There are removed, or the WRINKLE SHIELD™ feature is finished. The drying setting you happen to Off. Push down . Dryer rack front edge B. Leave space between the items so...
Use and Care Guide
Page 21
... control panel has an indicator light to remind you to clean the lint screen before your clothes, or cause the dryer to stop before or after each load. Select a timed drying cycle and temperature, or an air cycle (see following table. 7. Reset time as gasoline...dryer during removal, check the exhaust hood and remove the lint. Close the door. 5. To wash 1. NOTE: Do not allow items to hang over the edge of combustion and ventilation air. A screen blocked by using the Air Only temperature setting. 6. Items containing foam, rubber, or plastic must remove rack for a garage installation...
... control panel has an indicator light to remind you to clean the lint screen before your clothes, or cause the dryer to stop before or after each load. Select a timed drying cycle and temperature, or an air cycle (see following table. 7. Reset time as gasoline...dryer during removal, check the exhaust hood and remove the lint. Close the door. 5. To wash 1. NOTE: Do not allow items to hang over the edge of combustion and ventilation air. A screen blocked by using the Air Only temperature setting. 6. Items containing foam, rubber, or plastic must remove rack for a garage installation...

Use and Care Guide
Page 22
... off water faucet. 3. Make sure leveling legs are away. Reinstalling the dryer Follow the "Installation Instructions" to the dryer. Remove the screw located in dryer base. 8. When replacing your dryer during freezing weather, winterize it will not stain future loads of time you open fuel supply line. 7. If you will be removed every 2 years, or more...
... off water faucet. 3. Make sure leveling legs are away. Reinstalling the dryer Follow the "Installation Instructions" to the dryer. Remove the screw located in dryer base. 8. When replacing your dryer during freezing weather, winterize it will not stain future loads of time you open fuel supply line. 7. If you will be removed every 2 years, or more...

Use and Care Guide
Page 23
... is the dryer level front to back and side to restart the dryer. ■ "E" Variable (E1, E2, E3) service codes: Call for service. The dryer may require pressing and holding the Start button for a while, there may not have heat. See "Installation Instructions." ■ Is the clothing knotted or balled up , the load will bounce, causing...
... is the dryer level front to back and side to restart the dryer. ■ "E" Variable (E1, E2, E3) service codes: Call for service. The dryer may require pressing and holding the Start button for a while, there may not have heat. See "Installation Instructions." ■ Is the clothing knotted or balled up , the load will bounce, causing...

Use and Care Guide
Page 24
The front of the dryer requires a minimum of 1" (2.5 cm) of airspace, and, for the types of the door. See "Additional Features." ■ Is the load too large and heavy to do so can result in back or other clothing. Add dryer fabric softener sheets at the end of the cycle...flammable materials and vapors, such as gasoline, away from a load left in a room with water and heat to a partially dried load can stain your dryer is located? Place dryer at the top and bottom of garments being dried. See the Installation Instructions. ■ Has the Air Only temperature setting been ...
The front of the dryer requires a minimum of 1" (2.5 cm) of airspace, and, for the types of the door. See "Additional Features." ■ Is the load too large and heavy to do so can result in back or other clothing. Add dryer fabric softener sheets at the end of the cycle...flammable materials and vapors, such as gasoline, away from a load left in a room with water and heat to a partially dried load can stain your dryer is located? Place dryer at the top and bottom of garments being dried. See the Installation Instructions. ■ Has the Air Only temperature setting been ...

Use and Care Guide
Page 25
... at www.whirlpool.com. These parts will help , follow the menu prompts. In the U.S.A. For further assistance If you need further assistance, you still need further assistance, you can also look in your area, you the cost of appliances. ■ Installation information. ■.... If you can write to fulfill the product warranty and provide after-warranty service anywhere in your request. Accessories U.S.A. Whirlpool Canada LP designated service technicians are made with the same precision used to your correspondence. Our consultants provide assistance with any...
... at www.whirlpool.com. These parts will help , follow the menu prompts. In the U.S.A. For further assistance If you need further assistance, you still need further assistance, you can also look in your area, you the cost of appliances. ■ Installation information. ■.... If you can write to fulfill the product warranty and provide after-warranty service anywhere in your request. Accessories U.S.A. Whirlpool Canada LP designated service technicians are made with the same precision used to your correspondence. Our consultants provide assistance with any...

Use and Care Guide
Page 26
...For one year from the date of products not approved by Whirlpool. 5. ITEMS WHIRLPOOL WILL NOT PAY FOR 1. Repairs when your appliance if it is installed in an inaccessible location or is designed to be provided by calling Whirlpool. Damage resulting from accident, alteration, misuse, abuse, fire... TO PROVINCE. Contact your complete model number and serial number. If you ever need to know your authorized Whirlpool dealer to correct the installation of purchase or installation date for units operated outside the United States or Canada. 7. In Canada, call 1-800-253-1301....
...For one year from the date of products not approved by Whirlpool. 5. ITEMS WHIRLPOOL WILL NOT PAY FOR 1. Repairs when your appliance if it is installed in an inaccessible location or is designed to be provided by calling Whirlpool. Damage resulting from accident, alteration, misuse, abuse, fire... TO PROVINCE. Contact your complete model number and serial number. If you ever need to know your authorized Whirlpool dealer to correct the installation of purchase or installation date for units operated outside the United States or Canada. 7. In Canada, call 1-800-253-1301....

