

Use and Care Manual
Page 3
...very important. All safety messages will follow instructions. do not use gasoline or other flammable vapors and liquids in the vicinity of this manual must be killed or seriously injured if you and others are not followed. In the State of Massachusetts, the following installation instructions apply...the safety alert symbol and either the word "DANGER" or "WARNING." Do not store or use any phone in your safety, the information in this manual and on your gas supplier from a neighbor's phone. Installation and service must be a T-handle type. [] A flexible gas connector, when used, ...
...very important. All safety messages will follow instructions. do not use gasoline or other flammable vapors and liquids in the vicinity of this manual must be killed or seriously injured if you and others are not followed. In the State of Massachusetts, the following installation instructions apply...the safety alert symbol and either the word "DANGER" or "WARNING." Do not store or use any phone in your safety, the information in this manual and on your gas supplier from a neighbor's phone. Installation and service must be a T-handle type. [] A flexible gas connector, when used, ...

Use and Care Manual
Page 5
...15.5" (39.4 cm) pedestal. You may be ordered by calling the dealer from whom you will need to the "Assistance or Service" section of this manual. For a garage installation, you purchased your dryer. Check existing gas supply, electrical supply and venting. A B A. 10" (25.4 cm) pedestal ...dealer from whom you will add to purchase a Stack Kit. A B C D A. These pedestals will need to the total height of this manual. Ask for Part Number 346764. • Metal exhaust system hardware. Ask for Part Number 8541503. Pedestal Height Color Part Number 10" (25.4 ...
...15.5" (39.4 cm) pedestal. You may be ordered by calling the dealer from whom you will need to the "Assistance or Service" section of this manual. For a garage installation, you purchased your dryer. Check existing gas supply, electrical supply and venting. A B A. 10" (25.4 cm) pedestal ...dealer from whom you will add to purchase a Stack Kit. A B C D A. These pedestals will need to the total height of this manual. Ask for Part Number 346764. • Metal exhaust system hardware. Ask for Part Number 8541503. Pedestal Height Color Part Number 10" (25.4 ...
Use and Care Manual
Page 6
...homes or sleeping quarters. The combined weight of washer/dryer backguards. See "Venting Requirements." Louvered doors with a maximum slope of this manual. Backguard If you are acceptable. • Companion appliance spacing should also be installed in the same closet as gasoline, away from ..." section of installation and servicing. • Additional clearances might not shut off at least 18" (46 cm) above the floor for this manual. If using the "Y" connector provided. • 20-100 psi (138-690 kPa) for proper exhaust installation. The dryer must be considered ...
...homes or sleeping quarters. The combined weight of washer/dryer backguards. See "Venting Requirements." Louvered doors with a maximum slope of this manual. Backguard If you are acceptable. • Companion appliance spacing should also be installed in the same closet as gasoline, away from ..." section of installation and servicing. • Additional clearances might not shut off at least 18" (46 cm) above the floor for this manual. If using the "Y" connector provided. • 20-100 psi (138-690 kPa) for proper exhaust installation. The dryer must be considered ...
Use and Care Manual
Page 8
... used . Do not use larger pipe. GROUNDING INSTRUCTIONS • For a grounded, cord-connected dryer: This dryer must be grounded. It is a registered trademark of this manual. See "Tools and Parts" section for LP (propane or butane) gases with the dryer: if it will reduce the risk of gas in accordance with...
... used . Do not use larger pipe. GROUNDING INSTRUCTIONS • For a grounded, cord-connected dryer: This dryer must be grounded. It is a registered trademark of this manual. See "Tools and Parts" section for LP (propane or butane) gases with the dryer: if it will reduce the risk of gas in accordance with...
Use and Care Manual
Page 9
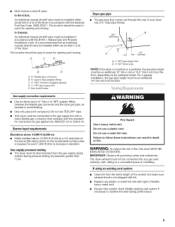
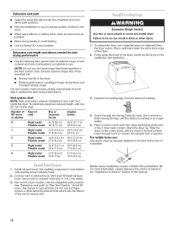
...comes out through the rear of your dryer has a %" male pipe thread. • Must include a shutoff valve: In the U.S.A.: An individual manual shutoff valve must be installed within six (6) feet (1.8 m) of the dryer. Vs" NPT minimum plugged tapping D. Burner input requirements Elevations above 10... of the dryer in elevation. Fire Hazard Use a heavy metal vent. WARNING: To reduce the risk of a building. In Canada: An individual manual shutoff valve must be installed in death or fire. Gas supply connection requirements • Use an elbow and a 3/8"flare x 3/8"NPT adapter fitting between...
...comes out through the rear of your dryer has a %" male pipe thread. • Must include a shutoff valve: In the U.S.A.: An individual manual shutoff valve must be installed within six (6) feet (1.8 m) of the dryer. Vs" NPT minimum plugged tapping D. Burner input requirements Elevations above 10... of the dryer in elevation. Fire Hazard Use a heavy metal vent. WARNING: To reduce the risk of a building. In Canada: An individual manual shutoff valve must be installed in death or fire. Gas supply connection requirements • Use an elbow and a 3/8"flare x 3/8"NPT adapter fitting between...
Use and Care Manual
Page 10
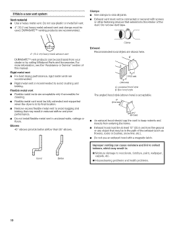
...vents are recommended. • Rigid metal vent is acceptable. Elbows 45 ° elbows provide better airflow than 90 ° elbows. If this manual. For more information, see the "Assistance or Service" section of this is in the path of the duct. Exhaust hood must be at ...location. • Remove excess flexible metal vent to seal all joints. • Exhaust vent must be purchased from your dealer or by calling Whirlpool Parts and Accessories. Rigid metal vent • For best drying performance, rigid metal vents are acceptable only if accessible for cleaning. •...
...vents are recommended. • Rigid metal vent is acceptable. Elbows 45 ° elbows provide better airflow than 90 ° elbows. If this manual. For more information, see the "Assistance or Service" section of this is in the path of the duct. Exhaust hood must be at ...location. • Remove excess flexible metal vent to seal all joints. • Exhaust vent must be purchased from your dealer or by calling Whirlpool Parts and Accessories. Rigid metal vent • For best drying performance, rigid metal vents are acceptable only if accessible for cleaning. •...
Use and Care Manual
Page 11
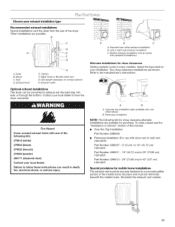
Standard rear offset exhaust installation B. Elbow C. Clamps F. Refer to connect elbows H. To order, please see the "Assistance or Service" section of this manual. • Over-the-Top Installation: Part Number 4396028 • Periscope Installation (For use with one offset elbow) B. Exhaust outlet Optional exhaust installations This dryer can ...
Standard rear offset exhaust installation B. Elbow C. Clamps F. Refer to connect elbows H. To order, please see the "Assistance or Service" section of this manual. • Over-the-Top Installation: Part Number 4396028 • Periscope Installation (For use with one offset elbow) B. Exhaust outlet Optional exhaust installations This dryer can ...
Use and Care Manual
Page 12
... hood combinations acceptable to use vent runs longer than those specified in longer drying times and increased energy usage. Firmly grasp the body of this manual. 12 Gently lay the dryer on the corner posts until the diamond marking is close to finish turning the legs until it is no longer...
... hood combinations acceptable to use vent runs longer than those specified in longer drying times and increased energy usage. Firmly grasp the body of this manual. 12 Gently lay the dryer on the corner posts until the diamond marking is close to finish turning the legs until it is no longer...
Use and Care Manual
Page 15
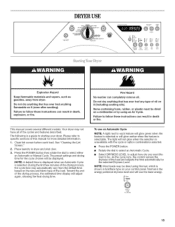
... several different models. Please refer to select either an Automatic or Manual Cycle. Place laundry in boldface type on your dryer. See "Cleaning the Lint Screen." 2. Press the POWER button then rotate the dial to specific sections ... load to be dried using an Air Cycle. Do not dry anything that has ever had anything that has ever had any type of this manual for the cycle chosen will use an Automatic Cycle NOTE: A light next to starting your control panel.
... several different models. Please refer to select either an Automatic or Manual Cycle. Place laundry in boldface type on your dryer. See "Cleaning the Lint Screen." 2. Press the POWER button then rotate the dial to specific sections ... load to be dried using an Air Cycle. Do not dry anything that has ever had anything that has ever had any type of this manual for the cycle chosen will use an Automatic Cycle NOTE: A light next to starting your control panel.
Use and Care Manual
Page 16
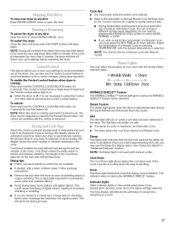
...Cycle • Press the POWER button. High Medium Low Extra Low Air Only Temperature AdjustManual Cycle0snly Temperature settings can be changed only with Manual Cycles. • Press the WRINKLE SHIELD TM feature button if this option is desired. • Press the CYCLE SIGNAL button to ...change by 1-minute intervals. The initial time displayed is extracted from clothing. Press STOP twice to select a Manual Cycle. NOTE: Time and Temperature are not adjustable for Manual or Steam Cycles. When the clothes have reached approximately 80% of moisture in the clothes. During the ...
...Cycle • Press the POWER button. High Medium Low Extra Low Air Only Temperature AdjustManual Cycle0snly Temperature settings can be changed only with Manual Cycles. • Press the WRINKLE SHIELD TM feature button if this option is desired. • Press the CYCLE SIGNAL button to ...change by 1-minute intervals. The initial time displayed is extracted from clothing. Press STOP twice to select a Manual Cycle. NOTE: Time and Temperature are not adjustable for Manual or Steam Cycles. When the clothes have reached approximately 80% of moisture in the clothes. During the ...
Use and Care Manual
Page 17
...NOTE: When the dryer is running , the display shows the estimated cycle time when your dryer is automatically sensing the dryness level of a Manual Cycle, you choose an Automatic Cycle. Cool Down tumbles the load without heat during the cool down buttons. If the cycle is on the...and dryness level or temperature for a guide to avoid unintended cycle or option changes during the WRINKLE SHIELD TM feature (when selected). If a Manual Cycle is not necessary to turn on the control panel show Cycle, Temperature, Dryness Level, and cycle signal settings selected• The time display...
...NOTE: When the dryer is running , the display shows the estimated cycle time when your dryer is automatically sensing the dryness level of a Manual Cycle, you choose an Automatic Cycle. Cool Down tumbles the load without heat during the cool down buttons. If the cycle is on the...and dryness level or temperature for a guide to avoid unintended cycle or option changes during the WRINKLE SHIELD TM feature (when selected). If a Manual Cycle is not necessary to turn on the control panel show Cycle, Temperature, Dryness Level, and cycle signal settings selected• The time display...
Use and Care Manual
Page 18
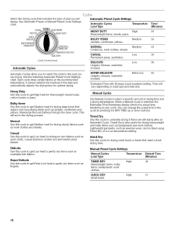
... such as washable knit fabrics. Time will aid in the cycle by pressing the DRY TIME up or down buttons. Manual Cycles Use Manual Cycles to get Low heat for drying sturdy fabrics such as work clothes, sheets Medium CASUAL Low Permanent press, synthetics DELICATE... drying time and a drying temperature. Heavy Duty Use this cycle to complete drying if items are drying, See Automatic Preset or Manual Preset Cycle Settings chart. A sensor detects the moisture in your cycle. CASUAL DELICATE SUPER DELICATE QUICKREFRESH AUTOMATIC CYCLES BULKYITEMS HEAVYDUTY DRY ...
... such as washable knit fabrics. Time will aid in the cycle by pressing the DRY TIME up or down buttons. Manual Cycles Use Manual Cycles to get Low heat for drying sturdy fabrics such as work clothes, sheets Medium CASUAL Low Permanent press, synthetics DELICATE... drying time and a drying temperature. Heavy Duty Use this cycle to complete drying if items are drying, See Automatic Preset or Manual Preset Cycle Settings chart. A sensor detects the moisture in your cycle. CASUAL DELICATE SUPER DELICATE QUICKREFRESH AUTOMATIC CYCLES BULKYITEMS HEAVYDUTY DRY ...


