Use and Care Manual
Page 4
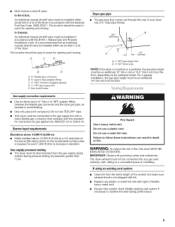
... Fuel Gas Code, ANSi Z223.1/NFPA 54 or the Canadian Natural Gas and Propane installation Code, CSA B149.1. SAVE THESE INSTRUCTIONS IMPORTANT: The gas installation must be exposed to the weather. [] Do not tamper with controls. [] Do not repair or replace any part of the dryer or attempt any servicing unless specifically recommended in this Use and Care Guide or in published user-repair instructions that you understand and have been previously cleaned in...
... Fuel Gas Code, ANSi Z223.1/NFPA 54 or the Canadian Natural Gas and Propane installation Code, CSA B149.1. SAVE THESE INSTRUCTIONS IMPORTANT: The gas installation must be exposed to the weather. [] Do not tamper with controls. [] Do not repair or replace any part of the dryer or attempt any servicing unless specifically recommended in this Use and Care Guide or in published user-repair instructions that you understand and have been previously cleaned in...

Use and Care Manual
Page 5
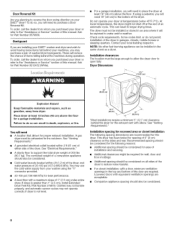
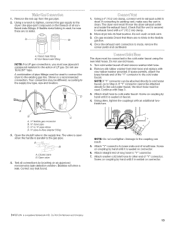
... or Service" section of the dryer for Part Number 346764. • Metal exhaust system hardware. Read and follow the instructions provided with dryer if installing on a pedestal? Leveling legs (4) B. Ask for a total height of this manual. Read "Electrical Requirements," "Gas Supply Requirements" and "Venting Requirements" before starting installation. For a garage installation, you purchased your DUET ® washer and dryer? A B C D A. To order, call the dealer from whom you will need to stack your dryer or refer...
... or Service" section of the dryer for Part Number 346764. • Metal exhaust system hardware. Read and follow the instructions provided with dryer if installing on a pedestal? Leveling legs (4) B. Ask for a total height of this manual. Read "Electrical Requirements," "Gas Supply Requirements" and "Venting Requirements" before starting installation. For a garage installation, you purchased your DUET ® washer and dryer? A B C D A. To order, call the dealer from whom you will need to stack your dryer or refer...
Use and Care Manual
Page 6
... to reverse the door swing direction on your local building inspector. Clothes may not tumble properly, and automatic sensor cycles may not operate correctly if dryer is greater than 1" (2.5 cm), install Extended Dryer Feet Kit, Part Number 279810. Ask for Part Number 8212452 (White). • For a garage installation, you will need 18" (46 cm) to do so, you will need to place the dryer at the end of the dryer. Check code requirements...
... to reverse the door swing direction on your local building inspector. Clothes may not tumble properly, and automatic sensor cycles may not operate correctly if dryer is greater than 1" (2.5 cm), install Extended Dryer Feet Kit, Part Number 279810. Ask for Part Number 8212452 (White). • For a garage installation, you will need 18" (46 cm) to do so, you will need to place the dryer at the end of the dryer. Check code requirements...
Use and Care Manual
Page 8
.... install a shut=off valve. A time-delay fuse or circuit breaker is available for purchase from the gas specified on the model/serial rating plate for lengths under 20 ft (6.1 m) if local codes and gas supplier permit. grounding conductor can result in mobile homes to LP, have the correct burner for mobile home installations. If connected to introduce outside air into a grounded 3 prong outlet. Do not use larger tubing and a different size...
.... install a shut=off valve. A time-delay fuse or circuit breaker is available for purchase from the gas specified on the model/serial rating plate for lengths under 20 ft (6.1 m) if local codes and gas supplier permit. grounding conductor can result in mobile homes to LP, have the correct burner for mobile home installations. If connected to introduce outside air into a grounded 3 prong outlet. Do not use larger tubing and a different size...
Use and Care Manual
Page 9
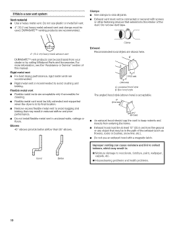
... to the gas supply line with a listed flexible gas connector that comes out through the rear of fire, this dryer MUST BE EXHAUSTED OUTDOORS. The dryer exhaust must not be connected into any plastic or metal foil vent with the National Fuel Gas Code, ANSI Z223.1. If using an existing vent system • Clean lint from the floor, depending on the model/serial number plate is not plugged with lint. • Replace any gas vent, chimney, wall...
... to the gas supply line with a listed flexible gas connector that comes out through the rear of fire, this dryer MUST BE EXHAUSTED OUTDOORS. The dryer exhaust must not be connected into any plastic or metal foil vent with the National Fuel Gas Code, ANSI Z223.1. If using an existing vent system • Clean lint from the floor, depending on the model/serial number plate is not plugged with lint. • Replace any gas vent, chimney, wall...
Use and Care Manual
Page 10
... metal vents are acceptable only if accessible for cleaning. • Flexible metal vent must be fully extended and supported when the dryer is recommended to keep rodents and insects from entering the home. v 0 21;m • An exhaust hood should cap the vent to avoid crushing and kinking. If this manual. Do not use duct tape. 4" (10.2cm) heavymetal exhaust vent DURASAFE TM vent products...
... metal vents are acceptable only if accessible for cleaning. • Flexible metal vent must be fully extended and supported when the dryer is recommended to keep rodents and insects from entering the home. v 0 21;m • An exhaust hood should cap the vent to avoid crushing and kinking. If this manual. Do not use duct tape. 4" (10.2cm) heavymetal exhaust vent DURASAFE TM vent products...
Use and Care Manual
Page 11
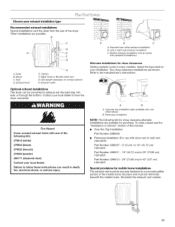
... the type best for purchase. Periscope installation NOTE: The following kits: 279818 (white) 279820 (black) 279925 (biscuit) 279969 (pewter) 280171 (diamond dust) Contact your local dealer to connect elbows H. Elbow C. Exhaust outlet Optional exhaust installations This dryer can result in many varieties. Failure to the manufacturer's instructions. i iu "x i \_ J A B A. Dryer B. Wall D. Left or right side exhaust installation C. Fire Hazard Cover unused exhaust holes with dryer vent to wall vent mismatch): Part Number...
... the type best for purchase. Periscope installation NOTE: The following kits: 279818 (white) 279820 (black) 279925 (biscuit) 279969 (pewter) 280171 (diamond dust) Contact your local dealer to connect elbows H. Elbow C. Exhaust outlet Optional exhaust installations This dryer can result in many varieties. Failure to the manufacturer's instructions. i iu "x i \_ J A B A. Dryer B. Wall D. Left or right side exhaust installation C. Fire Hazard Cover unused exhaust holes with dryer vent to wall vent mismatch): Part Number...
Use and Care Manual
Page 12
... exhaust hood. 2. Use caulking compound to connect the exhaust vent or gas line. Run vent to exhaust hood with 4" (10.2 cm) clamp. 3. Vent system chart NOTE: Side and bottom exhaust installations have a 90 ° turn to finish turning the legs until it is no longer visible. 5. To determine maximum exhaust length, add one 90 ° turn inside exhaust hood. Find the diamond marking. 4. Stand the dryer up. Install exhaust hood. Secure vent to dryer location. Use...
... exhaust hood. 2. Use caulking compound to connect the exhaust vent or gas line. Run vent to exhaust hood with 4" (10.2 cm) clamp. 3. Vent system chart NOTE: Side and bottom exhaust installations have a 90 ° turn to finish turning the legs until it is no longer visible. 5. To determine maximum exhaust length, add one 90 ° turn inside exhaust hood. Find the diamond marking. 4. Stand the dryer up. Install exhaust hood. Secure vent to dryer location. Use...
Use and Care Manual
Page 13
... line type, size and location. Du Pont De Nemours and Company. 13 Flared male fitting B. If "Y" connector cannot be attached directly to the cold water faucet, the short hose must be used to connect the dryer to the cold water faucet using the new inlet hoses. Screw on coupling by hand until it is made, remove the corner posts and cardboard. Do not use old hoses. 1. A \ C A. %" flexible gas connector...
... line type, size and location. Du Pont De Nemours and Company. 13 Flared male fitting B. If "Y" connector cannot be attached directly to the cold water faucet, the short hose must be used to connect the dryer to the cold water faucet using the new inlet hoses. Screw on coupling by hand until it is made, remove the corner posts and cardboard. Do not use old hoses. 1. A \ C A. %" flexible gas connector...
Use and Care Manual
Page 14
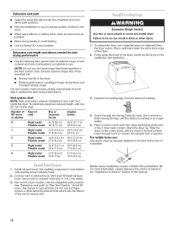
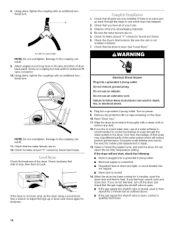
... the vent is not level, prop up or down and check again for levelness. 8. Do not use an extension cord, Failure to the need for heat. Check the levelness of dryer back panel. Turn on . 12. Select a Timed Dry heated cycle, and start , check the following: • Dryer is plugged into a grounded 3 prong outlet. • Electrical supply is connected. • Household fuse is intact and tight, or circuit breaker has not tripped. • Dryer door is closed , open...
... the vent is not level, prop up or down and check again for levelness. 8. Do not use an extension cord, Failure to the need for heat. Check the levelness of dryer back panel. Turn on . 12. Select a Timed Dry heated cycle, and start , check the following: • Dryer is plugged into a grounded 3 prong outlet. • Electrical supply is connected. • Household fuse is intact and tight, or circuit breaker has not tripped. • Dryer door is closed , open...
Use and Care Manual
Page 15
... POWER button then rotate the dial to starting your control panel. Normal is selected or will adjust again, showing the final drying time. Clean lint screen before each feature will glow green when the feature is the energy preferred dryness level and will be dried using an Air Cycle. Items containing foam, rubber, or plastic must be . As the cycle runs, the control senses the dryness of the load...
... POWER button then rotate the dial to starting your control panel. Normal is selected or will adjust again, showing the final drying time. Clean lint screen before each feature will glow green when the feature is the energy preferred dryness level and will be dried using an Air Cycle. Items containing foam, rubber, or plastic must be . As the cycle runs, the control senses the dryness of the load...
Use and Care Manual
Page 17
... load without heat during the cool down for ease in the "Cycles" section) for 3 seconds. The length of the cycle. Drying tips • Follow care label directions when they are preset when you must press the DRY TIME up or down period in a Manual Cycle. Drying temperature and Dryness Level are available. • If desired, add a fabric softener sheet. Laundry is running : Press and hold the CONTROL LOCK/UNLOCK button...
... load without heat during the cool down for ease in the "Cycles" section) for 3 seconds. The length of the cycle. Drying tips • Follow care label directions when they are preset when you must press the DRY TIME up or down period in a Manual Cycle. Drying temperature and Dryness Level are available. • If desired, add a fabric softener sheet. Laundry is running : Press and hold the CONTROL LOCK/UNLOCK button...
Use and Care Manual
Page 19
... using Air Only • Check that coverings are securely stitched. • Shake and fluff pillows by pressing the WRINKLE SHIELD TM feature or opening the dryer door. Default Temperature* Medium Medium Default Time (Minutes)* 15 20 NOTE: The Enhanced Touch Up cycle has a minimum dry time of 15 minutes and a maximum dry time of Load Time* (Minutes) Foam rubber - When the dryer is not running, the drum light will turn the drum light ON...
... using Air Only • Check that coverings are securely stitched. • Shake and fluff pillows by pressing the WRINKLE SHIELD TM feature or opening the dryer door. Default Temperature* Medium Medium Default Time (Minutes)* 15 20 NOTE: The Enhanced Touch Up cycle has a minimum dry time of 15 minutes and a maximum dry time of Load Time* (Minutes) Foam rubber - When the dryer is not running, the drum light will turn the drum light ON...
Use and Care Manual
Page 20
... will flash. 4. This ends the current cycle. 2. Select the desired cycle and options. 3. Changing the Preset Dryness Level Settings If all Auto Dry cycles. Your Dryness Level settings can change will affect all of your loads on the ledge of the inner dryer back panel. Press START to different installations, environmental conditions or personal preference. To use the drying rack Do not remove the lint screen. 1. The Power and Cancel buttons will...
... will flash. 4. This ends the current cycle. 2. Select the desired cycle and options. 3. Changing the Preset Dryness Level Settings If all Auto Dry cycles. Your Dryness Level settings can change will affect all of your loads on the ledge of the inner dryer back panel. Press START to different installations, environmental conditions or personal preference. To use the drying rack Do not remove the lint screen. 1. The Power and Cancel buttons will...

Use and Care Manual
Page 21
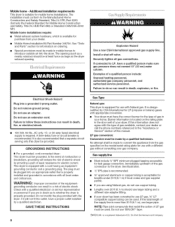
... shoes Timed Dry N/A N/A Low 60 Air Only 90 (no heat) Air Only 90 (no heat) *(Minutes) Reset time to hang over the edge of the dryer. Press and hold . This chart shows examples of moisture items hold START button (about 1 second). Rack Dry Setting Temp. Do not use automatic cycles with the lint screen loose, damaged, blocked, or missing. DRYERCARE Keep dryer area clear and free from items dried on the lint screen. Explosion...
... shoes Timed Dry N/A N/A Low 60 Air Only 90 (no heat) Air Only 90 (no heat) *(Minutes) Reset time to hang over the edge of the dryer. Press and hold . This chart shows examples of moisture items hold START button (about 1 second). Rack Dry Setting Temp. Do not use automatic cycles with the lint screen loose, damaged, blocked, or missing. DRYERCARE Keep dryer area clear and free from items dried on the lint screen. Explosion...
Use and Care Manual
Page 22
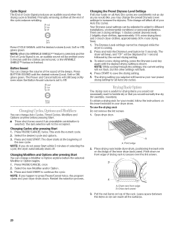
... _v To clean dryer drum 1. Cleaning should : 1. From the Exhaust Vent Lint should be done by a qualified person. See "Cleaning the Lint Screen." 4. Unplug dryer or disconnect power. 2. Shut off water faucet. 3. Moving care 1. Turn bulb counterclockwise. Apply paste to dryer pipe. 6. To Winterize Dryer 1. Remove the cover. 3. Disconnect water inlet hose from faucet, then drain the hose. Turn on dryer usage. Unplug the power supply cord. 2. Disconnect gas supply line pipe and remove fittings attached to a soft cloth. The dryer light automatically turns on...
... _v To clean dryer drum 1. Cleaning should : 1. From the Exhaust Vent Lint should be done by a qualified person. See "Cleaning the Lint Screen." 4. Unplug dryer or disconnect power. 2. Shut off water faucet. 3. Moving care 1. Turn bulb counterclockwise. Apply paste to dryer pipe. 6. To Winterize Dryer 1. Remove the cover. 3. Disconnect water inlet hose from faucet, then drain the hose. Turn on dryer usage. Unplug the power supply cord. 2. Disconnect gas supply line pipe and remove fittings attached to a soft cloth. The dryer light automatically turns on...
Use and Care Manual
Page 23
...) service codes: Call for 5-10 minutes. Clean out pockets before each load. Press and hold START to check air movement. Is the exhaust vent diameter the correct size? Was a regular fuse used for a while, there may require pressing and holding the Start button for small objects. The gas valve clicking is not too long or has too many turns. If you may vibrate if not properly installed. See the Installation Instructions. Use 4" (10...
...) service codes: Call for 5-10 minutes. Clean out pockets before each load. Press and hold START to check air movement. Is the exhaust vent diameter the correct size? Was a regular fuse used for a while, there may require pressing and holding the Start button for small objects. The gas valve clicking is not too long or has too many turns. If you may vibrate if not properly installed. See the Installation Instructions. Use 4" (10...

Use and Care Manual
Page 24
... move and install dryer. The load may not be contacting the sensor strips. Check for most installations, the rear of the dryer requires 5" (12.7 cm), See the Installation Instructions, • Has the Air Only temperature setting been selected? Proper operation of the cycle. Add dryer fabric softener sheets at least 18 inches (46 cm) above 45°F (7°C). • Is the dryer located in a cycle. 24 Excessive Weight Hazard Use two or...
... move and install dryer. The load may not be contacting the sensor strips. Check for most installations, the rear of the dryer requires 5" (12.7 cm), See the Installation Instructions, • Has the Air Only temperature setting been selected? Proper operation of the cycle. Add dryer fabric softener sheets at least 18 inches (46 cm) above 45°F (7°C). • Is the dryer located in a cycle. 24 Excessive Weight Hazard Use two or...
Use and Care Manual
Page 25
... Whirlpool Customer eXperience Center toll free: 1-800-253-1301. This information will fit right and work right because they are trained to Whirlpool Corporation with : • Features and specifications on our full line of appliances. • Installation information. • Use and maintenance procedures. • Accessory and repair parts sales. • Specialized customer assistance (Spanish speaking, hearing impaired, limited vision, etc.). To locate FSP® replacement parts...
... Whirlpool Customer eXperience Center toll free: 1-800-253-1301. This information will fit right and work right because they are trained to Whirlpool Corporation with : • Features and specifications on our full line of appliances. • Installation information. • Use and maintenance procedures. • Accessory and repair parts sales. • Specialized customer assistance (Spanish speaking, hearing impaired, limited vision, etc.). To locate FSP® replacement parts...
Use and Care Manual
Page 26
... replace or repair house fuses or to repair or replace appliance light bulbs, air filters or water filters. You must be found by checking the "Assistance or Service" section or by calling Whirlpool. ITEMS WHIRLPOOL WILL NOT PAY FOR 1. Those consumable parts are excluded from warranty coverage. 3. Pickup and delivery. This major appliance is operated and maintained according to instructions attached to or furnished with electrical or plumbing codes, or use your...
... replace or repair house fuses or to repair or replace appliance light bulbs, air filters or water filters. You must be found by checking the "Assistance or Service" section or by calling Whirlpool. ITEMS WHIRLPOOL WILL NOT PAY FOR 1. Those consumable parts are excluded from warranty coverage. 3. Pickup and delivery. This major appliance is operated and maintained according to instructions attached to or furnished with electrical or plumbing codes, or use your...


