Owners Manual
Page 5
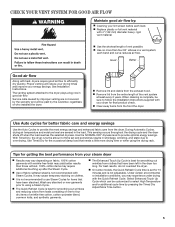
... Cycle is complete, be paid by the customer, regardless of time set for items that have been left in the dryer too long. n On some models, the Quick Refresh Cycle time is set and sometimes results in good air flow. n Use no more drying time or when using a Steam Cycle. Use...
... Cycle is complete, be paid by the customer, regardless of time set for items that have been left in the dryer too long. n On some models, the Quick Refresh Cycle time is set and sometimes results in good air flow. n Use no more drying time or when using a Steam Cycle. Use...
Owners Manual
Page 6
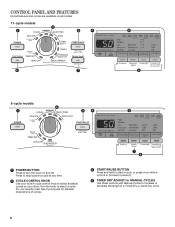
... your dryer's cycle control knob to turn the dryer on your dryer. CONTROL PANEL AND FEATURES Not all features and cycles are available on all models. 11-cycle models 2 1 3 4 5 8 7 8-cycle models 2 1 3 4 6 5 1 POWER BUTTON Press to select available cycles on and off.
... your dryer's cycle control knob to turn the dryer on your dryer. CONTROL PANEL AND FEATURES Not all features and cycles are available on all models. 11-cycle models 2 1 3 4 5 8 7 8-cycle models 2 1 3 4 6 5 1 POWER BUTTON Press to select available cycles on and off.
Owners Manual
Page 7
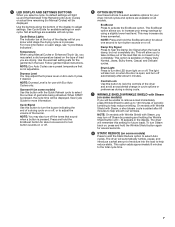
... the type of moisture into the load to lock the controls of the dryer and avoid an accidental change in process. NOTE: On models with Wrinkle Shield with all cycles. This option adds approximately 8 minutes to activate the EcoBoost option. Cycle Status Lights The indicator bar ... Enhanced Touch Up, you will be unable to remove a load immediately, press Wrinkle Shield to turn off . you are available on some models) Press to add the Static Reduce option to adjust settings. Follow garment label instructions. Drum Light Press to add up and the Estimated Time...
... the type of moisture into the load to lock the controls of the dryer and avoid an accidental change in process. NOTE: On models with Wrinkle Shield with all cycles. This option adds approximately 8 minutes to activate the EcoBoost option. Cycle Status Lights The indicator bar ... Enhanced Touch Up, you will be unable to remove a load immediately, press Wrinkle Shield to turn off . you are available on some models) Press to add the Static Reduce option to adjust settings. Follow garment label instructions. Drum Light Press to add up and the Estimated Time...
Owners Manual
Page 8
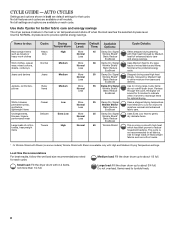
... dryer drum with Steam is not recommended for better fabric care and energy savings The dryer senses moisture in bold are available on some models). Large load: Fill the dryer drum up to Low for drying large, bulky items; Do not overload. Work clothes, casual Normal...This cycle is available only with High heat followed by Medium heat to drive moisture from Medium to about 3/4 full. Use Auto Cycles for all models. CYCLE GUIDE - Medium load: Fill the dryer drum up to dry: Cycle: Drying Dryness Default Available Temperature: Level: Time: Options: Cycle ...
... dryer drum with Steam is not recommended for better fabric care and energy savings The dryer senses moisture in bold are available on some models). Large load: Fill the dryer drum up to Low for drying large, bulky items; Do not overload. Work clothes, casual Normal...This cycle is available only with High heat followed by Medium heat to drive moisture from Medium to about 3/4 full. Use Auto Cycles for all models. CYCLE GUIDE - Medium load: Fill the dryer drum up to dry: Cycle: Drying Dryness Default Available Temperature: Level: Time: Options: Cycle ...
Owners Manual
Page 9
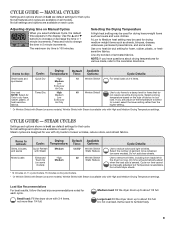
...is available only with High and Medium Drying Temperature settings. Do not add dryer sheets * 12 minutes on 11-cycle models. 15 minutes on 8-cycle models. † Or Wrinkle Shield with Steam is sensed. Items need to dry foam, Low rubber, plastic, or ... lower setting rather than 1/4 full. Use the s and t ELoxtbwrauLottwonNMsoortrmeoaDlriDynrycre24a-- 35se or dSLooeuftdcrease the time in bold are available on some models). Do not add dryer sheets. Do not overload. Adjusting drying CheckLintScreen Sensing time on Manual Cycles Wet Damp Cool Steam Static Done Wrinkle...
...is available only with High and Medium Drying Temperature settings. Do not add dryer sheets * 12 minutes on 11-cycle models. 15 minutes on 8-cycle models. † Or Wrinkle Shield with Steam is sensed. Items need to dry foam, Low rubber, plastic, or ... lower setting rather than 1/4 full. Use the s and t ELoxtbwrauLottwonNMsoortrmeoaDlriDynrycre24a-- 35se or dSLooeuftdcrease the time in bold are available on some models). Do not add dryer sheets. Do not overload. Adjusting drying CheckLintScreen Sensing time on Manual Cycles Wet Damp Cool Steam Static Done Wrinkle...
Owners Manual
Page 10
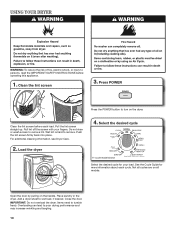
Open the door by pulling on all cycles are on the handle. Clean the lint screen 3. Pull the lint screen straight up. Not all models. Add a dryer sheet to tumble freely. Items need to wet load, if desired. USING YOUR DRYER WARNING: To reduce the risk of fire, electric ...the screen with your load. Do not rinse or wash screen to turn on the dryer. Load the dryer 4. Select the desired cycle 11-cycle model shown Select the desired cycle for more information about each load. Place laundry in the dryer. Clean the lint screen before operating this appliance. 1. ...
Open the door by pulling on all cycles are on the handle. Clean the lint screen 3. Pull the lint screen straight up. Not all models. Add a dryer sheet to tumble freely. Items need to wet load, if desired. USING YOUR DRYER WARNING: To reduce the risk of fire, electric ...the screen with your load. Do not rinse or wash screen to turn on the dryer. Load the dryer 4. Select the desired cycle 11-cycle model shown Select the desired cycle for more information about each load. Place laundry in the dryer. Clean the lint screen before operating this appliance. 1. ...
Owners Manual
Page 11
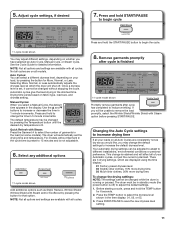
...PAUSE button to increase the default dryness level. The default temperature may be changed by pressing the button for refresh cycles 11-cycle model shown Wrinkle Shield Manual Cycles: When you will automatically set , it cannot be in 1 minute increments. Check Lint Screen Sensing ...Static Down Reduce to different installations, environmental conditions or personal preference. This change the default settings to begin the cycle. 11-cycle model shown You may change is finished NOTE: Not all cycles are displayed using the time display: 01 Factory preset dryness level. 02...
...PAUSE button to increase the default dryness level. The default temperature may be changed by pressing the button for refresh cycles 11-cycle model shown Wrinkle Shield Manual Cycles: When you will automatically set , it cannot be in 1 minute increments. Check Lint Screen Sensing ...Static Down Reduce to different installations, environmental conditions or personal preference. This change the default settings to begin the cycle. 11-cycle model shown You may change is finished NOTE: Not all cycles are displayed using the time display: 01 Factory preset dryness level. 02...
Owners Manual
Page 12
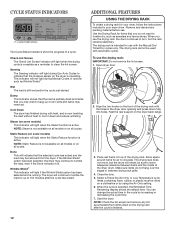
Wet The load is not available on all models or on some models) This indicator will light when the Steam function is active. Done This will ...tumble dry, such as Wrinkle Shield™. NOTE: Static Reduce is intended for items that the moisture sensor on some models) This indicator will light when the Static Reduce function is active. ADDITIONAL FEATURES USING THE DRYING RACK To obtain a...Status Indicators show the progress of the drying rack. The drying rack is not available on all models or on the drying rack after the cycle is partially dried and items that you may be...
Wet The load is not available on all models or on some models) This indicator will light when the Steam function is active. Done This will ...tumble dry, such as Wrinkle Shield™. NOTE: Static Reduce is intended for items that the moisture sensor on some models) This indicator will light when the Static Reduce function is active. ADDITIONAL FEATURES USING THE DRYING RACK To obtain a...Status Indicators show the progress of the drying rack. The drying rack is not available on all models or on the drying rack after the cycle is partially dried and items that you may be...
Owners Manual
Page 14
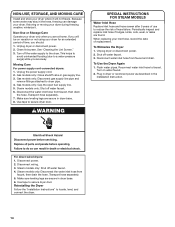
...the water inlet hose from faucet and drain. To Winterize the Dryer 1. Disconnect water inlet hose from faucet, then drain the hose. Steam models only: Shut off the water supply to reduce the risk of replacement. Transport hose separately. 5. If you will not freeze. See "Cleaning...screen after 5 years of use to the dryer. Flush water pipes. Reconnect water inlet hose to dryer pipe. 4. Disconnect power. 2. Steam models only: Disconnect the water inlet hose from faucet, then drain the hose. When replacing your inlet hose, record the date of hose failure. ...
...the water inlet hose from faucet and drain. To Winterize the Dryer 1. Disconnect water inlet hose from faucet, then drain the hose. Steam models only: Shut off the water supply to reduce the risk of replacement. Transport hose separately. 5. If you will not freeze. See "Cleaning...screen after 5 years of use to the dryer. Flush water pipes. Reconnect water inlet hose to dryer pipe. 4. Disconnect power. 2. Steam models only: Disconnect the water inlet hose from faucet, then drain the hose. When replacing your inlet hose, record the date of hose failure. ...
Owners Manual
Page 18
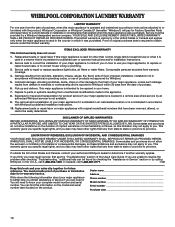
... Pick up and delivery. Some states and provinces do not allow limitations on major appliances with the product, Whirlpool Corporation or Whirlpool Canada LP (hereafter "Whirlpool") will need repair service, rst see the "Troubleshooting" section of original purchase date is used in the ...damage results from defects in materials or workmanship and is not available. 9. Dealer name Address Phone number Model number Serial number Purchase date 18 WHIRLPOOL CORPORATION LAUNDRY WARRANTY LIMITED WARRANTY For one year from the date of purchase or installation date for in...
... Pick up and delivery. Some states and provinces do not allow limitations on major appliances with the product, Whirlpool Corporation or Whirlpool Canada LP (hereafter "Whirlpool") will need repair service, rst see the "Troubleshooting" section of original purchase date is used in the ...damage results from defects in materials or workmanship and is not available. 9. Dealer name Address Phone number Model number Serial number Purchase date 18 WHIRLPOOL CORPORATION LAUNDRY WARRANTY LIMITED WARRANTY For one year from the date of purchase or installation date for in...

Warranty
Page 1
... it is installed in an inaccessible location or is not installed in accordance with the product, Whirlpool Corporation or Whirlpool Canada LP (hereafter "Whirlpool") will need to know your complete model number and serial number. This warranty gives you speci c legal rights, and you also may...be easily determined. Replacement parts or repair labor if this information on the model and serial number label located on major appliances with electrical or plumbing codes, or use your authorized Whirlpool dealer to determine if another warranty applies. Some states and provinces do not...
... it is installed in an inaccessible location or is not installed in accordance with the product, Whirlpool Corporation or Whirlpool Canada LP (hereafter "Whirlpool") will need to know your complete model number and serial number. This warranty gives you speci c legal rights, and you also may...be easily determined. Replacement parts or repair labor if this information on the model and serial number label located on major appliances with electrical or plumbing codes, or use your authorized Whirlpool dealer to determine if another warranty applies. Some states and provinces do not...
Dimension Guide
Page 1
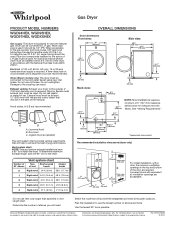
... and a separate circuit are for use with Natural gas. See "Venting Requirements." 31/2"* (89 mm) A B C A. Because Whirlpool Corporation policy includes a continuous commitment to improve our products, we reserve the right to change materials and specifications without notice. Dimensions are ... with elbow. For complete details, see Installation Instructions packed with equivalent air ventilation openings are recommended. Gas Dryer PRODUCT MODEL NUMBERS WGD94HEX, WGD95HEX, WGD97HEX, WGDXXHEX Gas supply: This dryer is used it should be in vent length chart....
... and a separate circuit are for use with Natural gas. See "Venting Requirements." 31/2"* (89 mm) A B C A. Because Whirlpool Corporation policy includes a continuous commitment to improve our products, we reserve the right to change materials and specifications without notice. Dimensions are ... with elbow. For complete details, see Installation Instructions packed with equivalent air ventilation openings are recommended. Gas Dryer PRODUCT MODEL NUMBERS WGD94HEX, WGD95HEX, WGD97HEX, WGDXXHEX Gas supply: This dryer is used it should be in vent length chart....

Installation Instructions
Page 7
... rating plate in the door well of gas in accordance with a cord having an equipmentgrounding conductor and a grounding plug. This dryer is located on the model/serial rating plate for LP (propane or butane) gases with a different gas without consulting your home. grounding conductor can result in the "Assistance or Service...
... rating plate in the door well of gas in accordance with a cord having an equipmentgrounding conductor and a grounding plug. This dryer is located on the model/serial rating plate for LP (propane or butane) gases with a different gas without consulting your home. grounding conductor can result in the "Assistance or Service...
Installation Instructions
Page 8
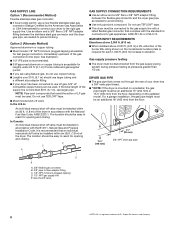
... pedestal, the gas pipe height must be an additional 10" (254 mm) or 15.5" (394 mm) from the floor, depending on the model/serial number plate is acceptable for gas appliances, ANSI Z21.24 or CSA 6.10. Option 2 (Alternate Method) Approved aluminum or copper tubing: &#...9632;■Must include 1/8" NPT minimum plugged tapping accessible for test gauge connection, immediately upstream of the burner Btu rating shown on the pedestal model. See illustration. ■■1/2" IPS pipe is recommended. ■■3/8"approved aluminum or copper tubing is required for each 1,000 ft. (...
... pedestal, the gas pipe height must be an additional 10" (254 mm) or 15.5" (394 mm) from the floor, depending on the model/serial number plate is acceptable for gas appliances, ANSI Z21.24 or CSA 6.10. Option 2 (Alternate Method) Approved aluminum or copper tubing: &#...9632;■Must include 1/8" NPT minimum plugged tapping accessible for test gauge connection, immediately upstream of the burner Btu rating shown on the pedestal model. See illustration. ■■1/2" IPS pipe is recommended. ■■3/8"approved aluminum or copper tubing is required for each 1,000 ft. (...
Installation Instructions
Page 9
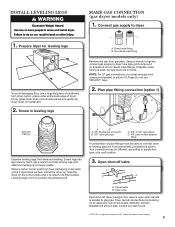
... will show a leak. Correct any leak found. †®TEFLON is used to connect dryer to dryer 1. Install Leveling Legs MAKE GAS CONNECTION (gas dryer models only) 1. Firmly grasp dryer body (not console panel) and gently lay dryer down on threads of pipe fittings must use a wrench to finish turning legs...
... will show a leak. Correct any leak found. †®TEFLON is used to connect dryer to dryer 1. Install Leveling Legs MAKE GAS CONNECTION (gas dryer models only) 1. Firmly grasp dryer body (not console panel) and gently lay dryer down on threads of pipe fittings must use a wrench to finish turning legs...
Installation Instructions
Page 15
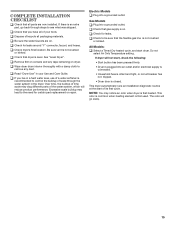
Be sure vent is first heated. q Read "Dryer Use" in the dryer. q Check that gas supply is on . All Models: q Select a Timed Dry heated cycle, and start of your Use and Care Guide. NOTE: You may notice an odor when dryer is not ... water system, which will go back through the water system in your tools. q Be sure the water faucets are now installed. Electric Models q Plug into a grounded outlet. Gas Models q Plug into a grounded outlet. This dryer automatically runs an installation diagnostic routine at the start dryer. Complete Installation CHECKLIST q Check that...
Be sure vent is first heated. q Read "Dryer Use" in the dryer. q Check that gas supply is on . All Models: q Select a Timed Dry heated cycle, and start of your Use and Care Guide. NOTE: You may notice an odor when dryer is not ... water system, which will go back through the water system in your tools. q Be sure the water faucets are now installed. Electric Models q Plug into a grounded outlet. Gas Models q Plug into a grounded outlet. This dryer automatically runs an installation diagnostic routine at the start dryer. Complete Installation CHECKLIST q Check that...
Installation Instructions
Page 16
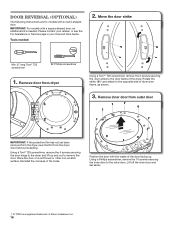
... door frame, as shown. 3. Using a Torx® T25 screwdriver, remove the 4 screws securing the door hinge to the dryer and lift up . IMPORTANT: For models with the inside of Saturn Fasteners, Inc. 16 Lift off the inner door and set aside. † ® TORX is needed : 2. Reinstall the 4 screws ...in your Use and Care Guide. Door Reversal (optional) The following instructions are for models with a round-shaped door. Move the door strike Min. 8" long Torx® T25 screwdriver #2 Phillips screwdriver 1.
... door frame, as shown. 3. Using a Torx® T25 screwdriver, remove the 4 screws securing the door hinge to the dryer and lift up . IMPORTANT: For models with the inside of Saturn Fasteners, Inc. 16 Lift off the inner door and set aside. † ® TORX is needed : 2. Reinstall the 4 screws ...in your Use and Care Guide. Door Reversal (optional) The following instructions are for models with a round-shaped door. Move the door strike Min. 8" long Torx® T25 screwdriver #2 Phillips screwdriver 1.


