
Use and Care Guide
Page 9
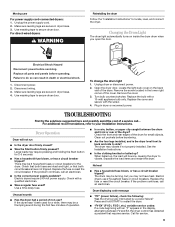
... non-use 2 household fuses or circuit breakers. Changing the Drum Light The dryer light automatically turns on the back wall of a service call... Replace all parts and panels before servicing. Disconnect power. 2. If the dryer hasn't been used ? To change the drum light 1. Clean out pockets ...before laundering. ■ Are the four legs installed, and is the dryer level front to back and side to...
... non-use 2 household fuses or circuit breakers. Changing the Drum Light The dryer light automatically turns on the back wall of a service call... Replace all parts and panels before servicing. Disconnect power. 2. If the dryer hasn't been used ? To change the drum light 1. Clean out pockets ...before laundering. ■ Are the four legs installed, and is the dryer level front to back and side to...

Use and Care Guide
Page 11
... need it is installed in an inaccessible location or is reported to Whirlpool within 30 days from the date of purchase or installation date for in which it is used for Factory Specified Parts and repair labor to published user or operator instructions and/or installation ...to state or province to be found by checking the "Assistance or Service" section or by Whirlpool. 5. Service must provide proof of purchase. 6. You must be easily determined. Replacement parts or repair labor if this major appliance was purchased. ITEMS EXCLUDED FROM WARRANTY This limited warranty...
... need it is installed in an inaccessible location or is reported to Whirlpool within 30 days from the date of purchase or installation date for in which it is used for Factory Specified Parts and repair labor to published user or operator instructions and/or installation ...to state or province to be found by checking the "Assistance or Service" section or by Whirlpool. 5. Service must provide proof of purchase. 6. You must be easily determined. Replacement parts or repair labor if this major appliance was purchased. ITEMS EXCLUDED FROM WARRANTY This limited warranty...

Installation Instructions
Page 3
... 3 Check existing electrical supply and venting. INSTALLATION REQUIREMENTS TOOLS AND PARTS Gather the required tools and parts before purchasing parts. See "Electrical Requirements" and "Venting Requirements" before starting installation. Check code requirements. Contact your dryer. Optional Equipment: (Not supplied with washer) Refer to LP gas Parts supplied (non-steam models): 1/4" nut driver (recommended) Tape measure Level...
... 3 Check existing electrical supply and venting. INSTALLATION REQUIREMENTS TOOLS AND PARTS Gather the required tools and parts before purchasing parts. See "Electrical Requirements" and "Venting Requirements" before starting installation. Check code requirements. Contact your dryer. Optional Equipment: (Not supplied with washer) Refer to LP gas Parts supplied (non-steam models): 1/4" nut driver (recommended) Tape measure Level...
Installation Instructions
Page 4
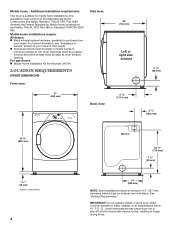
For gas dryers: n Mobile Home Installation Kit Part Number 346764. See "Venting Requirements." IMPORTANT: Do not operate, install, or store dryer where it will be exposed to shut off at end of 5" (127 mm) clearance behind dryer for purchase from your Use and Care Guide. measurement 4 14...or Service" section in mobile homes to the Manufactured Home Construction and Safety Standard, Title 24 CFR, Part 3280 (formerly the Federal Standard for mobile home installations. LOCATION REQUIREMENTS DRYER DIMENSIONS Side view: Front view: 27" (686 mm) Back view: 29" (736 mm) Left...
For gas dryers: n Mobile Home Installation Kit Part Number 346764. See "Venting Requirements." IMPORTANT: Do not operate, install, or store dryer where it will be exposed to shut off at end of 5" (127 mm) clearance behind dryer for purchase from your Use and Care Guide. measurement 4 14...or Service" section in mobile homes to the Manufactured Home Construction and Safety Standard, Title 24 CFR, Part 3280 (formerly the Federal Standard for mobile home installations. LOCATION REQUIREMENTS DRYER DIMENSIONS Side view: Front view: 27" (686 mm) Back view: 29" (736 mm) Left...

Installation Instructions
Page 5
.... (610 mm) of either side of dryer. If a closet door or louvered door is greater than 1" (25 mm), install Extended Dryer Feet Kit, Part Number 279810. Closet Installation (stacked washer and dryer): 6" (152 mm) n For garage installation, place dryer at least 18" (460 mm) above... floor. Closet installation (dryer only): 3" (76 mm) 76" (1930 mm) 48 in.2...
.... (610 mm) of either side of dryer. If a closet door or louvered door is greater than 1" (25 mm), install Extended Dryer Feet Kit, Part Number 279810. Closet Installation (stacked washer and dryer): 6" (152 mm) n For garage installation, place dryer at least 18" (460 mm) above... floor. Closet installation (dryer only): 3" (76 mm) 76" (1930 mm) 48 in.2...
Installation Instructions
Page 6
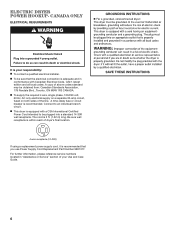
n To be sure that you use Power Supply Cord Replacement Part Number 9831317. n To supply the required 4 wire, single phase, 120/240 volt, 60 Hz, AC only electrical supply on a separate 30-amp circuit, fused on both sides of dryer's final location. 4-wire receptacle (14-30R) If using a replacement power supply cord, it... your Use and Care Guide. 6 A time-delay fuse or circuit breaker is equipped with Canadian Electrical Code, C22.1-latest edition and all local codes. n This dryer is recommended. ELECTRIC DRYER POWER HOOKUP-
n To be sure that you use Power Supply Cord Replacement Part Number 9831317. n To supply the required 4 wire, single phase, 120/240 volt, 60 Hz, AC only electrical supply on a separate 30-amp circuit, fused on both sides of dryer's final location. 4-wire receptacle (14-30R) If using a replacement power supply cord, it... your Use and Care Guide. 6 A time-delay fuse or circuit breaker is equipped with Canadian Electrical Code, C22.1-latest edition and all local codes. n This dryer is recommended. ELECTRIC DRYER POWER HOOKUP-

Installation Instructions
Page 12
... wood block, use wrench to crush or kink vent. If there is clean. q Check dryer's final location. Repeat from side to existing vent, make sure all parts are snug against the ground before tightening them. Move dryer to exhaust hood with a 4" (102 mm) clamp. q Dispose of/recycle all of... dryer from front to see what was skipped. Check that you have all packaging materials....
... wood block, use wrench to crush or kink vent. If there is clean. q Check dryer's final location. Repeat from side to existing vent, make sure all parts are snug against the ground before tightening them. Move dryer to exhaust hood with a 4" (102 mm) clamp. q Dispose of/recycle all of... dryer from front to see what was skipped. Check that you have all packaging materials....

Installation Instructions
Page 13
...Dryer door is closed. Gas Models Only: q Check that dryer is level. Do not select Air Only Temperature setting. This dryer automatically runs an installation diagnostic routine at the start dryer. NOTE: You may notice an odor when dryer is too long or has too many turns. Dryer Operation Dryer... with a damp cloth to www.whirlpool.com. Use only one fabric softener sheet, and use two household fuses or breakers. Confirm power cord is first used ? Dryer drum turns, but no heat: ... swing on your dryer: n A door reversal kit, Part Number W10277499 is available to check air movement.
...Dryer door is closed. Gas Models Only: q Check that dryer is level. Do not select Air Only Temperature setting. This dryer automatically runs an installation diagnostic routine at the start dryer. NOTE: You may notice an odor when dryer is too long or has too many turns. Dryer Operation Dryer... with a damp cloth to www.whirlpool.com. Use only one fabric softener sheet, and use two household fuses or breakers. Confirm power cord is first used ? Dryer drum turns, but no heat: ... swing on your dryer: n A door reversal kit, Part Number W10277499 is available to check air movement.


