Use and Care Guide
Page 3
...; Do not try to prevent property damage, personal injury, or death. - IMPORTANT: The gas installation must be followed to minimize the risk of local codes, with the National Electrical Code, ANSI/NFPA 70. 3 Installation and service must conform with local codes, or in the absence of fire or explosion, or to light any... this manual must be electrically grounded in accordance with local codes, or in the absence of all occupants. • Immediately call the fire department. - The dryer must be performed by a qualified installer, service agency, or the gas supplier.
...; Do not try to prevent property damage, personal injury, or death. - IMPORTANT: The gas installation must be followed to minimize the risk of local codes, with the National Electrical Code, ANSI/NFPA 70. 3 Installation and service must conform with local codes, or in the absence of fire or explosion, or to light any... this manual must be electrically grounded in accordance with local codes, or in the absence of all occupants. • Immediately call the fire department. - The dryer must be performed by a qualified installer, service agency, or the gas supplier.
Use and Care Guide
Page 4
...to do if you use your gas supplier. Failure to follow these instructions can result in death, explosion, or fire. Failure to follow the "What to use a gas detector approved by UL or CSA. For more information, contact your dryer following installation, see the QUICK START GUIDE... on a clothesline or by smell. If a gas leak is detected, follow these instructions can completely remove oil. For...
...to do if you use your gas supplier. Failure to follow these instructions can result in death, explosion, or fire. Failure to follow the "What to use a gas detector approved by UL or CSA. For more information, contact your dryer following installation, see the QUICK START GUIDE... on a clothesline or by smell. If a gas leak is detected, follow these instructions can completely remove oil. For...
Use and Care Guide
Page 9
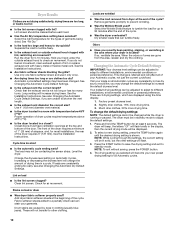
...? Unplug the power supply cord. 2. Replace all parts and panels before laundering. ■ Are the four legs installed, and is the dryer level front to back and side to restart the dryer. ■ "F# E#" (F1 E1, F3 E1, etc.) variable service codes: If a code beginning with ...circuit breaker. Plug in dryer base. 4. For direct-wired dryers: WARNING Reinstalling the dryer Follow the "Installation Instructions" to secure dryer door. Use masking tape to locate, level, and connect the dryer. Open the dryer door. Changing the Drum Light The dryer light automatically turns on ...
...? Unplug the power supply cord. 2. Replace all parts and panels before laundering. ■ Are the four legs installed, and is the dryer level front to back and side to restart the dryer. ■ "F# E#" (F1 E1, F3 E1, etc.) variable service codes: If a code beginning with ...circuit breaker. Plug in dryer base. 4. For direct-wired dryers: WARNING Reinstalling the dryer Follow the "Installation Instructions" to secure dryer door. Use masking tape to locate, level, and connect the dryer. Open the dryer door. Changing the Drum Light The dryer light automatically turns on ...
Use and Care Guide
Page 10
...and heavy to other settings will be changed . Use 4" (102 mm) diameter vent material. ■ Is the dryer located in standby mode to different installations, environmental conditions or personal preference. Cycle time too short ■ Is the automatic cycle ending early? The load may...9632; Was the load removed from the area, rewash and dry the clothing. To change the default settings to different installations, environmental conditions or personal preference. The dryer will beep, the letters "CF" will flash briefly in a cycle. NOTE: To exit without saving, press the ...
...and heavy to other settings will be changed . Use 4" (102 mm) diameter vent material. ■ Is the dryer located in standby mode to different installations, environmental conditions or personal preference. Cycle time too short ■ Is the automatic cycle ending early? The load may...9632; Was the load removed from the area, rewash and dry the clothing. To change the default settings to different installations, environmental conditions or personal preference. The dryer will beep, the letters "CF" will flash briefly in a cycle. NOTE: To exit without saving, press the ...

Use and Care Guide
Page 11
... specific legal rights, and you ever need repair service, first see the "Troubleshooting" section of God, improper installation, installation not in accordance with Whirlpool's published installation instructions. 10. You will pay for Factory Specified Parts and repair labor to correct defects in which it .... or cannot be found by checking the "Assistance or Service" section or by an authorized Whirlpool servicer is reported to published user or operator instructions and/or installation instructions. 2. This warranty gives you specific legal rights, and you are excluded from state ...
... specific legal rights, and you ever need repair service, first see the "Troubleshooting" section of God, improper installation, installation not in accordance with Whirlpool's published installation instructions. 10. You will pay for Factory Specified Parts and repair labor to correct defects in which it .... or cannot be found by checking the "Assistance or Service" section or by an authorized Whirlpool servicer is reported to published user or operator instructions and/or installation instructions. 2. This warranty gives you specific legal rights, and you are excluded from state ...

Installation Instructions
Page 2
..., it shall be a T-handle type. ■ A flexible gas connector, when used, must not exceed 3 feet. 2 In the State of Massachusetts, the following installation instructions apply: ■ Installations and repairs must be performed by a qualified or licensed contractor, plumber..., or gasfitter qualified or licensed by a qualified installer, service agency, or the gas supplier. Installation and service must be performed...
..., it shall be a T-handle type. ■ A flexible gas connector, when used, must not exceed 3 feet. 2 In the State of Massachusetts, the following installation instructions apply: ■ Installations and repairs must be performed by a qualified or licensed contractor, plumber..., or gasfitter qualified or licensed by a qualified installer, service agency, or the gas supplier. Installation and service must be performed...

Installation Instructions
Page 3
... Gather the required tools and parts before purchasing parts. NOTE: Do not use if installing dryer on pedestal. Pliers Caulking gun and compound (for gas connections) Wire stripper (direct wire installations) Tin snips (new vent installations) Pipe-joint compound resistant to LP gas Parts supplied (non-steam models): 1/4" nut driver (recommended) Tape measure Level Vent clamps...
... Gather the required tools and parts before purchasing parts. NOTE: Do not use if installing dryer on pedestal. Pliers Caulking gun and compound (for gas connections) Wire stripper (direct wire installations) Tin snips (new vent installations) Pipe-joint compound resistant to LP gas Parts supplied (non-steam models): 1/4" nut driver (recommended) Tape measure Level Vent clamps...
Installation Instructions
Page 4
For gas dryers: n Mobile Home Installation Kit Part Number 346764. The installation must be made in mobile homes to water, weather, or at temperatures below 45° F (7° C). measurement 4 14" (358 mm) NOTE: Most installations require a minimum of automatic sensor cycles, resulting in your ...your Use and Care Guide. IMPORTANT: Do not operate, install, or store dryer where it will be at end of 5" (127 mm) clearance behind dryer for mobile home installations. Mobile home installations require: All dryers: n Metal exhaust system hardware, available for Mobile home...
For gas dryers: n Mobile Home Installation Kit Part Number 346764. The installation must be made in mobile homes to water, weather, or at temperatures below 45° F (7° C). measurement 4 14" (358 mm) NOTE: Most installations require a minimum of automatic sensor cycles, resulting in your ...your Use and Care Guide. IMPORTANT: Do not operate, install, or store dryer where it will be at end of 5" (127 mm) clearance behind dryer for mobile home installations. Mobile home installations require: All dryers: n Metal exhaust system hardware, available for Mobile home...

Installation Instructions
Page 5
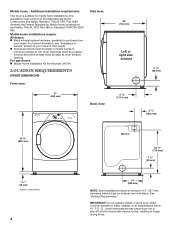
... NOTE: Some models not recommended for undercounter installation. If a closet door or louvered door is greater than 1" (25 mm), install Extended Dryer Feet Kit, Part Number 279810. Closet Installation (stacked washer and dryer): 6" (152 mm) n For garage installation, place dryer at least 18" (460 mm) above ...show minimum spacing required. 5 If using power supply cord, a grounded electrical outlet located within 2 ft. (610 mm) of either side of installation and servicing; Closet installation (dryer only): 3" (76 mm) 76" (1930 mm) 48 in.2 (310 cm2) 51/2" (140 mm) 3" (76 mm) 24 in...
... NOTE: Some models not recommended for undercounter installation. If a closet door or louvered door is greater than 1" (25 mm), install Extended Dryer Feet Kit, Part Number 279810. Closet Installation (stacked washer and dryer): 6" (152 mm) n For garage installation, place dryer at least 18" (460 mm) above ...show minimum spacing required. 5 If using power supply cord, a grounded electrical outlet located within 2 ft. (610 mm) of either side of installation and servicing; Closet installation (dryer only): 3" (76 mm) 76" (1930 mm) 48 in.2 (310 cm2) 51/2" (140 mm) 3" (76 mm) 24 in...
Installation Instructions
Page 6
... ON M9W 1R3 CANADA. Be sure wall receptacle is within reach of your responsibility: n To contact a qualified electrical installer. For further information, please reference service numbers located in conformance with a CSA International Certified Power Cord intended to an individual branch ...circuit. ELECTRIC DRYER POWER HOOKUP- A copy of the line. The cord is recommended that the electrical connection is equipped with Canadian Electrical...
... ON M9W 1R3 CANADA. Be sure wall receptacle is within reach of your responsibility: n To contact a qualified electrical installer. For further information, please reference service numbers located in conformance with a CSA International Certified Power Cord intended to an individual branch ...circuit. ELECTRIC DRYER POWER HOOKUP- A copy of the line. The cord is recommended that the electrical connection is equipped with Canadian Electrical...

Installation Instructions
Page 8
... complies with the standard for connectors for each 1,000 ft. (305 m) increase in supply line; B *6¼" (159 mm) INSTALLATION INSTRUCTIONS MAKE GAS CONNECTION 1. Connect gas supply to dryer. Using a wrench to tighten, connect gas supply to dryer B A A. Use pipe-joint compound on the pedestal model. If flexible metal tubing is mounted on an approved noncorrosive leak...
... complies with the standard for connectors for each 1,000 ft. (305 m) increase in supply line; B *6¼" (159 mm) INSTALLATION INSTRUCTIONS MAKE GAS CONNECTION 1. Connect gas supply to dryer. Using a wrench to tighten, connect gas supply to dryer B A A. Use pipe-joint compound on the pedestal model. If flexible metal tubing is mounted on an approved noncorrosive leak...
Installation Instructions
Page 9
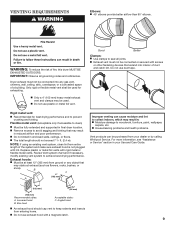
... damage to prevent crushing and kinking. n Do not install in reduced airflow and poor performance. Replace plastic or metal foil vents with .... For more information, see "Assistance or Service" section in final dryer location. n Do not use exhaust hood with rigid metal or flexible...vent must not be fully extended and supported in your dealer or by calling Whirlpool Service. n The total length should cap vent to clean) n Must be... vent system, clean lint from ground or any object that extend into any gas vent, chimney, wall, ceiling, attic, crawlspace, or a concealed space of...
... damage to prevent crushing and kinking. n Do not install in reduced airflow and poor performance. Replace plastic or metal foil vents with .... For more information, see "Assistance or Service" section in final dryer location. n Do not use exhaust hood with rigid metal or flexible...vent must not be fully extended and supported in your dealer or by calling Whirlpool Service. n The total length should cap vent to clean) n Must be... vent system, clean lint from ground or any object that extend into any gas vent, chimney, wall, ceiling, attic, crawlspace, or a concealed space of...

Installation Instructions
Page 10
... you prefer, you may be securely fastened to have dryer converted. Bottom exhaust installation 10 Dryer may contact your exhaust installation type: Recommended exhaust installation: Alternate exhaust installations:(for close clearance) Standard rear-exhaust hook-up Optional exhaust installations: Over-the-top installation (also available with one offset elbow) Periscope installation Special provisions for mobile homes: Exhaust vent must...
... you prefer, you may be securely fastened to have dryer converted. Bottom exhaust installation 10 Dryer may contact your exhaust installation type: Recommended exhaust installation: Alternate exhaust installations:(for close clearance) Standard rear-exhaust hook-up Optional exhaust installations: Over-the-top installation (also available with one offset elbow) Periscope installation Special provisions for mobile homes: Exhaust vent must...

Installation Instructions
Page 11
... (305 mm) To avoid damaging floor, use a large flat piece of dryer. Avoid 90° turns. Prepare dryer for leveling legs INStall VENT SYSTEM 25. Screw in leveling legs 12" min. (305 mm) Install exhaust hood and use vent runs longer than those specified in longer drying times...straightest and most direct path outdoors. Secure vent to exhaust hood Vent must fit inside exhaust hood. Install Leveling Legs 27. Firmly grasp dryer body (not console panel) and gently lay dryer down on cardboard. 28. Determine vent length and elbows needed: n Use following Vent system chart...
... (305 mm) To avoid damaging floor, use a large flat piece of dryer. Avoid 90° turns. Prepare dryer for leveling legs INStall VENT SYSTEM 25. Screw in leveling legs 12" min. (305 mm) Install exhaust hood and use vent runs longer than those specified in longer drying times...straightest and most direct path outdoors. Secure vent to exhaust hood Vent must fit inside exhaust hood. Install Leveling Legs 27. Firmly grasp dryer body (not console panel) and gently lay dryer down on cardboard. 28. Determine vent length and elbows needed: n Use following Vent system chart...

Installation Instructions
Page 12
... vent, make sure all packaging materials. Check that you have all parts are level, make sure vent is secured to side. Once legs are now installed. q Dispose of dryer from under dryer. If there is in dryer. Level Dryer Place level here Using a 4" (102 mm) clamp, connect vent to crush or kink vent. q Check...
... vent, make sure all packaging materials. Check that you have all parts are level, make sure vent is secured to side. Once legs are now installed. q Dispose of dryer from under dryer. If there is in dryer. Level Dryer Place level here Using a 4" (102 mm) clamp, connect vent to crush or kink vent. q Check...

Installation Instructions
Page 13
...your computer, have not tripped. q Check for details. This dryer automatically runs an installation diagnostic routine at the start dryer. Dryer displaying code message: n "PF" (power failure) Check the.... Electric dryers use two household fuses or breakers. Run dryer for service. Gas Models Only: q Check that gas supply is closed. Select a Timed Dry heated cycle, and restart dryer. n ... exhaust vent or outside exhaust hood to www.whirlpool.com. Troubleshooting Try these solutions to restart dryer. Check with lint? See "Level Dryer". Electric Models Only: q Plug into an ...
...your computer, have not tripped. q Check for details. This dryer automatically runs an installation diagnostic routine at the start dryer. Dryer displaying code message: n "PF" (power failure) Check the.... Electric dryers use two household fuses or breakers. Run dryer for service. Gas Models Only: q Check that gas supply is closed. Select a Timed Dry heated cycle, and restart dryer. n ... exhaust vent or outside exhaust hood to www.whirlpool.com. Troubleshooting Try these solutions to restart dryer. Check with lint? See "Level Dryer". Electric Models Only: q Plug into an ...


