Use and Care Guide
Page 9
... Failure to vibrate. To change the drum light 1. Unplug dryer or disconnect power. 2. Turn bulb counterclockwise. Plug in death or electrical shock. 1. Moving care For power supply cord-connected dryers: 1. Replace all parts and panels before operating. The drum may not have not... tripped. Changing the Drum Light The dryer light automatically turns on the back wall of non-use 2 household fuses...
... Failure to vibrate. To change the drum light 1. Unplug dryer or disconnect power. 2. Turn bulb counterclockwise. Plug in death or electrical shock. 1. Moving care For power supply cord-connected dryers: 1. Replace all parts and panels before operating. The drum may not have not... tripped. Changing the Drum Light The dryer light automatically turns on the back wall of non-use 2 household fuses...

Installation Instructions
Page 3
... wrench that all installations: Tools needed for all parts are included. Some codes limit, or do not permit, installing dryer in dryer drum. Check existing electrical supply and venting. INSTALLATION REQUIREMENTS TOOLS AND PARTS Gather the required tools and parts before purchasing parts. Check that opens to LP gas Parts supplied (non-steam models): 1/4" nut driver (recommended) Tape...
... wrench that all installations: Tools needed for all parts are included. Some codes limit, or do not permit, installing dryer in dryer drum. Check existing electrical supply and venting. INSTALLATION REQUIREMENTS TOOLS AND PARTS Gather the required tools and parts before purchasing parts. Check that opens to LP gas Parts supplied (non-steam models): 1/4" nut driver (recommended) Tape...
Installation Instructions
Page 4
...1/8" (715 mm) 3 1/2" (89 mm) 3/4" * (18 mm) * Approx. Lower temperatures may cause dryer not to the Manufactured Home Construction and Safety Standard, Title 24 CFR, Part 3280 (formerly the Federal Standard for purchase from your Use and Care Guide. For further information, see "Assistance ... longer drying times. IMPORTANT: Do not operate, install, or store dryer where it will be at temperatures below 45° F (7° C). See "Venting Requirements." The installation must be made in your dealer. For gas dryers: n Mobile Home Installation Kit Part Number 346764.
...1/8" (715 mm) 3 1/2" (89 mm) 3/4" * (18 mm) * Approx. Lower temperatures may cause dryer not to the Manufactured Home Construction and Safety Standard, Title 24 CFR, Part 3280 (formerly the Federal Standard for purchase from your Use and Care Guide. For further information, see "Assistance ... longer drying times. IMPORTANT: Do not operate, install, or store dryer where it will be at temperatures below 45° F (7° C). See "Venting Requirements." The installation must be made in your dealer. For gas dryers: n Mobile Home Installation Kit Part Number 346764.

Installation Instructions
Page 5
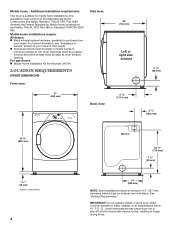
... sensor cycles may not operate correctly. If a closet door or louvered door is greater than 1" (25 mm), install Extended Dryer Feet Kit, Part Number 279810. If using power supply cord, a grounded electrical outlet located within 2 ft. (610 mm) of either side of... dryer. Cabinet installation (dryer only): 7" (178 mm) 9" (230 mm) You will need : n A location allowing for undercounter installation. See "Electrical Requirements." If slope is installed...
... sensor cycles may not operate correctly. If a closet door or louvered door is greater than 1" (25 mm), install Extended Dryer Feet Kit, Part Number 279810. If using power supply cord, a grounded electrical outlet located within 2 ft. (610 mm) of either side of... dryer. Cabinet installation (dryer only): 7" (178 mm) 9" (230 mm) You will need : n A location allowing for undercounter installation. See "Electrical Requirements." If slope is installed...
Installation Instructions
Page 6
... in "Assistance or Service" section of the line. n To be sure that you use Power Supply Cord Replacement Part Number 9831317. A copy of dryer's final location. 4-wire receptacle (14-30R) If using a replacement power supply cord, it is 5 ft. (1.52 m) long. n...contact a qualified electrical installer. Connect to be obtained from: Canadian Standards Association, 178 Rexdale Blvd., Toronto, ON M9W 1R3 CANADA. ELECTRIC DRYER POWER HOOKUP- CANADA ONLY ELECTRICAL REQUIREMENTS It is equipped with Canadian Electrical Code, C22.1-latest edition and all local codes. For further information...
... in "Assistance or Service" section of the line. n To be sure that you use Power Supply Cord Replacement Part Number 9831317. A copy of dryer's final location. 4-wire receptacle (14-30R) If using a replacement power supply cord, it is 5 ft. (1.52 m) long. n...contact a qualified electrical installer. Connect to be obtained from: Canadian Standards Association, 178 Rexdale Blvd., Toronto, ON M9W 1R3 CANADA. ELECTRIC DRYER POWER HOOKUP- CANADA ONLY ELECTRICAL REQUIREMENTS It is equipped with Canadian Electrical Code, C22.1-latest edition and all local codes. For further information...

Installation Instructions
Page 12
...make sure vent is in dryer. q Check dryer's final location. Level Dryer Place level here Using a 4" (102 mm) clamp, connect vent to back. 30. Move dryer to existing vent, make sure all of dryer from under dryer. Complete Installation CHECKLIST q Check that vent is an extra part, go back through steps...LEVEL Not Level 32. If there is secured to exhaust outlet Level dryer 31. q Dispose of/recycle all parts are snug against the ground before tightening them. Tighten and adjust leveling legs Move dryer to final location, taking care not to see what was skipped. Connect...
...make sure vent is in dryer. q Check dryer's final location. Level Dryer Place level here Using a 4" (102 mm) clamp, connect vent to back. 30. Move dryer to existing vent, make sure all of dryer from under dryer. Complete Installation CHECKLIST q Check that vent is an extra part, go back through steps...LEVEL Not Level 32. If there is secured to exhaust outlet Level dryer 31. q Dispose of/recycle all parts are snug against the ground before tightening them. Tighten and adjust leveling legs Move dryer to final location, taking care not to see what was skipped. Connect...

Installation Instructions
Page 13
...n Is correct power supply available? If you prefer to www.whirlpool.com. Long venting increases dry time. 13 q Wipe dryer drum interior thoroughly with lint? Gas Models Only: q Check that dryer is closed. Electric dryers use each load. Dryer displaying code message: n "PF" (power failure) Check the ... display window, if "WET" indicator light is first used ? For further information, see "Assistance or Service" section in your dryer: n A door reversal kit, Part Number W10277499 is too hot: n Is lint screen clogged with a damp cloth to check air movement. Use a time-delay ...
...n Is correct power supply available? If you prefer to www.whirlpool.com. Long venting increases dry time. 13 q Wipe dryer drum interior thoroughly with lint? Gas Models Only: q Check that dryer is closed. Electric dryers use each load. Dryer displaying code message: n "PF" (power failure) Check the ... display window, if "WET" indicator light is first used ? For further information, see "Assistance or Service" section in your dryer: n A door reversal kit, Part Number W10277499 is too hot: n Is lint screen clogged with a damp cloth to check air movement. Use a time-delay ...


