Owners Manual
Page 4
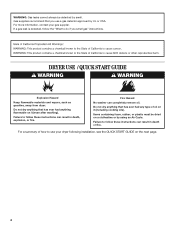
... from dryer. For a summary of oil on the next page. 4 WARNING: Gas leaks cannot always be dried on it (including cooking oils). Fire Hazard No washer can result in death or fire. Items containing foam, rubber, or plastic must be detected by using an Air Cycle. Gas suppliers recommend that has...
... from dryer. For a summary of oil on the next page. 4 WARNING: Gas leaks cannot always be dried on it (including cooking oils). Fire Hazard No washer can result in death or fire. Items containing foam, rubber, or plastic must be detected by using an Air Cycle. Gas suppliers recommend that has...

Dimension Guide
Page 1
... to change materials and specifications without notice. Rigid or flexible metal exhaust vent must be in .2 (155 cm2) 1" (25 mm) Because Whirlpool Corporation policy includes a continuous commitment to improve our products, we reserve the right to the cold water faucet using new inlet hoses. Louvered doors...(102 mm) 6" (152 mm) 1" (25 mm) 1" (25 mm) Cabinet (dryer only) installation 3" (76 mm) 76" (1930 mm) 48 in.2 (310 cm2) Stacked washer and dryer installation 51/2" (140 mm) 1" (25 mm) 3" (76 mm) 24 in the path of the dryer in vent length chart. When rigid pipe is...
... to change materials and specifications without notice. Rigid or flexible metal exhaust vent must be in .2 (155 cm2) 1" (25 mm) Because Whirlpool Corporation policy includes a continuous commitment to improve our products, we reserve the right to the cold water faucet using new inlet hoses. Louvered doors...(102 mm) 6" (152 mm) 1" (25 mm) 1" (25 mm) Cabinet (dryer only) installation 3" (76 mm) 76" (1930 mm) 48 in.2 (310 cm2) Stacked washer and dryer installation 51/2" (140 mm) 1" (25 mm) 3" (76 mm) 24 in the path of the dryer in vent length chart. When rigid pipe is...

Installation Instructions
Page 4
... not permit, installing dryer in dryer drum. INSTALLATION REQUIREMENTS TOOLS AND PARTS Tools needed for installing new exhaust vent) Utility knife Long inlet hose Rubber washer Parts package is located in garages, closets, mobile homes, or sleeping quarters. Check that all models): 1/4" nut driver (recommended) Vent clamps Leveling legs (4) Parts supplied...
... not permit, installing dryer in dryer drum. INSTALLATION REQUIREMENTS TOOLS AND PARTS Tools needed for installing new exhaust vent) Utility knife Long inlet hose Rubber washer Parts package is located in garages, closets, mobile homes, or sleeping quarters. Check that all models): 1/4" nut driver (recommended) Vent clamps Leveling legs (4) Parts supplied...

Installation Instructions
Page 5
... allow door to reduce noise transfer. If not level, clothes may not tumble properly and automatic sensor cycles may use the water supply for your washer using power supply cord, a grounded electrical outlet located within 4 ft. (1.2 m) of the water fill valves, and water pressure of 20-100 psi (137.9-689.6 kPa...
... allow door to reduce noise transfer. If not level, clothes may not tumble properly and automatic sensor cycles may use the water supply for your washer using power supply cord, a grounded electrical outlet located within 4 ft. (1.2 m) of the water fill valves, and water pressure of 20-100 psi (137.9-689.6 kPa...

Installation Instructions
Page 7
... construction and Safety, Title 24, HUD Part 280) or Standard CAN/CSA-Z240 MH. A copy of the line. The cord is recommended. Closet Installation (stacked washer and dryer): 6" (152 mm) 3" (76 mm) 76" (1930 mm) 48 in conformance with a CSA International Certified Power Cord intended to the Manufactured Home Construction and...
... construction and Safety, Title 24, HUD Part 280) or Standard CAN/CSA-Z240 MH. A copy of the line. The cord is recommended. Closet Installation (stacked washer and dryer): 6" (152 mm) 3" (76 mm) 76" (1930 mm) 48 in conformance with a CSA International Certified Power Cord intended to the Manufactured Home Construction and...

Installation Instructions
Page 13
... 15. Connect Inlet Hoses For non-steam models, skip to "Connect Vent" on threads of LP gas. Check and see if rubber washer is shown. Screw legs into leg holes by brushing on its final location. Your connection may be sure there are no longer visible. ...A. 3/8" flexible gas connector C. 3/8" to 3/8" pipe elbow B. 3/8" dryer pipe D. 3/8" pipe-to the cold water faucet using the new inlet hoses. Open shut-off and remove washer inlet hose. Then, test all non-flared male fittings. Bubbles will show a leak. Correct any leaks found. The dryer must use a wrench to connect the...
... 15. Connect Inlet Hoses For non-steam models, skip to "Connect Vent" on threads of LP gas. Check and see if rubber washer is shown. Screw legs into leg holes by brushing on its final location. Your connection may be sure there are no longer visible. ...A. 3/8" flexible gas connector C. 3/8" to 3/8" pipe elbow B. 3/8" dryer pipe D. 3/8" pipe-to the cold water faucet using the new inlet hoses. Open shut-off and remove washer inlet hose. Then, test all non-flared male fittings. Bubbles will show a leak. Correct any leaks found. The dryer must use a wrench to connect the...

Installation Instructions
Page 14
... to the cold water faucet. Screw on coupling by hand until it is seated on connector. Tighten couplings One end of the short hose. Attach washer cold inlet hose to cold water faucet. Screw on coupling by hand until it is seated on connector. 3. Damage to brass male end of the...
... to the cold water faucet. Screw on coupling by hand until it is seated on connector. Tighten couplings One end of the short hose. Attach washer cold inlet hose to cold water faucet. Screw on coupling by hand until it is seated on connector. 3. Damage to brass male end of the...

Installation Instructions
Page 16
... against the floor. Be sure vent is first heated. q Wipe dryer drum interior thoroughly with a damp cloth to see "Assistance or Service" section in your washer and dryer: A stack kit, Part Number 8572546 is on your tools. Troubleshooting See the "Use and Care Guide" or visit our website and reference Frequently... will reduce product performance. All Models: q Select a Timed Dry heated cycle, and start of a service call... 16 Do not select Air Only Temperature setting. STaCkiNG WASHER AND DRYER If you prefer to possibly avoid the cost of its first cycle. 2.
... against the floor. Be sure vent is first heated. q Wipe dryer drum interior thoroughly with a damp cloth to see "Assistance or Service" section in your washer and dryer: A stack kit, Part Number 8572546 is on your tools. Troubleshooting See the "Use and Care Guide" or visit our website and reference Frequently... will reduce product performance. All Models: q Select a Timed Dry heated cycle, and start of a service call... 16 Do not select Air Only Temperature setting. STaCkiNG WASHER AND DRYER If you prefer to possibly avoid the cost of its first cycle. 2.


