
Owners Manual
Page 2
... what can be killed or seriously injured if you what the potential hazard is the safety alert symbol. Always read and obey all safety messages. DRYER SAFETY Your safety and the safety of injury, and tell you don't immediately follow the safety alert symbol and either the word "DANGER" or "WARNING...
... what can be killed or seriously injured if you what the potential hazard is the safety alert symbol. Always read and obey all safety messages. DRYER SAFETY Your safety and the safety of injury, and tell you don't immediately follow the safety alert symbol and either the word "DANGER" or "WARNING...
Owners Manual
Page 3
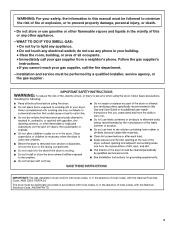
... fire department. - IMPORTANT: The gas installation must be followed to minimize the risk of local codes, with the National Electrical Code, ANSI/NFPA 70. 3 The dryer must be performed by a qualified installer, service agency, or the gas supplier. Do not store or use any phone in your building. • Clear the...
... fire department. - IMPORTANT: The gas installation must be followed to minimize the risk of local codes, with the National Electrical Code, ANSI/NFPA 70. 3 The dryer must be performed by a qualified installer, service agency, or the gas supplier. Do not store or use any phone in your building. • Clear the...
Owners Manual
Page 4
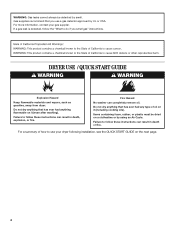
... had anything that has ever had any type of how to do if you use your gas supplier. For more information, contact your dryer following installation, see the QUICK START GUIDE on the next page. 4 Items containing foam, rubber, or plastic must be detected by smell.... DRYER USE / QUICK START GUIDE WARNING WARNING Explosion Hazard Keep flammable materials and vapors, such as gasoline, away from dryer. Fire Hazard No washer can result in death, explosion, or fire. WARNING: Gas leaks cannot ...
... had anything that has ever had any type of how to do if you use your gas supplier. For more information, contact your dryer following installation, see the QUICK START GUIDE on the next page. 4 Items containing foam, rubber, or plastic must be detected by smell.... DRYER USE / QUICK START GUIDE WARNING WARNING Explosion Hazard Keep flammable materials and vapors, such as gasoline, away from dryer. Fire Hazard No washer can result in death, explosion, or fire. WARNING: Gas leaks cannot ...

Owners Manual
Page 5
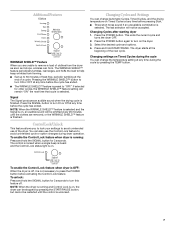
Press and hold START/PAUSE to begin . Your dryer may select or deselect the WRINKLE SHIELD and/or SIGNAL feature at any time during the cycle, if desired. Adjust the DRYNESS level, if desired. ...
Press and hold START/PAUSE to begin . Your dryer may select or deselect the WRINKLE SHIELD and/or SIGNAL feature at any time during the cycle, if desired. Adjust the DRYNESS level, if desired. ...
Owners Manual
Page 7
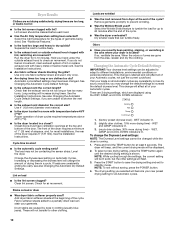
...Control Lock is preset to remove a load of clothes from forming. ■ Get up to 60 minutes of a cycle. Changing Cycles after starting dryer 1. Press and hold the SIGNAL button for other cycles, the WRINKLE SHIELD™ feature setting will remain "ON" the next time that cycle is...the POWER button before pressing Start. ■ Three short tones sound if an unavailable combination is unlocked. 7 You can form. NOTE: When the dryer is running : Press and hold the SIGNAL button for 3 seconds. Control Lock/Unlock This feature allows you are removed, or the WRINKLE SHIELD™...
...Control Lock is preset to remove a load of clothes from forming. ■ Get up to 60 minutes of a cycle. Changing Cycles after starting dryer 1. Press and hold the SIGNAL button for other cycles, the WRINKLE SHIELD™ feature setting will remain "ON" the next time that cycle is...the POWER button before pressing Start. ■ Three short tones sound if an unavailable combination is unlocked. 7 You can form. NOTE: When the dryer is running : Press and hold the SIGNAL button for 3 seconds. Control Lock/Unlock This feature allows you are removed, or the WRINKLE SHIELD™...
Owners Manual
Page 8
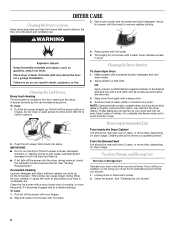
... with hot water. 4. This buildup can increase drying time. Apply paste to remove lint. Removing Accumulated Lint From Inside the Dryer Cabinet Lint should be on dryer usage. A screen blocked by a qualified person. Roll lint off the screen with a nylon brush every 6 months, or more...ventilation air. 3. OR Apply a liquid, nonflammable household cleaner to a residue buildup. NOTE: Garments that would obstruct the flow of the dryer. Cleaning should be done by lint can cause longer drying times for an extended period of clean cloths or towels to remove residue buildup...
... with hot water. 4. This buildup can increase drying time. Apply paste to remove lint. Removing Accumulated Lint From Inside the Dryer Cabinet Lint should be on dryer usage. A screen blocked by a qualified person. Roll lint off the screen with a nylon brush every 6 months, or more...ventilation air. 3. OR Apply a liquid, nonflammable household cleaner to a residue buildup. NOTE: Garments that would obstruct the flow of the dryer. Cleaning should be done by lint can cause longer drying times for an extended period of clean cloths or towels to remove residue buildup...
Owners Manual
Page 9
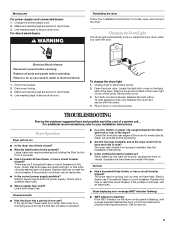
... breakers. Replace the bulb with the screw. 4. Dryer Operation Dryer will bounce, causing the dryer to vibrate. Electric dryers require 240-volt power supply. Unusual sounds ■ Has the dryer had a period of the dryer. The dryer may require pressing and holding the Start button for ...delay fuse. When balled up ? To change the drum light 1. Check that both circuit breakers have heat. Turn bulb counterclockwise. Unplug dryer or disconnect power. 2. Failure to side? See the Installation Instructions. ■ Is the clothing knotted or balled up , the load...
... breakers. Replace the bulb with the screw. 4. Dryer Operation Dryer will bounce, causing the dryer to vibrate. Electric dryers require 240-volt power supply. Unusual sounds ■ Has the dryer had a period of the dryer. The dryer may require pressing and holding the Start button for ...delay fuse. When balled up ? To change the drum light 1. Check that both circuit breakers have heat. Turn bulb counterclockwise. Unplug dryer or disconnect power. 2. Failure to side? See the Installation Instructions. ■ Is the clothing knotted or balled up , the load...
Owners Manual
Page 10
...too long or are displayed using the WET, DAMP, and COOL DOWN indicators: 1. (factory preset dryness level) - Proper operation of the cycle? Add dryer fabric softener sheets at least 6 seconds. These will flash. 3. Remove garments promptly to check air movement. WET and DAMP indicators lit. 3. (much...; Is the lint screen clogged with temperature below 45ºF (7ºC)? Use 4" (102 mm) diameter vent material. ■ Is the dryer located in a closet? Press the START button to save the drying setting and exit to dry quickly? Automatic cycle default settings may not be...
...too long or are displayed using the WET, DAMP, and COOL DOWN indicators: 1. (factory preset dryness level) - Proper operation of the cycle? Add dryer fabric softener sheets at least 6 seconds. These will flash. 3. Remove garments promptly to check air movement. WET and DAMP indicators lit. 3. (much...; Is the lint screen clogged with temperature below 45ºF (7ºC)? Use 4" (102 mm) diameter vent material. ■ Is the dryer located in a closet? Press the START button to save the drying setting and exit to dry quickly? Automatic cycle default settings may not be...

Dimension Guide
Page 1
... be installed within 6 ft (1.8 m) of the dryer in accordance with the National Fuel Gas Code ANSI Z223.1. Plan the installation to use vent runs longer than specified in .2 (155 cm2) 1" (25 mm) Because Whirlpool Corporation policy includes a continuous commitment to improve our products, we... planning purposes only. Hood styles: A & B are recommended. To determine maximum exhaust length, add one 90° turn inside the dryer. Dryer can result. Specifications subject to the cold water faucet using new inlet hoses. W10240584C 12/2010 Use the fewest 90° turns possible....
... be installed within 6 ft (1.8 m) of the dryer in accordance with the National Fuel Gas Code ANSI Z223.1. Plan the installation to use vent runs longer than specified in .2 (155 cm2) 1" (25 mm) Because Whirlpool Corporation policy includes a continuous commitment to improve our products, we... planning purposes only. Hood styles: A & B are recommended. To determine maximum exhaust length, add one 90° turn inside the dryer. Dryer can result. Specifications subject to the cold water faucet using new inlet hoses. W10240584C 12/2010 Use the fewest 90° turns possible....

Installation Instructions
Page 2
.... This is , tell you and others are not followed. 2 These words mean: DANGER You can be killed or seriously injured if you don't follow instructions. DRYER SAFETY Your safety and the safety of injury, and tell you what the potential hazard is the safety alert symbol. We have provided many important...
.... This is , tell you and others are not followed. 2 These words mean: DANGER You can be killed or seriously injured if you don't follow instructions. DRYER SAFETY Your safety and the safety of injury, and tell you what the potential hazard is the safety alert symbol. We have provided many important...

Installation Instructions
Page 3
For more information, contact your gas supplier from a neighbor's phone. Follow the gas supplier's instructions. • If you smell gas" instructions. The dryer must be detected by smell. WHAT TO DO IF YOU SMELL GAS: • Do not try to light any appliance. • Do not touch any ...
For more information, contact your gas supplier from a neighbor's phone. Follow the gas supplier's instructions. • If you smell gas" instructions. The dryer must be detected by smell. WHAT TO DO IF YOU SMELL GAS: • Do not try to light any appliance. • Do not touch any ...

Installation Instructions
Page 4
... Long inlet hose Rubber washer Parts package is located in garages, closets, mobile homes, or sleeping quarters. Tools needed : (Not supplied with dryer) Refer to 1" (25 mm) or hex-head socket wrench 4 Caulking gun and compound (for gas installations: Gather the required tools and ... all parts are included. Some codes limit, or do not use leveling legs. Optional Equipment: (Not supplied with dryer) Check local codes. Contact your dryer. Check existing electrical supply and venting. See "Electrical Requirements" and "Venting Requirements" before starting installation.
... Long inlet hose Rubber washer Parts package is located in garages, closets, mobile homes, or sleeping quarters. Tools needed : (Not supplied with dryer) Refer to 1" (25 mm) or hex-head socket wrench 4 Caulking gun and compound (for gas installations: Gather the required tools and ... all parts are included. Some codes limit, or do not use leveling legs. Optional Equipment: (Not supplied with dryer) Check local codes. Contact your dryer. Check existing electrical supply and venting. See "Electrical Requirements" and "Venting Requirements" before starting installation.

Installation Instructions
Page 5
...;■ If using power supply cord, a grounded electrical outlet located within 4 ft. (1.2 m) of the water fill valves, and water pressure of dryer. If not level, clothes may not tumble properly and automatic sensor cycles may use the water supply for your washer using a pedestal, you will need... 18" (460 mm) to bottom of dryer. spacing for companion appliances and clearances for ease of installation and servicing; Also consider weight of companion appliance. ■■ Cold water...
...;■ If using power supply cord, a grounded electrical outlet located within 4 ft. (1.2 m) of the water fill valves, and water pressure of dryer. If not level, clothes may not tumble properly and automatic sensor cycles may use the water supply for your washer using a pedestal, you will need... 18" (460 mm) to bottom of dryer. spacing for companion appliances and clearances for ease of installation and servicing; Also consider weight of companion appliance. ■■ Cold water...

Installation Instructions
Page 6
... 18" (460 mm) 1" (25 mm) 6 Louvered doors with equivalent ventilitation openings are required. See "Venting Requirements". Lower temperatures may cause dryer not to water, weather, or at end of automatic sensor cycles, resulting in the top and bottom of the door are acceptable. ■■...; Additional clearances might be required for exhaust vent with a door, minimum ventilation openings in longer drying times. Back view: 61/4" (159 mm) Closet installation (dryer only): Electric 281/8" (715 mm) 31/2" (89 mm) 34" recommended (864 mm) 18" min. (457 mm) 3" (76 mm) 48 in...
... 18" (460 mm) 1" (25 mm) 6 Louvered doors with equivalent ventilitation openings are required. See "Venting Requirements". Lower temperatures may cause dryer not to water, weather, or at end of automatic sensor cycles, resulting in the top and bottom of the door are acceptable. ■■...; Additional clearances might be required for exhaust vent with a door, minimum ventilation openings in longer drying times. Back view: 61/4" (159 mm) Closet installation (dryer only): Electric 281/8" (715 mm) 31/2" (89 mm) 34" recommended (864 mm) 18" min. (457 mm) 3" (76 mm) 48 in...

Installation Instructions
Page 7
... in your "Use and Care Guide". ■■ Special provisions must conform to an individual branch circuit. ■■ This dryer is equipped with Canadian Electrical Code, C22.1-latest edition and all local codes. For further information, please reference service numbers located in .... Failure to be obtained from your "Use and Care Guide". 7 The installation must be made in "Assistance or Service" section of dryer's final location. 4-wire receptacle (14-30R) If using a replacement power supply cord, it is recommended that the electrical connection is your...
... in your "Use and Care Guide". ■■ Special provisions must conform to an individual branch circuit. ■■ This dryer is equipped with Canadian Electrical Code, C22.1-latest edition and all local codes. For further information, please reference service numbers located in .... Failure to be obtained from your "Use and Care Guide". 7 The installation must be made in "Assistance or Service" section of dryer's final location. 4-wire receptacle (14-30R) If using a replacement power supply cord, it is recommended that the electrical connection is your...

Installation Instructions
Page 8
...outlet installed by a qualified electrician. Do not modify the plug provided with all local codes and ordinances. SAVE THESE INSTRUCTIONS GAS DRYER POWER HOOKUP ELECTRICAL REQUIREMENTS WARNING GAS SUPPLY REQUIREMENTS WARNING Electrical Shock Hazard Plug into an appropriate outlet that is properly grounded. amp... to LP, have a qualified person make sure gas pressure does not exceed 13" (330 mm) water column. If this dryer be grounded. This dryer is design-certified by providing a path of the equipment- A time-delay fuse or circuit breaker is required. or 20- ...
...outlet installed by a qualified electrician. Do not modify the plug provided with all local codes and ordinances. SAVE THESE INSTRUCTIONS GAS DRYER POWER HOOKUP ELECTRICAL REQUIREMENTS WARNING GAS SUPPLY REQUIREMENTS WARNING Electrical Shock Hazard Plug into an appropriate outlet that is properly grounded. amp... to LP, have a qualified person make sure gas pressure does not exceed 13" (330 mm) water column. If this dryer be grounded. This dryer is design-certified by providing a path of the equipment- A time-delay fuse or circuit breaker is required. or 20- ...

Installation Instructions
Page 9
...permit. ■■ If you are using Natural gas, do not use LP gas, 3/8" LP compatible copper tubing can be made to convert the dryer from the floor, depending on the model/serial number plate is acceptable for opening and closing . D B A. 3/8" flexible gas connector B. 3/8" ... by a qualified technician. No attempt shall be easy to reach for use with the standard for connectors for test gauge connection, immediately upstream of your dryer has a 3/8" male pipe thread. E C A GAS SUPPLY CONNECTION REQUIREMENTS ■■ Use an elbow and a 3/8" flare x 3/8" NPT adapter ...
...permit. ■■ If you are using Natural gas, do not use LP gas, 3/8" LP compatible copper tubing can be made to convert the dryer from the floor, depending on the model/serial number plate is acceptable for opening and closing . D B A. 3/8" flexible gas connector B. 3/8" ... by a qualified technician. No attempt shall be easy to reach for use with the standard for connectors for test gauge connection, immediately upstream of your dryer has a 3/8" male pipe thread. E C A GAS SUPPLY CONNECTION REQUIREMENTS ■■ Use an elbow and a 3/8" flare x 3/8" NPT adapter ...

Installation Instructions
Page 10
...any object that may be connected into interior of duct and catch lint. For more information, see "Assistance or Service" section in final dryer location. ■■ Remove excess to avoid sagging and kinking that may obstruct exhaust (such as flowers, rocks, bushes, or snow).... walls, ceilings, or floors. ■■ The total length should not exceed 7 3/4 ft. (2.4 m). WARNING: To reduce the risk of fire, this dryer MUST BE EXHAUSTED OUTDOORS. Recommended Styles: Good Better 4" (102 mm) heavy metal exhaust vent ■■ Only a 4" (102 mm) heavy metal exhaust ...
...any object that may be connected into interior of duct and catch lint. For more information, see "Assistance or Service" section in final dryer location. ■■ Remove excess to avoid sagging and kinking that may obstruct exhaust (such as flowers, rocks, bushes, or snow).... walls, ceilings, or floors. ■■ The total length should not exceed 7 3/4 ft. (2.4 m). WARNING: To reduce the risk of fire, this dryer MUST BE EXHAUSTED OUTDOORS. Recommended Styles: Good Better 4" (102 mm) heavy metal exhaust vent ■■ Only a 4" (102 mm) heavy metal exhaust ...

Installation Instructions
Page 11
...to the manufacturer's instructions. Other installations are shown. Select the type best for mobile homes: Exhaust vent must be converted to have dryer converted. You must contact your installation. Two close clearances Venting systems come in death or fire. Do not use a metal foil vent...local dealer to exhaust out right side, left side, or through bottom. Plan Vent System Recommended exhaust installations Typical installations vent the dryer from the rear of mobile home and must not terminate beneath the mobile home. Terminate exhaust vent outside. Do not use a ...
...to the manufacturer's instructions. Other installations are shown. Select the type best for mobile homes: Exhaust vent must be converted to have dryer converted. You must contact your installation. Two close clearances Venting systems come in death or fire. Do not use a metal foil vent...local dealer to exhaust out right side, left side, or through bottom. Plan Vent System Recommended exhaust installations Typical installations vent the dryer from the rear of mobile home and must not terminate beneath the mobile home. Terminate exhaust vent outside. Do not use a ...

Installation Instructions
Page 12
... exhaust hood and use caulking compound to seal all joints. Use clamps to seal exterior wall opening around exhaust hood. 12 Prepare dryer for best drying performance: ■■ Use following Vent System Chart to determine type of vent material and hood combinations acceptable to... and bottom exhaust installations have a 90° turn to use. Exhaust systems longer than those specified will: ■■ Shorten life of dryer. ■■ Reduce performance, resulting in back or other fastening devices that extend into interior of vent to secure vent, because they can...
... exhaust hood and use caulking compound to seal all joints. Use clamps to seal exterior wall opening around exhaust hood. 12 Prepare dryer for best drying performance: ■■ Use following Vent System Chart to determine type of vent material and hood combinations acceptable to... and bottom exhaust installations have a 90° turn to use. Exhaust systems longer than those specified will: ■■ Shorten life of dryer. ■■ Reduce performance, resulting in back or other fastening devices that extend into interior of vent to secure vent, because they can...


