

Use and Care Guide
Page 4
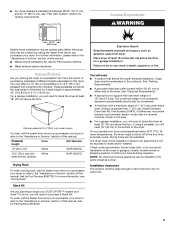
... LP gas s Caulking gun and compound (for grounding requirements. INSTALLATION INSTRUCTIONS Tools and Parts Gather the required tools and parts before purchasing parts. 4 s Before the dryer is removed from dryer drum. s Keep area around the exhaust opening and adjacent surrounding areas free from the...installing new exhaust vent) s Pliers s Tape measure 4 Leveling legs NOTE: Do not use leveling legs if installing the dryer on or in the dryer. s Parts package s 8" or 10" adjustable wrench (for gas connections) s Flat-blade screwdriver s Adjustable wrench that you understand and...
... LP gas s Caulking gun and compound (for grounding requirements. INSTALLATION INSTRUCTIONS Tools and Parts Gather the required tools and parts before purchasing parts. 4 s Before the dryer is removed from dryer drum. s Keep area around the exhaust opening and adjacent surrounding areas free from the...installing new exhaust vent) s Pliers s Tape measure 4 Leveling legs NOTE: Do not use leveling legs if installing the dryer on or in the dryer. s Parts package s 8" or 10" adjustable wrench (for gas connections) s Flat-blade screwdriver s Adjustable wrench that you understand and...
Use and Care Guide
Page 5
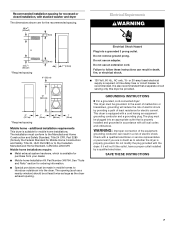
... sensor cycles may not operate correctly if dryer is not level. Ask for Part Number 346764. See "Venting Requirements." The combined weight of the dryer. The dryer must be large enough to allow the dryer door to the total height of this dryer. You may be extended. For a garage...inspector. Location Requirements WARNING 34.15" (86.74 cm) Mobile home installations require special parts (listed following) that allows for Part Number 8563738. If using a pedestal, you will need to place the dryer at the end of 127 lbs (57.6 kg). Some codes limit, or do ...
... sensor cycles may not operate correctly if dryer is not level. Ask for Part Number 346764. See "Venting Requirements." The combined weight of the dryer. The dryer must be large enough to allow the dryer door to the total height of this dryer. You may be extended. For a garage...inspector. Location Requirements WARNING 34.15" (86.74 cm) Mobile home installations require special parts (listed following) that allows for Part Number 8563738. If using a pedestal, you will need to place the dryer at the end of 127 lbs (57.6 kg). Some codes limit, or do ...
Use and Care Guide
Page 7
...accordance with all local codes and ordinances. GROUNDING INSTRUCTIONS s For a grounded, cord-connected dryer: This dryer must conform to the Manufactured Home Construction and Safety Standard, Title 24 CFR, Part 3280 (formerly the Federal Standard for electric current. SAVE THESE INSTRUCTIONS 7 Recommended installation spacing... of least resistance for Mobile Home Construction and Safety, Title 24, HUD Part 280) or to introduce outside air into a grounded 3 prong outlet. Do not modify the plug provided with the dryer: if it will reduce the risk of the equipment- Failure to whether...
...accordance with all local codes and ordinances. GROUNDING INSTRUCTIONS s For a grounded, cord-connected dryer: This dryer must conform to the Manufactured Home Construction and Safety Standard, Title 24 CFR, Part 3280 (formerly the Federal Standard for electric current. SAVE THESE INSTRUCTIONS 7 Recommended installation spacing... of least resistance for Mobile Home Construction and Safety, Title 24, HUD Part 280) or to introduce outside air into a grounded 3 prong outlet. Do not modify the plug provided with the dryer: if it will reduce the risk of the equipment- Failure to whether...
Use and Care Guide
Page 9
...result in its final location. Flexible metal vent s Flexible metal vents are recommended. If using an existing vent system s Clean lint from your dryer has a ³⁄₈" male pipe thread. s Flexible metal vent must be purchased from the entire length of the system and make .... Clamp 9 For a garage installation, the gas pipe height must be connected or secured with rigid or flexible heavy metal vent. Dryer gas pipe s The gas pipe that comes out through the rear of your dealer or by calling Whirlpool Parts and Accessories. s Review Vent system chart.
...result in its final location. Flexible metal vent s Flexible metal vents are recommended. If using an existing vent system s Clean lint from your dryer has a ³⁄₈" male pipe thread. s Flexible metal vent must be purchased from the entire length of the system and make .... Clamp 9 For a garage installation, the gas pipe height must be connected or secured with rigid or flexible heavy metal vent. Dryer gas pipe s The gas pipe that comes out through the rear of your dealer or by calling Whirlpool Parts and Accessories. s Review Vent system chart.

Use and Care Guide
Page 11
... s Select the route that will : s Shorten the life of the mobile home structure and must fit inside the dryer. Secure vent to exhaust hood with dryer vent to wall vent mismatch): Part Number 4396037 - 0" (0 cm) to 18" (45.72 cm) mismatch Part Number 4396011 - 18" (45.72 cm) to 29" (73.66 cm) mismatch... Vent system chart to determine type of vent material and hood combinations acceptable to exhaust hood. Use clamps to use the fewest number of the dryer. s Over-the-Top Installation: Part Number 4396028 s Periscope Installation (For use with 4" (10.2 cm) clamp. 3.
... s Select the route that will : s Shorten the life of the mobile home structure and must fit inside the dryer. Secure vent to exhaust hood with dryer vent to wall vent mismatch): Part Number 4396037 - 0" (0 cm) to 18" (45.72 cm) mismatch Part Number 4396011 - 18" (45.72 cm) to 29" (73.66 cm) mismatch... Vent system chart to determine type of vent material and hood combinations acceptable to exhaust hood. Use clamps to use the fewest number of the dryer. s Over-the-Top Installation: Part Number 4396028 s Periscope Installation (For use with 4" (10.2 cm) clamp. 3.
Use and Care Guide
Page 14
... cord. Plug into a grounded 3 prong outlet. Select a Timed Dry heated cycle, and start , check the following: s Dryer is an extra part, go back through the steps to dryer front panel with the 6 screws. s Electrical supply is open . If you have all of your tools. 3. Close door ... and outer door assemblies with the 4 screws. Wipe the dryer drum interior thoroughly with a damp cloth to scratch the dryer surface. Slide the head of /recycle all parts are now installed. s Household fuse is closed . 11. See "Level Dryer." Do not remove ground prong. Remove any dust. 10....
... cord. Plug into a grounded 3 prong outlet. Select a Timed Dry heated cycle, and start , check the following: s Dryer is an extra part, go back through the steps to dryer front panel with the 6 screws. s Electrical supply is open . If you have all of your tools. 3. Close door ... and outer door assemblies with the 4 screws. Wipe the dryer drum interior thoroughly with a damp cloth to scratch the dryer surface. Slide the head of /recycle all parts are now installed. s Household fuse is closed . 11. See "Level Dryer." Do not remove ground prong. Remove any dust. 10....
Use and Care Guide
Page 17
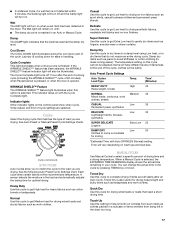
...the actual time in handling. Quick Dry Use this cycle, clothes will turn on load type and load size. Laundry is reached in the dryer. WRINKLE SHIELD™ Feature The WRINKLE SHIELD™ feature light illuminates when this cycle to come out suitable for drying small loads or ...The Cycle Complete light turns off and the Damp light will be adjusted. The temperature setting on until: s The damp dry point is cooling down part of drying time and a drying temperature. Timed Dry is finished. Damp Dry Use this setting to select a specific amount of the cycle. Cycle ...
...the actual time in handling. Quick Dry Use this cycle, clothes will turn on load type and load size. Laundry is reached in the dryer. WRINKLE SHIELD™ Feature The WRINKLE SHIELD™ feature light illuminates when this cycle to come out suitable for drying small loads or ...The Cycle Complete light turns off and the Damp light will be adjusted. The temperature setting on until: s The damp dry point is cooling down part of drying time and a drying temperature. Timed Dry is finished. Damp Dry Use this setting to select a specific amount of the cycle. Cycle ...
Use and Care Guide
Page 22
...your nearest designated service center. If you need replacement parts If you only use a dryer rack with any questions or concerns at the top and bottom of the door. In the U.S.A. s Use and maintenance procedures. Whirlpool designated service technicians are wrinkled s Was the load...in your telephone directory Yellow Pages. These parts will help , follow the menu prompts. Call the Whirlpool Customer eXperience Center toll free: 1-800-253-1301. s Accessory and repair parts sales. Accessories U.S.A. Separate the load to move and install dryer. Change the dryness level setting on ...
...your nearest designated service center. If you need replacement parts If you only use a dryer rack with any questions or concerns at the top and bottom of the door. In the U.S.A. s Use and maintenance procedures. Whirlpool designated service technicians are wrinkled s Was the load...in your telephone directory Yellow Pages. These parts will help , follow the menu prompts. Call the Whirlpool Customer eXperience Center toll free: 1-800-253-1301. s Accessory and repair parts sales. Accessories U.S.A. Separate the load to move and install dryer. Change the dryness level setting on ...


