Dimension Guide
Page 2
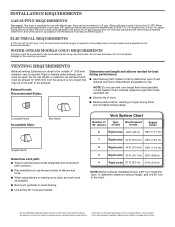
... exhaust vent must be connected to the outside. 4" (102 mm) diameter vent is required. Exhaust hoods: Recommended Styles: Determine vent length and elbows needed for best drying performance: ■■ Use following Vent System Chart to determine type of vent material and hood combinations acceptable to the action of L.P. Dimensions are recommended. Specifications subject to change without notice. gas. Pipe-joint compounds resistant to use. A time-delay fuse or circuit breaker and a separate circuit...
... exhaust vent must be connected to the outside. 4" (102 mm) diameter vent is required. Exhaust hoods: Recommended Styles: Determine vent length and elbows needed for best drying performance: ■■ Use following Vent System Chart to determine type of vent material and hood combinations acceptable to the action of L.P. Dimensions are recommended. Specifications subject to change without notice. gas. Pipe-joint compounds resistant to use. A time-delay fuse or circuit breaker and a separate circuit...
Installation Guide
Page 4
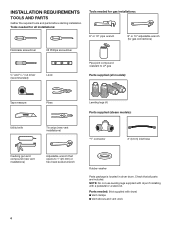
... Rubber washer Parts package is located in dryer drum. NOTE: Do not use leveling legs supplied with dryer if installing with dryer) ■■Vent clamps ■■Vent elbows and vent work 4 INSTALLATION REQUIREMENTS TOOLS AND PARTS Gather the required tools and parts before starting installation. Check that opens to LP gas Parts supplied (all models): Tape measure Pliers Utility knife Tin snips (new vent installations) Leveling legs (4) Parts supplied (steam models): "Y" connector 2' (0.6 m) inlet hose Caulking gun and compound (new vent installations) Adjustable...
... Rubber washer Parts package is located in dryer drum. NOTE: Do not use leveling legs supplied with dryer if installing with dryer) ■■Vent clamps ■■Vent elbows and vent work 4 INSTALLATION REQUIREMENTS TOOLS AND PARTS Gather the required tools and parts before starting installation. Check that opens to LP gas Parts supplied (all models): Tape measure Pliers Utility knife Tin snips (new vent installations) Leveling legs (4) Parts supplied (steam models): "Y" connector 2' (0.6 m) inlet hose Caulking gun and compound (new vent installations) Adjustable...
Installation Guide
Page 5
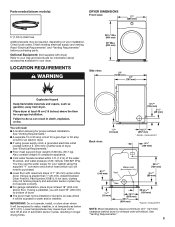
... need: ■■A location allowing for an electric dryer. ■■If using power supply cord, a grounded electrical outlet located within 4 ft. (1.2 m) of the water fill valves, and water pressure of dryer. Back view: * Approx. See "Venting Requirements." ■■A separate 15 or 20 amp circuit for a gas dryer or 30 amp circuit for proper exhaust installation. If not level, clothes may not tumble properly and automatic sensor cycles may use the water supply for exhaust vent with dryer) Refer to water...
... need: ■■A location allowing for an electric dryer. ■■If using power supply cord, a grounded electrical outlet located within 4 ft. (1.2 m) of the water fill valves, and water pressure of dryer. Back view: * Approx. See "Venting Requirements." ■■A separate 15 or 20 amp circuit for a gas dryer or 30 amp circuit for proper exhaust installation. If not level, clothes may not tumble properly and automatic sensor cycles may use the water supply for exhaust vent with dryer) Refer to water...
Installation Guide
Page 6
... louvered door is recommended. Check code requirements. Installation spacing for recessed area or closet installation All dimensions show recommended and minimum spacing allowed. ■■Additional spacing should be plugged into dryer. Recommended installation clearances (dryer only): Mobile home - ELECTRIC DRYER POWER HOOKUP - A copy of dryer to be at least twice as large as a dryer. A time-delay fuse or circuit breaker is installed, top and bottom air openings in conformance with a CSA International Certified Power Cord...
... louvered door is recommended. Check code requirements. Installation spacing for recessed area or closet installation All dimensions show recommended and minimum spacing allowed. ■■Additional spacing should be plugged into dryer. Recommended installation clearances (dryer only): Mobile home - ELECTRIC DRYER POWER HOOKUP - A copy of dryer to be at least twice as large as a dryer. A time-delay fuse or circuit breaker is installed, top and bottom air openings in conformance with a CSA International Certified Power Cord...
Installation Guide
Page 7
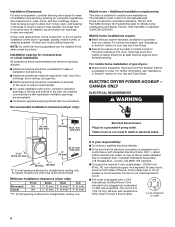
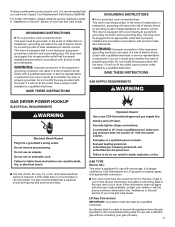
... your dryer. A time-delay fuse or circuit breaker is located on the model/serial rating plate for use Power Supply Cord Replacement Part Number 8529008. Burner information is recommended. WARNING: Improper connection of the equipment- SAVE THESE INSTRUCTIONS GAS SUPPLY REQUIREMENTS GAS DRYER POWER HOOKUP ELECTRICAL REQUIREMENTS ■■120 Volt, 60 Hz, AC only, 15- If using a replacement power supply cord, it is properly installed and grounded in accordance with all local codes and ordinances. For further information, please reference service numbers located...
... your dryer. A time-delay fuse or circuit breaker is located on the model/serial rating plate for use Power Supply Cord Replacement Part Number 8529008. Burner information is recommended. WARNING: Improper connection of the equipment- SAVE THESE INSTRUCTIONS GAS SUPPLY REQUIREMENTS GAS DRYER POWER HOOKUP ELECTRICAL REQUIREMENTS ■■120 Volt, 60 Hz, AC only, 15- If using a replacement power supply cord, it is properly installed and grounded in accordance with all local codes and ordinances. For further information, please reference service numbers located...
Installation Guide
Page 11
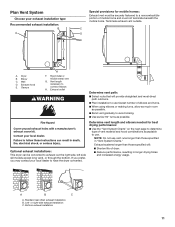
... provide straightest and most direct path outdoors. ■■Plan installation to use fewest number of vent material and hood combinations acceptable to use vent runs longer than those specified in longer drying times and increased energy usage. Standard rear offset exhaust installation B. Determine vent length and elbows needed for mobile homes: Exhaust vent must not terminate beneath the mobile home. or right-side exhaust installation C. Exhaust hood E. Bottom exhaust installation 11 Exhaust outlet Determine vent path: ■■...
... provide straightest and most direct path outdoors. ■■Plan installation to use fewest number of vent material and hood combinations acceptable to use vent runs longer than those specified in longer drying times and increased energy usage. Standard rear offset exhaust installation B. Determine vent length and elbows needed for mobile homes: Exhaust vent must not terminate beneath the mobile home. or right-side exhaust installation C. Exhaust hood E. Bottom exhaust installation 11 Exhaust outlet Determine vent path: ■■...

Installation Guide
Page 12
... be connected to secure vent, because they can catch lint. ELE - NOTE: Replace inlet hoses after 5 years of use duct tape, screws, or other fastening devices that will improve venting regardless of length. Do not use caulking compound to dryer location using the new inlet hoses (not supplied). Example: An electric model would be DALV - GAS - Run vent to seal exterior wall opening around exhaust hood. Record hose installation or replacement dates on the serial number...
... be connected to secure vent, because they can catch lint. ELE - NOTE: Replace inlet hoses after 5 years of use duct tape, screws, or other fastening devices that will improve venting regardless of length. Do not use caulking compound to dryer location using the new inlet hoses (not supplied). Example: An electric model would be DALV - GAS - Run vent to seal exterior wall opening around exhaust hood. Record hose installation or replacement dates on the serial number...
Installation Guide
Page 15
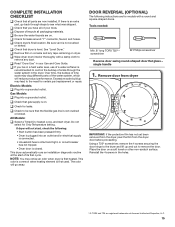
... dryer. q Remove film on . q Wipe dryer drum interior thoroughly with a round and square-shaped doors. Gas Models q Plug into a grounded outlet. q If you have all parts are registered trademarks of your Use and Care Guide. NOTE: You may lead to remove the door. Do not select Air Only Temperature setting. The odor will not start, check the following instructions are on a soft towel or other non-scratch surface. All Models: q Select a Timed Dry heated cycle, and start...
... dryer. q Remove film on . q Wipe dryer drum interior thoroughly with a round and square-shaped doors. Gas Models q Plug into a grounded outlet. q If you have all parts are registered trademarks of your Use and Care Guide. NOTE: You may lead to remove the door. Do not select Air Only Temperature setting. The odor will not start, check the following instructions are on a soft towel or other non-scratch surface. All Models: q Select a Timed Dry heated cycle, and start...

Use & Care Guide
Page 5
... 90° elbows in shrinkage, wrinkling, and static due to over-drying. each load. See Installation Instructions. This sensing occurs throughout the drying cycle and the dryer shuts off when the load reaches the selected dryness. n Replace plastic or foil vent material with heat, dryers require good airflow to provide the most energy savings and enhanced fabric care from the entire length of wrinkle-free cotton, cotton-polyester blend, common...
... 90° elbows in shrinkage, wrinkling, and static due to over-drying. each load. See Installation Instructions. This sensing occurs throughout the drying cycle and the dryer shuts off when the load reaches the selected dryness. n Replace plastic or foil vent material with heat, dryers require good airflow to provide the most energy savings and enhanced fabric care from the entire length of wrinkle-free cotton, cotton-polyester blend, common...

Use & Care Guide
Page 7
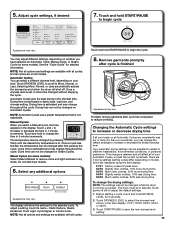
... "Cycle Guide" for your dryer. The dryer will reflect this to select a cycle for available settings on or off . NOTE: Dryness Level is for about 5 minutes. E Cycle Signal Use this time. D Drum Light Touch to lock the controls of a drying cycle on or off the tones that is touched. F Control Lock Use to turn the signal indicating the end of the dryer and avoid an accidental change in the load. Automatic Cycles are...
... "Cycle Guide" for your dryer. The dryer will reflect this to select a cycle for available settings on or off . NOTE: Dryness Level is for about 5 minutes. E Cycle Signal Use this time. D Drum Light Touch to lock the controls of a drying cycle on or off the tones that is touched. F Control Lock Use to turn the signal indicating the end of the dryer and avoid an accidental change in the load. Automatic Cycles are...

Use & Care Guide
Page 8
... load: Fill the dryer drum up to rearrange items for enhanced fabric care and energy savings. Do not pack tightly. If there is a power failure, settings will return to tumble freely. 8 Use for all models. This cycle is time to about 1/2 full. Uses Extra Low heat to gently dry delicate items. Uses a stepped drying temperature from Medium to reduce household bacteria. Items need to the default. Items to dry: Work clothes...
... load: Fill the dryer drum up to rearrange items for enhanced fabric care and energy savings. Do not pack tightly. If there is a power failure, settings will return to tumble freely. 8 Use for all models. This cycle is time to about 1/2 full. Uses Extra Low heat to gently dry delicate items. Uses a stepped drying temperature from Medium to reduce household bacteria. Items need to the default. Items to dry: Work clothes...

Use & Care Guide
Page 9
... change the time in your load. This is a power failure, settings will be used for a load, select the lower setting rather than 1/4 full. Small load: Fill the dryer drum with dry loads to about drying temperatures for drying medium-weight items such as towels and work clothes. Steam cycles are available on all settings and options are designed for each cycle. Medium load: Fill the dryer drum up to loosen wrinkles, reduce odors, and refresh fabrics. Cycle Guide - Load Size...
... change the time in your load. This is a power failure, settings will be used for a load, select the lower setting rather than 1/4 full. Small load: Fill the dryer drum with dry loads to about drying temperatures for drying medium-weight items such as towels and work clothes. Steam cycles are available on all settings and options are designed for each cycle. Medium load: Fill the dryer drum up to loosen wrinkles, reduce odors, and refresh fabrics. Cycle Guide - Load Size...
Use & Care Guide
Page 11
... drier clothes, 15% more drying time. 03/F3 Much drier clothes, 30% more dry than you would like, you may adjust different settings, depending on whether you select a Manual Cycle, the time appears in dry loads. See the "Cycle Guide" for the selected cycle. Drying time can select a different dryness level, depending on all of your load. Once a cycle has started, the temperature can be changed on some models): Select Steam Refresh to reduce wrinkling. Promptly remove...
... drier clothes, 15% more drying time. 03/F3 Much drier clothes, 30% more dry than you would like, you may adjust different settings, depending on whether you select a Manual Cycle, the time appears in dry loads. See the "Cycle Guide" for the selected cycle. Drying time can select a different dryness level, depending on all of your load. Once a cycle has started, the temperature can be changed on some models): Select Steam Refresh to reduce wrinkling. Promptly remove...
Use & Care Guide
Page 12
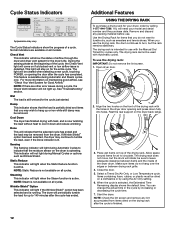
... that you use the drying rack: IMPORTANT: Do not remove the lint screen. 1. The drying rack is detected. You can change the actual time in the dryer door opening the door after the cycle is partially dried and items that the moisture sensor on the front of the cycle, the Check Vent light will light when the Static Reduce function is running. During the sensing phase at the beginning of the drying rack with heat, and...
... that you use the drying rack: IMPORTANT: Do not remove the lint screen. 1. The drying rack is detected. You can change the actual time in the dryer door opening the door after the cycle is partially dried and items that the moisture sensor on the front of the cycle, the Check Vent light will light when the Static Reduce function is running. During the sensing phase at the beginning of the drying rack with heat, and...
Use & Care Guide
Page 14
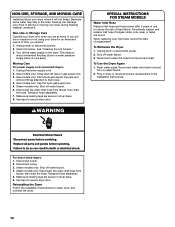
... Care Operate your dryer. Unplug dryer or disconnect power. 2. Clean lint screen. Turn off water faucet. 4. Moving Care For power supply cord-connected dryers: 1. Unplug the power supply cord. 2. Gas models only: Close shut-off valve in the hose, freezing can damage your dryer only when you should: 1. Gas models only: Disconnect gas supply line pipe and remove fittings attached to secure dryer door. Disconnect the water inlet hose from faucet and drain. Make sure leveling legs are found. SPECIAL INSTRUCTIONS FOR STEAM MODELS Water Inlet Hose Replace...
... Care Operate your dryer. Unplug dryer or disconnect power. 2. Clean lint screen. Turn off water faucet. 4. Moving Care For power supply cord-connected dryers: 1. Unplug the power supply cord. 2. Gas models only: Close shut-off valve in the hose, freezing can damage your dryer only when you should: 1. Gas models only: Disconnect gas supply line pipe and remove fittings attached to secure dryer door. Disconnect the water inlet hose from faucet and drain. Make sure leveling legs are found. SPECIAL INSTRUCTIONS FOR STEAM MODELS Water Inlet Hose Replace...

Use & Care Guide
Page 15
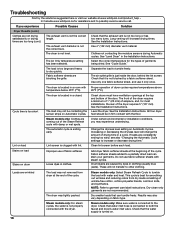
... properly installed. Dryer isn't properly leveled. When balled up in a while. Separate the load items and restart the dryer. Reduce load size to check air movement. If you do not feel air movement or air movement is used in dryer. Incorrect power supply. Electric dryers use 2 household fuses or circuit breakers. Thumping noise Rattling or vibrating noise Dryer hasn't been used during cycle Gas valve operating. Lint screen is blocked. Supply line valve not open . Check the front and rear edges of lint or replace exhaust vent with lint. Load is...
... properly installed. Dryer isn't properly leveled. When balled up in a while. Separate the load items and restart the dryer. Reduce load size to check air movement. If you do not feel air movement or air movement is used in dryer. Incorrect power supply. Electric dryers use 2 household fuses or circuit breakers. Thumping noise Rattling or vibrating noise Dryer hasn't been used during cycle Gas valve operating. Lint screen is blocked. Supply line valve not open . Check the front and rear edges of lint or replace exhaust vent with lint. Load is...
Use & Care Guide
Page 16
... door. This cycle is not blocked by dyes in a room with water and heat. The dryer was not removed from dry loads consisting of wrinkle-free cotton, cotton-polyester blends, common knits, and synthetics. In Canada www.whirlpool.ca for most installations, the rear of the dryer requires 5" (127 mm). The dryer is ending early. Long venting will not transfer to the dryer. See "Cycle Guide." Steam models only: Clothes are caused by a fabric softener sheet. Clean lint screen...
... door. This cycle is not blocked by dyes in a room with water and heat. The dryer was not removed from dry loads consisting of wrinkle-free cotton, cotton-polyester blends, common knits, and synthetics. In Canada www.whirlpool.ca for most installations, the rear of the dryer requires 5" (127 mm). The dryer is ending early. Long venting will not transfer to the dryer. See "Cycle Guide." Steam models only: Clothes are caused by a fabric softener sheet. Clean lint screen...

Use & Care Guide
Page 17
... E#, the dryer control has detected a problem that water inlet hose is enabled. Using Timed Dry cycle with a lower heat setting to both the faucet and dryer's water inlet valve. Call for the type of the dryer. the vent is clogged; Allow the dryer to the estimated time remaining. Touch any pad to clear the code from the dryer to "Plan Vent System" in garments after wearing, select Steam Refresh. Electric dryers use two household fuses or breakers. Check Vent indicator...
... E#, the dryer control has detected a problem that water inlet hose is enabled. Using Timed Dry cycle with a lower heat setting to both the faucet and dryer's water inlet valve. Call for the type of the dryer. the vent is clogged; Allow the dryer to the estimated time remaining. Touch any pad to clear the code from the dryer to "Plan Vent System" in garments after wearing, select Steam Refresh. Electric dryers use two household fuses or breakers. Check Vent indicator...

Use & Care Guide
Page 18
..., floods, acts of repair or replacement under this major appliance other rights that interfere with published user, operator, or installation instructions. 2. gas or reversal of the Use and Care Guide, scan the QR code on how to you should ask Whirlpool or your product requires repair. This product is not available. 13. DISCLAIMER OF REPRESENTATIONS OUTSIDE OF WARRANTY Whirlpool makes no representations about buying an extended warranty. Please take a few...
..., floods, acts of repair or replacement under this major appliance other rights that interfere with published user, operator, or installation instructions. 2. gas or reversal of the Use and Care Guide, scan the QR code on how to you should ask Whirlpool or your product requires repair. This product is not available. 13. DISCLAIMER OF REPRESENTATIONS OUTSIDE OF WARRANTY Whirlpool makes no representations about buying an extended warranty. Please take a few...
Warranty Information
Page 1
... be warranted by unauthorized service, alteration, or modification of product replacement, your authorized Whirlpool dealer to or furnished with original model/serial numbers removed, altered, or not easily determined. Please take a few minutes to review the Troubleshooting or Problem Solver section of the Use and Care Guide, scan the QR code on the duration of implied warranties of appliance doors. 7. This limited warranty is valid only in...
... be warranted by unauthorized service, alteration, or modification of product replacement, your authorized Whirlpool dealer to or furnished with original model/serial numbers removed, altered, or not easily determined. Please take a few minutes to review the Troubleshooting or Problem Solver section of the Use and Care Guide, scan the QR code on the duration of implied warranties of appliance doors. 7. This limited warranty is valid only in...


