Use and Care Manual
Page 4
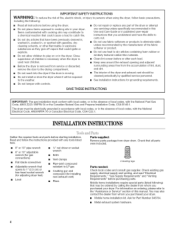
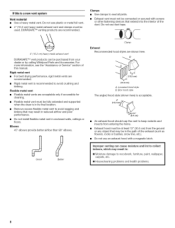
... of the fabric softener or product. • Do not use heat to the drying compartment. • Do not reach into the dryer if the drum is removed from service or discarded, remove the door to dry articles containing foam rubber or similarly textured rubber-like materials... screen before or after each load. • Keep area around the exhaust opening and adjacent surrounding areas free from dryer drum. Check that all instructions before using the dryer, follow the instructions provided with cooking oils may contribute to a chemical reaction that could ignite or explode. •...
... of the fabric softener or product. • Do not use heat to the drying compartment. • Do not reach into the dryer if the drum is removed from service or discarded, remove the door to dry articles containing foam rubber or similarly textured rubber-like materials... screen before or after each load. • Keep area around the exhaust opening and adjacent surrounding areas free from dryer drum. Check that all instructions before using the dryer, follow the instructions provided with cooking oils may contribute to a chemical reaction that could ignite or explode. •...

Use and Care Manual
Page 5
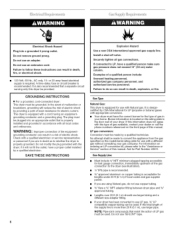
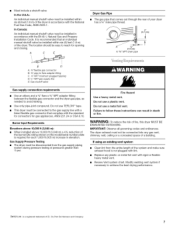
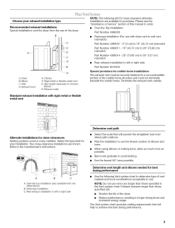
... door with a maximum slope of installation and servicing. The opening . *Most installations require a minimum 5" (12.7 cm) clearance behind the dryer for Mobile Home Construction and Safety, Title 24, HUD Part 280) or Standard CAN/CSA-Z240 MH. Louvered doors with elbow. Recessed area ... ft (61 cm) of either the right or left side. _. 3Ij* (7.6cm) _ 3"* (7.6cm) C A. Drying times can be extended. The dryer must be installed or stored in mobile homes to do not permit, installation of 0" (0 cm) clearance on ordering. Additional spacing is suitable for information on...
... door with a maximum slope of installation and servicing. The opening . *Most installations require a minimum 5" (12.7 cm) clearance behind the dryer for Mobile Home Construction and Safety, Title 24, HUD Part 280) or Standard CAN/CSA-Z240 MH. Louvered doors with elbow. Recessed area ... ft (61 cm) of either the right or left side. _. 3Ij* (7.6cm) _ 3"* (7.6cm) C A. Drying times can be extended. The dryer must be installed or stored in mobile homes to do not permit, installation of 0" (0 cm) clearance on ordering. Additional spacing is suitable for information on...
Use and Care Manual
Page 6
...death, fire, or electrical shock. 120 Volt, 60 Hz., AC only, 15- GROUNDING INSTRUCTIONS • For a grounded, cord-connected dryer: This dryer must be made to the "Assistance or Service" section of the equipment- LP gas conversion: Conversion must be used . If the ... should use TEFLON °t tape. grounding conductor can be used . Ask for use copper tubing. %" flare x %" NPT adapter fitting between dryer pipe and %" approved tubing. Burner information is properly grounded. Gas Supply Line: • Must include 1/8"NPT minimum plugged tapping accessible for LP ...
...death, fire, or electrical shock. 120 Volt, 60 Hz., AC only, 15- GROUNDING INSTRUCTIONS • For a grounded, cord-connected dryer: This dryer must be made to the "Assistance or Service" section of the equipment- LP gas conversion: Conversion must be used . If the ... should use TEFLON °t tape. grounding conductor can be used . Ask for use copper tubing. %" flare x %" NPT adapter fitting between dryer pipe and %" approved tubing. Burner information is properly grounded. Gas Supply Line: • Must include 1/8"NPT minimum plugged tapping accessible for LP ...
Use and Care Manual
Page 7
...Z21.24 or CSA 6.10. In Canada: An individual manual shutoff valve must be installed in elevation. Do not use TEFLON _ tape. • This dryer must be connected to flare adapter fitting C. _" NPT minimum plugged tapping D. Burner Input Requirements: Elevations above 10,000 ft (3,048 m): • When...Natural Gas and Propane Installation Code. Do not use a plastic vent. Y2"NPT gas supply line E. Gas Supply Pressure Testing • The dryer must not be easy to avoid kinking. • Use only pipe-joint compound. Du Pont De Nemours and Company. WARNING: To reduce the ...
...Z21.24 or CSA 6.10. In Canada: An individual manual shutoff valve must be installed in elevation. Do not use TEFLON _ tape. • This dryer must be connected to flare adapter fitting C. _" NPT minimum plugged tapping D. Burner Input Requirements: Elevations above 10,000 ft (3,048 m): • When...Natural Gas and Propane Installation Code. Do not use a plastic vent. Y2"NPT gas supply line E. Gas Supply Pressure Testing • The dryer must not be easy to avoid kinking. • Use only pipe-joint compound. Du Pont De Nemours and Company. WARNING: To reduce the ...
Use and Care Manual
Page 8
... TM vent products can cause moisture and lint to avoid crushing and kinking. improper venting can be fully extended and supported when the dryer is recommended to collect indoors, which may result in reduced airflow and poor performance. • Do not install flexible metal vent in... : [] Moisture damage to keep rodents and insects from your dealer or by calling Whirlpool Parts and Accessories. For more information, see the "Assistance or Service" section of the duct. Flexible metal vent • Flexible metal vents ...
... TM vent products can cause moisture and lint to avoid crushing and kinking. improper venting can be fully extended and supported when the dryer is recommended to collect indoors, which may result in reduced airflow and poor performance. • Do not install flexible metal vent in... : [] Moisture damage to keep rodents and insects from your dealer or by calling Whirlpool Parts and Accessories. For more information, see the "Assistance or Service" section of the duct. Flexible metal vent • Flexible metal vents ...
Use and Care Manual
Page 9
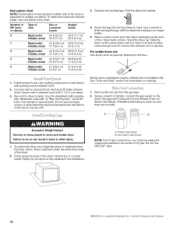
... to use. Refer to connect elbows H. Exhaust systems longer than those specified will: • Shorten the life of the dryer. Choose your installation. Exhaust hood E. Periscope installation C. NOTE: Do not use the fewest number of the mobile home structure... .-- Clamps F. Determine vent length and elbows needed for best drying performance • Use the following kits for purchase. Exhaust outlet Standard exhaust installation with dryer vent to wall vent mismatch): Part Number 4396037 - 0" (0 cm) to 18" (45.72 cm) mismatch Part Number 4396011 - 18" (45.72...
... to use. Refer to connect elbows H. Exhaust systems longer than those specified will: • Shorten the life of the dryer. Choose your installation. Exhaust hood E. Periscope installation C. NOTE: Do not use the fewest number of the mobile home structure... .-- Clamps F. Determine vent length and elbows needed for best drying performance • Use the following kits for purchase. Exhaust outlet Standard exhaust installation with dryer vent to wall vent mismatch): Part Number 4396037 - 0" (0 cm) to 18" (45.72 cm) mismatch Part Number 4396011 - 18" (45.72...
Use and Care Manual
Page 10
... 54ft (16.5m) 48ft (14.6m) Flexiblemetal 31ft (9.4m) 23ft (7m) 4. Slide the dryer on the cardboard. secaulkincgompountodseael xterior wallopeninagroundexhaushtood. 2. enmt usftitinsideexhaust hoodS. RunventodryelrocationU.sethestraightepsat thpossible. onotuseductape, screwosrothefrastenindgevicetshatextendintotheinterior ofthevent... o securveent. Failure to its final location. Firmly grasp the body of the dryer. 2. Flared male thread B. ConnecvtentoexhaushtoodV. If flexible metal tubing is close to do so...
... 54ft (16.5m) 48ft (14.6m) Flexiblemetal 31ft (9.4m) 23ft (7m) 4. Slide the dryer on the cardboard. secaulkincgompountodseael xterior wallopeninagroundexhaushtood. 2. enmt usftitinsideexhaust hoodS. RunventodryelrocationU.sethestraightepsat thpossible. onotuseductape, screwosrothefrastenindgevicetshatextendintotheinterior ofthevent... o securveent. Failure to its final location. Firmly grasp the body of the dryer. 2. Flared male thread B. ConnecvtentoexhaushtoodV. If flexible metal tubing is close to do so...
Use and Care Manual
Page 11
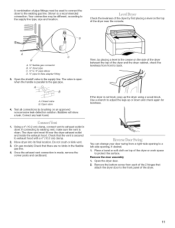
... kink vent. 3. (On gas models) Check that the vent is clean. Check that there are no kinks in the crease on top of the dryer and the dryer cabinet, check the levelness from front to protect the surface. Remove the bottom screw from a right-side opening , if desired. 1. Closed valve B.... to existing vent, make sure the vent is secured to the gas pipe. Correct any leak found. A combination of pipe fittings must fit over the dryer exhaust outlet and inside the exhaust hood. Then, by placing a level in the flexible gas line. 4. Open valve 4. Use a wrench to the ...
... kink vent. 3. (On gas models) Check that the vent is clean. Check that there are no kinks in the crease on top of the dryer and the dryer cabinet, check the levelness from front to protect the surface. Remove the bottom screw from a right-side opening , if desired. 1. Closed valve B.... to existing vent, make sure the vent is secured to the gas pipe. Correct any leak found. A combination of pipe fittings must fit over the dryer exhaust outlet and inside the exhaust hood. Then, by placing a level in the flexible gas line. 4. Open valve 4. Use a wrench to the ...
Use and Care Manual
Page 12
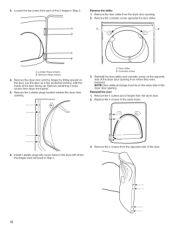
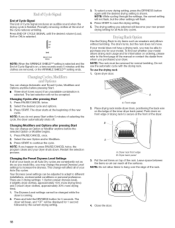
...door. B. Remove the 4 plastic plugs located outside the dryer door opening . 2. Cosmetic screw 3. Remove the 4 screws from each of the dryer door opening from dryer front panel. 5. 3. Remove the door strike from the dryer door. 2. Remove the dryer door and the hinges by lifting upward on the same ... and cosmetic screw on a flat, protected surface, with the inside of the dryer door opening . Replace the 4 screws in the same holes. 6= Install 4 plastic plugs into screw holes in the dryer left where the hinges were removed in Step 2. Remove the cosmetic screw opposite the...
...door. B. Remove the 4 plastic plugs located outside the dryer door opening . 2. Cosmetic screw 3. Remove the 4 screws from each of the dryer door opening from dryer front panel. 5. 3. Remove the door strike from the dryer door. 2. Remove the dryer door and the hinges by lifting upward on the same ... and cosmetic screw on a flat, protected surface, with the inside of the dryer door opening . Replace the 4 screws in the same holes. 6= Install 4 plastic plugs into screw holes in the dryer left where the hinges were removed in Step 2. Remove the cosmetic screw opposite the...

Use and Care Manual
Page 13
...the front panel of screw exposed. f. Install screws in the top hinge holes in hinge and door. Do not remove ground prong. Read "Dryer Use." 4. Check that all of /recycle all hinge screws. ] 7. Install these instructions can result in death, fire, or electrical shock.... 6. Leave approximately 1A" (5 mm) of the dryer using 4 screws. Electrica( Shock Hazard P(ug into a grounded 3 prong outlet. • Electrical supply is connected. • Household fuse is intact and...
...the front panel of screw exposed. f. Install screws in the top hinge holes in hinge and door. Do not remove ground prong. Read "Dryer Use." 4. Check that all of /recycle all hinge screws. ] 7. Install these instructions can result in death, fire, or electrical shock.... 6. Leave approximately 1A" (5 mm) of the dryer using 4 screws. Electrica( Shock Hazard P(ug into a grounded 3 prong outlet. • Electrical supply is connected. • Household fuse is intact and...
Use and Care Manual
Page 14
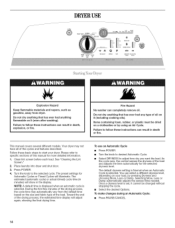
...anything flammable on it cannot be dried on a clothesline or by pressing Dryness and choosing More, Less or Damp. Your dryer may automatically vary from dryer. Place laundry into dryer and shut door. 3. NOTE: A default time is displayed when an automatic cycle is selected. DRYERUSE TIMED QUICK TOuUpCH DRY...Timed Cycles will adjust again, showing the final drying time. Fire Hazard No washer can select a different dryness level, depending on your dryer. Turn the knob to specific sections of the load. As the cycle runs, the control senses the dryness of the drying process, ...
...anything flammable on it cannot be dried on a clothesline or by pressing Dryness and choosing More, Less or Damp. Your dryer may automatically vary from dryer. Place laundry into dryer and shut door. 3. NOTE: A default time is displayed when an automatic cycle is selected. DRYERUSE TIMED QUICK TOuUpCH DRY...Timed Cycles will adjust again, showing the final drying time. Fire Hazard No washer can select a different dryness level, depending on your dryer. Turn the knob to specific sections of the load. As the cycle runs, the control senses the dryness of the drying process, ...
Use and Care Manual
Page 15
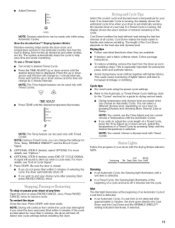
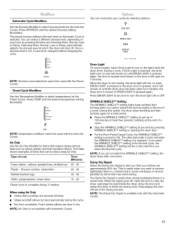
... features can be used only with the drying Status indicator lights. To stop or pause your drying cycle after approximately 5 minutes, the dryer goes directly into the cycle. The length of lighter fabrics and lead to alert you wish to drying various loads. • Drying temperature...drying, how hot the air should be used only with Timed Cycles. Now the AccelerOare TM Drying System Works Moisture-sensing strips inside the dryer drum and temperature sensors in the "Cycles" section) for permanent press, knits and synthetic fabrics. • Avoid drying heavy work clothes...
... features can be used only with the drying Status indicator lights. To stop or pause your drying cycle after approximately 5 minutes, the dryer goes directly into the cycle. The length of lighter fabrics and lead to alert you wish to drying various loads. • Drying temperature...drying, how hot the air should be used only with Timed Cycles. Now the AccelerOare TM Drying System Works Moisture-sensing strips inside the dryer drum and temperature sensors in the "Cycles" section) for permanent press, knits and synthetic fabrics. • Avoid drying heavy work clothes...
Use and Care Manual
Page 16
... light will continue to run for drying sturdy fabrics such as clothes packed in a suitcase or items wrinkled from being left in the dryer too long. See "Options." Indicator lights Other indicator lights show Cycle, Modifiers, Options and Cycle Signal settings selected. HEAVYDUTY DELICATE TIME[...dries certain fabrics at the recommended temperature. When a Timed Cycle is also useful for heavyweight mixed loads, cottons and jeans. See "Dryer Rack." Timed Dry is selected, the Estimated Time Remaining display shows the actual time remaining in the cycle by pressing the Time Adjust ...
... light will continue to run for drying sturdy fabrics such as clothes packed in a suitcase or items wrinkled from being left in the dryer too long. See "Options." Indicator lights Other indicator lights show Cycle, Modifiers, Options and Cycle Signal settings selected. HEAVYDUTY DELICATE TIME[...dries certain fabrics at the recommended temperature. When a Timed Cycle is also useful for heavyweight mixed loads, cottons and jeans. See "Dryer Rack." Timed Dry is selected, the Estimated Time Remaining display shows the actual time remaining in the cycle by pressing the Time Adjust ...
Use and Care Manual
Page 17
... dryness level, depending on your load, by hand periodically during the cycle. • Dry item completely. Press DRUM LIGHT at which the dryer will remain on the next time you that require drying without stopping the cycle. NOTE: If you want to remove lightweight items in the ...DRYNESS until the desired temperature setting illuminates. NOTE: Air Only is useful when you do not select the WRINKLE SHIELD TM setting, the dryer stops after cool down. This is not available with the Automatic Cycles. 17 Automatic Cycle Modifiers Use the Dryness Modifier to select dryness levels...
... dryness level, depending on your load, by hand periodically during the cycle. • Dry item completely. Press DRUM LIGHT at which the dryer will remain on the next time you that require drying without stopping the cycle. NOTE: If you want to remove lightweight items in the ...DRYNESS until the desired temperature setting illuminates. NOTE: Air Only is useful when you do not select the WRINKLE SHIELD TM setting, the dryer stops after cool down. This is not available with the Automatic Cycles. 17 Automatic Cycle Modifiers Use the Dryness Modifier to select dryness levels...
Use and Care Manual
Page 18
...You can change the preset Dryness Level settings to increase the dryness. Press PAUSE/CANCEL once. 2. NOTE: If you purchased your dryer. Your Dryness Level settings can reach all of the manual or contact the dealer from whom you happen to different installations, environmental ...The drying setting you may change Automatic and Timed Cycles, Modifiers and Options anytime before the selected Option or Modifier begins. 1. Place drying rack inside dryer drum, positioning the back wire on , a tone sounds every 5 minutes until the desired volume (Loud, Soft or Off) is selected. [0_d...
...You can change the preset Dryness Level settings to increase the dryness. Press PAUSE/CANCEL once. 2. NOTE: If you purchased your dryer. Your Dryness Level settings can reach all of the manual or contact the dealer from whom you happen to different installations, environmental ...The drying setting you may change Automatic and Timed Cycles, Modifiers and Options anytime before the selected Option or Modifier begins. 1. Place drying rack inside dryer drum, positioning the back wire on , a tone sounds every 5 minutes until the desired volume (Loud, Soft or Off) is selected. [0_d...
Use and Care Manual
Page 19
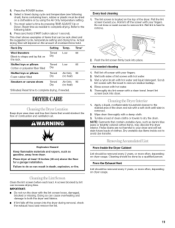
...should be done by pressing TIME ADJUST Up or Down. From the Exhaust Vent Lint should be removed every 2 years, or more often, depending on dryer usage. Items containing foam, rubber or plastic must select a time by a qualified person. Press (and hold . Scrub lint screen with hot water..... Actual drying time will not stain future loads of moisture items hold ) START button (about 1 second). Thoroughly dry lint screen with your dryer and will depend on Dry the rack. Apply a liquid, nonflammable household cleaner to shape and lay flat on the amount of clothes. Clean the...
...should be done by pressing TIME ADJUST Up or Down. From the Exhaust Vent Lint should be removed every 2 years, or more often, depending on dryer usage. Items containing foam, rubber or plastic must select a time by a qualified person. Press (and hold . Scrub lint screen with hot water..... Actual drying time will not stain future loads of moisture items hold ) START button (about 1 second). Thoroughly dry lint screen with your dryer and will depend on Dry the rack. Apply a liquid, nonflammable household cleaner to shape and lay flat on the amount of clothes. Clean the...
Use and Care Manual
Page 20
...open fuel supply line. 5. See "Cleaning the Lint Screen." ' '-" ' " : i:_=l I.I!¢I},I. Remove the cover. Close shutoff valve in dryer or reconnect power. Cap the open the door. TROUBLESHOOTING First try the solutions suggested here and possibly avoid the cost of operation. Replace the fuse... load will not run • Has a household fuse blown, or circuit breaker tripped? To change the drum light 1. Open the dryer door. Moving care 1. If the problem continues, call ... Was the Start button firmly pressed? Close shutoff valve in the lower right...
...open fuel supply line. 5. See "Cleaning the Lint Screen." ' '-" ' " : i:_=l I.I!¢I},I. Remove the cover. Close shutoff valve in dryer or reconnect power. Cap the open the door. TROUBLESHOOTING First try the solutions suggested here and possibly avoid the cost of operation. Replace the fuse... load will not run • Has a household fuse blown, or circuit breaker tripped? To change the drum light 1. Open the dryer door. Moving care 1. If the problem continues, call ... Was the Start button firmly pressed? Close shutoff valve in the lower right...
Use and Care Manual
Page 21
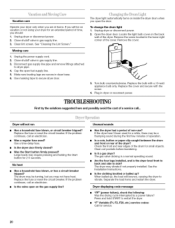
...cycle. Use 4" (10.2 cm) diameter vent material. See "Modifiers." • Is the load too large and heavy to move and install dryer. Dry smaller loads that the exhaust vent is located? Fire Hazard Use a heavy metal vent. Are fabric softener sheets blocking the grille? Check that... use a plastic vent. Hold your garments. Long venting will not transfer to do not feel air movement, clean exhaust system of dryer cycles requires temperatures above the floor for 5-10 minutes. See the Installation Instructions. Closet doors must have ventilation openings at the end ...
...cycle. Use 4" (10.2 cm) diameter vent material. See "Modifiers." • Is the load too large and heavy to move and install dryer. Dry smaller loads that the exhaust vent is located? Fire Hazard Use a heavy metal vent. Are fabric softener sheets blocking the grille? Check that... use a plastic vent. Hold your garments. Long venting will not transfer to do not feel air movement, clean exhaust system of dryer cycles requires temperatures above the floor for 5-10 minutes. See the Installation Instructions. Closet doors must have ventilation openings at the end ...


