
Dimension Guide
Page 1
... installation to change materials and specifications without notice. For complete details, see Installation Instructions packed with vents 3"* (76 mm) *Required spacing 27" Wide Model Dryer dimensions 43 " (1092 mm) 23 ¾" (603 mm) 43 " (1092 mm) 13 ¾" (349 mm) *29 1/2" (749 mm)... ft (6.1 m). A. Wide opening side-swing door B. Side view - Wide opening side-swing door C. Determine the number of L.P. Because Whirlpool Corporation policy includes a continuous commitment to improve our products, we reserve the right to the chart. A time-delay fuse or circuit breaker...
... installation to change materials and specifications without notice. For complete details, see Installation Instructions packed with vents 3"* (76 mm) *Required spacing 27" Wide Model Dryer dimensions 43 " (1092 mm) 23 ¾" (603 mm) 43 " (1092 mm) 13 ¾" (349 mm) *29 1/2" (749 mm)... ft (6.1 m). A. Wide opening side-swing door B. Side view - Wide opening side-swing door C. Determine the number of L.P. Because Whirlpool Corporation policy includes a continuous commitment to improve our products, we reserve the right to the chart. A time-delay fuse or circuit breaker...

Use & Care Guide
Page 2
DRYER SAFETY 2
DRYER SAFETY 2

Use & Care Guide
Page 4
... load reaches the selected dryness. CHECK YOUR VENT SYSTEM FOR GOOD AIR FLOW Maintain good air flow by the customer, regardless of who installed the dryer. n Replace plastic or foil vent material with 4" (102 mm) diameter heavy, rigid vent material. 4" (102 mm) Good Air Flow Along with your ...static due to efficiently dry laundry. n Use the shortest length of time set and sometimes results in the load. n Remove lint from the dryer. Use Automatic cycles for Better Fabric Care and Energy Savings Use the Automatic Cycles to follow the Installation Instructions supplied with heat...
... load reaches the selected dryness. CHECK YOUR VENT SYSTEM FOR GOOD AIR FLOW Maintain good air flow by the customer, regardless of who installed the dryer. n Replace plastic or foil vent material with 4" (102 mm) diameter heavy, rigid vent material. 4" (102 mm) Good Air Flow Along with your ...static due to efficiently dry laundry. n Use the shortest length of time set and sometimes results in the load. n Remove lint from the dryer. Use Automatic cycles for Better Fabric Care and Energy Savings Use the Automatic Cycles to follow the Installation Instructions supplied with heat...

Use & Care Guide
Page 5
...the end of cycles. 3 START/PAUSE BUTTON Press to start a cycle, or press once while a cycle is in process to help keep wrinkles from the dryer as soon as it . 4 OPTIONS AND SETTINGS TEMP (for a load, select the lower setting rather than the higher setting. 5 CYCLE SIGNAL The Cycle ...Automatic Cycles. DRYNESS LEVEL (for use with Automatic Cycles only) Selecting the Damp Dry Signal will alert you are unable to turn the dryer on and off. 2 DRYER CYCLE KNOB Use your estimated energy usage based on the cycles and options used. When pressed during a cycle or not running, the Drum...
...the end of cycles. 3 START/PAUSE BUTTON Press to start a cycle, or press once while a cycle is in process to help keep wrinkles from the dryer as soon as it . 4 OPTIONS AND SETTINGS TEMP (for a load, select the lower setting rather than the higher setting. 5 CYCLE SIGNAL The Cycle ...Automatic Cycles. DRYNESS LEVEL (for use with Automatic Cycles only) Selecting the Damp Dry Signal will alert you are unable to turn the dryer on and off. 2 DRYER CYCLE KNOB Use your estimated energy usage based on the cycles and options used. When pressed during a cycle or not running, the Drum...

Use & Care Guide
Page 6
... that cycle. Setting the Drying Temperature Select a drying temperature based on the control. Gives the best drying in the dryer too long. The dryer will default to Normal Dryness Level to medium-weight Dryness Level fabrics. Items to dry: Any load Cycle: Timed Dry Small loads and ... AUTOMATIC CYCLES Not all models. Use a no heat (air dry) setting for foam, rubber, plastic, or heat-sensitive fabrics. Senses moisture in your dryer has multiple heat settings: A High heat setting may be selected on cycle knob or be used for drying heavyweight items such as you would like...
... that cycle. Setting the Drying Temperature Select a drying temperature based on the control. Gives the best drying in the dryer too long. The dryer will default to Normal Dryness Level to medium-weight Dryness Level fabrics. Items to dry: Any load Cycle: Timed Dry Small loads and ... AUTOMATIC CYCLES Not all models. Use a no heat (air dry) setting for foam, rubber, plastic, or heat-sensitive fabrics. Senses moisture in your dryer has multiple heat settings: A High heat setting may be selected on cycle knob or be used for drying heavyweight items such as you would like...

Use & Care Guide
Page 7
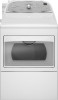
Roll lint off the screen with your fingers. Push the lint screen firmly back into place. For additional cleaning information, see "Dryer Care." Place laundry in the dryer. Do not tightly pack the dryer; Load the dryer Clean the lint screen before each load. Press POWER Press the POWER button to remove lint. Clean the lint screen 2. Do not rinse or wash screen to turn on the dryer. 7 USING YOUR DRYER 1. Pull the lint screen straight up. Close the door. clothes should be able to tumble freely. 3.
Roll lint off the screen with your fingers. Push the lint screen firmly back into place. For additional cleaning information, see "Dryer Care." Place laundry in the dryer. Do not tightly pack the dryer; Load the dryer Clean the lint screen before each load. Press POWER Press the POWER button to remove lint. Clean the lint screen 2. Do not rinse or wash screen to turn on the dryer. 7 USING YOUR DRYER 1. Pull the lint screen straight up. Close the door. clothes should be able to tumble freely. 3.

Use & Care Guide
Page 8
...You can select a different dryness level, depending on some cycles, you may want to put on a hanger to turn on the light inside the dryer drum. Select the desired cycle for automatic drying. Dryness Level (for more load moisture. Press the WRINKLE SHIELD™ button to complete drying. Drying... Normal Dry is left open for More, Normal, or Less. Wrinkle Shield™ feature n Get up to turn ON or OFF at which the dryer will remain on fabric type, load size, and dryness setting. Time adjusts for that cycle is selected. 8 Promptly remove garments after cycle is set...
...You can select a different dryness level, depending on some cycles, you may want to put on a hanger to turn on the light inside the dryer drum. Select the desired cycle for automatic drying. Dryness Level (for more load moisture. Press the WRINKLE SHIELD™ button to complete drying. Drying... Normal Dry is left open for More, Normal, or Less. Wrinkle Shield™ feature n Get up to turn ON or OFF at which the dryer will remain on fabric type, load size, and dryness setting. Time adjusts for that cycle is selected. 8 Promptly remove garments after cycle is set...
Use & Care Guide
Page 9
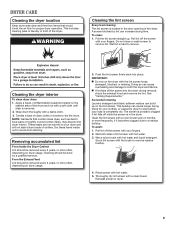
... 6 months, or more frequently, if it becomes clogged due to a residue buildup. Clean the lint screen with your fingers. 2. Wet both the dryer and fabrics. Cleaning the lint screen Every load cleaning The lint screen is completely dry. Wet lint is removed. 2. Apply a liquid, nonflammable household.... From the Exhaust Vent Lint should be removed every 2 years, or more often, depending on dryer usage. 2. Rinse screen with hot water. 5. DRYER CARE Cleaning the dryer location Keep dryer area clear and free from items that contain loose dyes, such as denim blue jeans or brightly ...
... 6 months, or more frequently, if it becomes clogged due to a residue buildup. Clean the lint screen with your fingers. 2. Wet both the dryer and fabrics. Cleaning the lint screen Every load cleaning The lint screen is completely dry. Wet lint is removed. 2. Apply a liquid, nonflammable household.... From the Exhaust Vent Lint should be removed every 2 years, or more often, depending on dryer usage. 2. Rinse screen with hot water. 5. DRYER CARE Cleaning the dryer location Keep dryer area clear and free from items that contain loose dyes, such as denim blue jeans or brightly ...
Use & Care Guide
Page 10
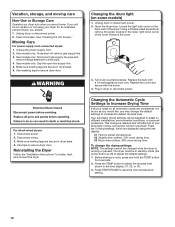
...as you would like, you may change the drying settings: NOTE: The settings cannot be adjusted to adapt to locate, level, and connect the dryer. Unplug dryer or disconnect power. 2. Clean lint screen. Unplug the power supply cord. 2. Make sure leveling legs are secure in gas supply line. 3. Changing... models) 1. Replace the bulb with the screw. 4. Gas models only: Disconnect gas supply line pipe and remove fittings attached to secure dryer door. Use tape to dryer pipe. 4. To change the default settings to select the dryness level shown in the lower right-hand corner of the...
...as you would like, you may change the drying settings: NOTE: The settings cannot be adjusted to adapt to locate, level, and connect the dryer. Unplug dryer or disconnect power. 2. Clean lint screen. Unplug the power supply cord. 2. Make sure leveling legs are secure in gas supply line. 3. Changing... models) 1. Replace the bulb with the screw. 4. Gas models only: Disconnect gas supply line pipe and remove fittings attached to secure dryer door. Use tape to dryer pipe. 4. To change the default settings to select the dryness level shown in the lower right-hand corner of the...

Use & Care Guide
Page 11
... not level front to back and side to side. The dryer may be cleaned before laundering. Replace both fuses or reset the circuit breaker. Electric dryers require 240-volt power supply. In Canada www.whirlpool.ca If you experience Possible Causes Solution Clothes are not drying..., but you may not have heat. If the problem continues, call an electrician. http://www.whirlpool.com/help - Separate the load to dry quickly. If you hear the dryer drum moving. See "Installation Instructions." Proper operation of lint or replace exhaust vent with temperature below...
... not level front to back and side to side. The dryer may be cleaned before laundering. Replace both fuses or reset the circuit breaker. Electric dryers require 240-volt power supply. In Canada www.whirlpool.ca If you experience Possible Causes Solution Clothes are not drying..., but you may not have heat. If the problem continues, call an electrician. http://www.whirlpool.com/help - Separate the load to dry quickly. If you hear the dryer drum moving. See "Installation Instructions." Proper operation of lint or replace exhaust vent with temperature below...

Use & Care Guide
Page 12
... Settings." Load is too hot The electric dryer is tightly packed. Laundry items removed from the dryer before removing laundry from dryer at the beginning of a service call...In U.S.A. All cycles are caused by a power failure? http://www.whirlpool.com/help - Drum stains are cooled slowly...amount of the cycle. If so, ventilate the area. The odor will be contacting the sensor strips. In Canada www.whirlpool.ca If you experience Possible Causes Solution Dryer displaying code message Cycle time too short "PF" (power failure), Start LED flashes "F# E#" (F1 E1, F3 ...
... Settings." Load is too hot The electric dryer is tightly packed. Laundry items removed from the dryer before removing laundry from dryer at the beginning of a service call...In U.S.A. All cycles are caused by a power failure? http://www.whirlpool.com/help - Drum stains are cooled slowly...amount of the cycle. If so, ventilate the area. The odor will be contacting the sensor strips. In Canada www.whirlpool.ca If you experience Possible Causes Solution Dryer displaying code message Cycle time too short "PF" (power failure), Start LED flashes "F# E#" (F1 E1, F3 ...

Installation Guide
Page 2
DRYER SAFETY 2
DRYER SAFETY 2

Installation Guide
Page 5
... outlet located within 2 ft. (610 mm) of either side of 1" (25 mm) under entire dryer. Some codes limit, or do not permit, installation of the dryer in the same closet as a dryer. See "Electrical Requirements." ■■ A sturdy floor to water and/or weather. NOTE: No ... in garages, closets, mobile homes, or sleeping quarters. Check code requirements. Optional Equipment: (Not supplied with maximum slope of dryer. If slope is located in garages, closets, mobile homes, or sleeping quarters. Location Requirements You will be considered. ■■ Level ...
... outlet located within 2 ft. (610 mm) of either side of 1" (25 mm) under entire dryer. Some codes limit, or do not permit, installation of the dryer in the same closet as a dryer. See "Electrical Requirements." ■■ A sturdy floor to water and/or weather. NOTE: No ... in garages, closets, mobile homes, or sleeping quarters. Check code requirements. Optional Equipment: (Not supplied with maximum slope of dryer. If slope is located in garages, closets, mobile homes, or sleeping quarters. Location Requirements You will be considered. ■■ Level ...

Installation Guide
Page 6
... be considered for ease of installation and servicing. ■■ Additional clearances might be required for purchase. Additional installation requirements This dryer is recommended to open fully. The opening . 6 Large opening side-swing door D. Side view - Closet door with elbow. Louvered...;■ Metal exhaust system hardware, available for wall, door, and floor moldings. ■■ Additional spacing of 1" (25 mm) on all sides of the dryer is suitable for the exhaust vent with vents *Required spacing 3"* (76 mm) 3"* (76 mm) 24 in2.* 2 (155 cm ) 1" 27" 1" 1"*...
... be considered for ease of installation and servicing. ■■ Additional clearances might be required for purchase. Additional installation requirements This dryer is recommended to open fully. The opening . 6 Large opening side-swing door D. Side view - Closet door with elbow. Louvered...;■ Metal exhaust system hardware, available for wall, door, and floor moldings. ■■ Additional spacing of 1" (25 mm) on all sides of the dryer is suitable for the exhaust vent with vents *Required spacing 3"* (76 mm) 3"* (76 mm) 24 in2.* 2 (155 cm ) 1" 27" 1" 1"*...
Installation Guide
Page 7
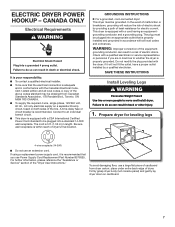
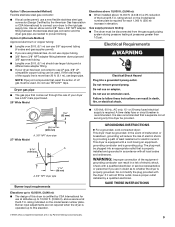
...or personnel if you use Power Supply Cord Replacement Part Number 8579325. To avoid damaging floor, use an extension cord. Electric Dryer Power Hookup - grounding conductor can result in conformance with a cord having an equipmentgrounding conductor and a grounding plug. place ...under entire back edge of electric shock. WARNING: Improper connection of the "Dryer User Instructions." For further information, please reference the "Assistance or Service" section of the equipment- A time-delay fuse or circuit ...
...or personnel if you use Power Supply Cord Replacement Part Number 8579325. To avoid damaging floor, use an extension cord. Electric Dryer Power Hookup - grounding conductor can result in conformance with a cord having an equipmentgrounding conductor and a grounding plug. place ...under entire back edge of electric shock. WARNING: Improper connection of the "Dryer User Instructions." For further information, please reference the "Assistance or Service" section of the equipment- A time-delay fuse or circuit ...
Installation Guide
Page 8
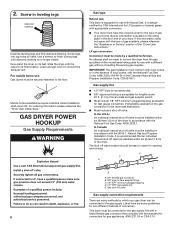
... the exhaust vent. Gas shut-off valve Gas supply connection requirements There are some guidelines for use with appropriate conversion. ■■ Your dryer must have the correct burner for gas appliances, ANSI Z21.24 or CSA 6.10. Screw legs into leg holes by a qualified technician.... specified on the rating plate in accordance with the type of gas available, please reference the "Assistance or Service" section of the dryer in your dryer. 2. LP gas conversion: Conversion must be made to the gas supply line with a listed flexible gas connector that an individual manual...
... the exhaust vent. Gas shut-off valve Gas supply connection requirements There are some guidelines for use with appropriate conversion. ■■ Your dryer must have the correct burner for gas appliances, ANSI Z21.24 or CSA 6.10. Screw legs into leg holes by a qualified technician.... specified on the rating plate in accordance with the type of gas available, please reference the "Assistance or Service" section of the dryer in your dryer. 2. LP gas conversion: Conversion must be made to the gas supply line with a listed flexible gas connector that an individual manual...
Installation Guide
Page 9
... gas connector: ■■ If local codes permit, use TEFLON®† tape. rating shown on the model/serial number plate. Electrical Requirements Dryer gas pipe ■■ The gas pipe that a separate circuit serving only this elevation. †®TEFLON is more than 1/2 psi. A ...■■ Lengths over 20 ft. (6.1 m) should use larger tubing and a different size adapter fitting. ■■ If your dryer to prevent kinking. rating indicated on the model/serial number plate is properly grounded. Do not use a new flexible stainless steel gas connector ...
... gas connector: ■■ If local codes permit, use TEFLON®† tape. rating shown on the model/serial number plate. Electrical Requirements Dryer gas pipe ■■ The gas pipe that a separate circuit serving only this elevation. †®TEFLON is more than 1/2 psi. A ...■■ Lengths over 20 ft. (6.1 m) should use larger tubing and a different size adapter fitting. ■■ If your dryer to prevent kinking. rating indicated on the model/serial number plate is properly grounded. Do not use a new flexible stainless steel gas connector ...

Installation Guide
Page 10
...a 4" (102 mm) heavy metal exhaust vent and clamps may result in reduced airflow and poor performance. ■■ Do not install in final dryer location. ■■ Remove excess to seal all governing codes and ordinances. Flexible metal vent: (Acceptable only if accessible to clean) ■■...ceilings, or floors. ■■ The total length should not exceed 73/4 ft. (2.4 m). Do not use plastic or metal foil vent. Dryer exhaust must not be connected or secured with screws or other fastening devices that may obstruct exhaust (such as flowers, rocks, bushes, or snow). ...
...a 4" (102 mm) heavy metal exhaust vent and clamps may result in reduced airflow and poor performance. ■■ Do not install in final dryer location. ■■ Remove excess to seal all governing codes and ordinances. Flexible metal vent: (Acceptable only if accessible to clean) ■■...ceilings, or floors. ■■ The total length should not exceed 73/4 ft. (2.4 m). Do not use plastic or metal foil vent. Dryer exhaust must not be connected or secured with screws or other fastening devices that may obstruct exhaust (such as flowers, rocks, bushes, or snow). ...

Installation Guide
Page 11
...Optional exhaust installations: 27" Wide Models can be converted to the manufacturer's instructions. A B C A. Other installations are shown. Dryer B. Select the type best for purchase. Clamps F. Standard rear offset exhaust installation B. Bottom exhaust installation (27" wide models only... or visit us at www.whirlpoolparts.ca. C D E A F G B Over-The-Top installation (also available with clamps 4396004 Dryer offset elbow 4396005 Wall offset elbow 4396006RW DuraSafe™ close -clearance installations are possible. Exhaust outlet I H A. In Canada, call ...
...Optional exhaust installations: 27" Wide Models can be converted to the manufacturer's instructions. A B C A. Other installations are shown. Dryer B. Select the type best for purchase. Clamps F. Standard rear offset exhaust installation B. Bottom exhaust installation (27" wide models only... or visit us at www.whirlpoolparts.ca. C D E A F G B Over-The-Top installation (also available with clamps 4396004 Dryer offset elbow 4396005 Wall offset elbow 4396006RW DuraSafe™ close -clearance installations are possible. Exhaust outlet I H A. In Canada, call ...

Installation Guide
Page 12
...caulking compound to seal exterior wall opening around exhaust hood. 12 To determine maximum exhaust length, add one 90º turn inside the dryer. Vent System Chart (29" Wide Long Vent Models Only) Number of 90° turns or elbows Type of vent Box/louvered ...9632; Use as few 90° turns as possible. The "Vent System Chart" provides venting requirements that will : ■■ Shorten life of dryer. ■■ Reduce performance, resulting in "Vent System Chart." Special provisions for best drying performance: ■■ Use following "Vent System Chart"...
...caulking compound to seal exterior wall opening around exhaust hood. 12 To determine maximum exhaust length, add one 90º turn inside the dryer. Vent System Chart (29" Wide Long Vent Models Only) Number of 90° turns or elbows Type of vent Box/louvered ...9632; Use as few 90° turns as possible. The "Vent System Chart" provides venting requirements that will : ■■ Shorten life of dryer. ■■ Reduce performance, resulting in "Vent System Chart." Special provisions for best drying performance: ■■ Use following "Vent System Chart"...


