
User Instructions
Page 1
... modelo y de serie dentro de la cavidad superior de la puerta. You will need to know your dryer with these premium accessories. Dealer name Serial number Address Phone number Model number Purchase date Accessories Enhance your complete model number and serial number. Part Number Accessory 20-48KITRC 4 ft (1.2 m) gas line dryer connector installation kit PT220L 4 ft (1.2 m) dryer cord, 3-wire, 30 amp PT400L 4 ft (1.2 m) dryer cord, 4-wire, 30 amp PT600L 6 ft (1.8 m) dryer cord, 4-wire, 30 amp 8212614 Dryer vent lint brush 31682 All...
... modelo y de serie dentro de la cavidad superior de la puerta. You will need to know your dryer with these premium accessories. Dealer name Serial number Address Phone number Model number Purchase date Accessories Enhance your complete model number and serial number. Part Number Accessory 20-48KITRC 4 ft (1.2 m) gas line dryer connector installation kit PT220L 4 ft (1.2 m) dryer cord, 3-wire, 30 amp PT400L 4 ft (1.2 m) dryer cord, 4-wire, 30 amp PT600L 6 ft (1.8 m) dryer cord, 4-wire, 30 amp 8212614 Dryer vent lint brush 31682 All...

User Instructions
Page 2
... of the dryer and exhaust vent should be killed or seriously injured if you and others are not followed. DRYER SAFETY Your safety and the safety of others . Always read and obey all instructions before or after each load. ■ Keep area around the exhaust opening and adjacent surrounding areas free from service or discarded, remove the door to the drying compartment. ■...
... of the dryer and exhaust vent should be killed or seriously injured if you and others are not followed. DRYER SAFETY Your safety and the safety of others . Always read and obey all instructions before or after each load. ■ Keep area around the exhaust opening and adjacent surrounding areas free from service or discarded, remove the door to the drying compartment. ■...

User Instructions
Page 3
.... - Clean exhaust vent periodically, depending on use a plastic vent. Checking Your Vent Your dryer must be followed to minimize the risk of this manual must be performed by a qualified installer, service agency, or the gas supplier. Check vent after installation. When cleaning is important for by improper venting will not be paid installation or selfinstalled. 1. Refer to flow. WARNING: For your safety, the information in this or any electrical switch; WHAT...
.... - Clean exhaust vent periodically, depending on use a plastic vent. Checking Your Vent Your dryer must be followed to minimize the risk of this manual must be performed by a qualified installer, service agency, or the gas supplier. Check vent after installation. When cleaning is important for by improper venting will not be paid installation or selfinstalled. 1. Refer to flow. WARNING: For your safety, the information in this or any electrical switch; WHAT...

User Instructions
Page 4
... a Temperature selector, set to follow these instructions can completely remove oil. When you are using an Air Cycle. Turn the selector to tumble freely. 3. The metal strips help smooth out wrinkles. 6. (OPTIONAL) Your dryer may have an END OF CYCLE SIGNAL. As clothes begin to remove dust from the dryer as soon as they pass. The drum turns, but the rack does not move. Do not use the drying rack...
... a Temperature selector, set to follow these instructions can completely remove oil. When you are using an Air Cycle. Turn the selector to tumble freely. 3. The metal strips help smooth out wrinkles. 6. (OPTIONAL) Your dryer may have an END OF CYCLE SIGNAL. As clothes begin to remove dust from the dryer as soon as they pass. The drum turns, but the rack does not move. Do not use the drying rack...

User Instructions
Page 5
... loads of the drum and rub with a soft cloth until stain is hard to remove residue buildup. 4. Cleaning should be done by a qualified person. Close the door. 3. Select a timed drying cycle and temperature, or an air cycle. Reset cycle to remove lint. WARNING 2. Pull the lint screen straight up. Do not rinse or wash screen to complete drying, if needed. The lint screen is located in dryer. NOTE: Garments that would obstruct the flow of the dryer...
... loads of the drum and rub with a soft cloth until stain is hard to remove residue buildup. 4. Cleaning should be done by a qualified person. Close the door. 3. Select a timed drying cycle and temperature, or an air cycle. Reset cycle to remove lint. WARNING 2. Pull the lint screen straight up. Do not rinse or wash screen to complete drying, if needed. The lint screen is located in dryer. NOTE: Garments that would obstruct the flow of the dryer...
User Instructions
Page 6
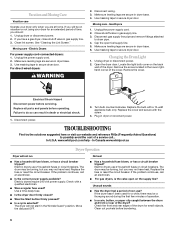
...-use? Clean lint screen. See "Cleaning the Lint Screen." Moving care - Unplug the power supply cord. 2. Use masking tape to secure dryer door. For direct-wired dryers: WARNING 2. Use masking tape to secure dryer door. Moving care - Gas Dryers 1. Unplug the power supply cord. 2. Close shutoff valve in dryer or reconnect power. Cap the open on the back wall of a service call an electrician. ■ Is the correct power supply available? Changing the Drum Light 1. Unplug dryer or disconnect power. 2. Locate the light bulb cover on the supply line? Remove...
...-use? Clean lint screen. See "Cleaning the Lint Screen." Moving care - Unplug the power supply cord. 2. Use masking tape to secure dryer door. For direct-wired dryers: WARNING 2. Use masking tape to secure dryer door. Moving care - Gas Dryers 1. Unplug the power supply cord. 2. Close shutoff valve in dryer or reconnect power. Cap the open on the back wall of a service call an electrician. ■ Is the correct power supply available? Changing the Drum Light 1. Unplug dryer or disconnect power. 2. Locate the light bulb cover on the supply line? Remove...

User Instructions
Page 7
... has too many turns. Dryer Results Clothes are not drying satisfactorily, drying times are caused by dyes in a closet? Check that the exhaust vent is mostly dry. Long venting will change the amount of the dryer requires 5" (12.7 cm). See the Installation Instructions. ■ Is the exhaust vent diameter the correct size? Failure to other injury. ■ Is the automatic cycle ending early? Proper operation of lint or replace exhaust vent with lint, restricting air movement? Cycle time too short...
... has too many turns. Dryer Results Clothes are not drying satisfactorily, drying times are caused by dyes in a closet? Check that the exhaust vent is mostly dry. Long venting will change the amount of the dryer requires 5" (12.7 cm). See the Installation Instructions. ■ Is the exhaust vent diameter the correct size? Failure to other injury. ■ Is the automatic cycle ending early? Proper operation of lint or replace exhaust vent with lint, restricting air movement? Cycle time too short...

User Instructions
Page 8
... remote locations. 10. All rights reserved. ® Registered Trademark/TM Trademark of Whirlpool, U.S.A. 8/07 Printed in accordance with published installation instructions. 11. Damage resulting from the area, rewash and dry the clothing. ■ Is the electric dryer being used for Factory Specified Parts and repair labor to correct defects in the home. 8. Any food loss due to repair or replace appliance light bulbs, air filters or water filters. Replacement parts or repair labor...
... remote locations. 10. All rights reserved. ® Registered Trademark/TM Trademark of Whirlpool, U.S.A. 8/07 Printed in accordance with published installation instructions. 11. Damage resulting from the area, rewash and dry the clothing. ■ Is the electric dryer being used for Factory Specified Parts and repair labor to correct defects in the home. 8. Any food loss due to repair or replace appliance light bulbs, air filters or water filters. Replacement parts or repair labor...


