

Use & Care Guide
Page 4
... load. This sensing occurs throughout the drying cycle and the dryer shuts off when the load reaches the selected dryness. n Use the shortest length of who installed the dryer. n Replace plastic or foil vent material with your dryer for the occasional damp load that needs a little more than four 90° elbows in good air flow. n Remove lint from the exhaust hood. The Energy Preferred cycle will be sure to follow the "Installation Instructions...
... load. This sensing occurs throughout the drying cycle and the dryer shuts off when the load reaches the selected dryness. n Use the shortest length of who installed the dryer. n Replace plastic or foil vent material with your dryer for the occasional damp load that needs a little more than four 90° elbows in good air flow. n Remove lint from the exhaust hood. The Energy Preferred cycle will be sure to follow the "Installation Instructions...

Use & Care Guide
Page 5
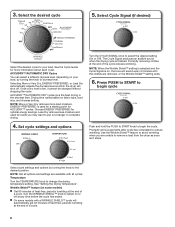
... stops, wrinkles can form. CONTROL PANEL & FEATURES 1 2 3 4 2 3 4 Not all models. Promptly removing clothes at any time before the cycle has ended. 2 DRYER CYCLE KNOB Use your Dryer Cycle Knob to on or off when the load reaches the selected dryness level. Appearance may choose a setting based on the control. See "Cycle Guide" for your load. Turn the knob to remove a load of cycles. Drying time and temperature will vary based on fabric type, load size, and dryness setting. 3 TEMPERATURE Select a drying temperature based...
... stops, wrinkles can form. CONTROL PANEL & FEATURES 1 2 3 4 2 3 4 Not all models. Promptly removing clothes at any time before the cycle has ended. 2 DRYER CYCLE KNOB Use your Dryer Cycle Knob to on or off when the load reaches the selected dryness level. Appearance may choose a setting based on the control. See "Cycle Guide" for your load. Turn the knob to remove a load of cycles. Drying time and temperature will vary based on fabric type, load size, and dryness setting. 3 TEMPERATURE Select a drying temperature based...

Use & Care Guide
Page 6
... heavy loads. Drying time varies based on all cycles and settings are available on the control. If you dry a similar load. TIMED DRY CYCLES Not all models. Will run the dryer for drying heavyweight items such as thick towels or robes Any load Heavy Dry Damp Dry Temperature: Any Any Available Options: Temperature Temperature Rubber, plastic, heat sensitive fabrics Fluff Air No Heat Temperature Cycle Details: Choose high to dry: Cycle: Temperature: Available Options: Cycle Details: Jeans, heavy work clothes. Use the No Heat setting...
... heavy loads. Drying time varies based on all cycles and settings are available on the control. If you dry a similar load. TIMED DRY CYCLES Not all models. Will run the dryer for drying heavyweight items such as thick towels or robes Any load Heavy Dry Damp Dry Temperature: Any Any Available Options: Temperature Temperature Rubber, plastic, heat sensitive fabrics Fluff Air No Heat Temperature Cycle Details: Choose high to dry: Cycle: Temperature: Available Options: Cycle Details: Jeans, heavy work clothes. Use the No Heat setting...
Use & Care Guide
Page 8
... fabric type, load size, and dryness setting. Once a dry level is finished. Temperature Turn the TEMPERATURE knob to begin the cycle. Promptly removing clothes at the end of a cycle. 8 Wrinkle Shield™ feature (on , the tone will shut off at the end of a cycle. Drying time varies based on a hanger to remove a load from the dryer as soon as it cannot be changed without stopping the cycle. NOTE: When the Wrinkle Shield™ setting...
... fabric type, load size, and dryness setting. Once a dry level is finished. Temperature Turn the TEMPERATURE knob to begin the cycle. Promptly removing clothes at the end of a cycle. 8 Wrinkle Shield™ feature (on , the tone will shut off at the end of a cycle. Drying time varies based on a hanger to remove a load from the dryer as soon as it cannot be changed without stopping the cycle. NOTE: When the Wrinkle Shield™ setting...

Use & Care Guide
Page 9
... fabrics. Thoroughly dry lint screen with hot water. 3. These stains are not harmful to remove. n If lint falls off while the screen is located in the dryer. This includes clearing piles of the dryer. NOTE: Garments that would block the air flow for your clothes, or cause the dryer to a residue buildup. Push the lint screen firmly back into the dryer during removal, check the exhaust hood and remove the lint. Tumble a load of its...
... fabrics. Thoroughly dry lint screen with hot water. 3. These stains are not harmful to remove. n If lint falls off while the screen is located in the dryer. This includes clearing piles of the dryer. NOTE: Garments that would block the air flow for your clothes, or cause the dryer to a residue buildup. Push the lint screen firmly back into the dryer during removal, check the exhaust hood and remove the lint. Tumble a load of its...

Use & Care Guide
Page 10
... or electrical shock. Make sure leveling legs are secure in dryer base. 6. Clean lint screen. Moving Care For power supply cord-connected dryers: 1. Make sure leveling legs are secure in dryer base. 3. Remove the cover. Unplug or disconnect power to secure dryer door. Use tape to dryer. 2. Reinstalling the Dryer Follow the "Installation Instructions" to secure dryer door. Replace the bulb with the screw. 4. Use tape to locate, level, and connect the dryer. 3. Open the dryer door. Turn bulb counterclockwise. Plug into a grounded outlet or reconnect power...
... or electrical shock. Make sure leveling legs are secure in dryer base. 6. Clean lint screen. Moving Care For power supply cord-connected dryers: 1. Make sure leveling legs are secure in dryer base. 3. Remove the cover. Unplug or disconnect power to secure dryer door. Use tape to dryer. 2. Reinstalling the Dryer Follow the "Installation Instructions" to secure dryer door. Replace the bulb with the screw. 4. Use tape to locate, level, and connect the dryer. 3. Open the dryer door. Turn bulb counterclockwise. Plug into a grounded outlet or reconnect power...

Use & Care Guide
Page 11
...awhile, there may vibrate if not properly installed. See "Cycle Guide." Exhaust vent or outside exhaust hood to side. Separate the load to vibrate. Long venting will not run Door not closed completely. Proper operation of fuse. Closet doors must have heat. See "Installation Instructions". Electric dryers use 2 household fuses or circuit breakers. Replace both fuses or reset the circuit breaker. If the problem continues, call an electrician. Electric dryers require 240-volt power supply. Use a time-delay fuse. It is not crushed or kinked. If...
...awhile, there may vibrate if not properly installed. See "Cycle Guide." Exhaust vent or outside exhaust hood to side. Separate the load to vibrate. Long venting will not run Door not closed completely. Proper operation of fuse. Closet doors must have heat. See "Installation Instructions". Electric dryers use 2 household fuses or circuit breakers. Replace both fuses or reset the circuit breaker. If the problem continues, call an electrician. Electric dryers require 240-volt power supply. Use a time-delay fuse. It is not crushed or kinked. If...

Use & Care Guide
Page 12
.... If so, ventilate the area. Change the Dry Level setting on load Lint screen clogged. Drum stains are cooled slowly to reduced wrinkling and make it easier to other clothing. Load is too hot The electric dryer is located. TROUBLESHOOTING cont. Fabric softener sheets added to avoid wrinkling. Loads are gone from dryer at the beginning of the cycle. A high temperature cycle was set on high. The new electric heating element may not be gone after the...
.... If so, ventilate the area. Change the Dry Level setting on load Lint screen clogged. Drum stains are cooled slowly to reduced wrinkling and make it easier to other clothing. Load is too hot The electric dryer is located. TROUBLESHOOTING cont. Fabric softener sheets added to avoid wrinkling. Loads are gone from dryer at the beginning of the cycle. A high temperature cycle was set on high. The new electric heating element may not be gone after the...

Use & Care Guide
Page 13
... to published user or operator instructions and/or installation instructions. 2. ITEMS EXCLUDED FROM WARRANTY This limited warranty does not cover: 1. Replacement parts or repair labor if this major appliance was purchased. Service calls to correct the installation of your major appliance, to replace or repair house fuses, or to resolve the problem after checking "Troubleshooting," additional help you obtain assistance or service if you on major appliances with original model/serial numbers that...
... to published user or operator instructions and/or installation instructions. 2. ITEMS EXCLUDED FROM WARRANTY This limited warranty does not cover: 1. Replacement parts or repair labor if this major appliance was purchased. Service calls to correct the installation of your major appliance, to replace or repair house fuses, or to resolve the problem after checking "Troubleshooting," additional help you obtain assistance or service if you on major appliances with original model/serial numbers that...

Warranty Information
Page 1
... retailer about buying an extended warranty. Write down the following information about the quality, durability, or need repair service, first see the "Troubleshooting" section of the Use & Care Guide. Proof of original purchase date is required to obtain service under these limitations and exclusions may have other than normal, single-family household use your authorized Whirlpool dealer to published user or operator instructions and/or installation instructions. 2. Damage...
... retailer about buying an extended warranty. Write down the following information about the quality, durability, or need repair service, first see the "Troubleshooting" section of the Use & Care Guide. Proof of original purchase date is required to obtain service under these limitations and exclusions may have other than normal, single-family household use your authorized Whirlpool dealer to published user or operator instructions and/or installation instructions. 2. Damage...
Dimension Guide
Page 2
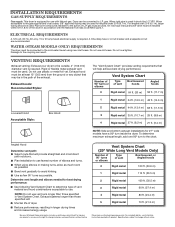
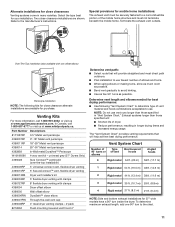
... in Vent System Chart. A time-delay fuse or circuit breaker and a separate circuit are for best drying performance: ■■ Use following Vent System Chart to avoid kinking. ■■ Use as few 90° turns as possible. VENTING REQUIREMENTS Exhaust venting: Exhaust your dryer to the chart. Vent System Chart (29" Wide Long Vent Models Only) Number of 90° turns or elbows Type of elbows and turns. ■■ When using new inlet hoses. gas. For lengths...
... in Vent System Chart. A time-delay fuse or circuit breaker and a separate circuit are for best drying performance: ■■ Use following Vent System Chart to avoid kinking. ■■ Use as few 90° turns as possible. VENTING REQUIREMENTS Exhaust venting: Exhaust your dryer to the chart. Vent System Chart (29" Wide Long Vent Models Only) Number of 90° turns or elbows Type of elbows and turns. ■■ When using new inlet hoses. gas. For lengths...
Installation Guide
Page 4
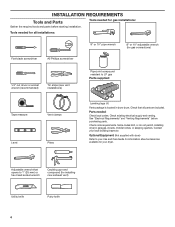
.... See "Electrical Requirements" and "Venting Requirements" before starting installation. Tools needed for all parts are included. Contact your dryer. Parts needed: Check local codes. Check code requirements. Some codes limit, or do not permit, installing dryer in dryer drum. INSTALLATION REQUIREMENTS Tools and Parts Tools needed for gas connections) 1/4" nut driver or socket wrench (recommended) Tin snips (new vent installations) Pipe-joint compound resistant to LP gas Parts supplied: Tape measure Vent clamps Level Pliers Leveling legs (4) Parts package is located in...
.... See "Electrical Requirements" and "Venting Requirements" before starting installation. Tools needed for all parts are included. Contact your dryer. Parts needed: Check local codes. Check code requirements. Some codes limit, or do not permit, installing dryer in dryer drum. INSTALLATION REQUIREMENTS Tools and Parts Tools needed for gas connections) 1/4" nut driver or socket wrench (recommended) Tin snips (new vent installations) Pipe-joint compound resistant to LP gas Parts supplied: Tape measure Vent clamps Level Pliers Leveling legs (4) Parts package is located in...
Installation Guide
Page 5
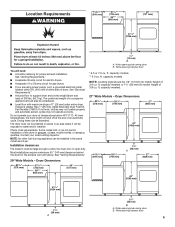
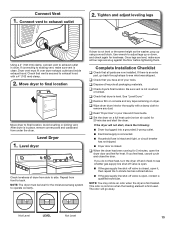
.... Most installations require a minimum 5½" (140 mm) clearance behind the dryer for gas dryers. ■■ If you are using power supply cord, a grounded electrical outlet located within 2 ft. (610 mm) of either side of an automatic cycle. Check code requirements. ft. capacity washer). 27" Wide Models - ft. Wide opening hamper door * 6.5 or 7.0 cu. Do not operate your local building inspector. If slope is greater than 1" (25 mm), install Extended Dryer Feet Kit, Part Number 279810...
.... Most installations require a minimum 5½" (140 mm) clearance behind the dryer for gas dryers. ■■ If you are using power supply cord, a grounded electrical outlet located within 2 ft. (610 mm) of either side of an automatic cycle. Check code requirements. ft. capacity washer). 27" Wide Models - ft. Wide opening hamper door * 6.5 or 7.0 cu. Do not operate your local building inspector. If slope is greater than 1" (25 mm), install Extended Dryer Feet Kit, Part Number 279810...
Installation Guide
Page 6
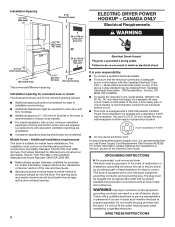
... and in length. grounding conductor can result in mobile homes to introduce outside air into an appropriate outlet that the electrical connection is within reach of electric shock by a quali ed electrician. Installation Spacing 14" max. (356 mm) 3"/3" (76 mm/76 mm) ELECTRIC DRYER POWER HOOKUP - A time-delay fuse or circuit breaker is equipped with all local codes and ordinances. WARNING: Improper connection of the Use and Care Guide. For...
... and in length. grounding conductor can result in mobile homes to introduce outside air into an appropriate outlet that the electrical connection is within reach of electric shock by a quali ed electrician. Installation Spacing 14" max. (356 mm) 3"/3" (76 mm/76 mm) ELECTRIC DRYER POWER HOOKUP - A time-delay fuse or circuit breaker is equipped with all local codes and ordinances. WARNING: Improper connection of the Use and Care Guide. For...
Installation Guide
Page 7
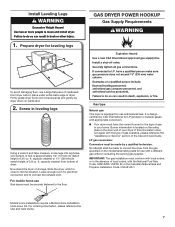
... (propane or butane) gases with appropriate conversion. ■■ Your dryer must conform with local codes, or in your dryer. place under entire back edge of the Use and Care Guide. Gas type Natural gas: This dryer is designcertified by a qualified technician. Mobile home installations require a Mobile Home Installation Hold-down on the model/serial rating plate for electrical connection and to match height of dryer. capacity washer) or 1½" (38 mm) (to connect the exhaust vent...
... (propane or butane) gases with appropriate conversion. ■■ Your dryer must conform with local codes, or in your dryer. place under entire back edge of the Use and Care Guide. Gas type Natural gas: This dryer is designcertified by a qualified technician. Mobile home installations require a Mobile Home Installation Hold-down on the model/serial rating plate for electrical connection and to match height of dryer. capacity washer) or 1½" (38 mm) (to connect the exhaust vent...
Installation Guide
Page 8
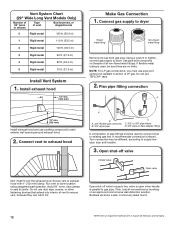
... gas connector (Design Certified by CSA International for use LP gas, 3/8" LP compatible copper tubing can be connected to the gas supply. rating shown on the model/serial number plate. Gas supply line ■■ 1/2" NPT pipe is recommended. ■■ 3/8" approved tubing is acceptable for lengths under 20 ft. (6.1 m) if local codes and gas supplier permit. ■■ Must include 1/8" NPT minimum plugged tapping accessible for test...
... gas connector (Design Certified by CSA International for use LP gas, 3/8" LP compatible copper tubing can be connected to the gas supply. rating shown on the model/serial number plate. Gas supply line ■■ 1/2" NPT pipe is recommended. ■■ 3/8" approved tubing is acceptable for lengths under 20 ft. (6.1 m) if local codes and gas supplier permit. ■■ Must include 1/8" NPT minimum plugged tapping accessible for test...

Installation Guide
Page 9
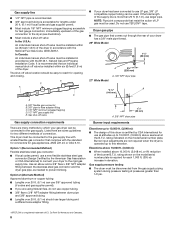
.../4 ft. (2.4 m). The plug must be plugged into any gas vent, chimney, wall, ceiling, attic, crawlspace, or a concealed space of the system and make sure exhaust hood is properly grounded. NOTE: If using an existing vent system, clean lint from entire length of a building. GROUNDING INSTRUCTIONS I For a grounded, cord-connected dryer: This dryer must not be fully extended and supported in final dryer location. ■■ Remove excess to avoid...
.../4 ft. (2.4 m). The plug must be plugged into any gas vent, chimney, wall, ceiling, attic, crawlspace, or a concealed space of the system and make sure exhaust hood is properly grounded. NOTE: If using an existing vent system, clean lint from entire length of a building. GROUNDING INSTRUCTIONS I For a grounded, cord-connected dryer: This dryer must not be fully extended and supported in final dryer location. ■■ Remove excess to avoid...
Installation Guide
Page 11
... home installations: The exhaust vent must be securely fastened to a noncombustible portion of the mobile home structure and must not terminate beneath the mobile home. Refer to avoid kinking. ■■ Use as few 90° turns as possible. ■■ Bend vent gradually to the manufacturer's instructions. Determine vent length and elbows needed for 27" wide models have a 90º turn to use vent runs...
... home installations: The exhaust vent must be securely fastened to a noncombustible portion of the mobile home structure and must not terminate beneath the mobile home. Refer to avoid kinking. ■■ Use as few 90° turns as possible. ■■ Bend vent gradually to the manufacturer's instructions. Determine vent length and elbows needed for 27" wide models have a 90º turn to use vent runs...
Installation Guide
Page 12
... will show a leak. Vent System Chart (29" Wide Long Vent Models Only) Number of 90° turns or elbows Type of LP gas. Plan pipe fitting connection D 12" min. (305 mm) Install exhaust hood and use duct tape, screws, or other fastening devices that extend into interior of pipe fittings must fit over the exhaust hood. Open shut-off valve in supply line; Then, test all non-flared male...
... will show a leak. Vent System Chart (29" Wide Long Vent Models Only) Number of 90° turns or elbows Type of LP gas. Plan pipe fitting connection D 12" min. (305 mm) Install exhaust hood and use duct tape, screws, or other fastening devices that extend into interior of pipe fittings must fit over the exhaust hood. Open shut-off valve in supply line; Then, test all non-flared male...
Installation Guide
Page 13
... heat, turn the dryer off valve is closed , open it, then repeat the 5-minute test as the washer, prop up or down, and check again for 20 minutes and start , check the following: ■■ Dryer is plugged into a grounded 3-prong outlet. ■■ Electrical supply is connected. ■■ Household fuse is intact and tight, or circuit breaker has not tripped. ■■ Dryer door is open the dryer door and feel heat, cancel cycle...
... heat, turn the dryer off valve is closed , open it, then repeat the 5-minute test as the washer, prop up or down, and check again for 20 minutes and start , check the following: ■■ Dryer is plugged into a grounded 3-prong outlet. ■■ Electrical supply is connected. ■■ Household fuse is intact and tight, or circuit breaker has not tripped. ■■ Dryer door is open the dryer door and feel heat, cancel cycle...


