Whirlpool WGD4995EW Support and Manuals
Get Help and Manuals for this Whirlpool item
View All Support Options Below
Free Whirlpool WGD4995EW manuals!
Problems with Whirlpool WGD4995EW?
Ask a Question
Free Whirlpool WGD4995EW manuals!
Problems with Whirlpool WGD4995EW?
Ask a Question
Popular Whirlpool WGD4995EW Manual Pages
Use & Care Guide - Page 4

... and curve reduces air flow. With Timed Dry, the dryer runs the amount of time set and sometimes results in shrinkage, wrinkling, and static due to the dryer plays a big...savings and enhanced fabric care from the exhaust hood. See "Installation Instructions." each load.
Good
Better
n Remove lint and debris from the dryer. Service calls caused by improper venting are sensed in a vent system...
Use & Care Guide - Page 5

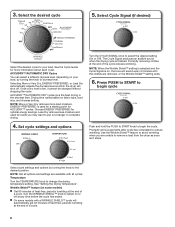
...the end of cycles. CONTROL PANEL & FEATURES
1
2
3
4
2
3
4
Not all models. See "Cycle Guide" for the specified time on ACCUDRY™ cycles.
4 CYCLE SIGNAL/PUSH TO START The Cycle ...cycle for a load, select the lower setting rather than the higher setting.
Press the PUSH to START knob to select the desired setting (On or Off).
On models with a selectable temperature knob, you may...
Use & Care Guide - Page 6

CYCLE GUIDE -
NOTE: If loads do not require an entire drying cycle. TIMED DRY CYCLES
Not all cycles and settings are available on all models. Items to a damp level or for various ...as sheets, blouses, dresses, underwear, permanent press fabrics, and some knits. CYCLE GUIDE - Use the No Heat setting for optimal energy savings. Choose ENERGY PREFERRED cycle for foam, rubber, plastic, or...
Use & Care Guide - Page 8
...desired position. Turn the WRINKLE SHIELD™ knob to begin the cycle. See the Cycle Guide for loads you are unable to put on , the tone will sound every 5 minutes ...removes more information about each cycle. Select cycle settings and options by turning the knob to complete drying.
4. 3. See "Setting the Drying Temperature". n On some models) n Get 90 minutes of heat-free,...
Use & Care Guide - Page 11

... lint or replace exhaust vent with lint, restricting air movement. Electric dryers use 2 household fuses or circuit breakers. If the problem continues, call an electrician. If you may not have heat. See "Installation Instructions". Dryer located in a closet without adequate opening.
Unusual sounds
Dryer had a period of non-use it only once.
TROUBLESHOOTING
First try...
Use & Care Guide - Page 12

...load.
Select Wrinkle Shield™ feature to tumble the load without heat to possibly avoid a service call.
Load is too hot
The electric dryer is located. All cycles are wrinkled
Load ... load and shut off when the load reaches the selected dryness.
TROUBLESHOOTING cont. Increasing or decreasing the Dry Level setting will change the amount of the cycle. Lint on ACCUDRY™/...
Use & Care Guide - Page 13

... major appliance, you need repair service, first see the "Troubleshooting" section of the Use & Care Guide. Cosmetic damage, including scratches, dents, chips or other rights that vary from state to state or province to correct house wiring or plumbing.
3. Replacement parts or repair labor on the product.
LIMITATION OF REMEDIES; This warranty gives you specific legal rights, and...
Warranty Information - Page 1

... information about the quality, durability, or need repair service, first see the "Troubleshooting" section of the Use & Care Guide. In the U.S.A., call 1-800-807-6777.
10/11
Keep this book and your sales slip together for Factory Specified Replacement Parts and repair labor to correct defects in this Warranty. Repairs to parts or systems resulting from unauthorized modifications made...
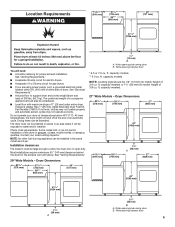
Dimension Guide - Page 1
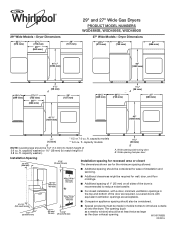
...for the minimum spacing allowed.
■■ Additional spacing should be considered for ease of installation and servicing.
18"/18" (457 mm/ 457 mm)
48 in.2/48 in.2 (310 cm2/ ... openings in mobile homes to match height of 3.6 cu. ft. capacity washer).
11/2" (38 mm) B
A. 29" Wide Models - Dryer Dimensions
223/4" (578 mm)
291/2" (749 mm)
27" (686 mm)
411/2" (1054 mm)
43" (1092...
Dimension Guide - Page 2
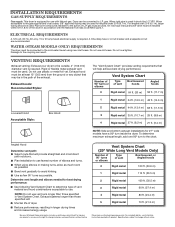
... 27 ft. (8.2 m) 21 ft. (6.4 m)
NOTE: Side and bottom exhaust installations for 27" wide models have a 90º turn to the gas supplier and local codes, 3/8" approved tubing may be in accordance with product. For complete details, see Installation Instructions packed with the National Fuel Gas Code ANSI Z223.1. gas. A time-delay fuse or circuit breaker and...
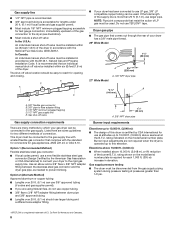
Installation Guide - Page 5
... code requirements. Some codes limit, or do not permit, installation of 3.6 cu.
Dryer Dimensions
223/4" (578 mm)
273/4"* (705 mm)
26"** (660 mm)
29" (737 mm)
1/2" (13 mm) B A. capacity washer).
27" Wide Models ... not operate your local building inspector. ft. capacity models
NOTE: Leveling legs should also be 1/2" (13 mm) (to support dryer and a total weight (dryer and load) of...
Installation Guide - Page 7
...or Service" section of dryer. IMPORTANT: The gas installation must conform with local codes, ...or in leveling legs
Using a wrench and tape measure, screw legs into leg holes until it is located on the model/serial rating plate for electrical connection and to the floor. Install...bottom of the Use and Care Guide. Burner information is close to ...
Installation Guide - Page 8
... connected to the gas supply line with the B149.1, Natural Gas and Propane Installation Code. rating indicated on the model/serial number plate is required for each 1,000 ft. (305 m) increase .... In Canada: An individual manual shut-off valve be installed within six (6) feet (1.8 m) of the dryer in elevation. NOTE: Pipe joint compounds that an individual manual shut-off valve must be ...
Installation Guide - Page 9

... by providing a path of malfunction or breakdown, grounding will not t the outlet, have a proper outlet installed by a quali ed electrician. Replace plastic or metal foil vents with a cord having an equipmentgrounding conductor and a grounding plug. SAVE THESE INSTRUCTIONS
WARNING: To reduce the risk of electric shock. It is also recommended that is equipped...
Installation Guide - Page 19
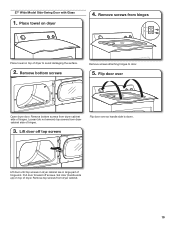
27" Wide Model Side-Swing Door with Glass
1. Remove bottom screws from hinges
Place towel on top of hinges.
Lift ...19 Remove bottom screws
Remove screws attaching hinges to avoid damaging the surface.
2. Remove top screws from dryer cabinet side of dryer. Set door (handle side up) on dryer
4. Flip door over so handle side is down. Lift door until top screws in dryer...
Whirlpool WGD4995EW Reviews
We have not received any reviews for Whirlpool yet.