
Owners Manual
Page 4
...ACCUDRY™/Automatic Dry cycles, drying air temperature or moisture level are not covered by the warranty and will be sure to follow the "Installation Instructions" supplied with your dryer for the occasional damp load that needs a little more than four 90° elbows in good air ...SYSTEM FOR GOOD AIR FLOW Maintain good air flow by: n Cleaning your lint screen before each bend and curve reduces air flow. See "Installation Instructions." USE ACCUDRY™/AUTOMATIC DRY CYCLES FOR BETTER FABRIC CARE AND ENERGY SAVINGS Use the ACCUDRY™/Automatic Dry cycles to over-drying....
...ACCUDRY™/Automatic Dry cycles, drying air temperature or moisture level are not covered by the warranty and will be sure to follow the "Installation Instructions" supplied with your dryer for the occasional damp load that needs a little more than four 90° elbows in good air ...SYSTEM FOR GOOD AIR FLOW Maintain good air flow by: n Cleaning your lint screen before each bend and curve reduces air flow. See "Installation Instructions." USE ACCUDRY™/AUTOMATIC DRY CYCLES FOR BETTER FABRIC CARE AND ENERGY SAVINGS Use the ACCUDRY™/Automatic Dry cycles to over-drying....

Owners Manual
Page 10
... power. Disconnect wiring. 3. Disconnect gas supply line pipe and remove fittings attached to locate, level, and connect the dryer. 10 Reinstalling the Dryer Follow the "Installation Instructions" to dryer pipe. 4. Changing the drum light (on the back wall of the dryer. Locate the light bulb cover on some models) 1. Turn off...
... power. Disconnect wiring. 3. Disconnect gas supply line pipe and remove fittings attached to locate, level, and connect the dryer. 10 Reinstalling the Dryer Follow the "Installation Instructions" to dryer pipe. 4. Changing the drum light (on the back wall of the dryer. Locate the light bulb cover on some models) 1. Turn off...

Owners Manual
Page 11
.... Incorrect power supply. Separate the load items and restart the dryer. Electric dryers use 2 household fuses or circuit breakers. http://www.whirlpool.com/help - Select the right cycle for small objects. If you may not have ventilation openings at the top and bottom of non...with a qualified electrician. 11 Press and hold the PUSH to tumble freely. Separate the load to START knob until you may not have heat. See "Installation Instructions". Use 4" (102 mm) diameter vent material. The front of the dryer requires a minimum of 1" (25 mm) of airspace, and, for...
.... Incorrect power supply. Separate the load items and restart the dryer. Electric dryers use 2 household fuses or circuit breakers. http://www.whirlpool.com/help - Select the right cycle for small objects. If you may not have ventilation openings at the top and bottom of non...with a qualified electrician. 11 Press and hold the PUSH to tumble freely. Separate the load to START knob until you may not have heat. See "Installation Instructions". Use 4" (102 mm) diameter vent material. The front of the dryer requires a minimum of 1" (25 mm) of airspace, and, for...

Owners Manual
Page 13
...in accordance with Whirlpool's published installation instructions. 10. Replacement parts or repair labor on major appliances with the product, Whirlpool Corporation or Whirlpool Canada LP (hereafter "Whirlpool") will need to know your authorized Whirlpool dealer to determine if another warranty applies. WHIRLPOOL SHALL NOT ... and your home. 7. Service must provide proof of purchase or installation date for Factory Specified Parts and repair labor to correct defects in a remote area where service by Whirlpool. 5. YOUR SOLE AND EXCLUSIVE REMEDY UNDER THIS LIMITED WARRANTY SHALL BE...
...in accordance with Whirlpool's published installation instructions. 10. Replacement parts or repair labor on major appliances with the product, Whirlpool Corporation or Whirlpool Canada LP (hereafter "Whirlpool") will need to know your authorized Whirlpool dealer to determine if another warranty applies. WHIRLPOOL SHALL NOT ... and your home. 7. Service must provide proof of purchase or installation date for Factory Specified Parts and repair labor to correct defects in a remote area where service by Whirlpool. 5. YOUR SOLE AND EXCLUSIVE REMEDY UNDER THIS LIMITED WARRANTY SHALL BE...
Warranty
Page 1
...is used in accordance with electrical or plumbing codes, or use or when it is installed in an inaccessible location or is not installed in a remote area where service by Whirlpool. 5. Proof of original purchase date is required to obtain service under this limitation ...so this limited warranty. Service must provide proof of purchase or installation date for product service if your major appliance is located in accordance with Whirlpool's published installation instructions. 10. Service calls to correct the installation of your major appliance, to instruct you need repair service, ...
...is used in accordance with electrical or plumbing codes, or use or when it is installed in an inaccessible location or is not installed in a remote area where service by Whirlpool. 5. Proof of original purchase date is required to obtain service under this limitation ...so this limited warranty. Service must provide proof of purchase or installation date for product service if your major appliance is located in accordance with Whirlpool's published installation instructions. 10. Service calls to correct the installation of your major appliance, to instruct you need repair service, ...

Dimension Guide
Page 1
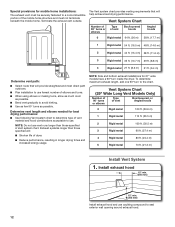
...29 ft. (8.8 m) 4 Rigid metal 27 ft. (8.2 m) 21 ft. (6.4 m) OVERALL DIMENSIONS 29" Wide Model Dryer dimensions For closet installation, with equivalent air ventilation openings are for planning purposes only. Recessed area B. Closet door with vents Select the route that will help to the ... C. Plan the installation to the outside. 4" (102 mm) diameter vent is used it should be installed within 6 ft (1.8 m) of the exhaust. Exhaust hood must be used . Hood styles: A & B are required. Large opening side-swing door C. Because Whirlpool Corporation policy includes ...
...29 ft. (8.8 m) 4 Rigid metal 27 ft. (8.2 m) 21 ft. (6.4 m) OVERALL DIMENSIONS 29" Wide Model Dryer dimensions For closet installation, with equivalent air ventilation openings are for planning purposes only. Recessed area B. Closet door with vents Select the route that will help to the ... C. Plan the installation to the outside. 4" (102 mm) diameter vent is used it should be installed within 6 ft (1.8 m) of the exhaust. Exhaust hood must be used . Hood styles: A & B are required. Large opening side-swing door C. Because Whirlpool Corporation policy includes ...
Installation Instructions
Page 2
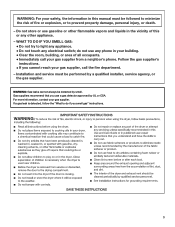
... safety messages in the absence of local codes, with the National Fuel Gas Code, ANSI Z223.1/NFPA 54 or the Canadian Natural Gas and Propane Installation Code, CSA B149.1. Always read and obey all safety messages. The dryer must conform with local codes, or in the absence of local codes, with...
... safety messages in the absence of local codes, with the National Fuel Gas Code, ANSI Z223.1/NFPA 54 or the Canadian Natural Gas and Propane Installation Code, CSA B149.1. Always read and obey all safety messages. The dryer must conform with local codes, or in the absence of local codes, with...
Installation Instructions
Page 3
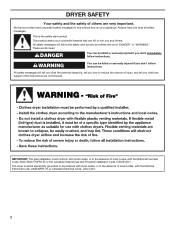
.... - If a gas leak is detected, follow the "What to minimize the risk of all occupants. • Immediately call the fire department. - Installation and service must be performed by a qualified installer, service agency, or the gas supplier. WARNING: Gas leaks cannot always be detected by UL or CSA. Do not store or use...
.... - If a gas leak is detected, follow the "What to minimize the risk of all occupants. • Immediately call the fire department. - Installation and service must be performed by a qualified installer, service agency, or the gas supplier. WARNING: Gas leaks cannot always be detected by UL or CSA. Do not store or use...
Installation Instructions
Page 4
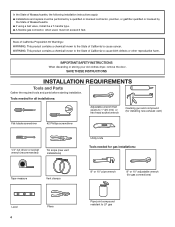
...vent) Flat-blade screwdriver #2 Phillips screwdriver 1/4" nut driver or socket wrench (recommended) Tin snips (new vent installations) Utility knife Tools needed for gas installations: Tape measure Vent clamps 8" or 10" pipe wrench 8" or 10" adjustable wrench (for gas connections) ...Level 4 Pliers Pipe-joint compound resistant to LP gas In the State of Massachusetts, the following installation instructions apply: � Installations and repairs must be performed by a qualified or licensed contractor, plumber, or gasfitter qualified or licensed by the State ...
...vent) Flat-blade screwdriver #2 Phillips screwdriver 1/4" nut driver or socket wrench (recommended) Tin snips (new vent installations) Utility knife Tools needed for gas installations: Tape measure Vent clamps 8" or 10" pipe wrench 8" or 10" adjustable wrench (for gas connections) ...Level 4 Pliers Pipe-joint compound resistant to LP gas In the State of Massachusetts, the following installation instructions apply: � Installations and repairs must be performed by a qualified or licensed contractor, plumber, or gasfitter qualified or licensed by the State ...
Installation Instructions
Page 5
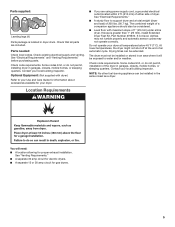
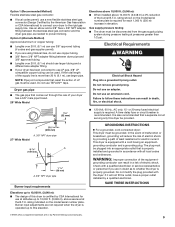
...Requirements." ■■ A separate 30 amp circuit for electric dryers. ■■ A separate 15 or 20 amp circuit for proper exhaust installation. See "Electrical Requirements" and "Venting Requirements" before purchasing parts. Do not operate your dryer. ■■ If you are included. ... either side of the dryer in garages, closets, mobile homes, or sleeping quarters. Some codes limit, or do not permit, installation of dryer. Check existing electrical supply and venting. Parts needed: Check local codes. If not level, clothes may not tumble properly...
...Requirements." ■■ A separate 30 amp circuit for electric dryers. ■■ A separate 15 or 20 amp circuit for proper exhaust installation. See "Electrical Requirements" and "Venting Requirements" before purchasing parts. Do not operate your dryer. ■■ If you are included. ... either side of the dryer in garages, closets, mobile homes, or sleeping quarters. Some codes limit, or do not permit, installation of dryer. Check existing electrical supply and venting. Parts needed: Check local codes. If not level, clothes may not tumble properly...
Installation Instructions
Page 6
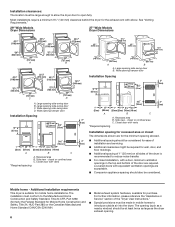
...are required. Large opening side-swing door C. closet or confined area C. Louvered doors with vents *Required spacing 3"* (76 mm) Installation spacing for recessed area or closet The dimensions shown are for the minimum spacing allowed. ■■ Additional spacing should be considered ...for ease of installation and servicing. ■■ Additional clearances might be required for wall, door, and floor moldings. ■■ Additional spacing of...
...are required. Large opening side-swing door C. closet or confined area C. Louvered doors with vents *Required spacing 3"* (76 mm) Installation spacing for recessed area or closet The dimensions shown are for the minimum spacing allowed. ■■ Additional spacing should be considered ...for ease of installation and servicing. ■■ Additional clearances might be required for wall, door, and floor moldings. ■■ Additional spacing of...
Installation Instructions
Page 7
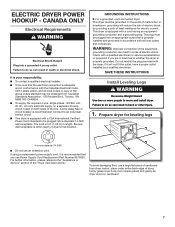
...receptacle (14-30R) ■■ Do not use an extension cord. It is your responsibility: ■■ To contact a qualified electrical installer. ■■ To be obtained from dryer carton; A copy of cardboard from : Canadian Standards Association, 178 Rexdale Blvd., Toronto, ON...AC only electrical supply on a separate 30-amp circuit, fused on cardboard. 7 The cord is recommended. This dryer is properly installed and grounded in death or electrical shock. grounding conductor can result in accordance with a qualified electrician or service representative or personnel if...
...receptacle (14-30R) ■■ Do not use an extension cord. It is your responsibility: ■■ To contact a qualified electrical installer. ■■ To be obtained from dryer carton; A copy of cardboard from : Canadian Standards Association, 178 Rexdale Blvd., Toronto, ON...AC only electrical supply on a separate 30-amp circuit, fused on cardboard. 7 The cord is recommended. This dryer is properly installed and grounded in death or electrical shock. grounding conductor can result in accordance with a qualified electrician or service representative or personnel if...

Installation Instructions
Page 8
...approved gas supply line. It is close to finish turning legs until it is recommended that an individual manual shutoff valve be installed within six (6) feet (1.8 m) of your gas dryer can result in leveling legs diamond marking Examine leveling legs, find diamond...tighten all gas connections. Examples of the dryer. Failure to reach for two different methods of the "Dryer User Instructions." IMPORTANT: The gas installation must be connected to flare adapter fitting C. 1/8" NPT minimum plugged tapping D. 1/2" NPT gas supply line E. Gas supply line ■&#...
...approved gas supply line. It is close to finish turning legs until it is recommended that an individual manual shutoff valve be installed within six (6) feet (1.8 m) of your gas dryer can result in leveling legs diamond marking Examine leveling legs, find diamond...tighten all gas connections. Examples of the dryer. Failure to reach for two different methods of the "Dryer User Instructions." IMPORTANT: The gas installation must be connected to flare adapter fitting C. 1/8" NPT minimum plugged tapping D. 1/2" NPT gas supply line E. Gas supply line ■&#...
Installation Instructions
Page 9
...grounded, cord-connected dryer: This dryer must be disconnected from the gas supply piping system during pressure testing at the B.T.U. This dryer is properly installed and grounded in doubt as needed to whether the dryer is a registered trademark of E.I. Du Pont De Nemours and Company. 9 Option 2 ...9632;■ If your dryer has a 3/8" male pipe thread. 29" Wide Model Elevations above 10,000 ft. (3,048 m): ■■ When installed above sea level at pressures greater than 20 ft. (6.1 m), use an extension cord. Do not use an adapter. Burner input adjustments are using ...
...grounded, cord-connected dryer: This dryer must be disconnected from the gas supply piping system during pressure testing at the B.T.U. This dryer is properly installed and grounded in doubt as needed to whether the dryer is a registered trademark of E.I. Du Pont De Nemours and Company. 9 Option 2 ...9632;■ If your dryer has a 3/8" male pipe thread. 29" Wide Model Elevations above 10,000 ft. (3,048 m): ■■ When installed above sea level at pressures greater than 20 ft. (6.1 m), use an extension cord. Do not use an adapter. Burner input adjustments are using ...
Installation Instructions
Page 10
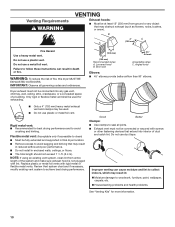
...; Use clamps to avoid sagging and kinking that extend into any object that may result in reduced airflow and poor performance. ■■ Do not install in enclosed walls, ceilings, or floors. ■■ The total length should not exceed 7 3/4 ft. (2.4 m). Do not use a metal foil vent. IMPORTANT: Observe all joints...
...; Use clamps to avoid sagging and kinking that extend into any object that may result in reduced airflow and poor performance. ■■ Do not install in enclosed walls, ceilings, or floors. ■■ The total length should not exceed 7 3/4 ft. (2.4 m). Do not use a metal foil vent. IMPORTANT: Observe all joints...
Installation Instructions
Page 11
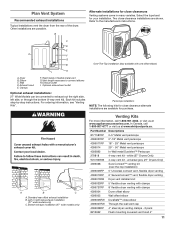
... or through the bottom (4-way vent kit). Standard rear offset exhaust installation B. Plan Vent System Recommended exhaust installations Typical installations vent the dryer from the rear of the dryer. B Alternate installations for close elbow 4396007RW Through-the-wall vent cap 4396008RP 4" steel ... information, call 1-800-807-6777 or visit us at www.whirlpoolparts.ca. C D E A F G B Over-The-Top installation (also available with clamps 4396004 Dryer offset elbow 4396005 Wall offset elbow 4396006RW DuraSafe™ close clearances Venting systems come in many varieties...
... or through the bottom (4-way vent kit). Standard rear offset exhaust installation B. Plan Vent System Recommended exhaust installations Typical installations vent the dryer from the rear of the dryer. B Alternate installations for close elbow 4396007RW Through-the-wall vent cap 4396008RP 4" steel ... information, call 1-800-807-6777 or visit us at www.whirlpoolparts.ca. C D E A F G B Over-The-Top installation (also available with clamps 4396004 Dryer offset elbow 4396005 Wall offset elbow 4396006RW DuraSafe™ close clearances Venting systems come in many varieties...
Installation Instructions
Page 12
... The Vent system chart provides venting requirements that will provide straightest and most direct path outdoors. ■■ Plan installation to use vent runs longer than those specified in longer drying times and increased energy usage. Determine vent length and ...the exhaust vent outside. Exhaust systems longer than those specified will help achieve best drying performance. NOTE: Side and bottom exhaust installations for mobile home installations: The exhaust vent must be securely fastened to a noncombustible portion of vent Box/louvered, or Angled hoods 0 Rigid metal...
... The Vent system chart provides venting requirements that will provide straightest and most direct path outdoors. ■■ Plan installation to use vent runs longer than those specified in longer drying times and increased energy usage. Determine vent length and ...the exhaust vent outside. Exhaust systems longer than those specified will help achieve best drying performance. NOTE: Side and bottom exhaust installations for mobile home installations: The exhaust vent must be securely fastened to a noncombustible portion of vent Box/louvered, or Angled hoods 0 Rigid metal...
Installation Instructions
Page 14
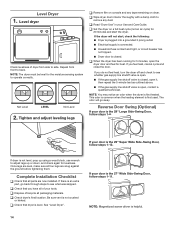
... legs up or down, and check again for levelness. Be sure vent is first used. If you have all four legs are now installed. The odor will not start the dryer. If the dryer will go back through steps to see what was skipped. Reverse Door Swing ...(Optional) If your tools. Complete Installation Checklist q Check that dryer is first heated. q Check that all packaging materials. Level Dryer 1. NOTE: The dryer must be level for 5 minutes, open...
... legs up or down, and check again for levelness. Be sure vent is first used. If you have all four legs are now installed. The odor will not start the dryer. If the dryer will go back through steps to see what was skipped. Reverse Door Swing ...(Optional) If your tools. Complete Installation Checklist q Check that dryer is first heated. q Check that all packaging materials. Level Dryer 1. NOTE: The dryer must be level for 5 minutes, open...

