
Owners Manual
Page 5
...AUTOMATIC DRY Senses moisture in the shortest time. NOTE: The Air Only temperature setting (on some models) is not available on ACCUDRY™ cycles. 3 WRINKLE SHIELD™ Feature (on your dryer model. Turn the knob to remove a load of clothes from forming. Drying time will vary based on...20 10 FLUFF AIR L kni o M e d iu m w ts casual H hea i y gh v End O of Cycle SOignnal TEMPERATURE fabric PUSH TO START Not all models. Appearance may choose a setting based on the control. If you are unsure of the temperature to select available cycles on some...
...AUTOMATIC DRY Senses moisture in the shortest time. NOTE: The Air Only temperature setting (on some models) is not available on ACCUDRY™ cycles. 3 WRINKLE SHIELD™ Feature (on your dryer model. Turn the knob to remove a load of clothes from forming. Drying time will vary based on...20 10 FLUFF AIR L kni o M e d iu m w ts casual H hea i y gh v End O of Cycle SOignnal TEMPERATURE fabric PUSH TO START Not all models. Appearance may choose a setting based on the control. If you are unsure of the temperature to select available cycles on some...
Owners Manual
Page 6
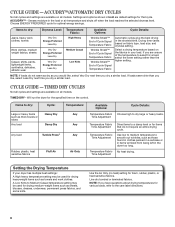
ACCUDRY™ - Senses moisture in bold are available on all models. If you have questions about drying temperatures for various loads, refer to dry: Dryness Level: Temperature Fabric: Available Options: Cycle Details: Jeans, heavy work clothes. .... No heat drying. Setting the Drying Temperature If your load. A Low Knits to select for items that cycle. NOTE: If you are available on all models. Items to the care label directions. 6 Select a drying temperature based on the fabrics in your dryer has multiple heat settings: A High heavy temperature setting may...
ACCUDRY™ - Senses moisture in bold are available on all models. If you have questions about drying temperatures for various loads, refer to dry: Dryness Level: Temperature Fabric: Available Options: Cycle Details: Jeans, heavy work clothes. .... No heat drying. Setting the Drying Temperature If your load. A Low Knits to select for items that cycle. NOTE: If you are available on all models. Items to the care label directions. 6 Select a drying temperature based on the fabrics in your dryer has multiple heat settings: A High heavy temperature setting may...
Owners Manual
Page 7
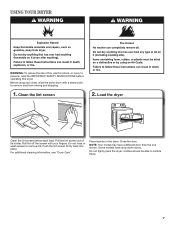
... load. Push the lint screen firmly back into place. Before using your fingers. For additional cleaning information, see "Dryer Care". NOTE: Your model may have drop down doors. Some models have a different door than the one shown. clothes should be able to remove lint. Close the door. Do not tightly pack the...
... load. Push the lint screen firmly back into place. Before using your fingers. For additional cleaning information, see "Dryer Care". NOTE: Your model may have drop down doors. Some models have a different door than the one shown. clothes should be able to remove lint. Close the door. Do not tightly pack the...
Owners Manual
Page 8
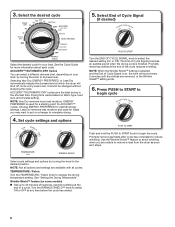
... tone will shut off. Promptly removing clothes at the end of the cycle reduces wrinkling. NOTE: When the Wrinkle Shield™ setting is on some models) n Get up to select the desired setting (On or Off). Promptly remove garments after cycle has completed to the desired position. ACCUDRY™/AUTOMATIC DRY...
... tone will shut off. Promptly removing clothes at the end of the cycle reduces wrinkling. NOTE: When the Wrinkle Shield™ setting is on some models) n Get up to select the desired setting (On or Off). Promptly remove garments after cycle has completed to the desired position. ACCUDRY™/AUTOMATIC DRY...

Owners Manual
Page 10
See "Cleaning the Lint Screen." Use tape to secure dryer door. Locate the light bulb cover on some models) 1. Turn bulb counterclockwise. Plug into a grounded outlet or reconnect power. For direct-wired dryers: 1. Use tape to secure dryer door. Moving Care For power supply ...
See "Cleaning the Lint Screen." Use tape to secure dryer door. Locate the light bulb cover on some models) 1. Turn bulb counterclockwise. Plug into a grounded outlet or reconnect power. For direct-wired dryers: 1. Use tape to secure dryer door. Moving Care For power supply ...

Owners Manual
Page 13
.... In the U.S.A., call 18008076777. 7/08 Keep this information on the model and serial number label located on major appliances with Whirlpool's published installation instructions. 10. ITEMS EXCLUDED FROM WARRANTY This limited warranty does not cover: 1. Replacement parts...workmanship that existed when this major appliance is used in the country in a remote area where service by a Whirlpool designated service company. WHIRLPOOL CORPORATION LAUNDRY WARRANTY LIMITED WARRANTY For one year from the date of purchase, when this major appliance is operated...
.... In the U.S.A., call 18008076777. 7/08 Keep this information on the model and serial number label located on major appliances with Whirlpool's published installation instructions. 10. ITEMS EXCLUDED FROM WARRANTY This limited warranty does not cover: 1. Replacement parts...workmanship that existed when this major appliance is used in the country in a remote area where service by a Whirlpool designated service company. WHIRLPOOL CORPORATION LAUNDRY WARRANTY LIMITED WARRANTY For one year from the date of purchase, when this major appliance is operated...
Warranty
Page 1
...Canada, call 1800253-1301. You must be easily determined. Dealer name Address Phone number Model number Serial number Purchase date 13 WHIRLPOOL CORPORATION LAUNDRY WARRANTY LIMITED WARRANTY For one year from the date of purchase, when this major appliance is ...operated and maintained according to instructions attached to or furnished with the product, Whirlpool Corporation or Whirlpool Canada LP (hereafter "Whirlpool") will need repair service, first see the "Troubleshooting" section of the Use & Care Guide. This limited ...
...Canada, call 1800253-1301. You must be easily determined. Dealer name Address Phone number Model number Serial number Purchase date 13 WHIRLPOOL CORPORATION LAUNDRY WARRANTY LIMITED WARRANTY For one year from the date of purchase, when this major appliance is ...operated and maintained according to instructions attached to or furnished with the product, Whirlpool Corporation or Whirlpool Canada LP (hereafter "Whirlpool") will need repair service, first see the "Troubleshooting" section of the Use & Care Guide. This limited ...

Dimension Guide
Page 1
...turns or elbows Type of the door are recommended. closet or confined area C. Plan the installation to change without notice. Because Whirlpool Corporation policy includes a continuous commitment to improve our products, we reserve the right to use old hoses. For complete details, see...Wide opening side-swing door B. Use the fewest 90° turns possible. Specifications subject to the chart. 29" and 27" Wide Model Gas Dryer PRODUCT MODEL NUMBERS WGD4750X, WGD4800X, WGD4900X, WGD5500X, WGD5550X, WGD5600X, WGD5700X, WGD4850X, WGD4890X, WGD5610X Gas supply: This dryer is used . Dryer ...
...turns or elbows Type of the door are recommended. closet or confined area C. Plan the installation to change without notice. Because Whirlpool Corporation policy includes a continuous commitment to improve our products, we reserve the right to use old hoses. For complete details, see...Wide opening side-swing door B. Use the fewest 90° turns possible. Specifications subject to the chart. 29" and 27" Wide Model Gas Dryer PRODUCT MODEL NUMBERS WGD4750X, WGD4800X, WGD4900X, WGD5500X, WGD5550X, WGD5600X, WGD5700X, WGD4850X, WGD4890X, WGD5610X Gas supply: This dryer is used . Dryer ...
Installation Instructions
Page 6
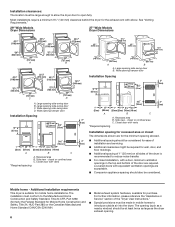
... clearances might be required for the exhaust vent with equivalent ventilation openings are required. Side view - The opening . 6 See "Venting Requirements." 29" Wide Models Dryer Dimensions 27" Wide Models Dryer Dimensions 43 " (1092 mm) 23 ¾" (603 mm) 43 " (1092 mm) 13 ¾" (349 mm) *29 1/2" (749 mm) 27" (687 mm) *29...
... clearances might be required for the exhaust vent with equivalent ventilation openings are required. Side view - The opening . 6 See "Venting Requirements." 29" Wide Models Dryer Dimensions 27" Wide Models Dryer Dimensions 43 " (1092 mm) 23 ¾" (603 mm) 43 " (1092 mm) 13 ¾" (349 mm) *29 1/2" (749 mm) 27" (687 mm) *29...

Installation Instructions
Page 8
... are many methods by hand, use Gas dryers must conform with the B149.1, Natural Gas and Propane Installation Code. Now stand the dryer on the model/serial rating plate for test gauge connection, immediately upstream of your dryer. For mobile home use a wrench to do so can be made by CSA...
... are many methods by hand, use Gas dryers must conform with the B149.1, Natural Gas and Propane Installation Code. Now stand the dryer on the model/serial rating plate for test gauge connection, immediately upstream of your dryer. For mobile home use a wrench to do so can be made by CSA...
Installation Instructions
Page 9
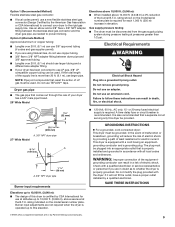
...shock. 1¼" (32 mm) ■■ 120 Volt, 60 Hz., AC only, 15- A 9¼" (235 mm) A. 3/8" NPT dryer pipe 27" Wide Model *5 3/4" A (159 mm) 1 1/2" (38 mm) A.A3./83"/8N" PNTPdTrdyeryr eprippeipe Burner input requirements GROUNDING INSTRUCTIONS � For a grounded, cord-connected dryer: This.... This dryer is more than 1/2 psi. Gas supply pressure testing ■■ The dryer must be grounded. rating shown on the model/serial number plate. Option 1 (Recommended Method) Flexible stainless steel gas connector: ■■ If local codes permit, use a new ...
...shock. 1¼" (32 mm) ■■ 120 Volt, 60 Hz., AC only, 15- A 9¼" (235 mm) A. 3/8" NPT dryer pipe 27" Wide Model *5 3/4" A (159 mm) 1 1/2" (38 mm) A.A3./83"/8N" PNTPdTrdyeryr eprippeipe Burner input requirements GROUNDING INSTRUCTIONS � For a grounded, cord-connected dryer: This.... This dryer is more than 1/2 psi. Gas supply pressure testing ■■ The dryer must be grounded. rating shown on the model/serial number plate. Option 1 (Recommended Method) Flexible stainless steel gas connector: ■■ If local codes permit, use a new ...
Installation Instructions
Page 11
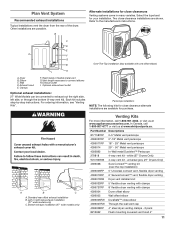
...dryer from the rear of the dryer. Dryer B. Exhaust hood E. Optional side exhaust outlet Optional exhaust installations: 27" Wide Models can be converted to connect elbows H. B Alternate installations for your installation. Refer to the manufacturer's instructions. For ordering ... 8' flexible dryer venting with one offset elbow) I . Standard rear offset exhaust installation B. Left or right side exhaust installation (27" wide models only) C. Other installations are shown. Elbow C. Clamps F. white (27" Dryers Only) W10186596 4-way vent kit - C D E ...
...dryer from the rear of the dryer. Dryer B. Exhaust hood E. Optional side exhaust outlet Optional exhaust installations: 27" Wide Models can be converted to connect elbows H. B Alternate installations for your installation. Refer to the manufacturer's instructions. For ordering ... 8' flexible dryer venting with one offset elbow) I . Standard rear offset exhaust installation B. Left or right side exhaust installation (27" wide models only) C. Other installations are shown. Elbow C. Clamps F. white (27" Dryers Only) W10186596 4-way vent kit - C D E ...
Installation Instructions
Page 12
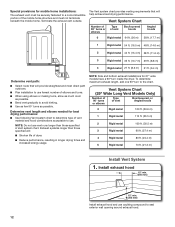
... few 90° turns as possible. Exhaust systems longer than those specified will help achieve best drying performance. Vent System Chart (29" Wide Long Vent Models Only) Number of 90° turns or elbows Type of vent Box/louvered hoods Angled hoods 0 Rigid metal 64 ft. (20 m) 58 ft. (17.7 m) 1 Rigid... 90 ft. (27.4 m) 4 Rigid metal 80 ft. (24.4 m) 5 Rigid metal 70 ft. (21.3 m) Install Vent System 1. NOTE: Side and bottom exhaust installations for 27" wide models have a 90º turn to seal exterior wall opening around exhaust hood. 12
... few 90° turns as possible. Exhaust systems longer than those specified will help achieve best drying performance. Vent System Chart (29" Wide Long Vent Models Only) Number of 90° turns or elbows Type of vent Box/louvered hoods Angled hoods 0 Rigid metal 64 ft. (20 m) 58 ft. (17.7 m) 1 Rigid... 90 ft. (27.4 m) 4 Rigid metal 80 ft. (24.4 m) 5 Rigid metal 70 ft. (21.3 m) Install Vent System 1. NOTE: Side and bottom exhaust installations for 27" wide models have a 90º turn to seal exterior wall opening around exhaust hood. 12

Installation Instructions
Page 15
29" Wide Model Large Side-Swing Door 1. Remove bottom screws from dryer cabinet side of dryer cabinet. 5. Insert and tighten top screws in large part of dryer cabinet. ...
29" Wide Model Large Side-Swing Door 1. Remove bottom screws from dryer cabinet side of dryer cabinet. 5. Insert and tighten top screws in large part of dryer cabinet. ...
Installation Instructions
Page 18
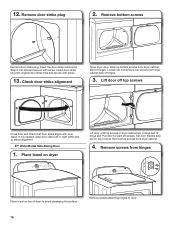
... door. If it is needed, slide door catch left or right within slot to door. 18 Remove screws attaching hinges to adjust alignment. 27" Wide Model Side-Swing Door 1. Remove bottom screws Remove door strike plug. Remove bottom screws from dryer cabinet side of dryer to avoid damaging the surface. Lift...
... door. If it is needed, slide door catch left or right within slot to door. 18 Remove screws attaching hinges to adjust alignment. 27" Wide Model Side-Swing Door 1. Remove bottom screws Remove door strike plug. Remove bottom screws from dryer cabinet side of dryer to avoid damaging the surface. Lift...


